Service Manual
Page 1
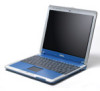
... document is subject to avoid the problem. Bluetooth is a registered trademark of Dell Inc. Intel is a trademark owned by Dell Inc. A02 Trademarks used in trademarks and trade names other than its own. Dell™ Inspiron™ 300m Service Manual Before You Begin Dell Diagnostics System Components Battery Memory, Modem, and Mini PCI Card Modules Keyboard...
... document is subject to avoid the problem. Bluetooth is a registered trademark of Dell Inc. Intel is a trademark owned by Dell Inc. A02 Trademarks used in trademarks and trade names other than its own. Dell™ Inspiron™ 300m Service Manual Before You Begin Dell Diagnostics System Components Battery Memory, Modem, and Mini PCI Card Modules Keyboard...

Service Manual
Page 2
... covers. 5. Back to unhook the latch from electrical outlets. On the inside of the bottom case, use your fingers to Contents Page Battery Latches Dell™ Inspiron™ 300m Service Manual Removing the Battery Latches Replacing the Battery Latches Removing the Battery Latches CAUTION: Before you begin any attached devices from the bottom...
... covers. 5. Back to unhook the latch from electrical outlets. On the inside of the bottom case, use your fingers to Contents Page Battery Latches Dell™ Inspiron™ 300m Service Manual Removing the Battery Latches Replacing the Battery Latches Removing the Battery Latches CAUTION: Before you begin any attached devices from the bottom...
Service Manual
Page 4
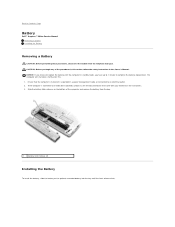
... to a media base (docked), undock it. Slide the battery latch releases on the bottom of the procedures in this . 1. Back to Contents Page Battery Dell™ Inspiron™ 300m Service Manual Removing a Battery Installing the Battery Removing a Battery CAUTION: Before performing these procedures, disconnect the modem from the bay. 1 battery latch release (2) Installing...
... to a media base (docked), undock it. Slide the battery latch releases on the bottom of the procedures in this . 1. Back to Contents Page Battery Dell™ Inspiron™ 300m Service Manual Removing a Battery Installing the Battery Removing a Battery CAUTION: Before performing these procedures, disconnect the modem from the bay. 1 battery latch release (2) Installing...

Service Manual
Page 6
...base (docked), undock it from their electrical outlets, and then press the power button to Contents Page Before You Begin Dell™ Inspiron™ 300m Service Manual Recommended Tools Shutting Down Your Computer Computer Orientation Screw Identification Placemat This section provides procedures for removing and installing... hold the power button for instructions. Shut down your computer and then unplug it . See the documentation that is not authorized by Dell is not covered by your media base for 4 seconds. 4. NOTICE: To disconnect a network cable, first unplug the cable from ...
...base (docked), undock it from their electrical outlets, and then press the power button to Contents Page Before You Begin Dell™ Inspiron™ 300m Service Manual Recommended Tools Shutting Down Your Computer Computer Orientation Screw Identification Placemat This section provides procedures for removing and installing... hold the power button for instructions. Shut down your computer and then unplug it . See the documentation that is not authorized by Dell is not covered by your media base for 4 seconds. 4. NOTICE: To disconnect a network cable, first unplug the cable from ...
Service Manual
Page 10
.... Click the BIOS link and follow the instructions to download the BIOS to your computer or select the appropriate Dell™ computer. Click Go. 3. Back to Contents Page Flashing the BIOS Dell™ Inspiron™ 300m Service Manual To update the basic input/output system (BIOS): 1. Select the appropriate operating system and language for...
.... Click the BIOS link and follow the instructions to download the BIOS to your computer or select the appropriate Dell™ computer. Click Go. 3. Back to Contents Page Flashing the BIOS Dell™ Inspiron™ 300m Service Manual To update the basic input/output system (BIOS): 1. Select the appropriate operating system and language for...
Service Manual
Page 11
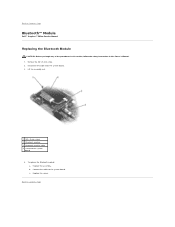
To replace the Bluetooth module: a. c. Remove the M2 x 5-mm screw. 2. Back to the system board. Connect the cable to Contents Page Bluetooth™ Module Dell™ Inspiron™ 300m Service Manual Replacing the Bluetooth Module CAUTION: Before you begin any of the procedures in this section, follow the safety instructions in the Owner's Manual...
To replace the Bluetooth module: a. c. Remove the M2 x 5-mm screw. 2. Back to the system board. Connect the cable to Contents Page Bluetooth™ Module Dell™ Inspiron™ 300m Service Manual Replacing the Bluetooth Module CAUTION: Before you begin any of the procedures in this section, follow the safety instructions in the Owner's Manual...
Service Manual
Page 12
... Page Dell Diagnostics Dell™ Inspiron™ 300m Service Manual When to Use the Dell Diagnostics Starting the Dell Diagnostics When to Use the Dell Diagnostics If you experience a problem with your computer, perform the checks in the "Solving Problems" section in error messages. The Dell Diagnostics allows... runs the Pre-boot System Assessment, a series of initial tests of the problem you contact Dell for Dell's service and support personnel. Shut down the error code(s) and contact Dell before you are having. Connect the computer to test your computer through the Start menu and...
... Page Dell Diagnostics Dell™ Inspiron™ 300m Service Manual When to Use the Dell Diagnostics Starting the Dell Diagnostics When to Use the Dell Diagnostics If you experience a problem with your computer, perform the checks in the "Solving Problems" section in error messages. The Dell Diagnostics allows... runs the Pre-boot System Assessment, a series of initial tests of the problem you contact Dell for Dell's service and support personnel. Shut down the error code(s) and contact Dell before you are having. Connect the computer to test your computer through the Start menu and...
Service Manual
Page 14
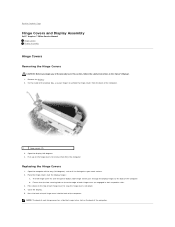
... securing tabs on the hinge covers to remove them from the back of the computer. Back to Contents Page Hinge Covers and Display Assembly Dell™ Inspiron™ 300m Service Manual Hinge Covers Display Assembly Hinge Covers Removing the Hinge Covers CAUTION: Before you begin any of the procedures in this section, follow...
... securing tabs on the hinge covers to remove them from the back of the computer. Back to Contents Page Hinge Covers and Display Assembly Dell™ Inspiron™ 300m Service Manual Hinge Covers Display Assembly Hinge Covers Removing the Hinge Covers CAUTION: Before you begin any of the procedures in this section, follow...
Service Manual
Page 17
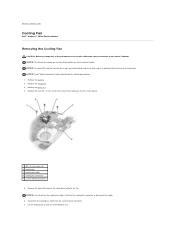
... "Before You Begin" before performing the following procedure. 1. Remove the keyboard. 3. NOTICE: Do not pull on the computer. Back to Contents Page Cooling Fan Dell™ Inspiron™ 300m Service Manual Removing the Cooling Fan CAUTION: Before you begin any attached devices from electrical outlets. NOTICE: Disconnect the computer and any of the...
... "Before You Begin" before performing the following procedure. 1. Remove the keyboard. 3. NOTICE: Do not pull on the computer. Back to Contents Page Cooling Fan Dell™ Inspiron™ 300m Service Manual Removing the Cooling Fan CAUTION: Before you begin any attached devices from electrical outlets. NOTICE: Disconnect the computer and any of the...
Service Manual
Page 19
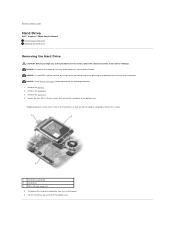
... You Begin" before performing the following procedure. 1. Disconnect the hard drive connector from electrical outlets. Remove the battery. 2. Back to Contents Page Hard Drive Dell™ Inspiron™ 300m Service Manual Removing the Hard Drive Replacing the Hard Drive Removing the Hard Drive CAUTION: Before you do not need to the bottom case.
... You Begin" before performing the following procedure. 1. Disconnect the hard drive connector from electrical outlets. Remove the battery. 2. Back to Contents Page Hard Drive Dell™ Inspiron™ 300m Service Manual Removing the Hard Drive Replacing the Hard Drive Removing the Hard Drive CAUTION: Before you do not need to the bottom case.
Service Manual
Page 21
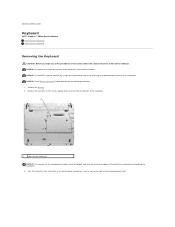
... safety instructions in the Owner's Manual. Turn the computer over, and insert a ¼-inch flat-blade screwdriver into the slot to Contents Page Keyboard Dell™ Inspiron™ 300m Service Manual Removing the Keyboard Replacing the Keyboard Removing the Keyboard CAUTION: Before you begin any attached devices from the bottom of the computer...
... safety instructions in the Owner's Manual. Turn the computer over, and insert a ¼-inch flat-blade screwdriver into the slot to Contents Page Keyboard Dell™ Inspiron™ 300m Service Manual Removing the Keyboard Replacing the Keyboard Removing the Keyboard CAUTION: Before you begin any attached devices from the bottom of the computer...
Service Manual
Page 24
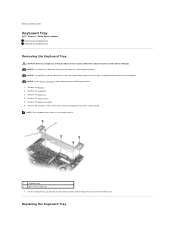
... before performing the following procedure. 1. Remove the battery. 2. Remove the five M2 x 4-mm screws that secure the keyboard tray to Contents Page Keyboard Tray Dell™ Inspiron™ 300m Service Manual Removing the Keyboard Tray Replacing the Keyboard Tray Removing the Keyboard Tray CAUTION: Before you begin any attached devices from electrical outlets...
... before performing the following procedure. 1. Remove the battery. 2. Remove the five M2 x 4-mm screws that secure the keyboard tray to Contents Page Keyboard Tray Dell™ Inspiron™ 300m Service Manual Removing the Keyboard Tray Replacing the Keyboard Tray Removing the Keyboard Tray CAUTION: Before you begin any attached devices from electrical outlets...
Service Manual
Page 26
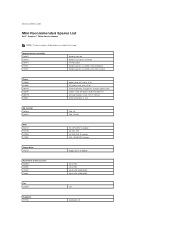
... 30-G HDD 40-G HDD (5400 RPM) 60-G HDD (5400 RPM) Fan D2589 fan Keyboard 5Y730 keyboard, US Back to Contents Page Mini Recommended Spares List Dell™ Inspiron™ 300m Service Manual NOTE: The part numbers listed below are subject to change.
... 30-G HDD 40-G HDD (5400 RPM) 60-G HDD (5400 RPM) Fan D2589 fan Keyboard 5Y730 keyboard, US Back to Contents Page Mini Recommended Spares List Dell™ Inspiron™ 300m Service Manual NOTE: The part numbers listed below are subject to change.

Service Manual
Page 28
Back to Contents Page Palm Rest Dell™ Inspiron™ 300m Service Manual Removing the Palm Rest Replacing the Palm Rest Removing the Palm Rest CAUTION: Before you begin any attached devices from the bottom of ...
Back to Contents Page Palm Rest Dell™ Inspiron™ 300m Service Manual Removing the Palm Rest Replacing the Palm Rest Removing the Palm Rest CAUTION: Before you begin any attached devices from the bottom of ...
Service Manual
Page 31
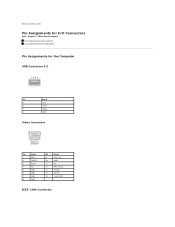
Back to Contents Page Pin Assignments for I/O Connectors Dell™ Inspiron™ 300m Service Manual Pin Assignments for the Computer Pin Assignments for the Media Base Pin Assignments for the Computer USB Connector 2.0 Pin Signal 1 VCC 2 Data- 3 Data+ 4 GND Video Connector Pin Signal 1 RED 2 GREEN 3 BLUE 4 NC 5 GND 6 GND 7 GND 8 GND Pin Signal 9 CRT_VCC 10 GND 11 NC 12 DAT_DDC2 13 HSYNC 14 VSYNC 15 CLK_DDC2 IEEE 1394 Connector
Back to Contents Page Pin Assignments for I/O Connectors Dell™ Inspiron™ 300m Service Manual Pin Assignments for the Computer Pin Assignments for the Media Base Pin Assignments for the Computer USB Connector 2.0 Pin Signal 1 VCC 2 Data- 3 Data+ 4 GND Video Connector Pin Signal 1 RED 2 GREEN 3 BLUE 4 NC 5 GND 6 GND 7 GND 8 GND Pin Signal 9 CRT_VCC 10 GND 11 NC 12 DAT_DDC2 13 HSYNC 14 VSYNC 15 CLK_DDC2 IEEE 1394 Connector
Service Manual
Page 36
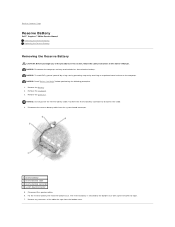
... rest. Disconnect the reserve battery cable from the bottom case. Remove the battery. 2. Pull from the reserve battery connector to Contents Page Reserve Battery Dell™ Inspiron™ 300m Service Manual Removing the Reserve Battery Replacing the Reserve Battery Removing the Reserve Battery CAUTION: Before you begin any of the procedures in this...
... rest. Disconnect the reserve battery cable from the bottom case. Remove the battery. 2. Pull from the reserve battery connector to Contents Page Reserve Battery Dell™ Inspiron™ 300m Service Manual Removing the Reserve Battery Replacing the Reserve Battery Removing the Reserve Battery CAUTION: Before you begin any of the procedures in this...
Service Manual
Page 38
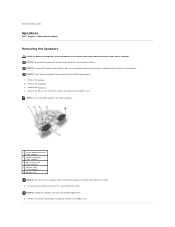
... with care to the bottom case. Remove the M2 x 4-mm screw that secures the speaker to avoid damaging them. 6. Back to Contents Page Speakers Dell™ Inspiron™ 300m Service Manual Removing the Speakers CAUTION: Before you begin any attached devices from electrical outlets. NOTE: The left and right speakers are interchangeable. 1 system...
... with care to the bottom case. Remove the M2 x 4-mm screw that secures the speaker to avoid damaging them. 6. Back to Contents Page Speakers Dell™ Inspiron™ 300m Service Manual Removing the Speakers CAUTION: Before you begin any attached devices from electrical outlets. NOTE: The left and right speakers are interchangeable. 1 system...
Service Manual
Page 40
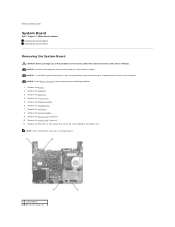
... in the Owner's Manual. Remove the keyboard tray. 7. Remove the three M2 x 4-mm screws that secure the system board to Contents Page System Board Dell™ Inspiron™ 300m Service Manual Removing the System Board Replacing the System Board Removing the System Board CAUTION: Before you begin any attached devices from electrical outlets...
... in the Owner's Manual. Remove the keyboard tray. 7. Remove the three M2 x 4-mm screws that secure the system board to Contents Page System Board Dell™ Inspiron™ 300m Service Manual Removing the System Board Replacing the System Board Removing the System Board CAUTION: Before you begin any attached devices from electrical outlets...
Service Manual
Page 42
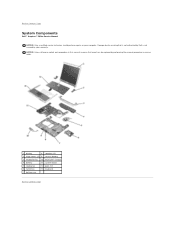
... 11 system board 5 cooling fan 12 palm rest 6 hard drive 13 keyboard 7 bottom case Back to Contents Page Back to Contents Page System Components Dell™ Inspiron™ 300m Service Manual NOTICE: Only a certified service technician should perform repairs on your warranty. Damage due to servicing that a part can be replaced by your...
... 11 system board 5 cooling fan 12 palm rest 6 hard drive 13 keyboard 7 bottom case Back to Contents Page Back to Contents Page System Components Dell™ Inspiron™ 300m Service Manual NOTICE: Only a certified service technician should perform repairs on your warranty. Damage due to servicing that a part can be replaced by your...
Service Manual
Page 43
... in this document to refer to Contents Page is a registered trademark of Intel Corporation; Bluetooth is a trademark owned by Dell Inc. under license. A01 Back to either potential damage to change without the written permission of your computer. and is ...reserved. Microsoft and Windows are trademarks of Microsoft Corporation; disclaims any manner whatsoever without notice. © 2003 Dell Inc. Back to Contents Page Dell™ Inspiron™ 300m Service Manual NOTE: A NOTE indicates important information that helps you how to avoid the problem. NOTICE: A...
... in this document to refer to Contents Page is a registered trademark of Intel Corporation; Bluetooth is a trademark owned by Dell Inc. under license. A01 Back to either potential damage to change without the written permission of your computer. and is ...reserved. Microsoft and Windows are trademarks of Microsoft Corporation; disclaims any manner whatsoever without notice. © 2003 Dell Inc. Back to Contents Page Dell™ Inspiron™ 300m Service Manual NOTE: A NOTE indicates important information that helps you how to avoid the problem. NOTICE: A...


