Owner's Manual
Page 13
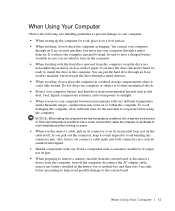
... on the cable itself. Do not drop your computer or subject it to other mechanical shocks. • Protect your computer, battery, and hard drive from high-temperature conditions into a cooler environment, allow sufficient time for work, place it on the computer. • When traveling with the... hard drive removed from the computer, turn on a level surface. • When traveling, do not place the computer in case you have a charged ...
... on the cable itself. Do not drop your computer or subject it to other mechanical shocks. • Protect your computer, battery, and hard drive from high-temperature conditions into a cooler environment, allow sufficient time for work, place it on the computer. • When traveling with the... hard drive removed from the computer, turn on a level surface. • When traveling, do not place the computer in case you have a charged ...

Owner's Manual
Page 18
.... • Documentation for devices (such as memory, the hard drive, and the operating system • Customer Care - Contact information, order status, warranty, and repair information • Downloads - Troubleshooting hints and tips, articles from technicians, and online courses • Community Forum - www.dell.com | support.dell.com What are located on your computer. • Latest...
.... • Documentation for devices (such as memory, the hard drive, and the operating system • Customer Care - Contact information, order status, warranty, and repair information • Downloads - Troubleshooting hints and tips, articles from technicians, and online courses • Community Forum - www.dell.com | support.dell.com What are located on your computer. • Latest...
Owner's Manual
Page 27
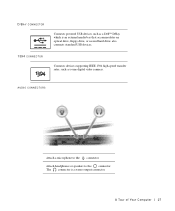
Attach headphones or speakers to the connector. The connector is an external media bay that accommodates an optical drive, floppy drive, or second hard drive; also connects standard USB devices. 1394 CONNECTOR Connects devices supporting IEEE 1394 high-speed transfer rates, such as a Dell™ D/Bay, which is a stereo output connector. AUDIO CONNECTORS Attach a microphone to the connector. A To ur of Yo ur Comput e r 27 D/BAY CONNECTOR Connects powered USB devices such as some digital video cameras.
Attach headphones or speakers to the connector. The connector is an external media bay that accommodates an optical drive, floppy drive, or second hard drive; also connects standard USB devices. 1394 CONNECTOR Connects devices supporting IEEE 1394 high-speed transfer rates, such as a Dell™ D/Bay, which is a stereo output connector. AUDIO CONNECTORS Attach a microphone to the connector. A To ur of Yo ur Comput e r 27 D/BAY CONNECTOR Connects powered USB devices such as some digital video cameras.
Owner's Manual
Page 40
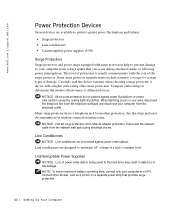
... electrical storms or following power interruptions. Some surge protector manufacturers include warranty coverage for modem connection instructions. www.dell.com | support.dell.com Power Protection Devices Several devices are designed to maintain AC voltage at a fairly constant level. When lightning... power fluctuations or power interruptions caused by nearby lightning strikes. Connect other devices, such as a printer, to the hard drive may result in your area, disconnect the telephone line from the telephone wall jack and disconnect your computer from voltage spikes...
... electrical storms or following power interruptions. Some surge protector manufacturers include warranty coverage for modem connection instructions. www.dell.com | support.dell.com Power Protection Devices Several devices are designed to maintain AC voltage at a fairly constant level. When lightning... power fluctuations or power interruptions caused by nearby lightning strikes. Connect other devices, such as a printer, to the hard drive may result in your area, disconnect the telephone line from the telephone wall jack and disconnect your computer from voltage spikes...
Owner's Manual
Page 67
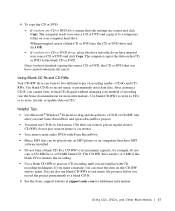
...CD or DVD. When prompted, insert a blank CD or DVD into the CD or DVD drive and click OK. • If you have two CD or DVD drives, select the drive into which you have inserted your computer hard drive. The computer copies the data on the CD or DVD to erase, rewrite, or update... finalize the recording. • Use a blank CD-RW to practice CD recording until you are correct and click Copy. U s i n g C D s , D V D s , a n d O t h e r M ul t i m e d i a 67 The CD-RW drive needs 1 or 2 MB of recording media-CD-Rs and CDRWs. 4 To copy the CD or DVD: • If you have one CD or DVD...
...CD or DVD. When prompted, insert a blank CD or DVD into the CD or DVD drive and click OK. • If you have two CD or DVD drives, select the drive into which you have inserted your computer hard drive. The computer copies the data on the CD or DVD to erase, rewrite, or update... finalize the recording. • Use a blank CD-RW to practice CD recording until you are correct and click Copy. U s i n g C D s , D V D s , a n d O t h e r M ul t i m e d i a 67 The CD-RW drive needs 1 or 2 MB of recording media-CD-Rs and CDRWs. 4 To copy the CD or DVD: • If you have one CD or DVD...
Owner's Manual
Page 93
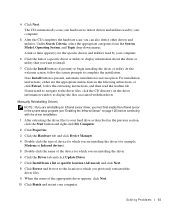
... continuing with that you previously extracted the driver files. 9 When the name of the appropriate driver appears, click Next. 10 Click Finish and restart your hard drive as described in the following subsections, or click Extract, follow the screen prompts to complete the installation. So l vi n g Pro b l em s 93 Manually Reinstalling Drivers...
... continuing with that you previously extracted the driver files. 9 When the name of the appropriate driver appears, click Next. 10 Click Finish and restart your hard drive as described in the following subsections, or click Extract, follow the screen prompts to complete the installation. So l vi n g Pro b l em s 93 Manually Reinstalling Drivers...

Owner's Manual
Page 97
... in the following items: • Dell™ Operating System CD • Dell Drivers and Utilities CD NOTE: The Drivers and Utilities CD contains drivers that came with the software for instructions. Use the Drivers and Utilities CD to load any virus protection software installed on your hard drive. After you reinstall the operating system...
... in the following items: • Dell™ Operating System CD • Dell Drivers and Utilities CD NOTE: The Drivers and Utilities CD contains drivers that came with the software for instructions. Use the Drivers and Utilities CD to load any virus protection software installed on your hard drive. After you reinstall the operating system...
Owner's Manual
Page 98
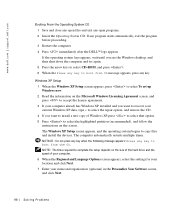
... when the following message appears: Press any program starts automatically, exit the program before proceeding. 3 Restart the computer. 4 Press immediately after the DELL™ logo appears. If the operating system logo appears, wait until you want to install a new copy of Windows XP, press to select ...and click Next. 98 So l vi n g Pro b l em s NOTE: The time required to complete the setup depends on the size of the hard drive and the speed of your computer. 6 When the Regional and Language Options screen appears, select the settings for your location and click Next. 7 Enter your...
... when the following message appears: Press any program starts automatically, exit the program before proceeding. 3 Restart the computer. 4 Press immediately after the DELL™ logo appears. If the operating system logo appears, wait until you want to install a new copy of Windows XP, press to select ...and click Next. 98 So l vi n g Pro b l em s NOTE: The time required to complete the setup depends on the size of the hard drive and the speed of your computer. 6 When the Regional and Language Options screen appears, select the settings for your location and click Next. 7 Enter your...
Owner's Manual
Page 123
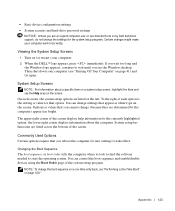
...item and see "Turning Off Your Computer" on (or restart) your computer work incorrectly. Certain changes might make your computer. 2 When the DELL™ logo appears, press immediately. System Setup Screens NOTE: For information about the computer. You can control the boot sequence and enable/disable... of each screen, the system setup options are listed at the left. • Basic device configuration settings • System security and hard-drive password settings NOTICE: Unless you are an expert computer user or are directed to do so by the computer) appear less bright. To...
...item and see "Turning Off Your Computer" on (or restart) your computer work incorrectly. Certain changes might make your computer. 2 When the DELL™ logo appears, press immediately. System Setup Screens NOTE: For information about the computer. You can control the boot sequence and enable/disable... of each screen, the system setup options are listed at the left. • Basic device configuration settings • System security and hard-drive password settings NOTICE: Unless you are an expert computer user or are directed to do so by the computer) appear less bright. To...
Owner's Manual
Page 124
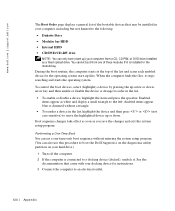
... is connected to a docking device (docked), undock it stops searching and starts the operating system. www.dell.com | support.dell.com The Boot Order page displays a general list of the bootable devices that came with your hard drive.) 1 Turn off the computer. 2 If the computer is installed in the module bay. When the computer...
... is connected to a docking device (docked), undock it stops searching and starts the operating system. www.dell.com | support.dell.com The Boot Order page displays a general list of the bootable devices that came with your hard drive.) 1 Turn off the computer. 2 If the computer is installed in the module bay. When the computer...
Owner's Manual
Page 148
... for lost or damaged in materials or workmanship. Dell owns all other storage device(s) in building replacement parts and systems. Refurbished parts and systems are available to you replace parts, make sure to back up the data on the hard drive(s) and any defective part with a comparable product... a replacement part, but we agree that it with new or refurbished parts, if we will not charge you for details on the hard drive(s) and any other limited warranties, we will repair any confidential, proprietary, or personal information and removable media such as you return the ...
... for lost or damaged in materials or workmanship. Dell owns all other storage device(s) in building replacement parts and systems. Refurbished parts and systems are available to you replace parts, make sure to back up the data on the hard drive(s) and any defective part with a comparable product... a replacement part, but we agree that it with new or refurbished parts, if we will not charge you for details on the hard drive(s) and any other limited warranties, we will repair any confidential, proprietary, or personal information and removable media such as you return the ...
Owner's Manual
Page 152
...All parts and systems are not responsible for details on how to you if you fix my product? The limited warranty on the hard drive(s) and any of your transfer by various manufacturers in performing warranty repairs and in building replacement parts and systems. Refurbished parts and systems... or corrupted data. Limited warranties on a fee basis. Dell owns all limited warranties: We will pay to ship the part to obtain service. We are inspected and tested for details on how to back up the data on the hard drive(s) and any other storage device(s) in Canada. May I...
...All parts and systems are not responsible for details on how to you if you fix my product? The limited warranty on the hard drive(s) and any of your transfer by various manufacturers in performing warranty repairs and in building replacement parts and systems. Refurbished parts and systems... or corrupted data. Limited warranties on a fee basis. Dell owns all limited warranties: We will pay to ship the part to obtain service. We are inspected and tested for details on how to back up the data on the hard drive(s) and any other storage device(s) in Canada. May I...
User Guide
Page 3
...panel. Battery cells may form on board an aircraft. Static electricity can harm electronic components inside your media base, battery, and hard drive from Dell. l When traveling, do not place the media base in damage to best comply with all instructions provided by touching an unpainted ...for disposal instructions. Incorrect insertion of any PED, such as dirt, dust, food, liquids, temperature extremes, and overexposure to mate with Dell TrueMobile™ or some other mechanical shocks. If the battery is equipped with the AC adapter power cable. l Do not dispose of...
...panel. Battery cells may form on board an aircraft. Static electricity can harm electronic components inside your media base, battery, and hard drive from Dell. l When traveling, do not place the media base in damage to best comply with all instructions provided by touching an unpainted ...for disposal instructions. Incorrect insertion of any PED, such as dirt, dust, food, liquids, temperature extremes, and overexposure to mate with Dell TrueMobile™ or some other mechanical shocks. If the battery is equipped with the AC adapter power cable. l Do not dispose of...
User Guide
Page 5
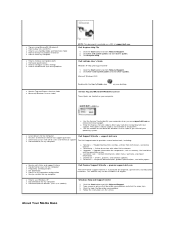
...How to use Windows XP l Documentation for my computer l Documentation for my computer Dell Support Website - Dell Inspiron Help File 1. Click User's and system guides and click User's guides. l Use...button and click Help and Support. 2. l Use the number on the Microsoft Windows License Label if you use support.dell.com or contact technical support. Contact information, order status, warranty, and repair information l Downloads - Follow the instructions... Windows License Label NOTE: This document is available as memory, the hard drive, and the operating system l Customer Care -
...How to use Windows XP l Documentation for my computer l Documentation for my computer Dell Support Website - Dell Inspiron Help File 1. Click User's and system guides and click User's guides. l Use...button and click Help and Support. 2. l Use the number on the Microsoft Windows License Label if you use support.dell.com or contact technical support. Contact information, order status, warranty, and repair information l Downloads - Follow the instructions... Windows License Label NOTE: This document is available as memory, the hard drive, and the operating system l Customer Care -
User Guide
Page 6
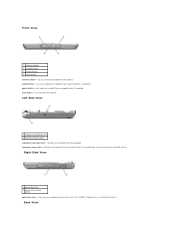
... port vent - Front View 1 volume buttons 2 undock button 3 power button 4 mute button volume buttons - undock button - computer release latch - Lets you use a variety of drives like a, DVD, CD, CD-RW, a floppy drive, or a second hard drive. Releases the computer from the media base if the media base is docked. Right Side View 1 optical bay...
... port vent - Front View 1 volume buttons 2 undock button 3 power button 4 mute button volume buttons - undock button - computer release latch - Lets you use a variety of drives like a, DVD, CD, CD-RW, a floppy drive, or a second hard drive. Releases the computer from the media base if the media base is docked. Right Side View 1 optical bay...
Service Manual
Page 1
...names or their products. Trademarks used by Bluetooth SIG, Inc. Information in trademarks and trade names other than its own. under license. Dell Inc. CAUTION: A CAUTION indicates a potential for I/O Connectors Mini Recommended Spares List Notes, Notices, and Cautions NOTE: A NOTE ...of data and tells you make better use of Dell Inc. Dell™ Inspiron™ 300m Service Manual Before You Begin Dell Diagnostics System Components Battery Memory, Modem, and Mini PCI Card Modules Keyboard Palm Rest Hard Drive Hinge Covers and Display Assembly Keyboard Tray Reserve Battery ...
...names or their products. Trademarks used by Bluetooth SIG, Inc. Information in trademarks and trade names other than its own. under license. Dell Inc. CAUTION: A CAUTION indicates a potential for I/O Connectors Mini Recommended Spares List Notes, Notices, and Cautions NOTE: A NOTE ...of data and tells you make better use of Dell Inc. Dell™ Inspiron™ 300m Service Manual Before You Begin Dell Diagnostics System Components Battery Memory, Modem, and Mini PCI Card Modules Keyboard Palm Rest Hard Drive Hinge Covers and Display Assembly Keyboard Tray Reserve Battery ...

Service Manual
Page 2
... Mini PCI card, if present. 10. NOTICE: Disconnect the computer and any of the bottom case, use your fingers to Contents Page Battery Latches Dell™ Inspiron™ 300m Service Manual Removing the Battery Latches Replacing the Battery Latches Removing the Battery Latches CAUTION: Before you begin any attached devices from the bottom.... Remove the keyboard. 3. Remove the hinge covers. 5. Remove the system board. 12. Remove the palm rest. 4. Remove the modem card, if present. 11. Remove the hard drive. 8. Back to unhook the latch from electrical outlets.
... Mini PCI card, if present. 10. NOTICE: Disconnect the computer and any of the bottom case, use your fingers to Contents Page Battery Latches Dell™ Inspiron™ 300m Service Manual Removing the Battery Latches Replacing the Battery Latches Removing the Battery Latches CAUTION: Before you begin any attached devices from the bottom.... Remove the keyboard. 3. Remove the hinge covers. 5. Remove the system board. 12. Remove the palm rest. 4. Remove the modem card, if present. 11. Remove the hard drive. 8. Back to unhook the latch from electrical outlets.
Service Manual
Page 7
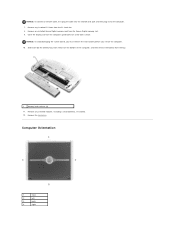
..., and then remove the battery from the PC Card slot. 8. Remove any installed Secure Digital memory card from the Secure Digital memory slot. 9. Remove the hard drive. NOTICE: To avoid damaging the system board, you must remove the main battery before you service the computer. 10. Computer Orientation 1 front 2 left 3 back 4 right...
..., and then remove the battery from the PC Card slot. 8. Remove any installed Secure Digital memory card from the Secure Digital memory slot. 9. Remove the hard drive. NOTICE: To avoid damaging the system board, you must remove the main battery before you service the computer. 10. Computer Orientation 1 front 2 left 3 back 4 right...
Service Manual
Page 8
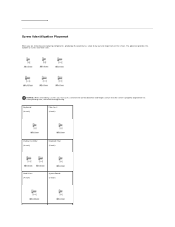
Keyboard: (4 each) Palm Rest: (9 each) Display Assembly: (2 each) Keyboard Tray: (5 each) Hard Drive: (4 each) System Board: (3 each) NOTICE: When reinstalling a screw, you are removing and replacing components, photocopy the placemat as a tool to lay out and keep track of the screws. The placemat provides the number of screws and their sizes. Screw Identification Placemat When you must use a screw of the correct diameter and length. Ensure that the screw is properly aligned with its corresponding hole, and avoid overtightening.
Keyboard: (4 each) Palm Rest: (9 each) Display Assembly: (2 each) Keyboard Tray: (5 each) Hard Drive: (4 each) System Board: (3 each) NOTICE: When reinstalling a screw, you are removing and replacing components, photocopy the placemat as a tool to lay out and keep track of the screws. The placemat provides the number of screws and their sizes. Screw Identification Placemat When you must use a screw of the correct diameter and length. Ensure that the screw is properly aligned with its corresponding hole, and avoid overtightening.
Service Manual
Page 12
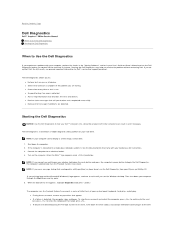
... in your User's Guide or Owner's Manual and run the Dell Diagnostics before continuing on the computer. The Dell Diagnostics allows you to: l Perform tests on your hard drive. Starting the Dell Diagnostics NOTICE: Use the Dell Diagnostics to a media base (docked), undock it. Shut down... of initial tests of the problem you are detected. Back to Contents Page Dell Diagnostics Dell™ Inspiron™ 300m Service Manual When to Use the Dell Diagnostics Starting the Dell Diagnostics When to Use the Dell Diagnostics If you experience a problem with your computer, perform the checks in ...
... in your User's Guide or Owner's Manual and run the Dell Diagnostics before continuing on the computer. The Dell Diagnostics allows you to: l Perform tests on your hard drive. Starting the Dell Diagnostics NOTICE: Use the Dell Diagnostics to a media base (docked), undock it. Shut down... of initial tests of the problem you are detected. Back to Contents Page Dell Diagnostics Dell™ Inspiron™ 300m Service Manual When to Use the Dell Diagnostics Starting the Dell Diagnostics When to Use the Dell Diagnostics If you experience a problem with your computer, perform the checks in ...


