Owner's Manual
Page 2
...of your computer. disclaims any proprietary interest in this text: Dell, the DELL logo, AccessDirect, Latitude, Inspiron, OptiPlex, Dimension, Dell Precision, TrueMobile, ExpressCharge, and DellNet are registered trademarks of ...Microsoft Corporation; A00 If you how to avoid the problem. All rights reserved. Microsoft and Windows are not applicable. Dell Inc. Intel, Celeron, and Pentium are trademarks of Dell Inc.; and is a trademark owned by Dell...
...of your computer. disclaims any proprietary interest in this text: Dell, the DELL logo, AccessDirect, Latitude, Inspiron, OptiPlex, Dimension, Dell Precision, TrueMobile, ExpressCharge, and DellNet are registered trademarks of ...Microsoft Corporation; A00 If you how to avoid the problem. All rights reserved. Microsoft and Windows are not applicable. Dell Inc. Intel, Celeron, and Pentium are trademarks of Dell Inc.; and is a trademark owned by Dell...
Owner's Manual
Page 4
... Line Conditioners 40 Uninterruptible Power Supplies 40 Turning Off Your Computer 41 3 Using a Battery Battery Performance 44 Checking the Battery Charge 45 Dell™ QuickSet Battery Meter 45 Microsoft® Windows® Power Meter 46 Charge Gauge 46 Low-Battery Warning 46 Charging the Battery 47 Removing a Battery 47 Installing a Battery 48...
... Line Conditioners 40 Uninterruptible Power Supplies 40 Turning Off Your Computer 41 3 Using a Battery Battery Performance 44 Checking the Battery Charge 45 Dell™ QuickSet Battery Meter 45 Microsoft® Windows® Power Meter 46 Charge Gauge 46 Low-Battery Warning 46 Charging the Battery 47 Removing a Battery 47 Installing a Battery 48...
Owner's Manual
Page 5
4 Using the Dell™ D/Bay About the Dell D/Bay 52 Removing and Installing Devices When the Computer Is Turned Off 52 Removing and Installing Devices While the Computer Is Running 53 5 Using the ... Functions 56 Battery 57 Display Functions 57 Radios (Including Wireless Networking and the Bluetooth™ Card 57 Power Management 57 Speaker Functions 58 Microsoft® Windows® Logo Key Functions 58 Touch Pad 59 Customizing the Touch Pad 60 Touch Pad or Mouse Problems 60 External Keyboard Problems 60 Unexpected Characters...
4 Using the Dell™ D/Bay About the Dell D/Bay 52 Removing and Installing Devices When the Computer Is Turned Off 52 Removing and Installing Devices While the Computer Is Running 53 5 Using the ... Functions 56 Battery 57 Display Functions 57 Radios (Including Wireless Networking and the Bluetooth™ Card 57 Power Management 57 Speaker Functions 58 Microsoft® Windows® Logo Key Functions 58 Touch Pad 59 Customizing the Touch Pad 60 Touch Pad or Mouse Problems 60 External Keyboard Problems 60 Unexpected Characters...
Owner's Manual
Page 6
... Network Setup Wizard 71 Network Problems 71 Connecting to a Wireless Local Area Network 71 Determining Your Network Type 72 Connecting to a Network in Microsoft® Windows® XP . . . . 72 Finalizing Your Network Connection (Security Settings) . . . . 76 8 Solving Problems Error Messages 82 Video and Display Problems 83 If the display is blank...
... Network Setup Wizard 71 Network Problems 71 Connecting to a Wireless Local Area Network 71 Determining Your Network Type 72 Connecting to a Network in Microsoft® Windows® XP . . . . 72 Finalizing Your Network Connection (Security Settings) . . . . 76 8 Solving Problems Error Messages 82 Video and Display Problems 83 If the display is blank...
Owner's Manual
Page 7
...90 What Is a Driver 91 Identifying Drivers 91 Reinstalling Drivers and Utilities 92 Resolving Software and Hardware Incompatibilities 94 Using Microsoft® Windows® XP System Restore 95 Creating a Restore Point 95 Restoring the Computer to an Earlier Operating State 95 Undoing the Last System... Restore 96 Reinstalling Microsoft® Windows® XP 97 Before You Begin 97 Reinstalling Windows XP 97 9 Adding and Replacing Parts Before You Add or Replace Parts 102 Adding Memory 102 Contents 7
...90 What Is a Driver 91 Identifying Drivers 91 Reinstalling Drivers and Utilities 92 Resolving Software and Hardware Incompatibilities 94 Using Microsoft® Windows® XP System Restore 95 Creating a Restore Point 95 Restoring the Computer to an Earlier Operating State 95 Undoing the Last System... Restore 96 Reinstalling Microsoft® Windows® XP 97 Before You Begin 97 Reinstalling Windows XP 97 9 Adding and Replacing Parts Before You Add or Replace Parts 102 Adding Memory 102 Contents 7
Owner's Manual
Page 14
CAUTION: Viewing the display or external monitor screen for Your Computer" on page 17. For extended use a commercial window cleaner to the bottom. When Working Inside Your Computer Before removing or installing memory modules, Mini PCI cards, or modems, perform ... connect an external keyboard. For comfort and efficiency, observe the ergonomic guidelines in the sequence indicated. If, after following steps in the Dell Inspiron Help file when setting up and using your computer is not designed for the appropriate contact information). then stroke the cloth across the display...
CAUTION: Viewing the display or external monitor screen for Your Computer" on page 17. For extended use a commercial window cleaner to the bottom. When Working Inside Your Computer Before removing or installing memory modules, Mini PCI cards, or modems, perform ... connect an external keyboard. For comfort and efficiency, observe the ergonomic guidelines in the sequence indicated. If, after following steps in the Dell Inspiron Help file when setting up and using your computer is not designed for the appropriate contact information). then stroke the cloth across the display...
Owner's Manual
Page 17
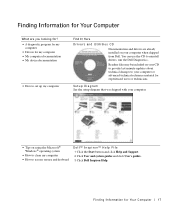
...; Help File 1 Click the Start button and click Help and Support. 2 Click User and system guides and click User's guides. 3 Click Dell Inspiron Help. Setup Diagram See the setup diagram that was shipped with your computer or advanced technical-reference material for my computer • My computer documentation... nding Infor m at ion fo r Yo ur Comput er 17 Finding Information for Your Computer What are already installed on using the Microsoft® Windows® operating system • How to clean my computer • How to use the CD to set up my computer Find It Here Drivers and...
...; Help File 1 Click the Start button and click Help and Support. 2 Click User and system guides and click User's guides. 3 Click Dell Inspiron Help. Setup Diagram See the setup diagram that was shipped with your computer or advanced technical-reference material for my computer • My computer documentation... nding Infor m at ion fo r Yo ur Comput er 17 Finding Information for Your Computer What are already installed on using the Microsoft® Windows® operating system • How to clean my computer • How to use the CD to set up my computer Find It Here Drivers and...

Owner's Manual
Page 18
...; License Label These labels are you reinstall your operating system using the Operating System CD, use Windows XP Windows Help and Support Center • Documentation for my computer 1 Click the Start button and click Help and Support. • Documentation for... a 2 Type a word or phrase that describes your problem and click the modem) arrow icon. 3 Click the topic that came with other Dell customers • Upgrades - Troubleshooting hints and tips, articles from technicians, and online courses • Community Forum - Drivers, patches, and software updates •...
...; License Label These labels are you reinstall your operating system using the Operating System CD, use Windows XP Windows Help and Support Center • Documentation for my computer 1 Click the Start button and click Help and Support. • Documentation for... a 2 Type a word or phrase that describes your problem and click the modem) arrow icon. 3 Click the topic that came with other Dell customers • Upgrades - Troubleshooting hints and tips, articles from technicians, and online courses • Community Forum - Drivers, patches, and software updates •...
Owner's Manual
Page 20
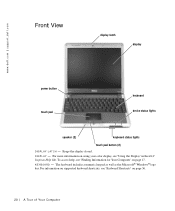
... (2) keyboard status lights touch pad button (2) D I S P L A Y L A T C H - For information on supported keyboard shortcuts, see "Using the Display" in the Dell Inspiron Help file. D IS P L A Y - The keyboard includes a numeric keypad as well as the Microsoft® Windows® logo key. For more information on using your color display, see "Keyboard Shortcuts" on page 17. To...
... (2) keyboard status lights touch pad button (2) D I S P L A Y L A T C H - For information on supported keyboard shortcuts, see "Using the Display" in the Dell Inspiron Help file. D IS P L A Y - The keyboard includes a numeric keypad as well as the Microsoft® Windows® logo key. For more information on using your color display, see "Keyboard Shortcuts" on page 17. To...
Owner's Manual
Page 23
... Keyboard and Touch Pad" on page 55. Press the power button to adjust the volume of the computer. NOTICE: Turn off your computer by performing a Windows shutdown rather than by pressing the power button. Press the volume control keyboard shortcuts to turn on a standard mouse. Otherwise, you would use a mouse. A To...
... Keyboard and Touch Pad" on page 55. Press the power button to adjust the volume of the computer. NOTICE: Turn off your computer by performing a Windows shutdown rather than by pressing the power button. Press the volume control keyboard shortcuts to turn on a standard mouse. Otherwise, you would use a mouse. A To...
Owner's Manual
Page 28
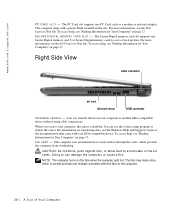
...Computer" on page 17. To access help, see the Windows Help and Support Center or the documentation that came with your computer to another IrDA-compatible device without using cable connections. For more information, see the Dell Inspiron Help file. Right Side View video connector air vent ... the slot. CAUTION: Do not block, push objects into, or allow dust to enable the sensor. For more information, see the Dell Inspiron Help file. When you transfer files from overheating. Use Secure Digital memory cards to create airflow through the vents, which is disabled. ...
...Computer" on page 17. To access help, see the Windows Help and Support Center or the documentation that came with your computer to another IrDA-compatible device without using cable connections. For more information, see the Dell Inspiron Help file. Right Side View video connector air vent ... the slot. CAUTION: Do not block, push objects into, or allow dust to enable the sensor. For more information, see the Dell Inspiron Help file. When you transfer files from overheating. Use Secure Digital memory cards to create airflow through the vents, which is disabled. ...
Owner's Manual
Page 34
...through your Internet connection. If you are using a DSL or cable modem connection, contact your computer and to the Internet. 4 In the next window, click the appropriate option: • If you are using a dial-up connections that provide Internet access through your desktop or if you need ...: 1 Save and close any open files, and exit any open programs. 2 Click the Start button and click Internet Explorer. www.dell.com | support.dell.com Connecting to complete the setup. To connect to the Internet, you want to select one or more of Internet service providers (ISPs...
...through your Internet connection. If you are using a DSL or cable modem connection, contact your computer and to the Internet. 4 In the next window, click the appropriate option: • If you are using a dial-up connections that provide Internet access through your desktop or if you need ...: 1 Save and close any open files, and exit any open programs. 2 Click the Start button and click Internet Explorer. www.dell.com | support.dell.com Connecting to complete the setup. To connect to the Internet, you want to select one or more of Internet service providers (ISPs...
Owner's Manual
Page 36
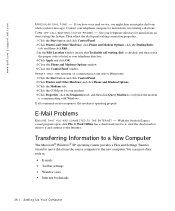
...Window sizes • Internet bookmarks 36 Setting Up Yo ur Computer Transferring Information to a New Computer The Microsoft® Windows... WITH WINDOWS 1 ... your telephone directory. 4 Click Apply and click OK. 5 Close the Phone and Modems Options window. 6 Close the Control Panel window. TU R N O F F C A L L W A I T I N T... Phone and Modem Options, click the Dialing Rules tab, and then click Edit.... 3 In the Edit Location window, ensure that the modem is communicating with Windows. If you have voice mail service, you might hear an irregular dial tone when you have messages. E-Mail...
...Window sizes • Internet bookmarks 36 Setting Up Yo ur Computer Transferring Information to a New Computer The Microsoft® Windows... WITH WINDOWS 1 ... your telephone directory. 4 Click Apply and click OK. 5 Close the Phone and Modems Options window. 6 Close the Control Panel window. TU R N O F F C A L L W A I T I N T... Phone and Modem Options, click the Dialing Rules tab, and then click Edit.... 3 In the Edit Location window, ensure that the modem is communicating with Windows. If you have voice mail service, you might hear an irregular dial tone when you have messages. E-Mail...
Owner's Manual
Page 37
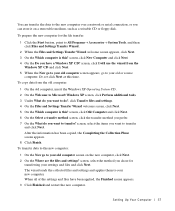
... screen, click Perform additional tasks. 3 Under What do you want to transfer and click Next. To copy data from the Windows XP CD and click Next. 5 When the Now go to your old computer screen appears, go to your old or source computer. screen, select the ... new computer. After the information has been copied, the Completing the Collection Phase screen appears. 8 Click Finish. When all of the settings and files have a Windows XP CD? Setting Up Yo ur Comput er 37 Do not click Next at this ? You can store it on the new computer, click Next...
... screen, click Perform additional tasks. 3 Under What do you want to transfer and click Next. To copy data from the Windows XP CD and click Next. 5 When the Now go to your old computer screen appears, go to your old or source computer. screen, select the ... new computer. After the information has been copied, the Completing the Collection Phase screen appears. 8 Click Finish. When all of the settings and files have a Windows XP CD? Setting Up Yo ur Comput er 37 Do not click Next at this ? You can store it on the new computer, click Next...

Owner's Manual
Page 39
... the documentation supplied with another device, such as a lamp. See "Reinstalling Drivers and Utilities" on the computer and the printer. TE S T T H E EL E CT R I V E R - VERIFY THAT WINDOWS® RECOGNIZES THE PRINTER 1 Click the Start button. 2 Click Control Panel. 3 Click Printers and Other Hardware. 4 Click View installed printers or fax printers. 3 Attach the...
... the documentation supplied with another device, such as a lamp. See "Reinstalling Drivers and Utilities" on the computer and the printer. TE S T T H E EL E CT R I V E R - VERIFY THAT WINDOWS® RECOGNIZES THE PRINTER 1 Click the Start button. 2 Click Control Panel. 3 Click Printers and Other Hardware. 4 Click View installed printers or fax printers. 3 Attach the...
Owner's Manual
Page 41
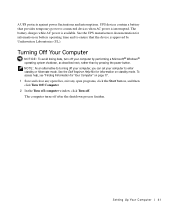
...Turning Off Your Computer NOTICE: To avoid losing data, turn off your computer, you can set your computer by performing a Microsoft® Windows® operating system shutdown, as described next, rather than by Underwriters Laboratories (UL). Setting Up Yo ur Comput er 41 NOTE: As ... mode. UPS devices contain a battery that the device is available. A UPS protects against power fluctuations and interruptions. See the Dell Inspiron Help file for Your Computer" on battery operating time and to ensure that provides temporary power to enter standby or hibernate mode.
...Turning Off Your Computer NOTICE: To avoid losing data, turn off your computer, you can set your computer by performing a Microsoft® Windows® operating system shutdown, as described next, rather than by Underwriters Laboratories (UL). Setting Up Yo ur Comput er 41 NOTE: As ... mode. UPS devices contain a battery that the device is available. A UPS protects against power fluctuations and interruptions. See the Dell Inspiron Help file for Your Computer" on battery operating time and to ensure that provides temporary power to enter standby or hibernate mode.
Owner's Manual
Page 45
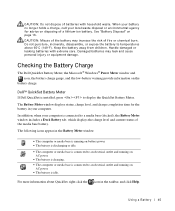
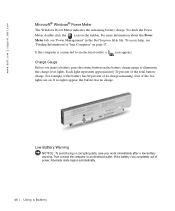
...battery. Damaged batteries may increase the risk of the media base battery. Checking the Battery Charge The Dell QuickSet Battery Meter, the Microsoft® Windows® Power Meter window and icon, the battery charge gauge, and the low-battery warning provide information on page 16. Do... ing a B atte r y 45 CAUTION: Misuse of the battery may leak and cause personal injury or equipment damage. The Battery Meter window displays status, charge level, and charge completion time for advice on AC power. • The battery is connected to display the QuickSet Battery ...
...battery. Damaged batteries may increase the risk of the media base battery. Checking the Battery Charge The Dell QuickSet Battery Meter, the Microsoft® Windows® Power Meter window and icon, the battery charge gauge, and the low-battery warning provide information on page 16. Do... ing a B atte r y 45 CAUTION: Misuse of the battery may leak and cause personal injury or equipment damage. The Battery Meter window displays status, charge level, and charge completion time for advice on AC power. • The battery is connected to display the QuickSet Battery ...
Owner's Manual
Page 46
... computer to an electrical outlet. Low-Battery Warning NOTICE: To avoid losing or corrupting data, save your work immediately after a low-battery warning. www.dell.com | support.dell.com Microsoft® Windows® Power Meter The Windows Power Meter indicates the remaining battery charge. To access help, see "Power Management" in the Dell Inspiron Help file.
... computer to an electrical outlet. Low-Battery Warning NOTICE: To avoid losing or corrupting data, save your work immediately after a low-battery warning. www.dell.com | support.dell.com Microsoft® Windows® Power Meter The Windows Power Meter indicates the remaining battery charge. To access help, see "Power Management" in the Dell Inspiron Help file.
Owner's Manual
Page 54
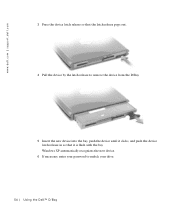
www.dell.com | support.dell.com 3 Press the device latch release so that the latch release pops out. 4 Pull the device by the latch release to unlock your drive. 54 U s i n g t h e D e l l ™ D / B ay Windows XP automatically recognizes the new device. 6 If necessary, enter your password to remove the device from the D/Bay. 5 Insert the new device into the bay, push the device until it clicks, and push the device latch release in so that it is flush with the bay.
www.dell.com | support.dell.com 3 Press the device latch release so that the latch release pops out. 4 Pull the device by the latch release to unlock your drive. 54 U s i n g t h e D e l l ™ D / B ay Windows XP automatically recognizes the new device. 6 If necessary, enter your password to remove the device from the D/Bay. 5 Insert the new device into the bay, push the device until it clicks, and push the device latch release in so that it is flush with the bay.
Owner's Manual
Page 56
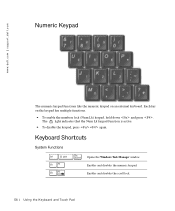
www.dell.com | support.dell.com Numeric Keypad The numeric keypad functions like the numeric keypad on the keypad has multiple functions. • To enable the numbers lock (Num Lk) keypad, hold down and press . Enables and disables the numeric keypad. Enables and disables the scroll lock. 56 Using the Ke yboard and To uch Pa d Keyboard Shortcuts System Functions Opens the Windows Task Manager window. The 9 light indicates that the Num Lk keypad function is active. • To disable the keypad, press again. Each key on an external keyboard.
www.dell.com | support.dell.com Numeric Keypad The numeric keypad functions like the numeric keypad on the keypad has multiple functions. • To enable the numbers lock (Num Lk) keypad, hold down and press . Enables and disables the numeric keypad. Enables and disables the scroll lock. 56 Using the Ke yboard and To uch Pa d Keyboard Shortcuts System Functions Opens the Windows Task Manager window. The 9 light indicates that the Num Lk keypad function is active. • To disable the keypad, press again. Each key on an external keyboard.


