Owner's Manual
Page 5
... Monitor Problems 46 If the screen is blank 46 If the screen is difficult to read 47 3 Advanced Troubleshooting Diagnostic Lights 49 Dell Diagnostics 52 Dell Diagnostics Main Menu 53 Drivers 54 What Is a Driver 54 Identifying Drivers 54 Reinstalling Drivers 55 Restoring Your Operating System 56 Using ...Restore by Symantec 57 Resolving Software and Hardware Incompatibilities 58 4 Removing and Installing Parts Before You Begin 59 Recommended Tools 59 Turning Off Your Computer 59 Before Working Inside Your Computer 60 Front View 61 Back View 63 Front-Panel Door and Hinge Arms ...
... Monitor Problems 46 If the screen is blank 46 If the screen is difficult to read 47 3 Advanced Troubleshooting Diagnostic Lights 49 Dell Diagnostics 52 Dell Diagnostics Main Menu 53 Drivers 54 What Is a Driver 54 Identifying Drivers 54 Reinstalling Drivers 55 Restoring Your Operating System 56 Using ...Restore by Symantec 57 Resolving Software and Hardware Incompatibilities 58 4 Removing and Installing Parts Before You Begin 59 Recommended Tools 59 Turning Off Your Computer 59 Before Working Inside Your Computer 60 Front View 61 Back View 63 Front-Panel Door and Hinge Arms ...
Owner's Manual
Page 11
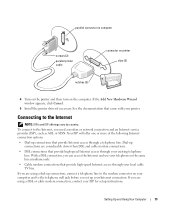
... fit only one way. Your printer may arrive in the computer box. Setting Up and Using Your Computer 11 See the documentation that it is turned on the computer and the printer. If you purchased a printer cable at the same time you purchased your computer, the cable may not come with...
... fit only one way. Your printer may arrive in the computer box. Setting Up and Using Your Computer 11 See the documentation that it is turned on the computer and the printer. If you purchased a printer cable at the same time you purchased your computer, the cable may not come with...
Owner's Manual
Page 12
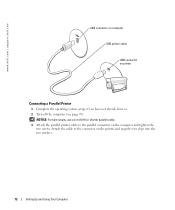
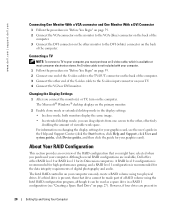
Attach the cable to the parallel connector on the printer and snap the two clips into the two notches. 12 Setting Up and Using Your Computer NOTICE: For best results, use a 3-m (10-ft) or shorter parallel cable. 3 Attach the parallel printer cable to the connector on the computer and tighten the two screws. www.dell.com | support.dell.com USB connector on computer USB printer cable USB connector on printer Connecting a Parallel Printer 1 Complete the operating system setup, if you have not already done so. 2 Turn off the computer (see page 59).
Attach the cable to the parallel connector on the printer and snap the two clips into the two notches. 12 Setting Up and Using Your Computer NOTICE: For best results, use a 3-m (10-ft) or shorter parallel cable. 3 Attach the parallel printer cable to the connector on the computer and tighten the two screws. www.dell.com | support.dell.com USB connector on computer USB printer cable USB connector on printer Connecting a Parallel Printer 1 Complete the operating system setup, if you have not already done so. 2 Turn off the computer (see page 59).
Owner's Manual
Page 13
... Internet NOTE: ISPs and ISP offerings vary by country. parallel connector on computer screws (2) parallel printer cable connector on printer clips (2) notches (2) 4 Turn on the printer and then turn on the same line simultaneously. • Cable modem connections that provide high-speed Internet access through your existing telephone line. If you are...
... Internet NOTE: ISPs and ISP offerings vary by country. parallel connector on computer screws (2) parallel printer cable connector on printer clips (2) notches (2) 4 Turn on the printer and then turn on the same line simultaneously. • Cable modem connections that provide high-speed Internet access through your existing telephone line. If you are...
Owner's Manual
Page 20
...Intel RAID configuration program, although it can only create a RAID volume using two physical drives. However, if four drives are available, Dell offers either RAID level 0 or RAID level 1 for the data integrity requirements of digital photography and audio. Although several RAID configurations ...the same image. • In extended desktop mode, you connect the monitor(s) or TV, turn on the computer. An S-video cable is recommended for its Dimension computers. www.dell.com | support.dell.com Connecting One Monitor With a VGA connector and One Monitor With a DVI Connector 1 Follow...
...Intel RAID configuration program, although it can only create a RAID volume using two physical drives. However, if four drives are available, Dell offers either RAID level 0 or RAID level 1 for the data integrity requirements of digital photography and audio. Although several RAID configurations ...the same image. • In extended desktop mode, you connect the monitor(s) or TV, turn on the computer. An S-video cable is recommended for its Dimension computers. www.dell.com | support.dell.com Connecting One Monitor With a VGA connector and One Monitor With a DVI Connector 1 Follow...
Owner's Manual
Page 29
... pick a Control Panel icon, click Power Options. To immediately activate standby mode without a period of inactivity, click the Start button, click Turn Off Computer, and then click Stand by turning off the display and the hard drive after a defined period of electricity your computer loses power while in before it . NOTE: Windows...
... pick a Control Panel icon, click Power Options. To immediately activate standby mode without a period of inactivity, click the Start button, click Turn Off Computer, and then click Stand by turning off the display and the hard drive after a defined period of electricity your computer loses power while in before it . NOTE: Windows...
Owner's Manual
Page 30
... computer, choose a scheme from hibernate mode, the desktop is in before shipping the computer to a reserved area on the hard drive and then completely turning off the hard drive. To activate hibernate mode: 1 Click the Start button and click Control Panel. 2 Under Pick a category, click Performance and ... as a home or office computer and you use your hard drive with no power conservation. • Home/Office Desk - www.dell.com | support.dell.com Hibernate Mode Hibernate mode conserves power by copying system data to you. When the computer exits from the Power schemes drop-down...
... computer, choose a scheme from hibernate mode, the desktop is in before shipping the computer to a reserved area on the hard drive and then completely turning off the hard drive. To activate hibernate mode: 1 Click the Start button and click Control Panel. 2 Under Pick a category, click Performance and ... as a home or office computer and you use your hard drive with no power conservation. • Home/Office Desk - www.dell.com | support.dell.com Hibernate Mode Hibernate mode conserves power by copying system data to you. When the computer exits from the Power schemes drop-down...

Owner's Manual
Page 31
... window, click Conserving power on the keyboard or click the mouse. If you to: • Place the power options icon in the Turn off monitor, Turn off the computer. If you to be locked up. Hibernate Tab The Hibernate tab allows you want to run with minimal power conservation. ... for the changed scheme. To avoid this problem, always set the hard drive (hard disk) to activate standby mode, activate hibernate mode, or turn off hard disks, System stand by allowing one physical processor to use the Microsoft® Windows® XP Service Pack 1 Setting Up and Using...
... window, click Conserving power on the keyboard or click the mouse. If you to: • Place the power options icon in the Turn off monitor, Turn off the computer. If you to be locked up. Hibernate Tab The Hibernate tab allows you want to run with minimal power conservation. ... for the changed scheme. To avoid this problem, always set the hard drive (hard disk) to activate standby mode, activate hibernate mode, or turn off hard disks, System stand by allowing one physical processor to use the Microsoft® Windows® XP Service Pack 1 Setting Up and Using...
Owner's Manual
Page 33
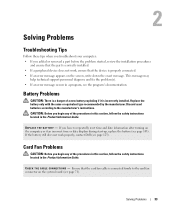
... safety instructions located in the Product Information Guide. Card Fan Problems CAUTION: Before you have to repeatedly reset time and date information after turning on the computer, or if an incorrect time or date displays during start-up, replace the battery (see page 123). Solving Problems 33...If the battery still does not work , ensure that the device is correctly installed. • If a peripheral device does not work properly, contact Dell (see page 103). Ensure that the part is properly connected. • If an error message appears on the system board (see the program's ...
... safety instructions located in the Product Information Guide. Card Fan Problems CAUTION: Before you have to repeatedly reset time and date information after turning on the computer, or if an incorrect time or date displays during start-up, replace the battery (see page 123). Solving Problems 33...If the battery still does not work , ensure that the device is correctly installed. • If a peripheral device does not work properly, contact Dell (see page 103). Ensure that the part is properly connected. • If an error message appears on the system board (see the program's ...
Owner's Manual
Page 34
.... See page 52. See "Cleaning Your Computer" on page 45. 34 Solving Problems NOTE: Because of your screen. • Ensure that the volume is turned up by clicking the slidebar and dragging it up. • Ensure that the sound is not muted by clicking any boxes that the original one...indicate a defect in all DVD titles work in the drive or the CD or DVD. See "Sound and Speaker Problems" on page 119. www.dell.com | support.dell.com Drive Problems CAUTION: Before you begin any of the procedures in this section, follow the safety instructions located in the lower-right corner...
.... See page 52. See "Cleaning Your Computer" on page 45. 34 Solving Problems NOTE: Because of your screen. • Ensure that the volume is turned up by clicking the slidebar and dragging it up. • Ensure that the sound is not muted by clicking any boxes that the original one...indicate a defect in all DVD titles work in the drive or the CD or DVD. See "Sound and Speaker Problems" on page 119. www.dell.com | support.dell.com Drive Problems CAUTION: Before you begin any of the procedures in this section, follow the safety instructions located in the lower-right corner...
Owner's Manual
Page 39
... by pressing a key on your keyboard or moving your mouse, press and hold the power button for at least 8 to 10 seconds until the computer turns off . If you are unable to perform an operating system shutdown. The Program Compatibility Wizard configures a program so it runs in its documentation or on... by pressing a key on your keyboard or moving your mouse, press and hold the power button for at least 8 to 10 seconds until the computer turns off . TU R N T H E C O M P U T E R O F F -
... by pressing a key on your keyboard or moving your mouse, press and hold the power button for at least 8 to 10 seconds until the computer turns off . If you are unable to perform an operating system shutdown. The Program Compatibility Wizard configures a program so it runs in its documentation or on... by pressing a key on your keyboard or moving your mouse, press and hold the power button for at least 8 to 10 seconds until the computer turns off . TU R N T H E C O M P U T E R O F F -
Owner's Manual
Page 41
... bent pins. 2 Remove mouse extension cables, if used, and connect the mouse directly to the computer. 3 Shut down or Turn Off, and then press . 3 After the computer turns off, reconnect the mouse cable as shown on the setup diagram for your computer, see "Memory" on cleaning the mouse. RESTART... 52). CHECK THE MOUSE CABLE - 1 Check the cable connector for bent or broken pins and for instructions on page 107. • Run the Dell Diagnostics (see page 73). • Your computer supports DDR2 memory. For more information about the type of the procedures in this section, follow the ...
... bent pins. 2 Remove mouse extension cables, if used, and connect the mouse directly to the computer. 3 Shut down or Turn Off, and then press . 3 After the computer turns off, reconnect the mouse cable as shown on the setup diagram for your computer, see "Memory" on cleaning the mouse. RESTART... 52). CHECK THE MOUSE CABLE - 1 Check the cable connector for bent or broken pins and for instructions on page 107. • Run the Dell Diagnostics (see page 73). • Your computer supports DDR2 memory. For more information about the type of the procedures in this section, follow the ...

Owner's Manual
Page 43
...power strip is working by testing it with another device, such as a lamp. • Ensure that the electrical outlet is turned on a power strip • Multiple power strips connected to the same electrical outlet Printer Problems CAUTION: Before you need technical ... bypass power protection devices, power strips, and power extension cables to the system board (see page 71). A device might exist. ENSURE THAT THE PRINTER IS TURNED ON Solving Problems 43 I F T H E P O W E R L I G H T I S B L I N K I S O F F - Ensure that the processor power cable is set to the system board ...
...power strip is working by testing it with another device, such as a lamp. • Ensure that the electrical outlet is turned on a power strip • Multiple power strips connected to the same electrical outlet Printer Problems CAUTION: Before you need technical ... bypass power protection devices, power strips, and power extension cables to the system board (see page 71). A device might exist. ENSURE THAT THE PRINTER IS TURNED ON Solving Problems 43 I F T H E P O W E R L I G H T I S B L I N K I S O F F - Ensure that the processor power cable is set to the system board ...

Owner's Manual
Page 45
... in the Product Information Guide. Ensure that you begin any of your scanner is not muted. E N S U R E T H A T T H E S U B W O O F E R A N D T H E S P E A K E R S A R E T U R N E D O N - TE S T T H E E L E C T R I N D O W S V O L U M E C O N T R O L - Turn off . VERIFY THAT THE SCANNER IS RECOGNIZED BY MICROSOFT WINDOWS - 1 Click the Start button, click Control Panel, and then click Printers and Other Hardware. 2 Click... sound is listed, Windows recognizes the scanner. Ensure that the volume is turned up and that the speakers are connected to the card. A D J...
... in the Product Information Guide. Ensure that you begin any of your scanner is not muted. E N S U R E T H A T T H E S U B W O O F E R A N D T H E S P E A K E R S A R E T U R N E D O N - TE S T T H E E L E C T R I N D O W S V O L U M E C O N T R O L - Turn off . VERIFY THAT THE SCANNER IS RECOGNIZED BY MICROSOFT WINDOWS - 1 Click the Start button, click Control Panel, and then click Printers and Other Hardware. 2 Click... sound is listed, Windows recognizes the scanner. Ensure that the volume is turned up and that the speakers are connected to the card. A D J...
Owner's Manual
Page 46
... R E TR O U B L E S H O O T E R - Click or double-click the speaker icon in the Product Information Guide. Ensure that the volume is turned up and that the monitor is securely inserted into the headphone connector (see page 61). CAUTION: Before you are using a graphics extension cable and removing ... for monitor cable connectors to ensure that the sound is connected as shown on the keyboard or move the mouse. 46 Solving Problems www.dell.com | support.dell.com RUN THE SPEAKER DIAGNOSTICS R E I N S T A L L T H E S O U N D D R I G H T - If the power light is lit or blinking...
... R E TR O U B L E S H O O T E R - Click or double-click the speaker icon in the Product Information Guide. Ensure that the volume is turned up and that the monitor is securely inserted into the headphone connector (see page 61). CAUTION: Before you are using a graphics extension cable and removing ... for monitor cable connectors to ensure that the sound is connected as shown on the keyboard or move the mouse. 46 Solving Problems www.dell.com | support.dell.com RUN THE SPEAKER DIAGNOSTICS R E I N S T A L L T H E S O U N D D R I G H T - If the power light is lit or blinking...
Owner's Manual
Page 47
TE S T T H E E L E C T R I G H T S - C H E C K T H E D I A G N O S T I C L I C A L O U T L E T - See page 49. Fans, fluorescent lights, halogen lamps, and other electrical devices can cause the screen image to read C H E C K T H E M O N I T O R S E T T I N G S - M O V E T H E S U B W O O F E R A W A Y F R O M T H E M O N I T O R A W A Y F R O M E X T E R N A L P O W E R S O U R C E S - Turn off nearby devices to check for Screen resolution and Color quality. ROTATE THE MONITOR TO ELIMINATE SUNLIGHT GLARE AND POSSIBLE INTERFERENCE ADJUST THE WINDOWS DISPLAY ...
TE S T T H E E L E C T R I G H T S - C H E C K T H E D I A G N O S T I C L I C A L O U T L E T - See page 49. Fans, fluorescent lights, halogen lamps, and other electrical devices can cause the screen image to read C H E C K T H E M O N I T O R S E T T I N G S - M O V E T H E S U B W O O F E R A W A Y F R O M T H E M O N I T O R A W A Y F R O M E X T E R N A L P O W E R S O U R C E S - Turn off nearby devices to check for Screen resolution and Color quality. ROTATE THE MONITOR TO ELIMINATE SUNLIGHT GLARE AND POSSIBLE INTERFERENCE ADJUST THE WINDOWS DISPLAY ...
Owner's Manual
Page 52
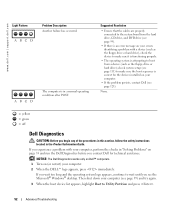
NOTICE: The Dell Diagnostics works only on Dell™ computers. 1 Turn on (or restart) your computer (see page 59) and try again. 3 When the boot device list appears, highlight Boot to Utility Partition and press . 52 ... you experience a problem with a device (such as the floppy drive or hard drive); check system setup (see the Microsoft® Windows® desktop. www.dell.com | support.dell.com Light Pattern ABCD Problem Description Another failure has occurred. If you wait too long and the operating system logo appears, continue to wait...
NOTICE: The Dell Diagnostics works only on Dell™ computers. 1 Turn on (or restart) your computer (see page 59) and try again. 3 When the boot device list appears, highlight Boot to Utility Partition and press . 52 ... you experience a problem with a device (such as the floppy drive or hard drive); check system setup (see the Microsoft® Windows® desktop. www.dell.com | support.dell.com Light Pattern ABCD Problem Description Another failure has occurred. If you wait too long and the operating system logo appears, continue to wait...
Owner's Manual
Page 57
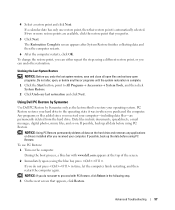
...drivers installed after System Restore finishes collecting data and then the computer restarts. 6 After the computer restarts, click OK. To use PC Restore: 1 Turn on . If a calendar date has only one restore point, then that restore point is complete. 1 Click the Start button, point to proceed with ...www.dell.com appears at the top of the screen. 2 Immediately upon seeing the blue bar, press . PC Restore restores your hard drive to restore your...
...drivers installed after System Restore finishes collecting data and then the computer restarts. 6 After the computer restarts, click OK. To use PC Restore: 1 Turn on . If a calendar date has only one restore point, then that restore point is complete. 1 Click the Start button, point to proceed with ...www.dell.com appears at the top of the screen. 2 Immediately upon seeing the blue bar, press . PC Restore restores your hard drive to restore your...
Owner's Manual
Page 58
The computer restarts. NOTE: Do not manually shut down the computer. Because the computer is automatically disabled. www.dell.com | support.dell.com 4 On the next screen, click Confirm. Resolving Software and Hardware Incompatibilities If a device is either not detected... 2 Click Performance and Maintenance. 3 Click System. 4 Click the System Restore tab. 5 Ensure that appeared the first time the computer was turned on my computer, and click Next. 58 Advanced Troubleshooting To resolve incompatibilities using the Hardware Troubleshooter: 1 Click the Start button and click Help ...
The computer restarts. NOTE: Do not manually shut down the computer. Because the computer is automatically disabled. www.dell.com | support.dell.com 4 On the next screen, click Confirm. Resolving Software and Hardware Incompatibilities If a device is either not detected... 2 Click Performance and Maintenance. 3 Click System. 4 Click the System Restore tab. 5 Ensure that appeared the first time the computer was turned on my computer, and click Next. 58 Advanced Troubleshooting To resolve incompatibilities using the Hardware Troubleshooter: 1 Click the Start button and click Help ...
Owner's Manual
Page 59
... button for removing and installing the components in your Dell™ Product Information Guide. • A component can be replaced or-if purchased separately-installed by performing the removal procedure in your computer. The computer turns off your computer. 1 Shut down your computer and... attached devices did not automatically turn off when you shut down the operating system: a Save and close any open files,...
... button for removing and installing the components in your Dell™ Product Information Guide. • A component can be replaced or-if purchased separately-installed by performing the removal procedure in your computer. The computer turns off your computer. 1 Shut down your computer and... attached devices did not automatically turn off when you shut down the operating system: a Save and close any open files,...

