Owner's Manual
Page 1
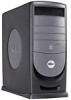
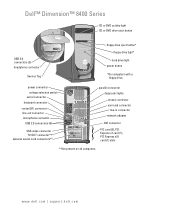
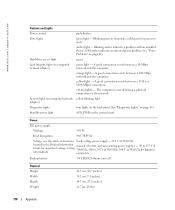
www.dell.com | support.dell.com power connector voltage selection switch serial connector keyboard connector center/LFE connector line-out connector microphone connector USB 2.0 connectors (6) VGA video connector TV-OUT connector... card (3), PCI Express x1 card (1), PCI Express x16 card (1) slots **Not present on all computers. Dell™ Dimension™ 8400 Series CD or DVD activity light CD or DVD drive eject button USB 2.0 connectors (2) headphone connector Service Tag floppy drive eject button* floppy drive light* hard drive light power button *On computers with a floppy drive.
www.dell.com | support.dell.com power connector voltage selection switch serial connector keyboard connector center/LFE connector line-out connector microphone connector USB 2.0 connectors (6) VGA video connector TV-OUT connector... card (3), PCI Express x1 card (1), PCI Express x16 card (1) slots **Not present on all computers. Dell™ Dimension™ 8400 Series CD or DVD activity light CD or DVD drive eject button USB 2.0 connectors (2) headphone connector Service Tag floppy drive eject button* floppy drive light* hard drive light power button *On computers with a floppy drive.
Owner's Manual
Page 29
... hard drive, or you can reduce the amount of electricity your computer loses power while in standby mode, it . To immediately activate standby mode without a period of inactivity, click the Start button, click Turn Off Computer, and then click Stand by turning off the display...and the hard drive after a defined period of inactivity: 1 Click the Start button and click Control Panel. 2 Under Pick a category, click Performance and Maintenance. 3 Under or pick a Control Panel icon, click Power Options. NOTE: Windows XP Professional includes security and networking features not available in ...
... hard drive, or you can reduce the amount of electricity your computer loses power while in standby mode, it . To immediately activate standby mode without a period of inactivity, click the Start button, click Turn Off Computer, and then click Stand by turning off the display...and the hard drive after a defined period of inactivity: 1 Click the Start button and click Control Panel. 2 Under Pick a category, click Performance and Maintenance. 3 Under or pick a Control Panel icon, click Power Options. NOTE: Windows XP Professional includes security and networking features not available in ...
Owner's Manual
Page 30
... mode, press the power button. To access the Power Options Properties window: 1 Click the Start button and click Control Panel. 2 Under Pick a category, click Performance and Maintenance. 3 Under or pick a Control Panel icon, click Power Options. 4 Define your hard drive with no power conservation. • Home...settings, hibernate mode settings, and other power settings in hibernate mode. Each scheme has different settings for traveling. 30 Setting Up and Using Your Computer www.dell.com | support.dell.com Hibernate Mode Hibernate mode conserves power by copying system data to a ...
... mode, press the power button. To access the Power Options Properties window: 1 Click the Start button and click Control Panel. 2 Under Pick a category, click Performance and Maintenance. 3 Under or pick a Control Panel icon, click Power Options. 4 Define your hard drive with no power conservation. • Home...settings, hibernate mode settings, and other power settings in hibernate mode. Each scheme has different settings for traveling. 30 Setting Up and Using Your Computer www.dell.com | support.dell.com Hibernate Mode Hibernate mode conserves power by copying system data to a ...

Owner's Manual
Page 31
...out for a scheme field permanently changes the default settings for that scheme, unless you want your computer. For more information on power management options: 1 Click the Start button and click Help and Support. 2 In the Help and Support window, click Performance and maintenance. 3 In the Performance and...mode, or turn off the computer. To program these functions, click an option from standby mode or hibernate mode. • Program the power button to function as two logical processors, capable of time. It is an Intel® technology that you use the hibernate settings you for...
...out for a scheme field permanently changes the default settings for that scheme, unless you want your computer. For more information on power management options: 1 Click the Start button and click Help and Support. 2 In the Help and Support window, click Performance and maintenance. 3 In the Performance and...mode, or turn off the computer. To program these functions, click an option from standby mode or hibernate mode. • Program the power button to function as two logical processors, capable of time. It is an Intel® technology that you use the hibernate settings you for...
Owner's Manual
Page 35
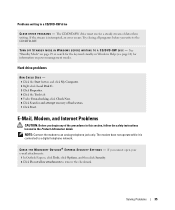
... Start. The modem does not operate while it is interrupted, an error occurs. R W D I N G T O A C D / D V D - See "Standby Mode" on power management modes. E-Mail, Modem, and Internet Problems CAUTION: Before you cannot open your e-mail attachments: 1 In Outlook Express, click Tools, click Options, and then click...in Windows Help (see page 10) for and attempt recovery of data when writing. Hard drive problems RUN CHECK DISK - 1 Click the Start button and click My Computer. 2 Right-click Local Disk C:. 3 Click Properties. 4 Click the Tools tab. 5 Under Error-checking, click Check...
... Start. The modem does not operate while it is interrupted, an error occurs. R W D I N G T O A C D / D V D - See "Standby Mode" on power management modes. E-Mail, Modem, and Internet Problems CAUTION: Before you cannot open your e-mail attachments: 1 In Outlook Express, click Tools, click Options, and then click...in Windows Help (see page 10) for and attempt recovery of data when writing. Hard drive problems RUN CHECK DISK - 1 Click the Start button and click My Computer. 2 Right-click Local Disk C:. 3 Click Properties. 4 Click the Tools tab. 5 Under Error-checking, click Check...
Owner's Manual
Page 39
...usually includes installation instructions in an environment similar to nonWindows XP operating system environments. 1 Click the Start button, point to All Programs→ Accessories, and then click Program Compatibility Wizard. 2 In the welcome ...End Task. If you are unable to get a response by pressing a key on your keyboard or moving your mouse, press and hold the power button for at least 8 to 10 seconds until the computer turns off . Then restart your computer. TU R N T H E C O...mouse, press and hold the power button for at least 8 to 10 seconds until the computer turns off .
...usually includes installation instructions in an environment similar to nonWindows XP operating system environments. 1 Click the Start button, point to All Programs→ Accessories, and then click Program Compatibility Wizard. 2 In the welcome ...End Task. If you are unable to get a response by pressing a key on your keyboard or moving your mouse, press and hold the power button for at least 8 to 10 seconds until the computer turns off . Then restart your computer. TU R N T H E C O...mouse, press and hold the power button for at least 8 to 10 seconds until the computer turns off .
Owner's Manual
Page 42
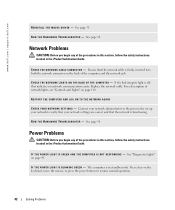
...network connector on the keyboard, move the mouse, or press the power button to verify that your network settings are correct and that the ... K T H E N E T W O R K C A B L E C O N N E C T O R - Replace the network cable. R U N T H E H A R D W A R E TR O U B L E S H O O T E R - C H E C K T H E N E T W O R K L I V E R - The computer is functioning. www.dell.com | support.dell.com R E I N S T A L L T H E M O U S E D R I G H T S O N T H E B A C K O F T H E C O M P U T E R - See page 55. RESTART THE COMPUTER AND LOG ON TO THE NETWORK AGAIN C H E C K Y O U R N E T W O R K S E T T I N G S...
...network connector on the keyboard, move the mouse, or press the power button to verify that your network settings are correct and that the ... K T H E N E T W O R K C A B L E C O N N E C T O R - Replace the network cable. R U N T H E H A R D W A R E TR O U B L E S H O O T E R - C H E C K T H E N E T W O R K L I V E R - The computer is functioning. www.dell.com | support.dell.com R E I N S T A L L T H E M O U S E D R I G H T S O N T H E B A C K O F T H E C O M P U T E R - See page 55. RESTART THE COMPUTER AND LOG ON TO THE NETWORK AGAIN C H E C K Y O U R N E T W O R K S E T T I N G S...
Owner's Manual
Page 46
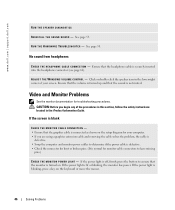
... - • Ensure that the monitor is turned on the setup diagram for your screen. If the power light is off, firmly press the button to ensure that the graphics cable is normal for troubleshooting procedures. Video and Monitor Problems See the monitor... documentation for monitor cable connectors to determine if the power cable is defective. • Check the connector for bent or broken pins. (It is connected as shown on . www.dell.com | support.dell...
... - • Ensure that the monitor is turned on the setup diagram for your screen. If the power light is off, firmly press the button to ensure that the graphics cable is normal for troubleshooting procedures. Video and Monitor Problems See the monitor... documentation for monitor cable connectors to determine if the power cable is defective. • Check the connector for bent or broken pins. (It is connected as shown on . www.dell.com | support.dell...
Owner's Manual
Page 49
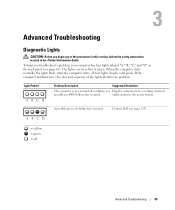
...four lights labeled "A," "B," "C," and "D" on the back panel (see page 123). The lights can be yellow or green. outlet and press the power button. After the computer starts, all four lights display solid green. A possible processor failure has occurred. ABCD = yellow = green = off condition or...occurred. When the computer starts normally, the lights flash. To help you begin any of the lights identify the problem. Contact Dell (see page 63). Light Pattern ABCD Problem Description Suggested Resolution The computer is in the Product Information Guide. If the computer...
...four lights labeled "A," "B," "C," and "D" on the back panel (see page 123). The lights can be yellow or green. outlet and press the power button. After the computer starts, all four lights display solid green. A possible processor failure has occurred. ABCD = yellow = green = off condition or...occurred. When the computer starts normally, the lights flash. To help you begin any of the lights identify the problem. Contact Dell (see page 63). Light Pattern ABCD Problem Description Suggested Resolution The computer is in the Product Information Guide. If the computer...
Owner's Manual
Page 59
.... If your computer and attached devices did not automatically turn off when you turn off your operating system, press and hold the power button for removing and installing the components in reverse order. The computer turns off after the operating system shutdown process finishes. 2 Ensure ...Computer" (see page 59) and "Before Working Inside Your Computer" (see page 60). • You have read the safety information in your Dell™ Product Information Guide. • A component can be replaced or-if purchased separately-installed by performing the removal procedure in your computer. b...
.... If your computer and attached devices did not automatically turn off when you turn off your operating system, press and hold the power button for removing and installing the components in reverse order. The computer turns off after the operating system shutdown process finishes. 2 Ensure ...Computer" (see page 59) and "Before Working Inside Your Computer" (see page 60). • You have read the safety information in your Dell™ Product Information Guide. • A component can be replaced or-if purchased separately-installed by performing the removal procedure in your computer. b...
Owner's Manual
Page 60
...CAUTION: To guard against electrical shock, always unplug your computer and all attached devices from their electrical outlets, and then press the power button to help ensure your computer. NOTICE: When you work, periodically touch an unpainted metal surface to avoid bending any static electricity that...connector pins. Hold a card by its edges or by its strain-relief loop, not on your own personal safety. www.dell.com | support.dell.com Before Working Inside Your Computer Use the following steps before you connect a cable, ensure that both connectors are disconnecting this ...
...CAUTION: To guard against electrical shock, always unplug your computer and all attached devices from their electrical outlets, and then press the power button to help ensure your computer. NOTICE: When you work, periodically touch an unpainted metal surface to avoid bending any static electricity that...connector pins. Hold a card by its edges or by its strain-relief loop, not on your own personal safety. www.dell.com | support.dell.com Before Working Inside Your Computer Use the following steps before you connect a cable, ensure that both connectors are disconnecting this ...
Owner's Manual
Page 62
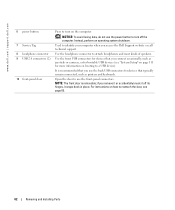
...when you remove it or accidentally knock it snaps back in place. Open the door to attach headphones and most kinds of speakers. www.dell.com | support.dell.com 6 power button 7 Service Tag 8 headphone connector 9 USB 2.0 connectors (2) 10 front-panel door Press to turn off its hinges, it off the ... is recommended that you use the front-panel connectors. For instructions on the computer. NOTICE: To avoid losing data, do not use the power button to turn on how to reattach the door, see "System Setup" on booting to a USB device). Use the headphone connector to use ...
...when you remove it or accidentally knock it snaps back in place. Open the door to attach headphones and most kinds of speakers. www.dell.com | support.dell.com 6 power button 7 Service Tag 8 headphone connector 9 USB 2.0 connectors (2) 10 front-panel door Press to turn off its hinges, it off the ... is recommended that you use the front-panel connectors. For instructions on the computer. NOTICE: To avoid losing data, do not use the power button to turn on how to reattach the door, see "System Setup" on booting to a USB device). Use the headphone connector to use ...
Owner's Manual
Page 110
...dell.com | support.dell.com Controls and Lights Power control Power light Hard-drive access light Link integrity light (on integrated network adapter) Activity light (on state. green green light - yellow blinking light four lights on the back panel (See "Diagnostic Lights" on page 49.) AUX_PWR on the system board Power DC power...physical connection to 265 V at 50/60 Hz; 100 V at 50/60 Hz for power-on integrated network adapter) Diagnostic lights Standby power light push button green light - solid green for Japanese information) computers Backup battery 3-V CR2032 lithium coin ...
...dell.com | support.dell.com Controls and Lights Power control Power light Hard-drive access light Link integrity light (on integrated network adapter) Activity light (on state. green green light - yellow blinking light four lights on the back panel (See "Diagnostic Lights" on page 49.) AUX_PWR on the system board Power DC power...physical connection to 265 V at 50/60 Hz; 100 V at 50/60 Hz for power-on integrated network adapter) Diagnostic lights Standby power light push button green light - solid green for Japanese information) computers Backup battery 3-V CR2032 lithium coin ...
Owner's Manual
Page 118
www.dell.com | support.dell.com PASS CLR CMOS (page 119) 2 Locate the 3-pin password jumper (PASS) on the system board (see page 104). NOTE: When you receive your computer, ... (see page 59). 6 Turn off the monitor and disconnect it into the network device and then plug it from the electrical outlet. 7 Disconnect the computer power cable from the electrical outlet, and press the power button to clear the password.
www.dell.com | support.dell.com PASS CLR CMOS (page 119) 2 Locate the 3-pin password jumper (PASS) on the system board (see page 104). NOTE: When you receive your computer, ... (see page 59). 6 Turn off the monitor and disconnect it into the network device and then plug it from the electrical outlet. 7 Disconnect the computer power cable from the electrical outlet, and press the power button to clear the password.
Owner's Manual
Page 141
... PCI slots, 64 removing PCI, 80 removing PCI Express, 85 cards (continued) slots, 64, 75 types supported, 75 CD/DVD drive activity light, 61 eject button, 61 front-panel inserts, 94 installing, 101 problems, 34 removing, 100 CD-RW drive problems, 35 CDs copying, 17 playing, 15 Check Disk, 35 CMOS... headphone, 62 keyboard, 65 line-in, 64 line-out, 64-65 connectors (continued) microphone, 64-65 modem, 64 mouse, 63 network adapter, 65 parallel, 63 power, 63 serial, 65 sound, 64-65 surround, 64 TV-OUT, 64 USB, 62, 65 VGA, 64 video, 64 copying CDs and DVDs, 17 cover closing...
... PCI slots, 64 removing PCI, 80 removing PCI Express, 85 cards (continued) slots, 64, 75 types supported, 75 CD/DVD drive activity light, 61 eject button, 61 front-panel inserts, 94 installing, 101 problems, 34 removing, 100 CD-RW drive problems, 35 CDs copying, 17 playing, 15 Check Disk, 35 CMOS... headphone, 62 keyboard, 65 line-in, 64 line-out, 64-65 connectors (continued) microphone, 64-65 modem, 64 mouse, 63 network adapter, 65 parallel, 63 power, 63 serial, 65 sound, 64-65 surround, 64 TV-OUT, 64 USB, 62, 65 VGA, 64 video, 64 copying CDs and DVDs, 17 cover closing...

Owner's Manual
Page 143
..., 57 PCI cards installing, 76 removing, 80 PCI Express cards card fan, 86 installing, 81 removing, 85 playing CDs, 15 playing DVDs, 15 power button, 62 connector, 63 conserving, 29 hibernate mode, 30-31 managing, 29 options, 30 options, advanced, 31 options, hibernate, 31 options, schemes, 30... problems, 42 standby mode, 29 power light conditions, 42 Power Options Properties, 30 printer cable, 11 connecting, 11 parallel, 12 problems, 43 setting up, 11 USB, 11 problems battery, 33 blue screen...
..., 57 PCI cards installing, 76 removing, 80 PCI Express cards card fan, 86 installing, 81 removing, 85 playing CDs, 15 playing DVDs, 15 power button, 62 connector, 63 conserving, 29 hibernate mode, 30-31 managing, 29 options, 30 options, advanced, 31 options, hibernate, 31 options, schemes, 30... problems, 42 standby mode, 29 power light conditions, 42 Power Options Properties, 30 printer cable, 11 connecting, 11 parallel, 12 problems, 43 setting up, 11 USB, 11 problems battery, 33 blue screen...


