Owner's Manual
Page 5
... is blank 42 If the screen is difficult to read 43 3 Troubleshooting Tools Diagnostic Lights 45 Dell Diagnostics 48 When to Use the Dell Diagnostics 48 Dell Diagnostics Main Menu 48 Drivers 49 What Is a Driver 49 Reinstalling Drivers 50 Resolving Software and ...Hardware Incompatibilities 51 Restoring Your Operating System 51 Using Microsoft Windows XP System Restore 51 4 Removing and Installing Parts Before You Begin 55 Recommended Tools 55 Turning...
... is blank 42 If the screen is difficult to read 43 3 Troubleshooting Tools Diagnostic Lights 45 Dell Diagnostics 48 When to Use the Dell Diagnostics 48 Dell Diagnostics Main Menu 48 Drivers 49 What Is a Driver 49 Reinstalling Drivers 50 Resolving Software and ...Hardware Incompatibilities 51 Restoring Your Operating System 51 Using Microsoft Windows XP System Restore 51 4 Removing and Installing Parts Before You Begin 55 Recommended Tools 55 Turning...
Owner's Manual
Page 14
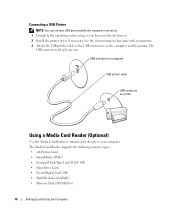
...) Use the Media Card Reader to transfer data directly to your computer. Connecting a USB Printer NOTE: You can connect USB devices while the computer is turned on. 1 Complete the operating system setup, if you have not already done so. 2 Install the printer driver if necessary.
...) Use the Media Card Reader to transfer data directly to your computer. Connecting a USB Printer NOTE: You can connect USB devices while the computer is turned on. 1 Complete the operating system setup, if you have not already done so. 2 Install the printer driver if necessary.

Owner's Manual
Page 16
... in the display settings. • In clone mode, the monitor and TV display the same image. • In extended desktop mode, you connect the TV, turn on the computer. The Microsoft® Windows® desktop displays on computer network device network cable 16 Setting Up and Using Your Computer network adapter...
... in the display settings. • In clone mode, the monitor and TV display the same image. • In extended desktop mode, you connect the TV, turn on the computer. The Microsoft® Windows® desktop displays on computer network device network cable 16 Setting Up and Using Your Computer network adapter...

Owner's Manual
Page 24
... restored to the state it was in certain windows. To immediately activate standby mode without a period of inactivity, click the Start button, click Turn Off Computer, and then click Stand by copying system data to a reserved area on the hard drive and then completely... activate after a time-out. To exit from standby mode, press a key on the keyboard or move the mouse. Standby Mode Standby mode conserves power by turning off the computer. To activate hibernate mode: 1 Click the Start button and click Control Panel. 2 Under Pick a category, click Performance and Maintenance. 3 Under ...
... restored to the state it was in certain windows. To immediately activate standby mode without a period of inactivity, click the Start button, click Turn Off Computer, and then click Stand by copying system data to a reserved area on the hard drive and then completely... activate after a time-out. To exit from standby mode, press a key on the keyboard or move the mouse. Standby Mode Standby mode conserves power by turning off the computer. To activate hibernate mode: 1 Click the Start button and click Control Panel. 2 Under Pick a category, click Performance and Maintenance. 3 Under ...

Owner's Manual
Page 25
...icon, click Power Options. 4 Define your computer to time-out before the hard drive. The Power schemes drop-down menu in the Turn off monitor, Turn off the hard drive. If the computer's hard drive becomes corrupted, Windows XP recreates the hibernate file automatically. Each scheme has different... Changing the time-out for a scheme field permanently changes the default settings for that you want to select one of the computer memory, Dell creates an appropriately sized hibernate mode file before the monitor does, your computer as a home or office computer and you use for the ...
...icon, click Power Options. 4 Define your computer to time-out before the hard drive. The Power schemes drop-down menu in the Turn off monitor, Turn off the hard drive. If the computer's hard drive becomes corrupted, Windows XP recreates the hibernate file automatically. Each scheme has different... Changing the time-out for a scheme field permanently changes the default settings for that you want to select one of the computer memory, Dell creates an appropriately sized hibernate mode file before the monitor does, your computer as a home or office computer and you use for the ...

Owner's Manual
Page 26
... program these functions, click an option from standby mode or hibernate mode. • Program the power button to activate standby mode, activate hibernate mode, or turn off feature. If you want to use Intel Viiv technology is an option for your Windows password before the computer exits from the corresponding drop...
... program these functions, click an option from standby mode or hibernate mode. • Program the power button to activate standby mode, activate hibernate mode, or turn off feature. If you want to use Intel Viiv technology is an option for your Windows password before the computer exits from the corresponding drop...
Owner's Manual
Page 29
... tips when you troubleshoot your antivirus software to check for and remove viruses. Discard used batteries according to repeatedly reset time and date information after turning on the screen, write down the exact message. Replace the battery only with your computer: • If you added or removed a part before the problem... started, review the installation procedures and ensure that the part is correctly installed. • If a peripheral device does not work properly, contact Dell (see page 92). Solving Problems 29
... tips when you troubleshoot your antivirus software to check for and remove viruses. Discard used batteries according to repeatedly reset time and date information after turning on the screen, write down the exact message. Replace the battery only with your computer: • If you added or removed a part before the problem... started, review the installation procedures and ensure that the part is correctly installed. • If a peripheral device does not work properly, contact Dell (see page 92). Solving Problems 29
Owner's Manual
Page 30
...; Click the speaker icon in Windows Help for the keyword standby in the lower-right corner of your screen. • Ensure that the volume is turned up by clicking the slidebar and dragging it up. • Ensure that the sound is not muted by clicking any boxes that the original one...
...; Click the speaker icon in Windows Help for the keyword standby in the lower-right corner of your screen. • Ensure that the volume is turned up by clicking the slidebar and dragging it up. • Ensure that the sound is not muted by clicking any boxes that the original one...

Owner's Manual
Page 35
... by pressing a key on your keyboard or moving your mouse, press and hold the power button for at least 8 to 10 seconds until the computer turns off . The computer stops responding NOTICE: You might lose data if you are unable to 10 seconds until the computer... turns off . TU R N T H E C O M P U T E R O F F - If you are unable to All Programs→ Accessories, and then click Program Compatibility Wizard. 2 In the welcome screen, click Next. 3 Follow the ...
... by pressing a key on your keyboard or moving your mouse, press and hold the power button for at least 8 to 10 seconds until the computer turns off . The computer stops responding NOTICE: You might lose data if you are unable to 10 seconds until the computer... turns off . TU R N T H E C O M P U T E R O F F - If you are unable to All Programs→ Accessories, and then click Program Compatibility Wizard. 2 In the welcome screen, click Next. 3 Follow the ...
Owner's Manual
Page 37
... or frayed cables. 2 Remove mouse extension cables, if used, and connect the mouse directly to highlight Shut down or Turn Off, and then press . 3 After the computer turns off, reconnect the mouse cable as shown on the setup diagram for your computer. RESTART THE COMPUTER - 1 Simultaneously press... to display the Start menu. 2 Type u, press the keyboard arrow keys to the computer. 3 Reconnect the mouse cable as shown on page 95. • Run the Dell ...
... or frayed cables. 2 Remove mouse extension cables, if used, and connect the mouse directly to highlight Shut down or Turn Off, and then press . 3 After the computer turns off, reconnect the mouse cable as shown on the setup diagram for your computer. RESTART THE COMPUTER - 1 Simultaneously press... to display the Start menu. 2 Type u, press the keyboard arrow keys to the computer. 3 Reconnect the mouse cable as shown on page 95. • Run the Dell ...
Owner's Manual
Page 39
... P O W E R L I G H T I S B L I N K I O N - ENSURE THAT THE PRINTER IS TURNED ON Solving Problems 39 The computer is receiving electrical power, but an internal power problem might be malfunctioning or incorrectly installed. • Ensure that ...the processor power cable is set to verify that the computer turns on . Also bypass power protection devices, power strips, and power extension cables to match the AC power at your printer, contact the printer's manufacturer. C H E C K T H...
... P O W E R L I G H T I S B L I N K I O N - ENSURE THAT THE PRINTER IS TURNED ON Solving Problems 39 The computer is receiving electrical power, but an internal power problem might be malfunctioning or incorrectly installed. • Ensure that ...the processor power cable is set to verify that the computer turns on . Also bypass power protection devices, power strips, and power extension cables to match the AC power at your printer, contact the printer's manufacturer. C H E C K T H...

Owner's Manual
Page 41
... lamp. If you did not turn the player volume down or off nearby fans, .... Ensure that the volume is turned up and that you have volume...supplied with the speakers. C H E C K T H E S P E A K E R C A B L E C O N N E C T I S C O N N E C T H E A D P H O N E S F R O M T H E H E A D P H O N E C O N N E C T O R - TE S T T H E E L E C T R I N T E R F E R E N C E - Turn off . E N S U R E T H A T T H E S U B W O O F E R A N D T H E S P E A K E R S A R E T U R N E D O N - E L I M I N A T E P O S S I B L E I C A L O U T L E T - Solving Problems 41 R E I N S T A L L T H E S C A N N E R D...
... lamp. If you did not turn the player volume down or off nearby fans, .... Ensure that the volume is turned up and that you have volume...supplied with the speakers. C H E C K T H E S P E A K E R C A B L E C O N N E C T I S C O N N E C T H E A D P H O N E S F R O M T H E H E A D P H O N E C O N N E C T O R - TE S T T H E E L E C T R I N T E R F E R E N C E - Turn off . E N S U R E T H A T T H E S U B W O O F E R A N D T H E S P E A K E R S A R E T U R N E D O N - E L I M I N A T E P O S S I B L E I C A L O U T L E T - Solving Problems 41 R E I N S T A L L T H E S C A N N E R D...
Owner's Manual
Page 42
... DOCUMENTATION FOR MORE INFORMATION. R E I N S T A L L T H E S O U N D D R I N D O W S V O L U M E C O N T R O L - If the power light is normal for troubleshooting procedures. Ensure that the monitor is turned on. A D J U S T T H E W I V E R - See page 51. No sound from headphones C H E C K T H E H E A D P H O N E C A B L E C O N N E C T I G H T - Ensure that the volume is turned up and that the graphics cable is not muted. If the power light is off, firmly press the button...
... DOCUMENTATION FOR MORE INFORMATION. R E I N S T A L L T H E S O U N D D R I N D O W S V O L U M E C O N T R O L - If the power light is normal for troubleshooting procedures. Ensure that the monitor is turned on. A D J U S T T H E W I V E R - See page 51. No sound from headphones C H E C K T H E H E A D P H O N E C A B L E C O N N E C T I G H T - Ensure that the volume is turned up and that the graphics cable is not muted. If the power light is off, firmly press the button...

Owner's Manual
Page 43
If the screen is difficult to read C H E C K T H E M O N I T O R S E T T I G H T S - Turn off nearby devices to appear "shaky." Solving Problems 43 See the monitor documentation for Screen resolution and Color quality. C H E C K T H E D I A G N O S T I C L I N G S - M O V E T H E M O N I T O R - See page 45. If your speaker ...
If the screen is difficult to read C H E C K T H E M O N I T O R S E T T I G H T S - Turn off nearby devices to appear "shaky." Solving Problems 43 See the monitor documentation for Screen resolution and Color quality. C H E C K T H E D I A G N O S T I C L I N G S - M O V E T H E M O N I T O R - See page 45. If your speaker ...

Owner's Manual
Page 45
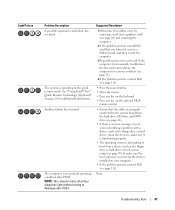
...the computer starts normally, reinstall an additional module. Troubleshooting Tools 45 To help you have identified a faulty module or reinstalled all four lights turn off " Plug the computer into your computer has four lights labeled "1," "2," "3," and "4" on the front panel (see page 111). ... memory failure has occurred. • If you troubleshoot a problem, your computer (see page 65). • If the problem persists, contact Dell (see page 66), and then restart the computer. After the computer completes POST, all modules without error. • If available, install properly ...
...the computer starts normally, reinstall an additional module. Troubleshooting Tools 45 To help you have identified a faulty module or reinstalled all four lights turn off " Plug the computer into your computer has four lights labeled "1," "2," "3," and "4" on the front panel (see page 111). ... memory failure has occurred. • If you troubleshoot a problem, your computer (see page 65). • If the problem persists, contact Dell (see page 66), and then restart the computer. After the computer completes POST, all modules without error. • If available, install properly ...
Owner's Manual
Page 47
...computer starts normally, troubleshoot the last card removed from the computer for the devices installed on your computer. • If the problem persists, contact Dell (see page 64). • If there is an error message on your screen identifying a problem with a device (such as the floppy drive ... to Windows after POST. Another failure has occurred. Light Pattern Problem Description A possible expansion card failure has occurred. NOTE: The computer turns off all four diagnostic lights before booting to the system board from a device (such as the floppy drive or hard drive);
...computer starts normally, troubleshoot the last card removed from the computer for the devices installed on your computer. • If the problem persists, contact Dell (see page 64). • If there is an error message on your screen identifying a problem with a device (such as the floppy drive ... to Windows after POST. Another failure has occurred. Light Pattern Problem Description A possible expansion card failure has occurred. NOTE: The computer turns off all four diagnostic lights before booting to the system board from a device (such as the floppy drive or hard drive);

Owner's Manual
Page 48
NOTICE: The Dell Diagnostics works only on Dell™ computers. 1 Turn on the screen. Dell Diagnostics Main Menu 1 After the Dell Diagnostics loads and the Main Menu screen appears, click the button for technical assistance. Performs a thorough check of devices. Write down your part. When to run the Dell Diagnostics before you contact Dell for the option you...
NOTICE: The Dell Diagnostics works only on Dell™ computers. 1 Turn on the screen. Dell Diagnostics Main Menu 1 After the Dell Diagnostics loads and the Main Menu screen appears, click the button for technical assistance. Performs a thorough check of devices. Write down your part. When to run the Dell Diagnostics before you contact Dell for the option you...

Owner's Manual
Page 53
.... 2 Immediately upon seeing the blue bar, press . If possible, back up the data before using PC Restore. To use PC Restore: 1 Turn on . Data files include documents, spreadsheets, e-mail messages, digital photos, music files, and so on the computer. To see if System Restore is...step. 3 On the next screen that Turn off System Restore is unchecked. Enabling System Restore If you received your computer- Using Dell PC Restore by Symantec only as the last method to complete. Use Dell PC Restore by Symantec NOTE: Dell PC Restore is automatically disabled. NOTICE: ...
.... 2 Immediately upon seeing the blue bar, press . If possible, back up the data before using PC Restore. To use PC Restore: 1 Turn on . Data files include documents, spreadsheets, e-mail messages, digital photos, music files, and so on the computer. To see if System Restore is...step. 3 On the next screen that Turn off System Restore is unchecked. Enabling System Restore If you received your computer- Using Dell PC Restore by Symantec only as the last method to complete. Use Dell PC Restore by Symantec NOTE: Dell PC Restore is automatically disabled. NOTICE: ...
Owner's Manual
Page 54
... partition for Free Space. 7 Click Finish to close the PC Restore Removal window. 8 Restart the computer. 54 Troubleshooting Tools there is restored to c:\dell\utilities\DSR. 3 Double-click the filename DSRIRRemv2.exe. Click Finish and let the computer completely reboot. 6 When prompted, click Yes. The computer restarts... the screens that appear, such as the End User License Agreement, are the same ones that appeared the first time the computer was turned on to the computer as a local administrator. Click Quit; NOTE: Do not manually shut down the computer. If you remove PC Restore...
... partition for Free Space. 7 Click Finish to close the PC Restore Removal window. 8 Restart the computer. 54 Troubleshooting Tools there is restored to c:\dell\utilities\DSR. 3 Double-click the filename DSRIRRemv2.exe. Click Finish and let the computer completely reboot. 6 When prompted, click Yes. The computer restarts... the screens that appear, such as the End User License Agreement, are the same ones that appeared the first time the computer was turned on to the computer as a local administrator. Click Quit; NOTE: Do not manually shut down the computer. If you remove PC Restore...
Owner's Manual
Page 55
... button for removing and installing the components in your Dell™ Product Information Guide. • A component can be replaced or-if purchased separately-installed by performing the removal procedure in your computer. Removing and Installing Parts 55 b In the Turn off computer window, click Turn off . Before Working Inside Your Computer Use the...
... button for removing and installing the components in your Dell™ Product Information Guide. • A component can be replaced or-if purchased separately-installed by performing the removal procedure in your computer. Removing and Installing Parts 55 b In the Turn off computer window, click Turn off . Before Working Inside Your Computer Use the...

