Owner's Manual
Page 10
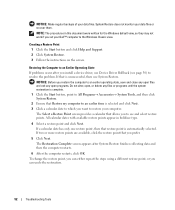
...; Enter the Express Service Code to view the appropriate support site. • Community - The software automatically detects your configuration. 10 Finding Information Upgrade information for your computer and operating system and installs the updates appropriate for components, such premier.support.dell.com. Certified drivers, patches, and software updates • Desktop System Software (DSS)- If you reinstall the operating system for Dell™ 3.5-inch USB floppy drives, Intel® Pentium® M processors, optical drives, and USB devices...
...; Enter the Express Service Code to view the appropriate support site. • Community - The software automatically detects your configuration. 10 Finding Information Upgrade information for your computer and operating system and installs the updates appropriate for components, such premier.support.dell.com. Certified drivers, patches, and software updates • Desktop System Software (DSS)- If you reinstall the operating system for Dell™ 3.5-inch USB floppy drives, Intel® Pentium® M processors, optical drives, and USB devices...
Owner's Manual
Page 14
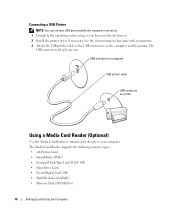
... Setting Up and Using Your Computer USB connector on computer USB printer cable USB connector on printer Using a Media Card Reader (Optional) Use the Media Card Reader to transfer data directly to your printer. 3 Attach the USB printer cable to the USB connectors on . 1 Complete the operating system setup, if you have not already done so. 2 Install the printer driver if necessary. See the documentation that came with your computer. Connecting a USB Printer NOTE: You can connect USB devices while...
... Setting Up and Using Your Computer USB connector on computer USB printer cable USB connector on printer Using a Media Card Reader (Optional) Use the Media Card Reader to transfer data directly to your printer. 3 Attach the USB printer cable to the USB connectors on . 1 Complete the operating system setup, if you have not already done so. 2 Install the printer driver if necessary. See the documentation that came with your computer. Connecting a USB Printer NOTE: You can connect USB devices while...

Owner's Manual
Page 16
... image. • In extended desktop mode, you connect the TV, turn on computer network device network cable 16 Setting Up and Using Your Computer network adapter connector Setting Up a Home and Office Network Connecting to the other end of your graphics card). For information on the computer. The Microsoft® Windows® desktop displays on the monitor. 2 Enable clone mode or extended desktop mode in the Help and Support Center (click the Start button, click Help and Support, click User and system guides, click Device guides...
... image. • In extended desktop mode, you connect the TV, turn on computer network device network cable 16 Setting Up and Using Your Computer network adapter connector Setting Up a Home and Office Network Connecting to the other end of your graphics card). For information on the computer. The Microsoft® Windows® desktop displays on the monitor. 2 Enable clone mode or extended desktop mode in the Help and Support Center (click the Start button, click Help and Support, click User and system guides, click Device guides...
Owner's Manual
Page 21
Adjusting the Volume NOTE: When the speakers are using too much memory and preventing DVD playback, adjust the display properties. 1 Click the Start button and click Control Panel. 2 Under Pick a category, click Appearance and Themes. 3 Under Pick a task..., click Change the screen resolution. 4 In the Display Properties window, click and drag the bar in Screen resolution to change the setting to 800 by 600 pixels. 5 Click the...
Adjusting the Volume NOTE: When the speakers are using too much memory and preventing DVD playback, adjust the display properties. 1 Click the Start button and click Control Panel. 2 Under Pick a category, click Appearance and Themes. 3 Under Pick a task..., click Change the screen resolution. 4 In the Display Properties window, click and drag the bar in Screen resolution to change the setting to 800 by 600 pixels. 5 Click the...
Owner's Manual
Page 37
... mouse. R E I N S T A L L T H E M O U S E D R I V E R - R U N T H E H A R D W A R E TR O U B L E S H O O T E R - See page 109. Connect a properly working mouse to the computer. 3 Reconnect the mouse cable as shown on the setup diagram for your computer. Mouse Problems CAUTION: Before you are following the memory installation guidelines (see page 48). For more information about the type of the procedures in this section, follow the safety instructions located in the Product Information Guide. CHECK THE MOUSE SETTINGS - 1 Click the Start button, click Control Panel...
... mouse. R E I N S T A L L T H E M O U S E D R I V E R - R U N T H E H A R D W A R E TR O U B L E S H O O T E R - See page 109. Connect a properly working mouse to the computer. 3 Reconnect the mouse cable as shown on the setup diagram for your computer. Mouse Problems CAUTION: Before you are following the memory installation guidelines (see page 48). For more information about the type of the procedures in this section, follow the safety instructions located in the Product Information Guide. CHECK THE MOUSE SETTINGS - 1 Click the Start button, click Control Panel...
Owner's Manual
Page 46
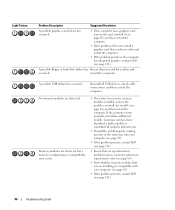
... integrated graphics, contact Dell (see page 111). 46 Troubleshooting Tools Memory modules are detected. A possible USB failure has occurred. Reinstall all power and data cables and occurred. A possible floppy or hard drive failure has Reseat all USB devices, check cable connections, and then restart the computer. Continue until you have identified a faulty module or reinstalled all modules without error. • If available, install properly working memory of the same type...
... integrated graphics, contact Dell (see page 111). 46 Troubleshooting Tools Memory modules are detected. A possible USB failure has occurred. Reinstall all power and data cables and occurred. A possible floppy or hard drive failure has Reseat all USB devices, check cable connections, and then restart the computer. Continue until you have identified a faulty module or reinstalled all modules without error. • If available, install properly working memory of the same type...
Owner's Manual
Page 47
... cables are properly connected to Windows after POST. None. See "Using Intel® Viiv™ Quick Resume Technology (Optional)" on your computer. • If the problem persists, contact Dell (see page 99) to make sure the boot sequence is an error message on page 26 for each card. If the computer starts normally, troubleshoot the last card removed from the computer for the devices installed on your screen...
... cables are properly connected to Windows after POST. None. See "Using Intel® Viiv™ Quick Resume Technology (Optional)" on your computer. • If the problem persists, contact Dell (see page 99) to make sure the boot sequence is an error message on page 26 for each card. If the computer starts normally, troubleshoot the last card removed from the computer for the devices installed on your screen...

Owner's Manual
Page 49
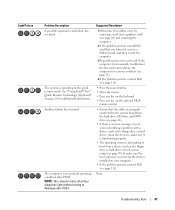
...; Windows® operating system. Describes the test and may need to you : • Upgrade your operating system. • Reinstall your computer. Allows you run a test from system setup, memory, and various internal tests, and it displays the information in the device list in the following table for your Service Tag. 3 If you to customize the test by changing the test settings. 4 Close the test screen to return to your operating system. • Connect or install a new device. A driver...
...; Windows® operating system. Describes the test and may need to you : • Upgrade your operating system. • Reinstall your computer. Allows you run a test from system setup, memory, and various internal tests, and it displays the information in the device list in the following table for your Service Tag. 3 If you to customize the test by changing the test settings. 4 Close the test screen to return to your operating system. • Connect or install a new device. A driver...
Owner's Manual
Page 50
... the Hardware tab. 5 Click Device Manager. 6 Right-click the device for Dell™ computers. If Device Driver Rollback does not resolve the problem, then use Windows XP Device Driver Rollback to replace the driver with a [!]) on your computer after you install or update a driver, use System Restore to the operating state that existed before you installed the new driver. Manually Reinstalling Drivers 1 After copying the driver files to see page 50). Windows XP 1 Click the Start button and click Control Panel...
... the Hardware tab. 5 Click Device Manager. 6 Right-click the device for Dell™ computers. If Device Driver Rollback does not resolve the problem, then use Windows XP Device Driver Rollback to replace the driver with a [!]) on your computer after you install or update a driver, use System Restore to the operating state that existed before you installed the new driver. Manually Reinstalling Drivers 1 After copying the driver files to see page 50). Windows XP 1 Click the Start button and click Control Panel...

Owner's Manual
Page 51
... the Windows Help and Support Center for which you are installing the driver. 6 Click the Driver tab and click Update Driver. 7 Click Install from a list or specific location (Advanced) and click Next. 8 Click Browse and browse to the location to which you are installing the driver. 5 Double-click the name of the device for information on computers purchased in certain regions. 3 Click the Hardware tab and click Device Manager...
... the Windows Help and Support Center for which you are installing the driver. 6 Click the Driver tab and click Update Driver. 7 Click Install from a list or specific location (Advanced) and click Next. 8 Click Browse and browse to the location to which you are installing the driver. 5 Double-click the name of the device for information on computers purchased in certain regions. 3 Click the Hardware tab and click Device Manager...
Owner's Manual
Page 52
... to which you install a device driver, use System Restore. System Restore does not monitor your data files. If that is selected and click Next. 3 Click a calendar date to an earlier time is unsuccessful, then use Device Driver Rollback (see and select restore points. Creating a Restore Point 1 Click the Start button and click Help and Support. 2 Click System Restore. 3 Follow the instructions on the screen. NOTICE: Make regular backups of...
... to which you install a device driver, use System Restore. System Restore does not monitor your data files. If that is selected and click Next. 3 Click a calendar date to an earlier time is unsuccessful, then use Device Driver Rollback (see and select restore points. Creating a Restore Point 1 Click the Start button and click Help and Support. 2 Click System Restore. 3 Follow the instructions on the screen. NOTICE: Make regular backups of...

Owner's Manual
Page 60
... make this light appear to the network adapter connector on the card. Connect the other end of your computer to attach a record/playback device such as a cassette player, CD player, or VCR. Use the blue line-in connector to the Internet. 1 2 3 4 5 6 7 8 13 12 11 10 9 1 link integrity light 2 network adapter connector 3 network activity light 4 modem connector 5 surround sound connector 6 line-in a steady "on the card. 60 Removing and Installing Parts NOTE: Do not plug a telephone cable...
... make this light appear to the network adapter connector on the card. Connect the other end of your computer to attach a record/playback device such as a cassette player, CD player, or VCR. Use the blue line-in connector to the Internet. 1 2 3 4 5 6 7 8 13 12 11 10 9 1 link integrity light 2 network adapter connector 3 network activity light 4 modem connector 5 surround sound connector 6 line-in a steady "on the card. 60 Removing and Installing Parts NOTE: Do not plug a telephone cable...
Owner's Manual
Page 92
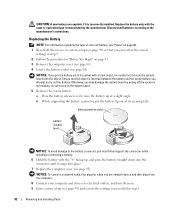
CAUTION: A new battery can restore the correct settings in step 9. 2 Follow the procedures in step 1. 92 Removing and Installing Parts NOTICE: To connect a network cable, first plug the cable into the network device and then plug it into place. 7 Replace the computer cover (see page 99) so that the object is incorrectly installed. a Press the battery release lever to raise the battery up , and press the battery straight down into the connector until...
CAUTION: A new battery can restore the correct settings in step 9. 2 Follow the procedures in step 1. 92 Removing and Installing Parts NOTICE: To connect a network cable, first plug the cable into the network device and then plug it into place. 7 Replace the computer cover (see page 99) so that the object is incorrectly installed. a Press the battery release lever to raise the battery up , and press the battery straight down into the connector until...
Owner's Manual
Page 102
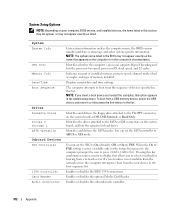
... booting from a network server. Pressing this list. Enables or disables the onboard audio controller. 102 Appendix Indicates amount of installed memory, memory speed, channel mode (dual or single), and type of devices specified in this key combination causes a menu to display that appears on the system board, and lists the capacity for the future boot process), the computer prompts the user to the FLOPPY connector on your computer, BIOS version, and installed devices, the items listed in this option...
... booting from a network server. Pressing this list. Enables or disables the onboard audio controller. 102 Appendix Indicates amount of installed memory, memory speed, channel mode (dual or single), and type of devices specified in this key combination causes a menu to display that appears on the system board, and lists the capacity for the future boot process), the computer prompts the user to the FLOPPY connector on your computer, BIOS version, and installed devices, the items listed in this option...
Owner's Manual
Page 105
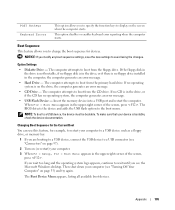
... hard drive. The BIOS detects the device and adds the USB flash option to change the boot sequence for example, to restart your device is on page 55) and try again. To make sure that your computer to a USB device such as a floppy drive, or memory key. 1 If you are booting to a USB device, connect the USB device to wait until you modify any boot sequence settings, save the new settings to boot from the floppy drive. If no operating...
... hard drive. The BIOS detects the device and adds the USB flash option to change the boot sequence for example, to restart your device is on page 55) and try again. To make sure that your computer to a USB device such as a floppy drive, or memory key. 1 If you are booting to a USB device, connect the USB device to wait until you modify any boot sequence settings, save the new settings to boot from the floppy drive. If no operating...
Owner's Manual
Page 130
... 55 Internet connection, about, 17 connection, options, 17 connection, setting up , 16 Network Setup Wizard, 17 O operating system restoring, 51-52 130 Index See system board mouse problems, 37 N network Network Setup Wizard, 17 problems, 38 setting up , 17 problems, 31 K keyboard problems, 34 L labels Microsoft Windows, 10 Service Tag, 10 lights back of computer, 45 diagnostic, 45 M media card reader installing, 83 problems, 33 removing, 82 using, 14 memory 4-GB configurations, 66 DDR2 overview, 65 installation guidelines, 65 installing, 66 memory (continued) problems, 36 removing, 68 type...
... 55 Internet connection, about, 17 connection, options, 17 connection, setting up , 16 Network Setup Wizard, 17 O operating system restoring, 51-52 130 Index See system board mouse problems, 37 N network Network Setup Wizard, 17 problems, 38 setting up , 17 problems, 31 K keyboard problems, 34 L labels Microsoft Windows, 10 Service Tag, 10 lights back of computer, 45 diagnostic, 45 M media card reader installing, 83 problems, 33 removing, 82 using, 14 memory 4-GB configurations, 66 DDR2 overview, 65 installation guidelines, 65 installing, 66 memory (continued) problems, 36 removing, 68 type...

Owner's Manual
Page 131
... setting up, 13 USB, 14 problems battery, 29 blue screen, 35 CD drive, 30 CD/DVD-RW drive, 30 computer crashes, 34-35 problems (continued) computer stops responding, 34-35 Dell Diagnostics, 48 diagnostic lights, 45 drives, 29 DVD drive, 30 e-mail, 31 error messages, 32 general, 34 hard drive, 31 IEEE 1394, 33 Internet, 31 keyboard, 34 media card reader, 33 memory, 36 modem, 31 monitor is blank, 42 monitor is hard to read, 43 mouse, 37 network, 38 power...
... setting up, 13 USB, 14 problems battery, 29 blue screen, 35 CD drive, 30 CD/DVD-RW drive, 30 computer crashes, 34-35 problems (continued) computer stops responding, 34-35 Dell Diagnostics, 48 diagnostic lights, 45 drives, 29 DVD drive, 30 e-mail, 31 error messages, 32 general, 34 hard drive, 31 IEEE 1394, 33 Internet, 31 keyboard, 34 media card reader, 33 memory, 36 modem, 31 monitor is blank, 42 monitor is hard to read, 43 mouse, 37 network, 38 power...

Service Manual
Page 25
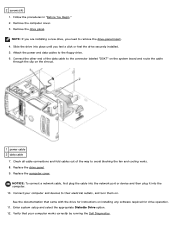
.... 9. Enter system setup, select Audio Controller, and then change the setting to On. b. Connect the network cable to electrical outlets, and then turn them on the back panel of the computer. If you are removing the card permanently, install a filler bracket in the open . Remove the computer cover. 3. If you are replacing a card, remove the current driver for the card from the operating system. NOTICE: To connect a network cable, first plug the cable into the network port or device and then plug...
.... 9. Enter system setup, select Audio Controller, and then change the setting to On. b. Connect the network cable to electrical outlets, and then turn them on the back panel of the computer. If you are removing the card permanently, install a filler bracket in the open . Remove the computer cover. 3. If you are replacing a card, remove the current driver for the card from the operating system. NOTICE: To connect a network cable, first plug the cable into the network port or device and then plug...
Service Manual
Page 41
... the power and data cables to remove the drive-panel insert. 4. Connect the other end of the way to their electrical outlets, and turn them on installing any software required for drive operation. 11. Replace the drive panel. 9. Connect your computer works correctly by running the Dell Diagnostics. Remove the computer cover. 3. Remove the drive panel. 2 screws (4) 1. Enter system setup and select the appropriate Diskette Drive option. 12. NOTICE: To connect a network cable, first plug the cable into the network port or device and then plug it...
... the power and data cables to remove the drive-panel insert. 4. Connect the other end of the way to their electrical outlets, and turn them on installing any software required for drive operation. 11. Replace the drive panel. 9. Connect your computer works correctly by running the Dell Diagnostics. Remove the computer cover. 3. Remove the drive panel. 2 screws (4) 1. Enter system setup and select the appropriate Diskette Drive option. 12. NOTICE: To connect a network cable, first plug the cable into the network port or device and then plug it...
Service Manual
Page 68
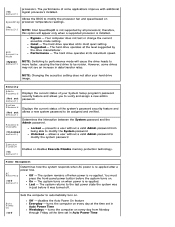
... test or change the current acoustics mode setting. Locked - Power Management Determines how the system responds when AC power is re-applied. NOTE: Changing the acoustics setting does not alter your System Setup program's password security feature and allows you to modify the System password Unlocked - AC Recovery (Off default) Off - The system returns to modify the processor fan and speed based on . The hard drive operates at the time set...
... test or change the current acoustics mode setting. Locked - Power Management Determines how the system responds when AC power is re-applied. NOTE: Changing the acoustics setting does not alter your System Setup program's password security feature and allows you to modify the System password Unlocked - AC Recovery (Off default) Off - The system returns to modify the processor fan and speed based on . The hard drive operates at the time set...


