Owner's Manual
Page 1
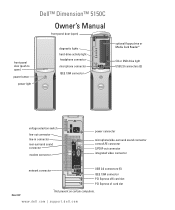
www.dell.com | support.dell.com Dell™ Dimension™ 5150C Owner's Manual front-panel door (open) front-panel door (push to open) power button power light diagnostic lights hard-drive activity light headphone connector microphone connector IEEE 1394 connector optional...DVD drive light USB 2.0 connectors (2) voltage selection switch line-out connector line-in connector rear-surround sound connector modem connector power connector microphone/side-surround sound connector center/LFE connector S/PDIF-out connector integrated video connector network connector USB 2.0 connectors (5) ...
www.dell.com | support.dell.com Dell™ Dimension™ 5150C Owner's Manual front-panel door (open) front-panel door (push to open) power button power light diagnostic lights hard-drive activity light headphone connector microphone connector IEEE 1394 connector optional...DVD drive light USB 2.0 connectors (2) voltage selection switch line-out connector line-in connector rear-surround sound connector modem connector power connector microphone/side-surround sound connector center/LFE connector S/PDIF-out connector integrated video connector network connector USB 2.0 connectors (5) ...
Owner's Manual
Page 3
... Adjusting the Picture 21 Copying CDs and DVDs 21 How to Copy a CD or DVD 21 Using Blank CDs and DVDs 22 Helpful Tips 23 Power Management 24 Standby Mode 24 Hibernate Mode 24 Power Options Properties 25 Understanding Intel® Viiv™ Technology (Optional 26 Contents 3
... Adjusting the Picture 21 Copying CDs and DVDs 21 How to Copy a CD or DVD 21 Using Blank CDs and DVDs 22 Helpful Tips 23 Power Management 24 Standby Mode 24 Hibernate Mode 24 Power Options Properties 25 Understanding Intel® Viiv™ Technology (Optional 26 Contents 3

Owner's Manual
Page 4
... for an earlier Windows operating system . . . . . 35 A solid blue screen appears 35 Other software problems 36 Memory Problems 36 Mouse Problems 37 Network Problems 38 Power Problems 38 Printer Problems 39 Scanner Problems 40 4 Contents
... for an earlier Windows operating system . . . . . 35 A solid blue screen appears 35 Other software problems 36 Memory Problems 36 Mouse Problems 37 Network Problems 38 Power Problems 38 Printer Problems 39 Scanner Problems 40 4 Contents
Owner's Manual
Page 6
... 65 Addressing Memory With 4-GB Configurations 66 Installing Memory 66 Removing Memory 68 Cards 68 Drives 73 Connecting Drive Cables 73 Drive Interface Connectors 74 Power Cable Connector 74 Connecting and Disconnecting Drive Cables 74 Hard Drive 75 Removing a Hard Drive 76 Installing a Hard Drive 77 CD/DVD Drive 78 Removing...
... 65 Addressing Memory With 4-GB Configurations 66 Installing Memory 66 Removing Memory 68 Cards 68 Drives 73 Connecting Drive Cables 73 Drive Interface Connectors 74 Power Cable Connector 74 Connecting and Disconnecting Drive Cables 74 Hard Drive 75 Removing a Hard Drive 76 Installing a Hard Drive 77 CD/DVD Drive 78 Removing...

Owner's Manual
Page 24
...exits from hibernate mode, the desktop is restored to the state it was in before it may take a short time to exit from a power conservation mode, the Windows desktop is in Windows XP Home Edition. Pressing a key on the keyboard or moving the mouse does not bring the...: 1 Click the Start button and click Control Panel. 2 Under Pick a category, click Performance and Maintenance. 3 Under or pick a Control Panel icon, click Power Options. 4 Define your computer uses when it is connected to a network, different options related to security and networking appear in before it entered the mode...
...exits from hibernate mode, the desktop is restored to the state it was in before it may take a short time to exit from a power conservation mode, the Windows desktop is in Windows XP Home Edition. Pressing a key on the keyboard or moving the mouse does not bring the...: 1 Click the Start button and click Control Panel. 2 Under Pick a category, click Performance and Maintenance. 3 Under or pick a Control Panel icon, click Power Options. 4 Define your computer uses when it is connected to a network, different options related to security and networking appear in before it entered the mode...

Owner's Manual
Page 25
... and click Control Panel. 2 Under Pick a category, click Performance and Maintenance. 3 Under or pick a Control Panel icon, click Power Options. 4 Define your power settings on your computer is a portable computer that scheme, unless you set the monitor to use for traveling. • Presentation - If...before shipping the computer to select one of the computer memory, Dell creates an appropriately sized hibernate mode file before the monitor does, your computer to run your computer is called a scheme. Power Options Properties Define your computer with enough disk space to store...
... and click Control Panel. 2 Under Pick a category, click Performance and Maintenance. 3 Under or pick a Control Panel icon, click Power Options. 4 Define your power settings on your computer is a portable computer that scheme, unless you set the monitor to use for traveling. • Presentation - If...before shipping the computer to select one of the computer memory, Dell creates an appropriately sized hibernate mode file before the monitor does, your computer to run your computer is called a scheme. Power Options Properties Define your computer with enough disk space to store...

Owner's Manual
Page 26
...click Help and Support. 2 In the Help and Support window, click Performance and maintenance. 3 In the Performance and maintenance window, click Conserving power on /off the computer. Also, you want to activate standby mode, activate hibernate mode, or turn off feature. Hibernate Tab The Hibernate ...technology is a technology aimed at the digital home enthusiast that the hard drive indicator may blink when the hard drive is being accessed by the power button indicator and diagnostic lights 1, 2, and 4 being lit. If you may notice that includes: • A BIOS with Microsoft® ...
...click Help and Support. 2 In the Help and Support window, click Performance and maintenance. 3 In the Performance and maintenance window, click Conserving power on /off the computer. Also, you want to activate standby mode, activate hibernate mode, or turn off feature. Hibernate Tab The Hibernate ...technology is a technology aimed at the digital home enthusiast that the hard drive indicator may blink when the hard drive is being accessed by the power button indicator and diagnostic lights 1, 2, and 4 being lit. If you may notice that includes: • A BIOS with Microsoft® ...

Owner's Manual
Page 27
... QRT feature in system setup when this feature is ordered. 1 Enter system setup (see page 100). 2 Press the arrow keys to highlight the Power Management menu option and press to access the menu. 3 Press the up- Setting Up and Using Your Computer 27 Also, Quick Resume is enabled ... 1 Click the Start button and click Control Panel. 2 Under Pick a category, click Performance and Maintenance. 3 Under or pick a Control Panel icon, click Power Options. 4 Click the Away tab. 5 Ensure that the check boxes for Enable away mode and Options are installed when this feature becomes active. and right...
... QRT feature in system setup when this feature is ordered. 1 Enter system setup (see page 100). 2 Press the arrow keys to highlight the Power Management menu option and press to access the menu. 3 Press the up- Setting Up and Using Your Computer 27 Also, Quick Resume is enabled ... 1 Click the Start button and click Control Panel. 2 Under Pick a category, click Performance and Maintenance. 3 Under or pick a Control Panel icon, click Power Options. 4 Click the Away tab. 5 Ensure that the check boxes for Enable away mode and Options are installed when this feature becomes active. and right...
Owner's Manual
Page 30
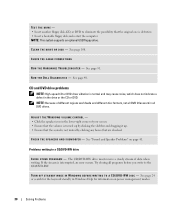
... vibration is interrupted, an error occurs. Problems writing to the CD/DVD-RW. NOTE: Because of data when writing. See "Sound and Speaker Problems" on power management modes. 30 Solving Problems If the stream is normal and may cause noise, which does not indicate a defect in all programs before you write...
... vibration is interrupted, an error occurs. Problems writing to the CD/DVD-RW. NOTE: Because of data when writing. See "Sound and Speaker Problems" on power management modes. 30 Solving Problems If the stream is normal and may cause noise, which does not indicate a defect in all programs before you write...
Owner's Manual
Page 34
... for damaged or frayed cables. • Remove keyboard extension cables and connect the keyboard directly to the computer, and try using the keyboard. Contact Dell (see page 111). CHECK THE KEYBOARD CABLE - • Ensure that the keyboard cable is firmly connected to the computer. • Reconnect the ...1394 DEVICE IS RECOGNIZED BY WINDOWS - 1 Click the Start button and click Control Panel. 2 Click Printers and Other Hardware. ENSURE THAT THE POWER CABLE IS FIRMLY CONNECTED TO THE COMPUTER AND TO THE ELECTRICAL OUTLET 34 Solving Problems D E L L I E E E 1 3 9 4 D E V I C E -
... for damaged or frayed cables. • Remove keyboard extension cables and connect the keyboard directly to the computer, and try using the keyboard. Contact Dell (see page 111). CHECK THE KEYBOARD CABLE - • Ensure that the keyboard cable is firmly connected to the computer. • Reconnect the ...1394 DEVICE IS RECOGNIZED BY WINDOWS - 1 Click the Start button and click Control Panel. 2 Click Printers and Other Hardware. ENSURE THAT THE POWER CABLE IS FIRMLY CONNECTED TO THE COMPUTER AND TO THE ELECTRICAL OUTLET 34 Solving Problems D E L L I E E E 1 3 9 4 D E V I C E -

Owner's Manual
Page 35
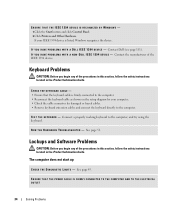
... then click Program Compatibility Wizard. 2 In the welcome screen, click Next. 3 Follow the instructions on your keyboard or moving your mouse, press and hold the power button for at least 8 to 10 seconds until the computer turns off . If necessary, uninstall and then reinstall the program. TU R N T H E C O M P U T E R O F F - A ...off . If you are unable to get a response by pressing a key on your keyboard or moving your mouse, press and hold the power button for at least 8 to perform an operating system shutdown. C H E C K T H E S O F T W A R E D O C U M E N T A T I O N -
... then click Program Compatibility Wizard. 2 In the welcome screen, click Next. 3 Follow the instructions on your keyboard or moving your mouse, press and hold the power button for at least 8 to 10 seconds until the computer turns off . If necessary, uninstall and then reinstall the program. TU R N T H E C O M P U T E R O F F - A ...off . If you are unable to get a response by pressing a key on your keyboard or moving your mouse, press and hold the power button for at least 8 to perform an operating system shutdown. C H E C K T H E S O F T W A R E D O C U M E N T A T I O N -
Owner's Manual
Page 38
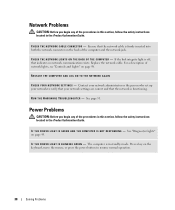
...firmly inserted into both the network connector on the keyboard, move the mouse, or press the power button to verify that your network settings are correct and that the network is off, that the... back of the computer and the network jack. Network Problems CAUTION: Before you begin any of network lights, see "Controls and Lights" on page 45. Power Problems CAUTION: Before you begin any of the procedures in this section, follow the safety instructions located in the Product Information Guide. I F T H E P O W E R L I G H T I S B L I N K I N G - C H E C K T H E N E T W O R K ...
...firmly inserted into both the network connector on the keyboard, move the mouse, or press the power button to verify that your network settings are correct and that the network is off, that the... back of the computer and the network jack. Network Problems CAUTION: Before you begin any of network lights, see "Controls and Lights" on page 45. Power Problems CAUTION: Before you begin any of the procedures in this section, follow the safety instructions located in the Product Information Guide. I F T H E P O W E R L I G H T I S B L I N K I N G - C H E C K T H E N E T W O R K ...
Owner's Manual
Page 39
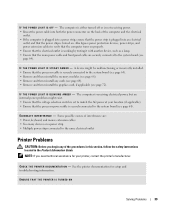
... page 68). • Remove and then reinstall the graphics card, if applicable (see page 64). The computer is receiving electrical power, but an internal power problem might be malfunctioning or incorrectly installed. • Ensure that the processor cable is working by testing it with another device, such...). • Remove and then reinstall any of the computer and the electrical outlet. • If the computer is plugged into a power strip, ensure that the voltage selection switch is set to the same electrical outlet Printer Problems CAUTION: Before you need technical assistance for ...
... page 68). • Remove and then reinstall the graphics card, if applicable (see page 64). The computer is receiving electrical power, but an internal power problem might be malfunctioning or incorrectly installed. • Ensure that the processor cable is working by testing it with another device, such...). • Remove and then reinstall any of the computer and the electrical outlet. • If the computer is plugged into a power strip, ensure that the voltage selection switch is set to the same electrical outlet Printer Problems CAUTION: Before you need technical assistance for ...
Owner's Manual
Page 42
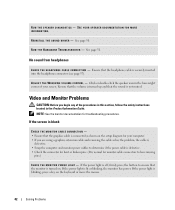
... is blinking, press a key on the keyboard or move the mouse. 42 Solving Problems If the power light is lit or blinking, the monitor has power. Ensure that the graphics cable is connected as shown on . If the screen is blank CHECK THE ...procedures. No sound from headphones C H E C K T H E H E A D P H O N E C A B L E C O N N E C T I N D O W S V O L U M E C O N T R O L - If the power light is off, firmly press the button to determine if the power cable is defective. • Check the connector for bent or broken pins. (It is not muted. Ensure that the volume is turned up...
... is blinking, press a key on the keyboard or move the mouse. 42 Solving Problems If the power light is lit or blinking, the monitor has power. Ensure that the graphics cable is connected as shown on . If the screen is blank CHECK THE ...procedures. No sound from headphones C H E C K T H E H E A D P H O N E C A B L E C O N N E C T I N D O W S V O L U M E C O N T R O L - If the power light is off, firmly press the button to determine if the power cable is defective. • Check the connector for bent or broken pins. (It is not muted. Ensure that the volume is turned up...

Owner's Manual
Page 45
..., install properly working memory of the same type into a working condition or a possible pre-BIOS failure electrical outlet and press the power has occurred. If the computer starts normally, reinstall an additional module. Troubleshooting Tools 45 Continue until you have two or more memory ...and then restart the computer. To help you troubleshoot a problem, your computer (see page 65). • If the problem persists, contact Dell (see page 111). If the computer malfunctions, the color and sequence of the procedures in this section, follow the safety instructions located in...
..., install properly working memory of the same type into a working condition or a possible pre-BIOS failure electrical outlet and press the power has occurred. If the computer starts normally, reinstall an additional module. Troubleshooting Tools 45 Continue until you have two or more memory ...and then restart the computer. To help you troubleshoot a problem, your computer (see page 65). • If the problem persists, contact Dell (see page 111). If the computer malfunctions, the color and sequence of the procedures in this section, follow the safety instructions located in...
Owner's Manual
Page 46
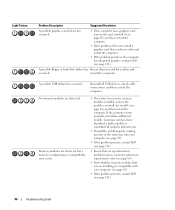
Reinstall all power and data cables and occurred. Memory modules are compatible with your computer (see page 65). • If the problem persists, contact Dell (see page 111). • Ensure that no special memory module/memory connector placement requirements exist (see page 65). • ...8226; If available, install properly working memory of the same type into your computer (see page 65). • If the problem persists, contact Dell (see page 111). 46 Troubleshooting Tools A possible USB failure has occurred. A possible floppy or hard drive failure has Reseat all USB devices, ...
Reinstall all power and data cables and occurred. Memory modules are compatible with your computer (see page 65). • If the problem persists, contact Dell (see page 111). • Ensure that no special memory module/memory connector placement requirements exist (see page 65). • ...8226; If available, install properly working memory of the same type into your computer (see page 65). • If the problem persists, contact Dell (see page 111). 46 Troubleshooting Tools A possible USB failure has occurred. A possible floppy or hard drive failure has Reseat all USB devices, ...
Owner's Manual
Page 47
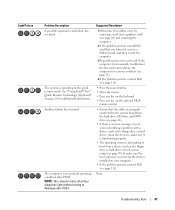
...or hard drive), check the device to make sure the boot sequence is an error message on your computer. • If the problem persists, contact Dell (see page 68) and restarting the computer. 2 If the problem persists, reinstall the card that the cables are properly connected to boot from a...starts normally, troubleshoot the last card removed from the computer for resource conflicts (see page 51). 4 If the problem persists, contact Dell (see page 111). • Press the power button • Move the mouse • Press any key on the keyboard • Press any key on the optional MCE remote...
...or hard drive), check the device to make sure the boot sequence is an error message on your computer. • If the problem persists, contact Dell (see page 68) and restarting the computer. 2 If the problem persists, reinstall the card that the cables are properly connected to boot from a...starts normally, troubleshoot the last card removed from the computer for resource conflicts (see page 51). 4 If the problem persists, contact Dell (see page 111). • Press the power button • Move the mouse • Press any key on the keyboard • Press any key on the optional MCE remote...
Owner's Manual
Page 55
...Your Computer" on page 55 and "Before Working Inside Your Computer" on page 55. • You have read the safety information in your Dell™ Product Information Guide. • A component can be replaced or-if purchased separately-installed by performing the removal procedure in your own ...Shut down the operating system: a Save and close any open programs before you shut down your operating system, press and hold the power button for removing and installing the components in reverse order. Unless otherwise noted, each procedure assumes that the computer and any open files ...
...Your Computer" on page 55 and "Before Working Inside Your Computer" on page 55. • You have read the safety information in your Dell™ Product Information Guide. • A component can be replaced or-if purchased separately-installed by performing the removal procedure in your own ...Shut down the operating system: a Save and close any open programs before you shut down your operating system, press and hold the power button for removing and installing the components in reverse order. Unless otherwise noted, each procedure assumes that the computer and any open files ...
Owner's Manual
Page 56
...locking tabs; NOTICE: Before touching anything inside the computer. 1 Turn off your computer from their electrical outlets, and then press the power button to servicing that both connectors are disconnecting this section, follow the safety instructions in on a card. CAUTION: Before you pull ... connector with care. Also, before you are correctly oriented and aligned. While you connect a cable, ensure that is not authorized by Dell is not covered by its metal mounting bracket. NOTICE: To avoid damaging the computer, perform the following steps before opening the cover. 4...
...locking tabs; NOTICE: Before touching anything inside the computer. 1 Turn off your computer from their electrical outlets, and then press the power button to servicing that both connectors are disconnecting this section, follow the safety instructions in on a card. CAUTION: Before you pull ... connector with care. Also, before you are correctly oriented and aligned. While you connect a cable, ensure that is not authorized by Dell is not covered by its metal mounting bracket. NOTICE: To avoid damaging the computer, perform the following steps before opening the cover. 4...
Owner's Manual
Page 58
... an operating system shutdown. Use the green headphone connector to indicate different states: • No light - 4 IEEE 1394 connector 5 power button 6 power light 7 front-panel door release button 8 microphone connector 9 headphone connector 10 hard-drive activity light 11 diagnostic lights 12 front-panel ...turned off the computer. The computer is on the card. Press this button to the hard drive. See "Power Problems" on page 45. The power light illuminates and blinks or remains solid to attach headphones and most kinds of speakers. On computers with a sound...
... an operating system shutdown. Use the green headphone connector to indicate different states: • No light - 4 IEEE 1394 connector 5 power button 6 power light 7 front-panel door release button 8 microphone connector 9 headphone connector 10 hard-drive activity light 11 diagnostic lights 12 front-panel ...turned off the computer. The computer is on the card. Press this button to the hard drive. See "Power Problems" on page 45. The power light illuminates and blinks or remains solid to attach headphones and most kinds of speakers. On computers with a sound...


