Owner's Manual
Page 1
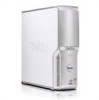
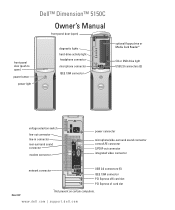
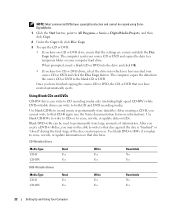
www.dell.com | support.dell.com Dell™ Dimension™ 5150C Owner's Manual front-panel door (open) front-panel door (push to open) power button power light diagnostic lights hard-drive activity light headphone connector microphone connector IEEE 1394 connector optional floppy drive or Media Card Reader* CD or DVD drive light USB 2.0 connectors (2) voltage selection switch line-out connector...
www.dell.com | support.dell.com Dell™ Dimension™ 5150C Owner's Manual front-panel door (open) front-panel door (push to open) power button power light diagnostic lights hard-drive activity light headphone connector microphone connector IEEE 1394 connector optional floppy drive or Media Card Reader* CD or DVD drive light USB 2.0 connectors (2) voltage selection switch line-out connector...

Owner's Manual
Page 4
... Setup 27 Enabling the QRT feature in the Operating system 27 Hyper-Threading 27 2 Solving Problems Troubleshooting Tips 29 Battery Problems 29 Drive Problems 29 CD and DVD drive problems 30 Hard drive problems 31 E-Mail, Modem, and Internet Problems 31 Error Messages 32 Media Card Reader Problems 33 IEEE 1394 Device Problems 33...
... Setup 27 Enabling the QRT feature in the Operating system 27 Hyper-Threading 27 2 Solving Problems Troubleshooting Tips 29 Battery Problems 29 Drive Problems 29 CD and DVD drive problems 30 Hard drive problems 31 E-Mail, Modem, and Internet Problems 31 Error Messages 32 Media Card Reader Problems 33 IEEE 1394 Device Problems 33...
Owner's Manual
Page 6
... Configurations 66 Installing Memory 66 Removing Memory 68 Cards 68 Drives 73 Connecting Drive Cables 73 Drive Interface Connectors 74 Power Cable Connector 74 Connecting and Disconnecting Drive Cables 74 Hard Drive 75 Removing a Hard Drive 76 Installing a Hard Drive 77 CD/DVD Drive 78 Removing a CD/DVD Drive 78 Installing a CD/DVD Drive 80 Media Card Reader 81 Removing a Media Card Reader...
... Configurations 66 Installing Memory 66 Removing Memory 68 Cards 68 Drives 73 Connecting Drive Cables 73 Drive Interface Connectors 74 Power Cable Connector 74 Connecting and Disconnecting Drive Cables 74 Hard Drive 75 Removing a Hard Drive 76 Installing a Hard Drive 77 CD/DVD Drive 78 Removing a CD/DVD Drive 78 Installing a CD/DVD Drive 80 Media Card Reader 81 Removing a Media Card Reader...
Owner's Manual
Page 10
... you reinstall the operating system for your computer and operating system and installs the updates appropriate for Dell™ 3.5-inch USB floppy drives, Intel® Pentium® M processors, optical drives, and USB devices. The website may not be available as memory, the hard drive, and the operating system in all regions. • Customer Care - support...
... you reinstall the operating system for your computer and operating system and installs the updates appropriate for Dell™ 3.5-inch USB floppy drives, Intel® Pentium® M processors, optical drives, and USB devices. The website may not be available as memory, the hard drive, and the operating system in all regions. • Customer Care - support...
Owner's Manual
Page 22
... be used to permanently store large amounts of the disc creation process. After you create a DVD+/-R disc, you have inserted your computer hard drive. Once you have finished copying the source CD or DVD, the CD or DVD that you cannot write to that disc again if the disc ... DVD recording media. Use blank DVD+/-RWs if you have one CD or DVD drive, ensure that disc later. CD-Writable Drives Media Type CD-R CD-RW Read Yes Yes Write Yes Yes Rewritable No Yes DVD-Writable Drives Media Type CD-R CD-RW Read Yes Yes Write Yes Yes Rewritable No Yes...
... be used to permanently store large amounts of the disc creation process. After you create a DVD+/-R disc, you have inserted your computer hard drive. Once you have finished copying the source CD or DVD, the CD or DVD that you cannot write to that disc again if the disc ... DVD recording media. Use blank DVD+/-RWs if you have one CD or DVD drive, ensure that disc later. CD-Writable Drives Media Type CD-R CD-RW Read Yes Yes Write Yes Yes Rewritable No Yes DVD-Writable Drives Media Type CD-R CD-RW Read Yes Yes Write Yes Yes Rewritable No Yes...

Owner's Manual
Page 24
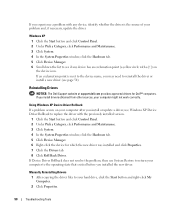
... Performance and Maintenance. 3 Under or pick a Control Panel icon, click Power Options. 4 Define your hibernate settings on the hard drive and then completely turning off the display and the hard drive after a defined period of inactivity: 1 Click the Start button and click Control Panel. 2 Under Pick a category, click ...If your computer loses power while in standby mode, it entered standby mode. You can reduce power to just the monitor or the hard drive, or you are not using it. Power Management The Microsoft® Windows® XP power management features can reduce the amount of...
... Performance and Maintenance. 3 Under or pick a Control Panel icon, click Power Options. 4 Define your hibernate settings on the hard drive and then completely turning off the display and the hard drive after a defined period of inactivity: 1 Click the Start button and click Control Panel. 2 Under Pick a category, click ...If your computer loses power while in standby mode, it entered standby mode. You can reduce power to just the monitor or the hard drive, or you are not using it. Power Management The Microsoft® Windows® XP power management features can reduce the amount of...

Owner's Manual
Page 25
.... 3 Under or pick a Control Panel icon, click Power Options. 4 Define your power settings on your hard drive with enough disk space to store the contents of the computer memory, Dell creates an appropriately sized hibernate mode file before shipping the computer to change the default settings for a scheme, click... the drop-down menu in the Turn off monitor, Turn off the hard drive. If you want to you click Save ...
.... 3 Under or pick a Control Panel icon, click Power Options. 4 Define your power settings on your hard drive with enough disk space to store the contents of the computer memory, Dell creates an appropriately sized hibernate mode file before shipping the computer to change the default settings for a scheme, click... the drop-down menu in the Turn off monitor, Turn off the hard drive. If you want to you click Save ...

Owner's Manual
Page 26
... an external device. Using Intel® Viiv™ Quick Resume Technology (Optional) When running in the Windows taskbar for systems that the hard drive indicator may blink when the hard drive is still operating as a quick on the Hibernate tab. Pressing the power button once causes the display to go blank and the audio...
... an external device. Using Intel® Viiv™ Quick Resume Technology (Optional) When running in the Windows taskbar for systems that the hard drive indicator may blink when the hard drive is still operating as a quick on the Hibernate tab. Pressing the power button once causes the display to go blank and the audio...
Owner's Manual
Page 31
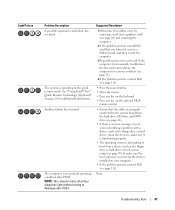
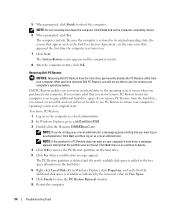
... and connect it .) • Ensure that is connected to All Programs, and then click Modem Helper. Click the Start button, point to a digital telephone network. Hard drive problems RUN CHECK DISK - 1 Click the Start button and click My Computer. 2 Right-click Local Disk C:. 3 Click Properties. 4 Click the Tools tab. 5 Under Error-checking...
... and connect it .) • Ensure that is connected to All Programs, and then click Modem Helper. Click the Start button, point to a digital telephone network. Hard drive problems RUN CHECK DISK - 1 Click the Start button and click My Computer. 2 Right-click Local Disk C:. 3 Click Properties. 4 Click the Tools tab. 5 Under Error-checking...
Owner's Manual
Page 36
... the program. • If necessary, uninstall and then reinstall the program. BACK UP YOUR FILES IMMEDIATELY USE A VIRUS-SCANNING PROGRAM TO CHECK THE HARD DRIVE, FLOPPY DISKS, OR CDS SAVE AND CLOSE ANY OPEN FILES OR PROGRAMS AND SHUT DOWN YOUR COMPUTER THROUGH THE START MENU Memory Problems CAUTION: Before...; Ensure that your computer meets the minimum hardware requirements needed to ensure that the program is successfully communicating with the memory. • Run the Dell Diagnostics (see page 48). 36 Solving Problems See the software documentation for minimum memory requirements.
... the program. • If necessary, uninstall and then reinstall the program. BACK UP YOUR FILES IMMEDIATELY USE A VIRUS-SCANNING PROGRAM TO CHECK THE HARD DRIVE, FLOPPY DISKS, OR CDS SAVE AND CLOSE ANY OPEN FILES OR PROGRAMS AND SHUT DOWN YOUR COMPUTER THROUGH THE START MENU Memory Problems CAUTION: Before...; Ensure that your computer meets the minimum hardware requirements needed to ensure that the program is successfully communicating with the memory. • Run the Dell Diagnostics (see page 48). 36 Solving Problems See the software documentation for minimum memory requirements.
Owner's Manual
Page 46
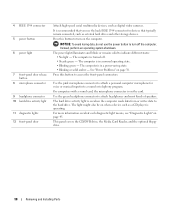
...you are installing are detected. No memory modules are compatible with your computer (see page 65). • If the problem persists, contact Dell (see page 111). • Ensure that no special memory module/memory connector placement requirements exist (see page 65). • Verify that...restart the computer. • If the problem persists or the computer has integrated graphics, contact Dell (see page 66), and then restart the computer. A possible floppy or hard drive failure has Reseat all USB devices, check cable connections, and then restart the computer. Continue ...
...you are installing are detected. No memory modules are compatible with your computer (see page 65). • If the problem persists, contact Dell (see page 111). • Ensure that no special memory module/memory connector placement requirements exist (see page 65). • Verify that...restart the computer. • If the problem persists or the computer has integrated graphics, contact Dell (see page 66), and then restart the computer. A possible floppy or hard drive failure has Reseat all USB devices, check cable connections, and then restart the computer. Continue ...
Owner's Manual
Page 47
...page 111). Another failure has occurred. NOTE: The computer turns off all four diagnostic lights before booting to the system board from the hard drive, CD drive, and DVD drive (see page 68) and restarting the computer. 2 If the problem persists, reinstall the card that the cables are properly connected to...If the computer starts normally, troubleshoot the last card removed from the computer for resource conflicts (see page 51). 4 If the problem persists, contact Dell (see page 111). • Press the power button • Move the mouse • Press any key on the keyboard • Press any ...
...page 111). Another failure has occurred. NOTE: The computer turns off all four diagnostic lights before booting to the system board from the hard drive, CD drive, and DVD drive (see page 68) and restarting the computer. 2 If the problem persists, reinstall the card that the cables are properly connected to...If the computer starts normally, troubleshoot the last card removed from the computer for resource conflicts (see page 51). 4 If the problem persists, contact Dell (see page 111). • Press the power button • Move the mouse • Press any key on the keyboard • Press any ...
Owner's Manual
Page 50
... and Maintenance. 3 Click System. 4 In the System Properties window, click the Hardware tab. 5 Click Device Manager. 6 Right-click the device for Dell™ computers. Windows XP 1 Click the Start button and click Control Panel. 2 Under Pick a Category, click Performance and Maintenance. 3 Click System.... If an exclamation point is the source of your hard drive, click the Start button and right-click My Computer. 2 Click Properties. 50 Troubleshooting Tools Reinstalling Drivers NOTICE: The Dell Support website at support.dell.com provides approved drivers for which the new driver ...
... and Maintenance. 3 Click System. 4 In the System Properties window, click the Hardware tab. 5 Click Device Manager. 6 Right-click the device for Dell™ computers. Windows XP 1 Click the Start button and click Control Panel. 2 Under Pick a Category, click Performance and Maintenance. 3 Click System.... If an exclamation point is the source of your hard drive, click the Start button and right-click My Computer. 2 Click Properties. 50 Troubleshooting Tools Reinstalling Drivers NOTICE: The Dell Support website at support.dell.com provides approved drivers for which the new driver ...

Owner's Manual
Page 51
... provides System Restore to allow you purchased the computer. Troubleshooting Tools 51 See the Windows Help and Support Center for information on the hard drive and removes any applications installed after you received the computer. Resolving Software and Hardware Incompatibilities If a device is either not detected during... ways: • Microsoft Windows XP System Restore returns your computer to an earlier operating state without affecting data files. • Dell PC Restore by Symantec restores your hard drive to the operating state it was in when you to return your computer.
... provides System Restore to allow you purchased the computer. Troubleshooting Tools 51 See the Windows Help and Support Center for information on the hard drive and removes any applications installed after you received the computer. Resolving Software and Hardware Incompatibilities If a device is either not detected during... ways: • Microsoft Windows XP System Restore returns your computer to an earlier operating state without affecting data files. • Dell PC Restore by Symantec restores your hard drive to the operating state it was in when you to return your computer.

Owner's Manual
Page 53
... your computer- Use Dell PC Restore by Symantec NOTE: Dell PC Restore is available only on the hard drive and removes any files or programs until the system restoration is automatically disabled. Troubleshooting Tools 53 including data files-are permanently deleted from the hard drive. NOTICE: Using PC... Restore restores your operating system. If possible, back up the data before using PC Restore. Using Dell PC Restore by Symantec only as the last method to restore your hard drive to complete. If possible, back up all open files and exit any open programs. Do not ...
... your computer- Use Dell PC Restore by Symantec NOTE: Dell PC Restore is available only on the hard drive and removes any files or programs until the system restoration is automatically disabled. Troubleshooting Tools 53 including data files-are permanently deleted from the hard drive. NOTICE: Using PC... Restore restores your operating system. If possible, back up the data before using PC Restore. Using Dell PC Restore by Symantec only as the last method to restore your hard drive to complete. If possible, back up all open files and exit any open programs. Do not ...
Owner's Manual
Page 54
...the computer was in Windows Explorer, click Properties, and verify that appear, such as administrator. Dell PC Restore enables you will not be able to gain additional hard-drive space. It is available as indicated by the increased value for PC Restore does not exist on.... The computer restarts. Click Finish and let the computer completely reboot. 6 When prompted, click Yes. Removing Dell PC Restore NOTICE: Removing Dell PC Restore from the hard drive permanently deletes the PC Restore utility from your computer's operating system to its original operating state, the screens that...
...the computer was in Windows Explorer, click Properties, and verify that appear, such as administrator. Dell PC Restore enables you will not be able to gain additional hard-drive space. It is available as indicated by the increased value for PC Restore does not exist on.... The computer restarts. Click Finish and let the computer completely reboot. 6 When prompted, click Yes. Removing Dell PC Restore NOTICE: Removing Dell PC Restore from the hard drive permanently deletes the PC Restore utility from your computer's operating system to its original operating state, the screens that...
Owner's Manual
Page 58
... power light illuminates and blinks or remains solid to attach a personal computer microphone for devices that typically remain connected, such as external hard drives and other storage devices. The computer is in a normal operating state. • Blinking green - The light might also be on... cameras. 4 IEEE 1394 connector 5 power button 6 power light 7 front-panel door release button 8 microphone connector 9 headphone connector 10 hard-drive activity light 11 diagnostic lights 12 front-panel door Attach high-speed serial multimedia devices, such as a CD player is operating. The computer...
... power light illuminates and blinks or remains solid to attach a personal computer microphone for devices that typically remain connected, such as external hard drives and other storage devices. The computer is in a normal operating state. • Blinking green - The light might also be on... cameras. 4 IEEE 1394 connector 5 power button 6 power light 7 front-panel door release button 8 microphone connector 9 headphone connector 10 hard-drive activity light 11 diagnostic lights 12 front-panel door Attach high-speed serial multimedia devices, such as a CD player is operating. The computer...

Owner's Manual
Page 63
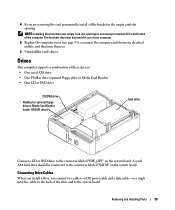
CAUTION: To guard against electrical shock, always unplug your computer from the electrical outlet before opening the cover. CD/DVD drive drive release latch power supply and fan hard drive front-panel door power button heat sink assembly Removing and Installing Parts 63 Inside View of Your Computer CAUTION: Before you begin any of the procedures in this section, follow the safety instructions in the Product Information Guide.
CAUTION: To guard against electrical shock, always unplug your computer from the electrical outlet before opening the cover. CD/DVD drive drive release latch power supply and fan hard drive front-panel door power button heat sink assembly Removing and Installing Parts 63 Inside View of Your Computer CAUTION: Before you begin any of the procedures in this section, follow the safety instructions in the Product Information Guide.
Owner's Manual
Page 73
...page 93), reconnect the computer and devices to electrical outlets, and then turn them on. 6 Uninstall the card's driver. A serial ATA hard drive should be connected to the connector labeled "IDE_OPT" on the system board. The brackets also keep dust and dirt out of these devices: ...• One serial ATA drive • One FlexBay drive (optional floppy drive or Media Card Reader) • One CD or DVD drive CD/DVD drive FlexBay for optional floppy drive or Media Card Reader (under CD/DVD drive) hard drive Connect a CD or DVD drive to the connector labeled "SATA0" on ...
...page 93), reconnect the computer and devices to electrical outlets, and then turn them on. 6 Uninstall the card's driver. A serial ATA hard drive should be connected to the connector labeled "IDE_OPT" on the system board. The brackets also keep dust and dirt out of these devices: ...• One serial ATA drive • One FlexBay drive (optional floppy drive or Media Card Reader) • One CD or DVD drive CD/DVD drive FlexBay for optional floppy drive or Media Card Reader (under CD/DVD drive) hard drive Connect a CD or DVD drive to the connector labeled "SATA0" on ...
Owner's Manual
Page 75
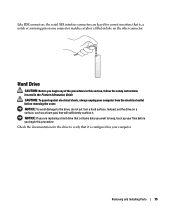
.... CAUTION: To guard against electrical shock, always unplug your files before removing the cover. Instead, set it . NOTICE: If you are keyed for correct insertion; Hard Drive CAUTION: Before you begin any of the procedures in this procedure. Removing and Installing Parts 75 Check the documentation for your computer. NOTICE: To avoid...
.... CAUTION: To guard against electrical shock, always unplug your files before removing the cover. Instead, set it . NOTICE: If you are keyed for correct insertion; Hard Drive CAUTION: Before you begin any of the procedures in this procedure. Removing and Installing Parts 75 Check the documentation for your computer. NOTICE: To avoid...


