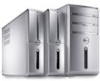
Dell Inspiron 660 Support and Manuals
Get Help and Manuals for this Dell item
View All Support Options Below
Free Dell Inspiron 660 manuals!
Problems with Dell Inspiron 660?
Ask a Question
Free Dell Inspiron 660 manuals!
Problems with Dell Inspiron 660?
Ask a Question
Most Recent Dell Inspiron 660 Questions

Connecting Audio Cable
I want to connect the audio cables to my computer. one audio cable is in the monitor and other is co...
I want to connect the audio cables to my computer. one audio cable is in the monitor and other is co...
(Posted by aceone303 8 years ago)

How To Log Back In To Signed Out User?
Hi my name is Erin i have the Dell Inspirion 660 . I am getting a user loin issue the says login fai...
Hi my name is Erin i have the Dell Inspirion 660 . I am getting a user loin issue the says login fai...
(Posted by fivestarfloors1 9 years ago)

Where Do You Insert A Disc On Dell Inspiron
(Posted by rfgSm 9 years ago)

Dell Inspiron 660s What Kind Of Screwdriver
(Posted by riveryu 9 years ago)

How To Enter Boot Sequence Dell 660
(Posted by mgmwelce 9 years ago)
Dell Inspiron 660 Videos

MineCraft Dell Inspiron 660 Test
Duration: 1:26
Total Views: 451
Duration: 1:26
Total Views: 451
dell inspiron 660
Duration: 1:27
Total Views: 159
Duration: 1:27
Total Views: 159
Got a new desktop computer today: Dell Inspiron 660
Duration: 15:15
Total Views: 970
Duration: 15:15
Total Views: 970
UnBoxing Dell Inspiron 660
Duration: 2:58
Total Views: 3,057
Duration: 2:58
Total Views: 3,057
Popular Dell Inspiron 660 Manual Pages
Owners Manual - Page 6
...-Cell Battery 77
Removing the Coin-Cell Battery 77 Replacing the Coin-Cell Battery 79
18 Power Supply 81
Removing the Power Supply 81 Replacing the Power Supply 83
19 System Board 85
Removing the System Board 85 Replacing the System Board 87 Entering the Service Tag in the BIOS 88
20 System Setup 91
Overview 91 Entering System Setup 91 Clearing Forgotten Passwords 102 Clearing CMOS...
Owners Manual - Page 21

... become very hot during normal operation. If the memory module is difficult to remove, gently ease the memory module back and forth to cool before touching them. 1 Locate the memory-module connector on page 14. 2 Press out the securing clip at dell.com/regulatory_compliance. Memory Module(s)
WARNING: Before working inside your computer, read the safety information that...
Owners Manual - Page 22
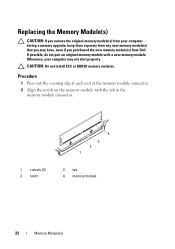
...Replacing the Memory Module(s)
CAUTION: If you remove the original memory module(s) from your computer may have, even if you purchased the new memory module(s) from Dell.
If possible, do not pair an original memory module with the tab in the
memory module connector.
1 cutouts (2) 3 notch
4 3 2 1
2 tab 4 memory module
22
Memory Module(s) Otherwise, your computer during a memory upgrade...
Owners Manual - Page 35
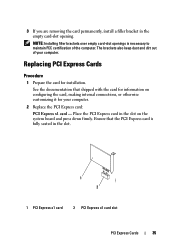
... the card for information on the system board and press down firmly. See the documentation that the PCI Express card is necessary to maintain FCC certification of your computer.
2 Replace the PCI Express card: PCI Express x1 card - 3 If you are removing the card permanently, install a filler bracket in the slot.
1 2
1 PCI Express x1 card
2 PCI Express x1 card slot
PCI Express Cards
35...
Owners Manual - Page 39
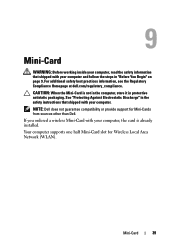
NOTE: Dell does not guarantee compatibility or provide support for Wireless Local Area Network (WLAN). Your computer supports one half Mini-Card slot for Mini-Cards from sources other than Dell.
If you ordered a wireless Mini-Card with your computer. Mini-Card
39 For additional safety best practices information, see the Regulatory Compliance Homepage at dell.com/regulatory_compliance.
...
Owners Manual - Page 58

See "System Board Components" on page 14.
2 Remove the screws that you can re-route them correctly when installing the new front I/O panel.
1 Disconnect the front I/O panel cables from the front panel and pull it away.
1 screws (2)
58
Front I/O Panel
2 1
2 front I /O panel to release the clamps from the system board connectors (AUDIOF1, USBF1, and USBF2). Procedure
NOTE...
Owners Manual - Page 66
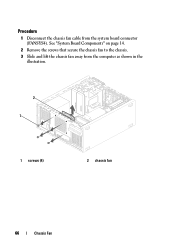
See "System Board Components" on page 14.
2 Remove the screws that secure the chassis fan to the chassis. 3 Slide and lift the chassis fan away from the system board connector (FANSYS4). Procedure
1 Disconnect the chassis fan cable from the computer as shown in the
illustration.
2
1
1 screws (4)
2 chassis fan
66
Chassis Fan
Owners Manual - Page 82
...
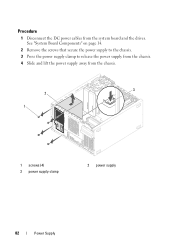
1 Disconnect the DC power cables from the chassis.
3 2
1
1 screws (4) 3 power supply clamp
2 power supply
82
Power Supply See "System Board Components" on page 14.
2 Remove the screws that secure the power supply to the chassis. 3 Press the power supply clamp to release the power supply from the chassis. 4 Slide and lift the power supply away from the system board and the drives.
Owners Manual - Page 83
... 19.
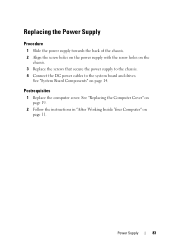
2 Follow the instructions in "After Working Inside Your Computer" on page 14. Power Supply
83 See "System Board Components" on page 11. Replacing the Power Supply
Procedure
1 Slide the power supply towards the back of the chassis. 2 Align the screw holes on the power supply with the screw holes on the
chassis. 3 Replace the screws that secure the power supply to the chassis. 4 Connect...
Owners Manual - Page 96

... by default)
Advanced -
USB Configuration
Front USB Ports
Allows you to enable or disable the front USB ports on your computer
Enabled or Disabled (Enabled by default)
Rear USB Ports
Allows you to enable or disable the rear USB ports on your computer from a network
Enabled or Disabled (Disabled by default)
Boot Numlock Key
Keyboard Errors
Allows you to set the status of...
Owners Manual - Page 100

... is enabled in system setup. Insert the memory device into a USB port and restart the computer. To ensure that the Onboard LAN Boot ROM option is found on the drive, the computer generates an error message.
• CD/DVD/CD-RW Drive - The computer attempts to boot from the primary hard drive. The computer attempts to boot from the network, ensure that your...
Owners Manual - Page 101
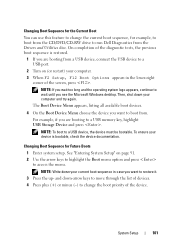
... until you want to boot from the Drivers and Utilities disc. For example, if you are booting to a USB memory key, highlight USB Storage Device and press . NOTE: To boot to change the current boot sequence, for Future Boots
1 Enter system setup.
and down your device is restored.
1 If you are booting from a USB device, connect the USB device to a USB port.
2 Turn on page 91...
Owners Manual - Page 102

..., ground yourself by using a wrist grounding strap or by your computer. See "Removing the Computer Cover" on page 18.
3 Locate the 3-pin password reset jumper (PSWDCLR1) on pins 1 and 2.
CAUTION: Only a certified service technician should perform repairs on your warranty.
See "System Board Components" on page 14.
4 Remove the 2-pin jumper plug from the electrical outlet to...
Owners Manual - Page 104

... page 18.
3 Locate the 3-pin CMOS reset jumper (CMOSCLR1) on pins 1 and 2.
104
System Setup
CMOSCLR1
Damage due to clear the password setting.
Clearing CMOS Passwords
WARNING: Before you begin any of the procedures in "Before You Begin" on page 9.
2 Remove the computer cover. CAUTION: Only a certified service technician should perform repairs on your computer. WARNING: The computer...
Owners Manual - Page 107
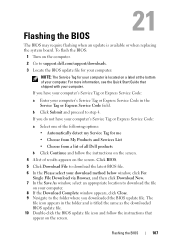
... to support.dell.com/support/downloads.
3 Locate the BIOS update file for your computer:
NOTE: The Service Tag for me
• Choose from My Products and Services List
• Choose from a list of the following options:
• Automatically detect my Service Tag for your computer is available or when replacing the system board. For more information, see the Quick Start Guide...
Dell Inspiron 660 Reviews
We have not received any reviews for Dell yet.