

User Guide
Page 5
... ...206 Saving energy...206 Using Eco‑Mode...206 Reducing printer noise...207 Adjusting Sleep mode ...208 Using Hibernate Mode...208 Setting...Dell products...210 Securing the printer 211 Statement of Volatility...211 Erasing volatile memory...211 Erasing non‑volatile memory...212 Erasing printer hard disk memory...212 Configuring printer hard disk encryption 213 Finding printer security information...214 Maintaining the printer 215 Cleaning the printer parts...215 Cleaning the printer... the status of parts and supplies on the printer control panel 217 Checking the status of parts ...
... ...206 Saving energy...206 Using Eco‑Mode...206 Reducing printer noise...207 Adjusting Sleep mode ...208 Using Hibernate Mode...208 Setting...Dell products...210 Securing the printer 211 Statement of Volatility...211 Erasing volatile memory...211 Erasing non‑volatile memory...212 Erasing printer hard disk memory...212 Configuring printer hard disk encryption 213 Finding printer security information...214 Maintaining the printer 215 Cleaning the printer parts...215 Cleaning the printer... the status of parts and supplies on the printer control panel 217 Checking the status of parts ...

User Guide
Page 6
... all pages from the finisher's accumulator. Leave paper in bin. [45y.xx 246 Troubleshooting 249 Understanding the printer messages...249 Solving printer problems...264 Solving print problems...270 Solving copy problems...295 Contents 6 Ordering an ADF separator roller ...218 Storing... Replacing the toner cartridge ...219 Replacing the imaging unit ...220 Replacing the staple cartridge ...223 Moving the printer...225 Before moving the printer ...225 Moving the printer to another location...226 Shipping the printer ...226 Managing the printer 227 Managing printer messages...227 Accessing ...
... all pages from the finisher's accumulator. Leave paper in bin. [45y.xx 246 Troubleshooting 249 Understanding the printer messages...249 Solving printer problems...264 Solving print problems...270 Solving copy problems...295 Contents 6 Ordering an ADF separator roller ...218 Storing... Replacing the toner cartridge ...219 Replacing the imaging unit ...220 Replacing the staple cartridge ...223 Moving the printer...225 Before moving the printer ...225 Moving the printer to another location...226 Shipping the printer ...226 Managing the printer 227 Managing printer messages...227 Accessing ...
User Guide
Page 11
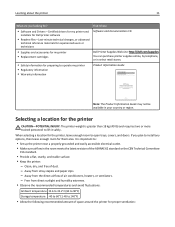
... and Drivers-Certified drivers for my printer and installers for Dell printer software • Readme files-Last‑minute technical changes, or advanced technical reference materials for experienced users or technicians • Supplies and accessories for my printer • Replacement cartridges • Safety information for preparing to operate my printer • Regulatory information • Warranty information...
... and Drivers-Certified drivers for my printer and installers for Dell printer software • Readme files-Last‑minute technical changes, or advanced technical reference materials for experienced users or technicians • Supplies and accessories for my printer • Replacement cartridges • Safety information for preparing to operate my printer • Regulatory information • Warranty information...

User Guide
Page 19
... located at the upper left corner of the home screen and appears as Toner Low or Cartridge Low. • Show intervention messages so the printer can view and remotely configure printer settings even when you can continue processing. You can use the IP address when accessing the ...Feature Warning Description If an error condition occurs, then this icon appears. Status message bar Printer IP address Example: 123.123.123.123 • Show the current printer status such as Ready or Busy. • Show printer conditions such as four sets of options. 2 Copy It Print a copy. 3 Advanced...
... located at the upper left corner of the home screen and appears as Toner Low or Cartridge Low. • Show intervention messages so the printer can view and remotely configure printer settings even when you can continue processing. You can use the IP address when accessing the ...Feature Warning Description If an error condition occurs, then this icon appears. Status message bar Printer IP address Example: 123.123.123.123 • Show the current printer status such as Ready or Busy. • Show printer conditions such as four sets of options. 2 Copy It Print a copy. 3 Advanced...
User Guide
Page 71
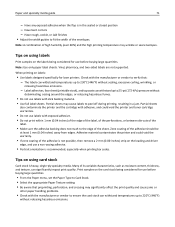
...8226; Select the appropriate Paper Texture setting. • Be aware that : - Print samples on the labels being considered for laser printers. Note: A combination of the sheet. Partial sheets may significantly affect the print quality and cause jams or other paper handling problems... away from edges. Zone coating of the adhesive is recommended, especially when printing bar codes. Adhesive material contaminates the printer and could void the printer and toner cartridge warranties. • Do not use a non‑oozing adhesive. • Portrait orientation is not possible, then ...
...8226; Select the appropriate Paper Texture setting. • Be aware that : - Print samples on the labels being considered for laser printers. Note: A combination of the sheet. Partial sheets may significantly affect the print quality and cause jams or other paper handling problems... away from edges. Zone coating of the adhesive is recommended, especially when printing bar codes. Adhesive material contaminates the printer and could void the printer and toner cartridge warranties. • Do not use a non‑oozing adhesive. • Portrait orientation is not possible, then ...
User Guide
Page 166
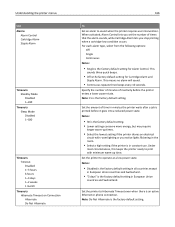
...beeps. • Off is the factory default setting. Note: 15 is the factory default setting for Alarm Control. Understanding the printer menus Use Alarms Alarm Control Cartridge Alarm Staple Alarm Timeouts Standby Mode Disabled 1-240 Timeouts Sleep Mode Disabled 1-180 Timeouts Timeout Disabled 1-3 hours 6 hours 1-3 ...and Switzerland. • "3 days" is in minutes the printer waits after a job is an active Ethernet or phone connection. Set the printer to print with room lighting or you stop printing when a cartridge‑low condition occurs. Set the amount of times that the...
...beeps. • Off is the factory default setting. Note: 15 is the factory default setting for Alarm Control. Understanding the printer menus Use Alarms Alarm Control Cartridge Alarm Staple Alarm Timeouts Standby Mode Disabled 1-240 Timeouts Sleep Mode Disabled 1-180 Timeouts Timeout Disabled 1-3 hours 6 hours 1-3 ...and Switzerland. • "3 days" is in minutes the printer waits after a job is an active Ethernet or phone connection. Set the printer to print with room lighting or you stop printing when a cartridge‑low condition occurs. Set the amount of times that the...

User Guide
Page 217
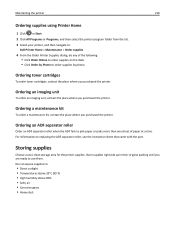
...printer, and then navigate to: Status Monitor Center > Order Supplies 4 From the Order Printer...printer settings. Maintaining the printer 217 Checking the status of parts and supplies Checking the status of the printer...is dependent on the printer control panel From the...printer are using the Supplies Ordering Utility 1 Click or Start. 2 Click All Programs or Programs, and then select the printer...Web browser, and then type the printer IP address in accordance with ISO/...printer, initial estimates assume future supplies consumption based on the home screen. Notes: • View the printer...
...printer, and then navigate to: Status Monitor Center > Order Supplies 4 From the Order Printer...printer settings. Maintaining the printer 217 Checking the status of parts and supplies Checking the status of the printer...is dependent on the printer control panel From the...printer are using the Supplies Ordering Utility 1 Click or Start. 2 Click All Programs or Programs, and then select the printer...Web browser, and then type the printer IP address in accordance with ISO/...printer, initial estimates assume future supplies consumption based on the home screen. Notes: • View the printer...
User Guide
Page 218
...in their original packing until you purchased the printer. Ordering an imaging unit To order an imaging unit, contact the place where you purchased the printer. Storing supplies Choose a cool, clean storage area for the printer supplies. For information on the Web. •... Programs, and then select the printer program folder from the list. 3 Select your printer, and then navigate to: Dell Printer Home > Maintenance > Order supplies 4 From the Order Printer Supplies dialog, do any of paper at a time. Ordering toner cartridges To order toner cartridges, contact the place where you ...
...in their original packing until you purchased the printer. Ordering an imaging unit To order an imaging unit, contact the place where you purchased the printer. Storing supplies Choose a cool, clean storage area for the printer supplies. For information on the Web. •... Programs, and then select the printer program folder from the list. 3 Select your printer, and then navigate to: Dell Printer Home > Maintenance > Order supplies 4 From the Order Printer Supplies dialog, do any of paper at a time. Ordering toner cartridges To order toner cartridges, contact the place where you ...
User Guide
Page 219
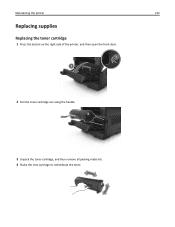
Maintaining the printer 219 Replacing supplies Replacing the toner cartridge 1 Press the button on the right side of the printer, and then open the front door. 1 2 2 Pull the toner cartridge out using the handle. 3 Unpack the toner cartridge, and then remove all packing materials. 4 Shake the new cartridge to redistribute the toner.
Maintaining the printer 219 Replacing supplies Replacing the toner cartridge 1 Press the button on the right side of the printer, and then open the front door. 1 2 2 Pull the toner cartridge out using the handle. 3 Unpack the toner cartridge, and then remove all packing materials. 4 Shake the new cartridge to redistribute the toner.
User Guide
Page 220
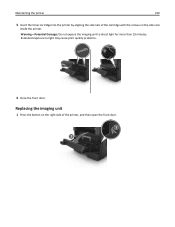
Warning-Potential Damage: Do not expose the imaging unit to light may cause print quality problems. 6 Close the front door. Replacing the imaging unit 1 Press the button on the right side of the cartridge with the arrows on the side rails inside the printer. Extended exposure to direct light for more than 10 minutes. Maintaining the printer 220 5 Insert the toner cartridge into the printer by aligning the side rails of the printer, and then open the front door. 1 2
Warning-Potential Damage: Do not expose the imaging unit to light may cause print quality problems. 6 Close the front door. Replacing the imaging unit 1 Press the button on the right side of the cartridge with the arrows on the side rails inside the printer. Extended exposure to direct light for more than 10 minutes. Maintaining the printer 220 5 Insert the toner cartridge into the printer by aligning the side rails of the printer, and then open the front door. 1 2

User Guide
Page 221
Maintaining the printer 221 2 Pull the toner cartridge out using the handle. 3 Lift the blue handle, and then pull the imaging unit out of the printer. 4 Unpack the new imaging unit, and then shake it.
Maintaining the printer 221 2 Pull the toner cartridge out using the handle. 3 Lift the blue handle, and then pull the imaging unit out of the printer. 4 Unpack the new imaging unit, and then shake it.

User Guide
Page 223
Replacing the staple cartridge 1 Open the stapler door. Maintaining the printer 223 7 Insert the toner cartridge into the printer by aligning the side rails of the cartridge with the arrows on the side rails inside the printer. 8 Close the front door.
Replacing the staple cartridge 1 Open the stapler door. Maintaining the printer 223 7 Insert the toner cartridge into the printer by aligning the side rails of the cartridge with the arrows on the side rails inside the printer. 8 Close the front door.

User Guide
Page 224
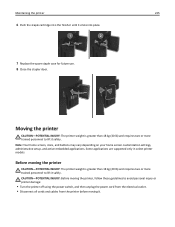
Maintaining the printer 224 2 Pull out the staple cartridge from the finisher. 1 2 3 Hold both sides of the empty staple case with your fingers, pull, and then lift the empty staple case from the cartridge. 3 1 2 4 Remove the spare staple case from its holder. 5 Insert the spare staple case into the staple cartridge. 1 2
Maintaining the printer 224 2 Pull out the staple cartridge from the finisher. 1 2 3 Hold both sides of the empty staple case with your fingers, pull, and then lift the empty staple case from the cartridge. 3 1 2 4 Remove the spare staple case from its holder. 5 Insert the spare staple case into the staple cartridge. 1 2
User Guide
Page 225
... screen customization settings, administrative setup, and active embedded applications. Maintaining the printer 225 6 Push the staple cartridge into the finisher until it safely. CAUTION-POTENTIAL INJURY: Before moving the printer, follow these guidelines to avoid personal injury or printer damage: • Turn the printer off using the power switch, and then unplug the power cord...
... screen customization settings, administrative setup, and active embedded applications. Maintaining the printer 225 6 Push the staple cartridge into the finisher until it safely. CAUTION-POTENTIAL INJURY: Before moving the printer, follow these guidelines to avoid personal injury or printer damage: • Turn the printer off using the power switch, and then unplug the power cord...
User Guide
Page 228
... an actual display would like to view. These reports are useful for assessing the status of numbers separated by setting the selectable alerts. Managing the printer 228 • If you are using a proxy server, then temporarily disable it to be changed or added, or when there is a paper jam. ...be notified when supplies run nearly low, low, very low, or reach their end‑of the screen. Notes: • View the printer IP address on the toner cartridge, imaging unit, and maintenance kit. The virtual display works as 123.123.123.123. • If you are using a proxy server...
... an actual display would like to view. These reports are useful for assessing the status of numbers separated by setting the selectable alerts. Managing the printer 228 • If you are using a proxy server, then temporarily disable it to be changed or added, or when there is a paper jam. ...be notified when supplies run nearly low, low, very low, or reach their end‑of the screen. Notes: • View the printer IP address on the toner cartridge, imaging unit, and maintenance kit. The virtual display works as 123.123.123.123. • If you are using a proxy server...
User Guide
Page 231
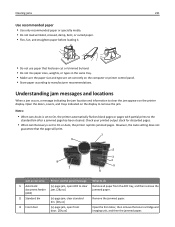
...curled paper. • Flex, fan, and straighten paper before loading it. • Do not use paper that the page will print. 1 9 8 7 2 3 4 5 6 Jam access area Printer control panel message What to do 1 Automatic [x]‑page jam, open ADF to clear Remove all paper from the ADF tray, and then remove the...[20y.xx] Remove the jammed paper. 3 Front door [x]‑page jam, open front door. [20y.xx] Open the front door, then remove the toner cartridge and imaging unit, and then the jammed paper. However, the Auto setting does not guarantee that has been cut or trimmed by hand. • Do...
...curled paper. • Flex, fan, and straighten paper before loading it. • Do not use paper that the page will print. 1 9 8 7 2 3 4 5 6 Jam access area Printer control panel message What to do 1 Automatic [x]‑page jam, open ADF to clear Remove all paper from the ADF tray, and then remove the...[20y.xx] Remove the jammed paper. 3 Front door [x]‑page jam, open front door. [20y.xx] Open the front door, then remove the toner cartridge and imaging unit, and then the jammed paper. However, the Auto setting does not guarantee that has been cut or trimmed by hand. • Do...
User Guide
Page 235
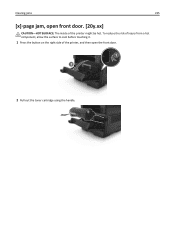
Clearing jams 235 [x]‑page jam, open the front door. 1 2 2 Pull out the toner cartridge using the handle. To reduce the risk of injury from a hot component, allow the surface to cool before touching it. 1 Press the button on the right side of the printer, and then open front door. [20y.xx] CAUTION-HOT SURFACE: The inside of the printer might be hot.
Clearing jams 235 [x]‑page jam, open the front door. 1 2 2 Pull out the toner cartridge using the handle. To reduce the risk of injury from a hot component, allow the surface to cool before touching it. 1 Press the button on the right side of the printer, and then open front door. [20y.xx] CAUTION-HOT SURFACE: The inside of the printer might be hot.

User Guide
Page 237
Clearing jams 237 7 Insert the imaging unit by aligning the arrows on the side rails of the unit with the arrows on the side rails inside the printer, and then insert the imaging unit into the printer. 8 Insert the toner cartridge by aligning the side rails of the cartridge with the arrows on the side rails inside the printer, and then insert the cartridge into the printer. 9 Close the front door. 10 From the printer control panel, select Continue to clear the message and continue printing.
Clearing jams 237 7 Insert the imaging unit by aligning the arrows on the side rails of the unit with the arrows on the side rails inside the printer, and then insert the imaging unit into the printer. 8 Insert the toner cartridge by aligning the side rails of the cartridge with the arrows on the side rails inside the printer, and then insert the cartridge into the printer. 9 Close the front door. 10 From the printer control panel, select Continue to clear the message and continue printing.

User Guide
Page 244
Clearing jams 244 Staple jam in the finisher 1 Open the staple access door. 2 Pull out the staple cartridge from the finisher. 1 2 3 Lift the staple guard, and then remove any jammed or loose staples.
Clearing jams 244 Staple jam in the finisher 1 Open the staple access door. 2 Pull out the staple cartridge from the finisher. 1 2 3 Lift the staple guard, and then remove any jammed or loose staples.
User Guide
Page 245
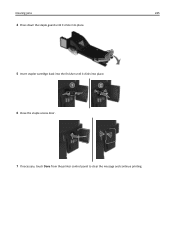
Clearing jams 245 4 Press down the staple guard until it clicks into place. 5 Insert stapler cartridge back into the finisher until it clicks into place. 6 Close the staple access door. 7 If necessary, touch Done from the printer control panel to clear the message and continue printing.
Clearing jams 245 4 Press down the staple guard until it clicks into place. 5 Insert stapler cartridge back into the finisher until it clicks into place. 6 Close the staple access door. 7 If necessary, touch Done from the printer control panel to clear the message and continue printing.


