User Guide
Page 2
Contents 2 Contents Safety information 8 Learning about the printer 10 Finding information about the printer...10 Selecting a location for the printer...11 Printer configurations...12 Using the Embedded Web Server...14 Understanding the basic functions of the scanner 15 Using the ADF and scanner glass...15 ... home screen applications 21 Finding the IP address of the computer 21 Finding the IP address of the printer...21 Accessing the Embedded Web Server...22 Customizing the home screen...22 Understanding the different applications 22 Activating the home screen applications 23 Finding ...
Contents 2 Contents Safety information 8 Learning about the printer 10 Finding information about the printer...10 Selecting a location for the printer...11 Printer configurations...12 Using the Embedded Web Server...14 Understanding the basic functions of the scanner 15 Using the ADF and scanner glass...15 ... home screen applications 21 Finding the IP address of the computer 21 Finding the IP address of the printer...21 Accessing the Embedded Web Server...22 Customizing the home screen...22 Understanding the different applications 22 Activating the home screen applications 23 Finding ...
User Guide
Page 3
... to set up the printer on a wireless network 49 Connecting the printer using the Wireless Setup Wizard 50 Connecting the printer to a wireless network using Wi‑Fi Protected Setup 51 Connecting the printer to a wireless network using the Embedded Web Server 52 Changing port settings ...after installing a new network Internal Solutions Port 52 Setting up serial printing...54 Verifying printer setup...55 Printing a menu settings page ...55 Printing...
... to set up the printer on a wireless network 49 Connecting the printer using the Wireless Setup Wizard 50 Connecting the printer to a wireless network using Wi‑Fi Protected Setup 51 Connecting the printer to a wireless network using the Embedded Web Server 52 Changing port settings ...after installing a new network Internal Solutions Port 52 Setting up serial printing...54 Verifying printer setup...55 Printing a menu settings page ...55 Printing...

User Guide
Page 5
...Dell products...210 Securing the printer 211 Statement of Volatility...211 Erasing volatile memory...211 Erasing non‑volatile memory...212 Erasing printer hard disk memory...212 Configuring printer hard disk encryption 213 Finding printer security information...214 Maintaining the printer 215 Cleaning the printer parts...215 Cleaning the printer...and supplies 217 Checking the status of parts and supplies on the printer control panel 217 Checking the status of parts and supplies from the Embedded Web Server 217 Estimated number of remaining pages 217 Ordering supplies...217 Ordering ...
...Dell products...210 Securing the printer 211 Statement of Volatility...211 Erasing volatile memory...211 Erasing non‑volatile memory...212 Erasing printer hard disk memory...212 Configuring printer hard disk encryption 213 Finding printer security information...214 Maintaining the printer 215 Cleaning the printer parts...215 Cleaning the printer...and supplies 217 Checking the status of parts and supplies on the printer control panel 217 Checking the status of parts and supplies from the Embedded Web Server 217 Estimated number of remaining pages 217 Ordering supplies...217 Ordering ...

User Guide
Page 6
... the staple cartridge ...223 Moving the printer...225 Before moving the printer ...225 Moving the printer to another location...226 Shipping the printer ...226 Managing the printer 227 Managing printer messages...227 Accessing Status Monitor Center...227... Checking the virtual display...227 Setting up e‑mail alerts...228 Viewing reports...228 Configuring supply notifications from the Embedded Web Server...
... the staple cartridge ...223 Moving the printer...225 Before moving the printer ...225 Moving the printer to another location...226 Shipping the printer ...226 Managing the printer 227 Managing printer messages...227 Accessing Status Monitor Center...227... Checking the virtual display...227 Setting up e‑mail alerts...228 Viewing reports...228 Configuring supply notifications from the Embedded Web Server...
User Guide
Page 7
Contents 7 Solving fax problems...299 Solving scanner problems...305 Solving home screen applications problems 310 Embedded Web Server does not open 310 Contacting technical support...311 Appendix 312 Index...314
Contents 7 Solving fax problems...299 Solving scanner problems...305 Solving home screen applications problems 310 Embedded Web Server does not open 310 Contacting technical support...311 Appendix 312 Index...314
User Guide
Page 14
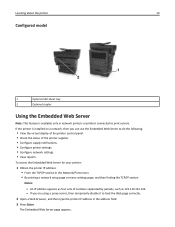
... menu settings page, and then finding the TCP/IP section Notes: - The Embedded Web Server page appears. If the printer is available only in network printers or printers connected to print servers. Learning about the printer 14 Configured model 1 2 1 Optional 550‑sheet tray 2 Optional stapler Using the ... 2 Open a Web browser, and then type the printer IP address in the address field. 3 Press Enter. If you can use the Embedded Web Server to do the following: • View the virtual display of the printer control panel. • Check the status of numbers separated...
... menu settings page, and then finding the TCP/IP section Notes: - The Embedded Web Server page appears. If the printer is available only in network printers or printers connected to print servers. Learning about the printer 14 Configured model 1 2 1 Optional 550‑sheet tray 2 Optional stapler Using the ... 2 Open a Web browser, and then type the printer IP address in the address field. 3 Press Enter. If you can use the Embedded Web Server to do the following: • View the virtual display of the printer control panel. • Check the status of numbers separated...
User Guide
Page 18
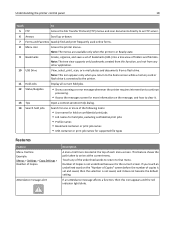
... created from a flash drive. This feature shows the path taken to an FTP server. 6 Arrows Scroll up or down. 7 Forms and Favorites Quickly find and print frequently used online forms. 8 Menu icon Access the printer menus. If you return to the home screen while a memory card or flash ...or e‑mail photos and documents from this icon appears and the red indicator light blinks. Number of folders and file links. Understanding the printer control panel 18 Touch To 5 FTP Access the File Transfer Protocol (FTP) menus and scan documents directly to arrive at the top of the...
... created from a flash drive. This feature shows the path taken to an FTP server. 6 Arrows Scroll up or down. 7 Forms and Favorites Quickly find and print frequently used online forms. 8 Menu icon Access the printer menus. If you return to the home screen while a memory card or flash ...or e‑mail photos and documents from this icon appears and the red indicator light blinks. Number of folders and file links. Understanding the printer control panel 18 Touch To 5 FTP Access the File Transfer Protocol (FTP) menus and scan documents directly to arrive at the top of the...

User Guide
Page 19
...use the IP address when accessing the Embedded Web Server so you are not physically near the printer. Status message bar Printer IP address Example: 123.123.123.123 • Show the current printer status such as Ready or Busy. • Show printer conditions such as four sets of options. 2 Copy...context-sensitive Help dialog. 43 2 Using the touch-screen buttons Note: Your home screen, icons, and buttons may vary, depending on your network printer is located at the upper left corner of the home screen and appears as Toner Low or Cartridge Low. • Show intervention messages so the...
...use the IP address when accessing the Embedded Web Server so you are not physically near the printer. Status message bar Printer IP address Example: 123.123.123.123 • Show the current printer status such as Ready or Busy. • Show printer conditions such as four sets of options. 2 Copy...context-sensitive Help dialog. 43 2 Using the touch-screen buttons Note: Your home screen, icons, and buttons may vary, depending on your network printer is located at the upper left corner of the home screen and appears as Toner Low or Cartridge Low. • Show intervention messages so the...
User Guide
Page 21
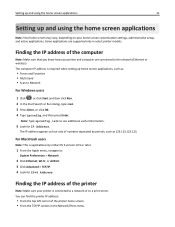
...only in Mac OS X version 10.5 or later. 1 From the Apple menu, navigate to a print server. The IP address appears as four sets of the computer Note: Make sure that you know how your printer is connected to a network or to : System Preferences > Network 2 Click Ethernet, Wi‑Fi, ... applications are connected to see additional useful information. 5 Look for IPv4 Address. Finding the IP address of the printer home screen. • From the TCP/IP section in select printer models. Setting up and using the home screen applications Note: Your home screen may vary, depending on your home...
...only in Mac OS X version 10.5 or later. 1 From the Apple menu, navigate to a print server. The IP address appears as four sets of the computer Note: Make sure that you know how your printer is connected to a network or to : System Preferences > Network 2 Click Ethernet, Wi‑Fi, ... applications are connected to see additional useful information. 5 Look for IPv4 Address. Finding the IP address of the printer home screen. • From the TCP/IP section in select printer models. Setting up and using the home screen applications Note: Your home screen may vary, depending on your home...
User Guide
Page 22
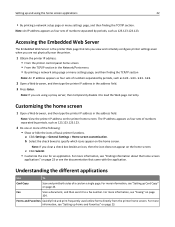
... temporarily disable it to a fax number. Setting up Forms and Favorites" on page 23. Accessing the Embedded Web Server The Embedded Web Server is the printer Web page that came with the application. b Select the check boxes to load the Web page correctly. c Click Submit. • Customize the icon for an ...
... temporarily disable it to a fax number. Setting up Forms and Favorites" on page 23. Accessing the Embedded Web Server The Embedded Web Server is the printer Web page that came with the application. b Select the check boxes to load the Web page correctly. c Click Submit. • Customize the icon for an ...
User Guide
Page 23
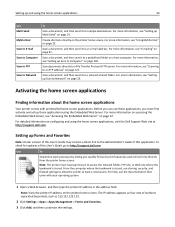
...For more information, see "E-mailing" on page 22. For more information on accessing the Embedded Web Server, see "Setting up Scan to Network" on page 26. For more information, see "Accessing the Embedded Web Server" on page 97. Use To Streamline work processes by periods, such as 123.123.123.123... address in the address field. To check for updates of this User's Guide, go to allow the printer at http://support.dell.com. Note: The printer must first activate and set up Forms and Favorites Note: A later version of this User's Guide may contain a direct link to the ...
...For more information, see "E-mailing" on page 22. For more information on accessing the Embedded Web Server, see "Setting up Scan to Network" on page 26. For more information, see "Accessing the Embedded Web Server" on page 97. Use To Streamline work processes by periods, such as 123.123.123.123... address in the address field. To check for updates of this User's Guide, go to allow the printer at http://support.dell.com. Note: The printer must first activate and set up Forms and Favorites Note: A later version of this User's Guide may contain a direct link to the ...
User Guide
Page 49
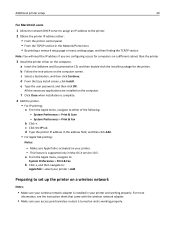
... & Fax b Click +, and then navigate to: AppleTalk > select your printer > Add Preparing to the printer. 2 Obtain the printer IP address either of the following: - Additional printer setup 49 For Macintosh users 1 Allow the network DHCP server to assign an IP address to set up the printer on a wireless network Notes: • Make sure your wireless network...
... & Fax b Click +, and then navigate to: AppleTalk > select your printer > Add Preparing to the printer. 2 Obtain the printer IP address either of the following: - Additional printer setup 49 For Macintosh users 1 Allow the network DHCP server to assign an IP address to set up the printer on a wireless network Notes: • Make sure your wireless network...

User Guide
Page 50
...• A wireless network adapter is either infrastructure or ad hoc. • Channel (for ad hoc networks)-The channel defaults to Auto. Connecting the printer using an unsecured wireless network. To set this to Auto, navigate to: > Network/Ports > Active NIC > Auto > Submit Note: Make sure to... To find the SSID or the security information for your network, then see the Embedded Web Server associated with the wireless network adapter. • An Ethernet cable is disconnected from the printer. • Active NIC is connected to as an additional layer of the computer network adapter, ...
...• A wireless network adapter is either infrastructure or ad hoc. • Channel (for ad hoc networks)-The channel defaults to Auto. Connecting the printer using an unsecured wireless network. To set this to Auto, navigate to: > Network/Ports > Active NIC > Auto > Submit Note: Make sure to... To find the SSID or the security information for your network, then see the Embedded Web Server associated with the wireless network adapter. • An Ethernet cable is disconnected from the printer. • Active NIC is connected to as an additional layer of the computer network adapter, ...
User Guide
Page 51
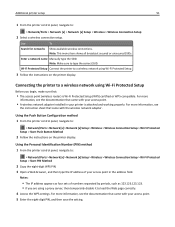
...: • The access point (wireless router) is attached and working properly. Wi‑Fi Protected Setup Connect the printer to a wireless network using a proxy server, then temporarily disable it to a wireless network using Wi‑Fi Protected Setup Before you are using Wi‑Fi ...Protected Setup. 3 Follow the instructions on the printer display. Use To Search for networks Show available wireless connections. ...
...: • The access point (wireless router) is attached and working properly. Wi‑Fi Protected Setup Connect the printer to a wireless network using a proxy server, then temporarily disable it to a wireless network using Wi‑Fi Protected Setup Before you are using Wi‑Fi ...Protected Setup. 3 Follow the instructions on the printer display. Use To Search for networks Show available wireless connections. ...
User Guide
Page 52
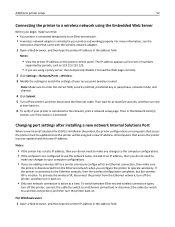
...to your computer configurations. • If you are using the Embedded Web Server Before you begin, make sure the printer is active at least five seconds, and then turn off the printer, and then disconnect the Ethernet cable. To switch between Ethernet and wireless connection...address. The IP address appears as four sets of your printer and working properly. Additional printer setup 52 Connecting the printer to a wireless network using a proxy server, then temporarily disable it back on computers that access the printer must be assigned a new IP address. Then wait for ...
...to your computer configurations. • If you are using the Embedded Web Server Before you begin, make sure the printer is active at least five seconds, and then turn off the printer, and then disconnect the Ethernet cable. To switch between Ethernet and wireless connection...address. The IP address appears as four sets of your printer and working properly. Additional printer setup 52 Connecting the printer to a wireless network using a proxy server, then temporarily disable it back on computers that access the printer must be assigned a new IP address. Then wait for ...
User Guide
Page 53
...as 123.123.123.123. • If you are using a proxy server, then temporarily disable it to : AppleTalk > select the printer > Add System Preferences > Print & Fax b Click +. For Macintosh users 1 Open a Web browser, and then type the printer IP address in the address field, and then click Add. • ...sets of numbers separated by periods, such as 123.123.123.123. • If you are using a proxy server, then temporarily disable it to load the Web page correctly. 2 Add the printer. • For IP printing: a From the Apple menu, navigate to either of them with the new IP ...
...as 123.123.123.123. • If you are using a proxy server, then temporarily disable it to : AppleTalk > select the printer > Add System Preferences > Print & Fax b Click +. For Macintosh users 1 Open a Web browser, and then type the printer IP address in the address field, and then click Add. • ...sets of numbers separated by periods, such as 123.123.123.123. • If you are using a proxy server, then temporarily disable it to load the Web page correctly. 2 Add the printer. • For IP printing: a From the Apple menu, navigate to either of them with the new IP ...
User Guide
Page 67
... screen. The IP address appears as 123.123.123.123. • If you are using the printer control panel. Note: You can also change the paper size and type settings using a proxy server, then temporarily disable it to load the Web page correctly. 2 Click Settings > Paper Menu. 3 Change the paper size and... the other tray. • To unlink trays, make sure the paper size or type for a paper type Using the Embedded Web Server 1 Open a Web browser, and then type the printer IP address in the address field. Note: Close the paper stop , pull it so that the trays they are in do not...
... screen. The IP address appears as 123.123.123.123. • If you are using the printer control panel. Note: You can also change the paper size and type settings using a proxy server, then temporarily disable it to load the Web page correctly. 2 Click Settings > Paper Menu. 3 Change the paper size and... the other tray. • To unlink trays, make sure the paper size or type for a paper type Using the Embedded Web Server 1 Open a Web browser, and then type the printer IP address in the address field. Note: Close the paper stop , pull it so that the trays they are in do not...
User Guide
Page 68
Notes: • View the printer IP address on the printer home screen. Assigning a custom paper type Using the Embedded Web Server Assign a custom paper type name to : > Paper Menu > Custom Names 2 Select a custom name, and then type a custom paper type name. 3 Touch . 4 ...paper type for all user‑defined custom names. 4 Click Submit. Loading paper and specialty media 68 Notes: • View the printer IP address on the printer home screen. Using the printer control panel 1 From the home screen, navigate to load the Web page correctly. 2 Click Settings > Paper Menu > Custom Names...
Notes: • View the printer IP address on the printer home screen. Assigning a custom paper type Using the Embedded Web Server Assign a custom paper type name to : > Paper Menu > Custom Names 2 Select a custom name, and then type a custom paper type name. 3 Touch . 4 ...paper type for all user‑defined custom names. 4 Click Submit. Loading paper and specialty media 68 Notes: • View the printer IP address on the printer home screen. Using the printer control panel 1 From the home screen, navigate to load the Web page correctly. 2 Click Settings > Paper Menu > Custom Names...
User Guide
Page 69
...paper and specialty media 69 Configuring a custom name Using the Embedded Web Server 1 Open a Web browser, and then type the printer IP address in the address field. Notes: • View the printer IP address on the printer home screen. Using the printer control panel 1 From the home screen, navigate to: > Paper Menu... The IP address appears as four sets of numbers separated by periods, such as 123.123.123.123. • If you are using a proxy server, then temporarily disable it to load the Web page correctly. 2 Click Settings > Paper Menu > Custom Types. 3 Select a custom name you want...
...paper and specialty media 69 Configuring a custom name Using the Embedded Web Server 1 Open a Web browser, and then type the printer IP address in the address field. Notes: • View the printer IP address on the printer home screen. Using the printer control panel 1 From the home screen, navigate to: > Paper Menu... The IP address appears as four sets of numbers separated by periods, such as 123.123.123.123. • If you are using a proxy server, then temporarily disable it to load the Web page correctly. 2 Click Settings > Paper Menu > Custom Types. 3 Select a custom name you want...
User Guide
Page 80
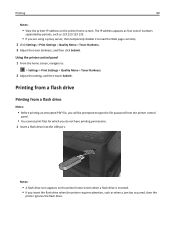
... screen when a flash drive is inserted. • If you insert the flash drive when the printer requires attention, such as 123.123.123.123. • If you are using a proxy server, then temporarily disable it to load the Web page correctly. 2 Click Settings > Print Settings > Quality Menu > ...Toner Darkness. 3 Adjust the toner darkness, and then click Submit. Notes: • A flash drive icon appears on the printer home screen. The IP address appears...
... screen when a flash drive is inserted. • If you insert the flash drive when the printer requires attention, such as 123.123.123.123. • If you are using a proxy server, then temporarily disable it to load the Web page correctly. 2 Click Settings > Print Settings > Quality Menu > ...Toner Darkness. 3 Adjust the toner darkness, and then click Submit. Notes: • A flash drive icon appears on the printer home screen. The IP address appears...


