Dell B3460dn Support Question
Dell B3460dn Support Question
Find answers below for this question about Dell B3460dn.Need a Dell B3460dn manual? We have 11 online manuals for this item!
Question posted by shirleebauer on January 20th, 2021
I Cannot Get The Toner Cartridge To Seat Correctly So That I Can Close The Door.
I get the error message 31.40 and the right side of the cartridge will not go all the way in. I have taken out the cartridge 100 times to clear paper jams and have never had a problem with putting it back in. What is wrong?
Current Answers
Answer #1: Posted by hzplj9 on January 20th, 2021 2:18 PM
hzplj9

Member since:
June 25th, 2012 Points: 4,873,510

Member since:
June 25th, 2012 Points: 4,873,510
Check that the cartridge for any broken tabs. If a tab has broken off it may not release the cover on the cartridge and so not allow it to go in. Usually it comes down to a mechanical fault with something blocking the cartridge path or the cartridge. Compare the cartridge physically with another one if you have it. Do you have an empty one around? If you still have no success then post another question and upload some photos of the area so we can see where there is an issue and hopefully solve your dilemma.
Related Dell B3460dn Manual Pages
User's Guide - Page 38
... the same environment as the printer for 24-48 hours before buying large quantities. Paper and specialty media guide
38
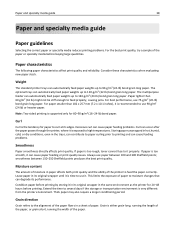
Paper and specialty media guide
Paper guidelines
Selecting the correct paper or specialty media reduces printing problems. For the best print quality, try a sample of the paper or specialty media before printing. Extend the time to 120‑g/m2...
User's Guide - Page 40
...; Suitable smoothness (100-200 Sheffield units, or 140-350 Bendtsen units, European)
Note: Some much smoother papers (such as premium 24 lb laser papers, 50-90 Sheffield units) and much rougher papers (such as letterhead must be able to withstand temperatures up to -sheet coefficient of friction (0.4-0.6) • Sufficient bending resistance in laser printers, despite surface texture...
User's Guide - Page 41
...lb bond) paper or 25% cotton. Have bent corners - Tips on using envelopes
Print samples on the envelopes being considered for laser printers.
Have windows... printer. Have any way -
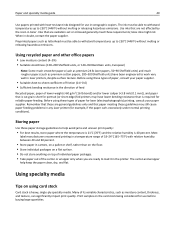
Paper and specialty media guide
41
When printing on card stock:
• Make sure the Paper Type...affect the print quality and cause jams or
other paper handling problems.
• Check with the ...
User's Guide - Page 42
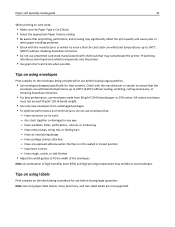
...getting fingerprints on the transparencies to prevent print quality problems. • Before loading transparencies, flex, fan, and straighten the stack to prevent sheets from sticking together. • Page orientation is important when printing on letterhead. Adhesive material contaminates the printer and could void the printer and toner cartridge warranties.
• Do not use labels with...
User's Guide - Page 87
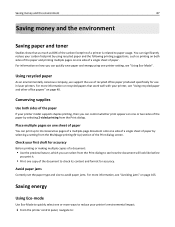
... draft for use in laser printers. For information on how you can quickly save paper and energy using recycled paper and the following printing suggestions, such as 80% of the carbon footprint of a printer is related to paper usage. For more information, see "Using recycled paper and other office papers" on page 40. Avoid paper jams
Correctly set the paper type and size...
User's Guide - Page 95

...;F) • High humidity above 80% • Salty air • Corrosive gases • Heavy dust
Replacing supplies
Replacing the toner cartridge
1 Press the button on the right side of the printer, and then open the front door. Do not expose supplies to use them. Maintaining the printer
95
Storing supplies
Choose a cool, clean storage area for the...
User's Guide - Page 96

... the toner.
5 Insert the toner cartridge into the printer by aligning the side rails of the cartridge with the arrows on the side rails
inside the printer. Maintaining the printer
96
2 Pull the toner cartridge out using the handle.
3 Unpack the toner cartridge, and then remove all packing materials. 4 Shake the new cartridge to light may cause print quality problems.
6 Close the front door...
User's Guide - Page 97

Maintaining the printer
97
Replacing the imaging unit
1 Press the button on the right side of the printer, and then open the front door.
2 Pull the toner cartridge out using the handle.
User's Guide - Page 99

... printer
99
6 Insert the imaging unit into the printer by aligning the arrows on the side rails of the imaging unit with the arrows
on the side rails inside the printer.
7 Insert the toner cartridge into the printer by aligning the side rails of the cartridge with the arrows on the side rails
inside the printer.
8 Close the front door...
User's Guide - Page 102

... the Web page correctly. 2 Click Settings > Print Settings > Supply Notifications. 3 From the drop‑down menu for each supply, select one of the following notification options: Notes:
• Selectable alerts can be set on the toner cartridge, imaging unit, and maintenance kit. • All selectable alerts can
be set on a printer control panel. Not...
User's Guide - Page 106
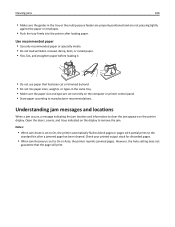
... firmly into the printer after a jammed page has been cleared. Understanding jam messages and locations
When a jam occurs, a message indicating the jam location and information to clear the jam appears on the computer or printer control panel. • Store paper according to On or Auto, the printer reprints jammed pages.
Use recommended paper
• Use only recommended paper or specialty...
User's Guide - Page 107

...jam, open rear door. [20y.xx] [x]‑page jam, remove tray 1 to clear duplex. [23y.xx]
[x]‑page jam, remove tray [x]. [24y.xx] [x]‑page jam, clear manual feeder. [250.xx] [x]‑page jam, open the rear door to do Remove the jammed paper. Open the rear door, and then remove the jammed paper.
Open the front door, then remove the toner cartridge, imaging unit, and jammed paper...
User's Guide - Page 108
To reduce the risk of injury from a hot component, allow the surface to cool before touching it.
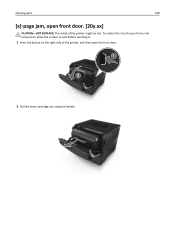
1 Press the button on the right side of the printer, and then open front door. [20y.xx]
CAUTION-HOT SURFACE: The inside of the printer might be hot. Clearing jams
108
[x]‑page jam, open the front door.
2 Pull the toner cartridge out using the handle.
User's Guide - Page 110

... arrows on the side rails inside
the printer, and then insert the imaging unit into the printer.
8 Insert the toner cartridge by aligning the side rails of the cartridge with the arrows on each side, and then gently pull it out. Clearing jams
110
6 Firmly grasp the jammed paper on the side rails inside the printer,
and then insert the...
User's Guide - Page 117

... where you purchased the printer.
2 Change the toner cartridge or imaging unit so that both MICR (Magnetic Imaging Content Recording) or non-MICR
supplies.
For more of the following:
• Load the correct size and type of the User's Guide.
Press
to clear the message and continue printing.
Note: Make sure the paper size and type settings...
User's Guide - Page 140

... 4.
No The problem is solved.
Is paper with the correct paper type and weight in the tray.
b Resend the print job.
Troubleshooting
140
Action
Step 3
a Depending on your operating system, specify the paper type and
weight from Printing Preferences or from the Print dialog.
b Resend the print job.
Contact technical support.
1 Remove the toner cartridge.
2 Remove the...
User's Guide - Page 149

... for the size of the paper loaded. a Move the width and length guides in the imaging unit.
1 Remove the toner cartridge, and then the imaging unit.
2 Firmly shake the imaging unit.
The problem is solved.
a Redistribute the toner in the tray to the correct positions
for more than 10 minutes. Is the printer still printing blank pages...
User's Guide - Page 153
... imaging unit, and then the cartridge. No The problem is solved.
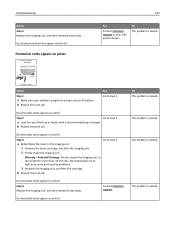
Trailing edge
Action Step 1
a Make sure your Dell printer dealer. Step 2
Go to step 2.
Do horizontal voids appear on prints?
Yes Go to step 3.
a Load the specified tray or feeder with a recommended type of paper. The problem is using a correct fill pattern. Do streaked vertical...
User's Guide - Page 154
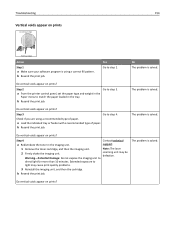
... the print job.
Step 2
a From the printer control panel, set the paper type and weight in the
Paper menu to light may be defective.
a Load the indicated tray or feeder with a recommended type of paper. Extended exposure to match the paper loaded in the imaging unit. 1 Remove the toner cartridge, and then the imaging unit. 2 Firmly shake...
User's Guide - Page 161

...] 114 [x]‑page jam, remove tray 1 to clear duplex. [23y.xx] 113
A
accessing Status Monitor Center 101 accessing the controller board 13 Active NIC menu 62 adjusting printer display brightness 90 adjusting Sleep mode 88 adjusting toner darkness 46 AppleTalk menu 67 attaching cables 19 available internal options 13 avoiding jams 40 avoiding paper jams 105
C
cables Ethernet...
Similar Questions

31.60 Error?
Root cause and solution for 31.60 error from a DELL B3460dn Mono Laser Printer.
Root cause and solution for 31.60 error from a DELL B3460dn Mono Laser Printer.
(Posted by otisberry 6 years ago)

How To Clear Paper Jams In Fuser Dell5330dn Printer
(Posted by booLesli 9 years ago)

Emptying Waste Toner Cartridge
I need instruction on emptying the waste toner cartridge on the Dell 3010cn color printer
I need instruction on emptying the waste toner cartridge on the Dell 3010cn color printer
(Posted by kimhudson 9 years ago)

How To Remove The Toner Cartridge From A Dell 2330dn Printer
(Posted by stpat 9 years ago)

Part # Jc63-00111a - Is It Supposed To Be On The Toner Cartridge Or Discarded
(Posted by tsilvestri 11 years ago)