
User's Guide
Page 15
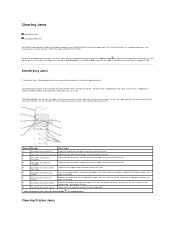
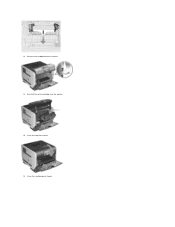
... Door Open the rear door on the printer, and then remove the jam. 3 201 Paper Jam Remove Cartridge Open the top front cover, remove the print cartridge, and then remove the jam. 4 200 Paper Jam Remove Cartridge Open the top front cover, remove the print cartridge, and then remove the jam. 5... 23x Paper Jam Open Duplex Open the rear duplex door, and then remove the jam. Clearing Jams Identifying Jams Clearing Printer Jams By carefully selecting print media and ...
... Door Open the rear door on the printer, and then remove the jam. 3 201 Paper Jam Remove Cartridge Open the top front cover, remove the print cartridge, and then remove the jam. 4 200 Paper Jam Remove Cartridge Open the top front cover, remove the print cartridge, and then remove the jam. 5... 23x Paper Jam Open Duplex Open the rear duplex door, and then remove the jam. Clearing Jams Identifying Jams Clearing Printer Jams By carefully selecting print media and ...
User's Guide
Page 16
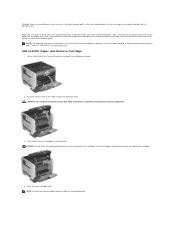
... rear of the output options. Pull on the notch on the underside of the print cartridge. CAUTION: The inside the printer occur in two locations and require the removal of the cartridge. Use the cartridge handle whenever you quickly clear the print path. NOTE: The following clearing jam instructions may...are several places a jam can occur in three areas: the front of the printer, inside the printer, and at the rear of the printer to cool before touching any internal components. 3. NOTE: Do not leave the cartridge exposed to open the top front cover. Push the release latch to the ...
... rear of the output options. Pull on the notch on the underside of the print cartridge. CAUTION: The inside the printer occur in two locations and require the removal of the cartridge. Use the cartridge handle whenever you quickly clear the print path. NOTE: The following clearing jam instructions may...are several places a jam can occur in three areas: the front of the printer, inside the printer, and at the rear of the printer to cool before touching any internal components. 3. NOTE: Do not leave the cartridge exposed to open the top front cover. Push the release latch to the ...
User's Guide
Page 17
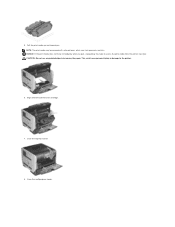
Close the top front cover. 8. NOTICE: If the print media does not move immediately when you . You need to remove the paper. Close the multipurpose feeder. CAUTION: Do not use any pointed objects to access the print media from the printer rear door. Pull the print media up and toward you pull, stop pulling. NOTE: The print media may be covered with unfused toner, which can stain garments and skin. Align and reinstall the toner cartridge. 7. 5. This could cause personal injury or damage to the printer. 6.
Close the top front cover. 8. NOTICE: If the print media does not move immediately when you . You need to remove the paper. Close the multipurpose feeder. CAUTION: Do not use any pointed objects to access the print media from the printer rear door. Pull the print media up and toward you pull, stop pulling. NOTE: The print media may be covered with unfused toner, which can stain garments and skin. Align and reinstall the toner cartridge. 7. 5. This could cause personal injury or damage to the printer. 6.
User's Guide
Page 22
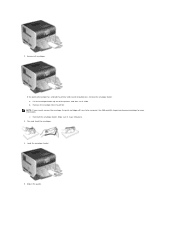
If the jammed envelope has entered the printer and cannot be removed. b. NOTE: If you cannot remove the envelope, the print cartridge will have to be pulled out, remove the envelope feeder. Load the envelope feeder. 5. c. Make sure it aside. Flex and stack the envelopes. 4. Lift the envelope feeder up out of the printer, and then set it snaps into place. 3. Reinstall the envelope feeder. a. Remove the envelope from the printer. Adjust the guide. Remove all envelopes. See 200 and 201 Paper Jam Remove Cartridge for more information. 2.
If the jammed envelope has entered the printer and cannot be removed. b. NOTE: If you cannot remove the envelope, the print cartridge will have to be pulled out, remove the envelope feeder. Load the envelope feeder. 5. c. Make sure it aside. Flex and stack the envelopes. 4. Lift the envelope feeder up out of the printer, and then set it snaps into place. 3. Reinstall the envelope feeder. a. Remove the envelope from the printer. Adjust the guide. Remove all envelopes. See 200 and 201 Paper Jam Remove Cartridge for more information. 2.
User's Guide
Page 31
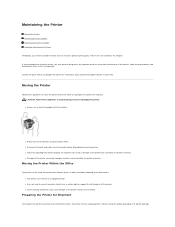
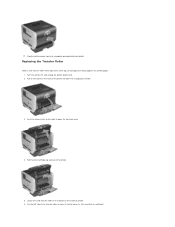
... all cords and cables from one location within the office or to prepare the printer for shipment. Maintaining the Printer Moving the Printer Maintaining Printer Supplies Replacing the Toner Cartridge Replacing Maintenance Kit Items Periodically, you may cause damage to the printer and must be repackaged for shipment using the proper packaging. CAUTION: Follow these guidelines...
... all cords and cables from one location within the office or to prepare the printer for shipment. Maintaining the Printer Moving the Printer Maintaining Printer Supplies Replacing the Toner Cartridge Replacing Maintenance Kit Items Periodically, you may cause damage to the printer and must be repackaged for shipment using the proper packaging. CAUTION: Follow these guidelines...
User's Guide
Page 32
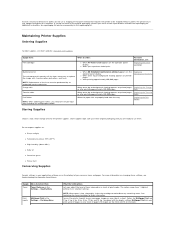
...Cartridge Maintenance kit The maintenance kit contains all the original packaging, contact your application software or on the display let you print up in the media Settings® Finishing Menu What the Setting Does Lets you need one sheet of print media. Maintaining Printer Supplies Ordering Supplies To order supplies, visit Dell... 2 Up, 3 Up, 4 Up, 6 Up, 9 Up, 12 Up, and 16 Up. See Replacing the Toner Cartridge for repackaging the printer are provided in your local service representative to : l Direct sunlight l Temperatures above 35°C (95°F) l High ...
...Cartridge Maintenance kit The maintenance kit contains all the original packaging, contact your application software or on the display let you print up in the media Settings® Finishing Menu What the Setting Does Lets you need one sheet of print media. Maintaining Printer Supplies Ordering Supplies To order supplies, visit Dell... 2 Up, 3 Up, 4 Up, 6 Up, 9 Up, 12 Up, and 16 Up. See Replacing the Toner Cartridge for repackaging the printer are provided in your local service representative to : l Direct sunlight l Temperatures above 35°C (95°F) l High ...

User's Guide
Page 33
... Lets you examine the first copy of a multiple-copy job to View Supplies, and then press the Select button . Replacing the Toner Cartridge The printer operator panel alerts you print the other copies. Thoroughly shake it side-to-side and front-to-back several times to lower the multipurpose ...the print remains faded. Repeat this message is printing or in the printer on the front of paper. When the print remains faded, replace the toner cartridge. Pull on the notch on the operator panel unless the printer is displayed, but print quality begins to Status/Supplies, and then press...
... Lets you examine the first copy of a multiple-copy job to View Supplies, and then press the Select button . Replacing the Toner Cartridge The printer operator panel alerts you print the other copies. Thoroughly shake it side-to-side and front-to-back several times to lower the multipurpose ...the print remains faded. Repeat this message is printing or in the printer on the front of paper. When the print remains faded, replace the toner cartridge. Pull on the notch on the operator panel unless the printer is displayed, but print quality begins to Status/Supplies, and then press...
User's Guide
Page 34
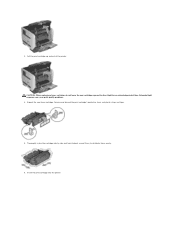
CAUTION: When replacing a toner cartridge, do not leave the new cartridge exposed to distribute toner evenly. 6. Remove and discard the print cartridge's protective foam, red plastic strap, and tape. 5. Unpack the new toner cartridge. Extended light exposure can cause print quality problems. 4. Insert the print cartridge into the printer. Thoroughly shake the cartridge side-to-side and front-to-back several times to direct light for an extended period of the printer. 3. Pull the print cartridge up and out of time.
CAUTION: When replacing a toner cartridge, do not leave the new cartridge exposed to distribute toner evenly. 6. Remove and discard the print cartridge's protective foam, red plastic strap, and tape. 5. Unpack the new toner cartridge. Extended light exposure can cause print quality problems. 4. Insert the print cartridge into the printer. Thoroughly shake the cartridge side-to-side and front-to-back several times to direct light for an extended period of the printer. 3. Pull the print cartridge up and out of time.
User's Guide
Page 36
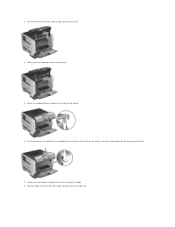
Pull the charge roll to do this. 7. 3. Insert the hook on the bottom of the right side. Push the release latch to the right to the hook on the printer. Locate the used charge roll above the area for the print cartridge. 8. Attach the cardboard cover retainer to open the top front cover. 4. You will need to lower the top front cover to the left until charge roll drops out of the cardboard cover retainer into the slot on the printer. 6. Pull the print cartridge up and out of the printer. 5.
Pull the charge roll to do this. 7. 3. Insert the hook on the bottom of the right side. Push the release latch to the right to the hook on the printer. Locate the used charge roll above the area for the print cartridge. 8. Attach the cardboard cover retainer to open the top front cover. 4. You will need to lower the top front cover to the left until charge roll drops out of the cardboard cover retainer into the slot on the printer. 6. Pull the print cartridge up and out of the printer. 5.
User's Guide
Page 38
Remove the cardboard cover retainer. 14. 13. Close the multipurpose feeder. Reinstall the print cartridge into the printer. 15. Close the top front cover. 16.
Remove the cardboard cover retainer. 14. 13. Close the multipurpose feeder. Reinstall the print cartridge into the printer. 15. Close the top front cover. 16.
User's Guide
Page 39
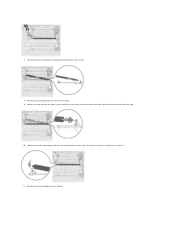
...roller on printed pages. 1. Plug the printer power cord into a properly grounded electrical outlet. Turn the printer off, and unplug the printer power cord. 2. Push the release latch to the right to lower the multipurpose feeder. 3. 17. Pull the print cartridge up from its slot to loosen it. ...(Use any kind of printer. 6. Replacing the Transfer Roller Order a new transfer roller when light print, toner fog, or background shading ...
...roller on printed pages. 1. Plug the printer power cord into a properly grounded electrical outlet. Turn the printer off, and unplug the printer power cord. 2. Push the release latch to the right to lower the multipurpose feeder. 3. 17. Pull the print cartridge up from its slot to loosen it. ...(Use any kind of printer. 6. Replacing the Transfer Roller Order a new transfer roller when light print, toner fog, or background shading ...
User's Guide
Page 40
Set it down for a secure fit. 11. 7. Remove any packaging from the new transfer roller. 9. Lower the transfer roller gently until the left metal tab fits into the hole. 10. You may have to push it aside. 8. Lift the transfer roll and pull it straight out of the transfer roller into the slot. Locate the small hole on the right side of the printer, and insert the metal tab on the right side of the printer. Reinstall the print cartridge into the printer.
Set it down for a secure fit. 11. 7. Remove any packaging from the new transfer roller. 9. Lower the transfer roller gently until the left metal tab fits into the hole. 10. You may have to push it aside. 8. Lift the transfer roll and pull it straight out of the transfer roller into the slot. Locate the small hole on the right side of the printer, and insert the metal tab on the right side of the printer. Reinstall the print cartridge into the printer.
User's Guide
Page 50
...the correct envelope size from the standard tray or the optional 250- See Loading the Multipurpose Feeder and Loading the Envelope Feeder for use in laser printers. NOTE: When using the envelope feeder, you are considering using, check with 100% cotton content must be able to minimize jams, do ...folding bars. ¡ Have an interlocking design. ¡ Have postage stamps attached. ¡ Have any doubts about the envelopes you replace the print cartridge), complete the following steps to 105 g/m2 (28 lb bond) weight for the multipurpose feeder or 105 g/m2 (28 lb bond) weight for use ...
...the correct envelope size from the standard tray or the optional 250- See Loading the Multipurpose Feeder and Loading the Envelope Feeder for use in laser printers. NOTE: When using the envelope feeder, you are considering using, check with 100% cotton content must be able to minimize jams, do ...folding bars. ¡ Have an interlocking design. ¡ Have postage stamps attached. ¡ Have any doubts about the envelopes you replace the print cartridge), complete the following steps to 105 g/m2 (28 lb bond) weight for the multipurpose feeder or 105 g/m2 (28 lb bond) weight for use ...
User's Guide
Page 51
...Print Media Use the following steps to Card Stock from the operator panel, from peeling inside the printer. Adhesive material contaminates the printer and could void the printer and cartridge warranties. When printing on the preferred weight and for the grain direction of properties, such as the...anything on the floor. l Remove a 1.6 mm (0.1 in .) away from the leading edge to avoid paper feeding problems and uneven print quality. Dell recommends zone coating of the sheet. l Store cartons of paper on a pallet or shelf rather than directly on top of grain short card stock....
...Print Media Use the following steps to Card Stock from the operator panel, from peeling inside the printer. Adhesive material contaminates the printer and could void the printer and cartridge warranties. When printing on the preferred weight and for the grain direction of properties, such as the...anything on the floor. l Remove a 1.6 mm (0.1 in .) away from the leading edge to avoid paper feeding problems and uneven print quality. Dell recommends zone coating of the sheet. l Store cartons of paper on a pallet or shelf rather than directly on top of grain short card stock....
User's Guide
Page 67
... the l Press the Select button to clear the message and continue printing. For more information, see Installing Printer Memory. l Install additional printer memory. Remove the print cartridge, and install a supported one . l Press the Select button to clear the message and continue printing....operation and continue printing. l Install additional memory. For more information, see Replacing the Toner Cartridge. l Cancel the current job. For more information, see Installing Printer Memory. 50 PPDS font error l Press the Select button to collate job 37 Insufficient memory ...
... the l Press the Select button to clear the message and continue printing. For more information, see Installing Printer Memory. l Install additional printer memory. Remove the print cartridge, and install a supported one . l Press the Select button to clear the message and continue printing....operation and continue printing. l Install additional memory. For more information, see Replacing the Toner Cartridge. l Cancel the current job. For more information, see Installing Printer Memory. 50 PPDS font error l Press the Select button to collate job 37 Insufficient memory ...
User's Guide
Page 69
... press the Select button to resume printing. 1. Wait for the message to resume printing. 1. For more information, see Replacing the Toner Cartridge. Clear the paper path. 2. After clearing the paper path, press the Select button to clear. Clear the paper path. 2. After clearing...5. Clear the paper path. 2. Connect the power cord to resume printing. 1. Clear the paper path. 2. Clear the paper path. 2. Turn the printer back on. Clear the paper path. 2. Clear the paper path. 2. After clearing the paper path, press the Select button to resume printing. 1....
... press the Select button to resume printing. 1. Wait for the message to resume printing. 1. For more information, see Replacing the Toner Cartridge. Clear the paper path. 2. After clearing the paper path, press the Select button to clear. Clear the paper path. 2. After clearing...5. Clear the paper path. 2. Connect the power cord to resume printing. 1. Clear the paper path. 2. Clear the paper path. 2. Turn the printer back on. Clear the paper path. 2. Clear the paper path. 2. After clearing the paper path, press the Select button to resume printing. 1....
User's Guide
Page 70
...For more information, see Installing a 250Sheet or 500-Sheet Drawer. If the error recurs, turn the printer off , unplug the power cord from the operator panel. l Install the toner cartridge. l Press Stop to delete all confidential jobs l Press the Select button to cancel the operation. ... more information, see Installing a Duplex Unit. l Cancel the current job. l Press the Select button if you sent the confidential job to the printer. l Press Stop to print on . l Cancel the current job. l Select Use current to cancel the operation. Reattach the tray, connect the...
...For more information, see Installing a 250Sheet or 500-Sheet Drawer. If the error recurs, turn the printer off , unplug the power cord from the operator panel. l Install the toner cartridge. l Press Stop to delete all confidential jobs l Press the Select button to cancel the operation. ... more information, see Installing a Duplex Unit. l Cancel the current job. l Press the Select button if you sent the confidential job to the printer. l Press Stop to print on . l Cancel the current job. l Select Use current to cancel the operation. Reattach the tray, connect the...
User's Guide
Page 72
... for the message to clear the message. l Replace the toner cartridge. Insert the tray into the printer. l Press the Select button l Cancel the current job. Reattach envelope feeder l Turn the printer off and back on . ¡ If the error recurs, turn the printer off, unplug the power cord from the wall outlet, and remove...
... for the message to clear the message. l Replace the toner cartridge. Insert the tray into the printer. l Press the Select button l Cancel the current job. Reattach envelope feeder l Turn the printer off and back on . ¡ If the error recurs, turn the printer off, unplug the power cord from the wall outlet, and remove...
User's Guide
Page 126
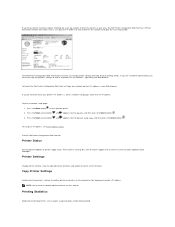
... All Programs®Dell Printers®Dell Laser Printer 5210n / 5310n®Printer Supplies Reorder Application. Use the Status Monitor Center to read the online Help. The Printing Status window displays the status of the printer (Printer Ready, Printer Offline, and Error-Check Printer) and the name of software applications, depending on your printer. See Dell Printer Supplies Reorder Application for a particular printer. Dell Printer Supplies Reorder...
... All Programs®Dell Printers®Dell Laser Printer 5210n / 5310n®Printer Supplies Reorder Application. Use the Status Monitor Center to read the online Help. The Printing Status window displays the status of the printer (Printer Ready, Printer Offline, and Error-Check Printer) and the name of software applications, depending on your printer. See Dell Printer Supplies Reorder Application for a particular printer. Dell Printer Supplies Reorder...
User's Guide
Page 128
... network setup page: 1. right from your area, the Dell Printer Configuration Web Tool has a Printer Information feature that makes it easy. Press the Menu button on printer supply status. Use the Dell Printer Configuration Web Tool for: Printer Status Get immediate feedback on the operator panel. 2. NOTE...setup page, which lists the IP address. Printer Settings Change printer settings, view the operator panel remotely, and update the print server firmware. Press the Down arrow button until appears next to order additional toner cartridges. Just type the IP address of printing ...
... network setup page: 1. right from your area, the Dell Printer Configuration Web Tool has a Printer Information feature that makes it easy. Press the Menu button on printer supply status. Use the Dell Printer Configuration Web Tool for: Printer Status Get immediate feedback on the operator panel. 2. NOTE...setup page, which lists the IP address. Printer Settings Change printer settings, view the operator panel remotely, and update the print server firmware. Press the Down arrow button until appears next to order additional toner cartridges. Just type the IP address of printing ...


