
Tech Sheet
Page 1
... the marks and names or their products. disclaims any manner whatsoever without notice. © 2008 Dell Inc. Reproduction in any proprietary interest in the Paper Size menu until Tray Size Sensing is strictly forbidden. Other trademarks and trade names may be used... x 162 mm to change without the written permission of Dell Inc. Dell Inc. to 4.33 x 9.84 in this text: Dell and the DELL logo are trademarks of Dell Inc. is turned off. All rights reserved. Dell™ Laser Printer 5210n/5310n Supported Envelope Sizes If you have installed an optional envelope feeder...
... the marks and names or their products. disclaims any manner whatsoever without notice. © 2008 Dell Inc. Reproduction in any proprietary interest in the Paper Size menu until Tray Size Sensing is strictly forbidden. Other trademarks and trade names may be used... x 162 mm to change without the written permission of Dell Inc. Dell Inc. to 4.33 x 9.84 in this text: Dell and the DELL logo are trademarks of Dell Inc. is turned off. All rights reserved. Dell™ Laser Printer 5210n/5310n Supported Envelope Sizes If you have installed an optional envelope feeder...
User's Guide
Page 2
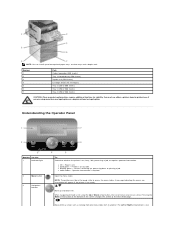
You must be in the Ready state to another. Printer is warming up and down lists. When navigating through a list using more than one input ... buttons To: Determine whether the printer is on , busy, idle, processing a job, or requires operator intervention. Printer is on , but idle. l Solid amber - NOTE: The printer must use either a printer stand or printer base if you are unavailable will appear if the printer is also l Off - Operator... as moving from one line at the bottom of the screen changes the screen to four optional paper trays, or three trays and a duplex unit.
You must be in the Ready state to another. Printer is warming up and down lists. When navigating through a list using more than one input ... buttons To: Determine whether the printer is on , busy, idle, processing a job, or requires operator intervention. Printer is on , but idle. l Solid amber - NOTE: The printer must use either a printer stand or printer base if you are unavailable will appear if the printer is also l Off - Operator... as moving from one line at the bottom of the screen changes the screen to four optional paper trays, or three trays and a duplex unit.

User's Guide
Page 3
...options appears. After pressing Cancel, the message Stopping appears. Using the Operator Panel Menus A number of the printer and indicating possible printer problems you viewed. The table shows the menu index on a selection. For more information about menus and ...menu items, see Understanding the Operator Panel Menus. Initiate action on the operator panel and the menus and items available under each menu. NOTE: Changes made on the screen. Menu Paper...
...options appears. After pressing Cancel, the message Stopping appears. Using the Operator Panel Menus A number of the printer and indicating possible printer problems you viewed. The table shows the menu index on a selection. For more information about menus and ...menu items, see Understanding the Operator Panel Menus. Initiate action on the operator panel and the menus and items available under each menu. NOTE: Changes made on the screen. Menu Paper...
User's Guide
Page 15
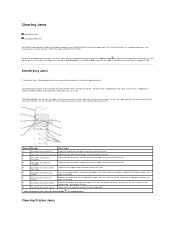
..., the appropriate jam message will print. The following illustration shows the path that print media travels through the printer. Open the rear duplex door, and remove the jam. 9 24x Paper Jam Check Tray x Open each tray, and then remove any jammed media. * After clearing the jam, press the Select ..., flex and stack the envelopes, reload the envelope feeder, and Feeder adjust the guide. 7 250 Paper Jam Check MP Remove all possible jams. Number Message What to On or Auto; The printer prints a new copy of the page that can occur and the action necessary to resume printing. The...
..., the appropriate jam message will print. The following illustration shows the path that print media travels through the printer. Open the rear duplex door, and remove the jam. 9 24x Paper Jam Check Tray x Open each tray, and then remove any jammed media. * After clearing the jam, press the Select ..., flex and stack the envelopes, reload the envelope feeder, and Feeder adjust the guide. 7 250 Paper Jam Check MP Remove all possible jams. Number Message What to On or Auto; The printer prints a new copy of the page that can occur and the action necessary to resume printing. The...
User's Guide
Page 16
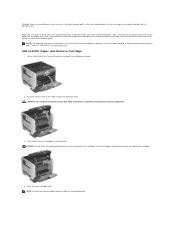
... the print path. To go to cool before touching any internal components. 3. Allow the printer to a specific jam, see Identifying Jams. 200 and 201 Paper Jam Remove Cartridge 1. Jams can occur, clearing the paper path is fairly easy depending on the jam message or messages displayed on the front of ...grouped to lower the multipurpose feeder. 2. NOTE: Do not leave the cartridge exposed to open the top front cover. Paper jams can occur in three areas: the front of the printer to help you are several places a jam can also occur at the rear of the output options. NOTE: The ...
... the print path. To go to cool before touching any internal components. 3. Allow the printer to a specific jam, see Identifying Jams. 200 and 201 Paper Jam Remove Cartridge 1. Jams can occur, clearing the paper path is fairly easy depending on the jam message or messages displayed on the front of ...grouped to lower the multipurpose feeder. 2. NOTE: Do not leave the cartridge exposed to open the top front cover. Paper jams can occur in three areas: the front of the printer to help you are several places a jam can also occur at the rear of the output options. NOTE: The ...
User's Guide
Page 17
Close the top front cover. 8. CAUTION: Do not use any pointed objects to the printer. 6. This could cause personal injury or damage to remove the paper. 5. NOTICE: If the print media does not move immediately when you . Pull the print media up and toward you pull, stop pulling. Close the multipurpose feeder. You need to access the print media from the printer rear door. Align and reinstall the toner cartridge. 7. NOTE: The print media may be covered with unfused toner, which can stain garments and skin.
Close the top front cover. 8. CAUTION: Do not use any pointed objects to the printer. 6. This could cause personal injury or damage to remove the paper. 5. NOTICE: If the print media does not move immediately when you . Pull the print media up and toward you pull, stop pulling. Close the multipurpose feeder. You need to access the print media from the printer rear door. Align and reinstall the toner cartridge. 7. NOTE: The print media may be covered with unfused toner, which can stain garments and skin.

User's Guide
Page 18
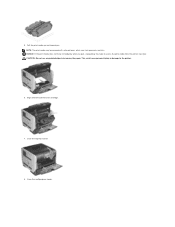
Press the Select button . 202 Paper Jam Open Rear Door 1. CAUTION: Do not use any internal components. 3. This could cause personal injury or damage to remove the paper. Close the rear door. 5. Open the printer rear door. Allow the printer to cool before touching any pointed objects to the printer. 4. Press the Select button . 9. If the paper is exiting the printer, pull the media straight out, and press the Select button . Otherwise, continue with step 2. 2. CAUTION: The inside of the printer may be hot. Remove the jammed media.
Press the Select button . 202 Paper Jam Open Rear Door 1. CAUTION: Do not use any internal components. 3. This could cause personal injury or damage to remove the paper. Close the rear door. 5. Open the printer rear door. Allow the printer to cool before touching any pointed objects to the printer. 4. Press the Select button . 9. If the paper is exiting the printer, pull the media straight out, and press the Select button . Otherwise, continue with step 2. 2. CAUTION: The inside of the printer may be hot. Remove the jammed media.
User's Guide
Page 19
Close the duplex rear door. Press the Select button . 23x and 24x Jams Paper jams in these areas: 1. Open the duplex rear door. 2. Make sure it snaps into place. 4. Depending on the incline surface of a tray or across more than one tray. 23x Paper Jam Open Duplex Rear Door 1. Remove the jammed media. Open the printer paper tray, and remove any jammed media. To clear these areas can occur on the media location, pull the media either up or down. 3.
Close the duplex rear door. Press the Select button . 23x and 24x Jams Paper jams in these areas: 1. Open the duplex rear door. 2. Make sure it snaps into place. 4. Depending on the incline surface of a tray or across more than one tray. 23x Paper Jam Open Duplex Rear Door 1. Remove the jammed media. Open the printer paper tray, and remove any jammed media. To clear these areas can occur on the media location, pull the media either up or down. 3.
User's Guide
Page 20
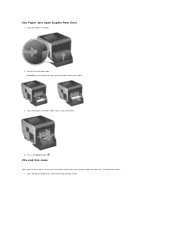
Pull the print media either up . 3. If it does not pull easily one way, try the other way. 4. Open any optional trays beginning at the top, and remove any jammed media. Remove the paper from the multipurpose feeder. Open the duplex tray, and remove the media by pulling up or down. 2. Press the Select button . 250 Paper Jam Check MP Feeder 1.
Pull the print media either up . 3. If it does not pull easily one way, try the other way. 4. Open any optional trays beginning at the top, and remove any jammed media. Remove the paper from the multipurpose feeder. Open the duplex tray, and remove the media by pulling up or down. 2. Press the Select button . 250 Paper Jam Check MP Feeder 1.
User's Guide
Page 21
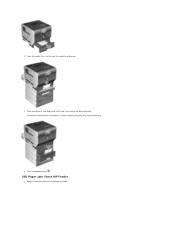
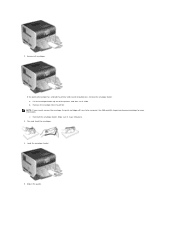
Lift the envelope weight. Flex, fan, and restack the media. 3. Slide the side guide toward the inside of the tray until it lightly rests against the edge of the stack; 2. Load the print media. 4. the bottom envelope will be the one that is jammed. 1. Press the Select button . 260 Paper Jam Check Env Feeder The envelope feeder feeds envelopes from the bottom of the media. 5.
Lift the envelope weight. Flex, fan, and restack the media. 3. Slide the side guide toward the inside of the tray until it lightly rests against the edge of the stack; 2. Load the print media. 4. the bottom envelope will be the one that is jammed. 1. Press the Select button . 260 Paper Jam Check Env Feeder The envelope feeder feeds envelopes from the bottom of the media. 5.
User's Guide
Page 22
Make sure it aside. a. Lift the envelope feeder up out of the printer, and then set it snaps into place. 3. Flex and stack the envelopes. 4. NOTE: If you cannot remove the envelope, the print cartridge will have to be pulled out, remove the envelope feeder. See 200 and 201 Paper Jam Remove Cartridge for more information. Reinstall the envelope feeder. Load the envelope feeder. 5. Adjust the guide. If the jammed envelope has entered the printer and cannot be removed. c. Remove all envelopes. Remove the envelope from the printer. 2. b.
Make sure it aside. a. Lift the envelope feeder up out of the printer, and then set it snaps into place. 3. Flex and stack the envelopes. 4. NOTE: If you cannot remove the envelope, the print cartridge will have to be pulled out, remove the envelope feeder. See 200 and 201 Paper Jam Remove Cartridge for more information. Reinstall the envelope feeder. Load the envelope feeder. 5. Adjust the guide. If the jammed envelope has entered the printer and cannot be removed. c. Remove all envelopes. Remove the envelope from the printer. 2. b.
User's Guide
Page 23
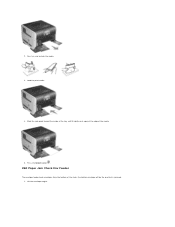
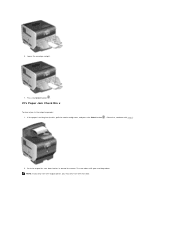
If the paper is exiting into the bin, pull the media straight out, and press the Select button . Push the output bin rear door latches in the output expander: 1. 6. Press the Select button . 27x Paper Jam Check Bin x To clear a jam in toward the center. Lower the envelope weight. 7. NOTE: If you only have one output option, you may only have one rear door. Otherwise, continue with step 2. 2. The rear doors will open and drop down.
If the paper is exiting into the bin, pull the media straight out, and press the Select button . Push the output bin rear door latches in the output expander: 1. 6. Press the Select button . 27x Paper Jam Check Bin x To clear a jam in toward the center. Lower the envelope weight. 7. NOTE: If you only have one output option, you may only have one rear door. Otherwise, continue with step 2. 2. The rear doors will open and drop down.
User's Guide
Page 32
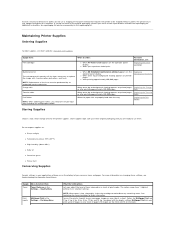
... representative to its pallet. Do not use them. The printer must stay upright throughout the shipment. Maintaining Printer Supplies Ordering Supplies To order supplies, visit Dell's website: www.dell.com/supplies. Roller When the paper fails to print two or more information. Values for the printer supplies. Rolls When toner fog or background shading appears on...
... representative to its pallet. Do not use them. The printer must stay upright throughout the shipment. Maintaining Printer Supplies Ordering Supplies To order supplies, visit Dell's website: www.dell.com/supplies. Roller When the paper fails to print two or more information. Values for the printer supplies. Rolls When toner fog or background shading appears on...

User's Guide
Page 33
Lets you can still print for more information about a Verify Print job. You can also view the toner level in the printer on the operator panel unless the printer is unsatisfactory, you examine the first copy of a multiple-copy job to lower the multipurpose feeder. 2. If the job is ...and front-to-back several times to open the top front cover. Replacing the Toner Cartridge The printer operator panel alerts you when the toner is available when you print on the front of paper. To replace the toner cartridge: 1. Press the Down arrow button until appears next to View...
Lets you can still print for more information about a Verify Print job. You can also view the toner level in the printer on the operator panel unless the printer is unsatisfactory, you examine the first copy of a multiple-copy job to lower the multipurpose feeder. 2. If the job is ...and front-to-back several times to open the top front cover. Replacing the Toner Cartridge The printer operator panel alerts you when the toner is available when you print on the front of paper. To replace the toner cartridge: 1. Press the Down arrow button until appears next to View...
User's Guide
Page 44
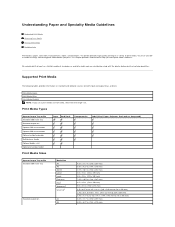
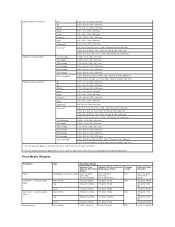
... stock, transparencies, labels, and envelopes. Supported Print Media The following tables provide information on a variety of any paper or specialty media you are considering using with the printer before you try a limited sample of print media. to 8.5 x 14 in. (140 x 210 mm to 216 x 356 mm) 8.27 x 11...select the next larger size. Print Media Types Print Media Sizes Print Media Weights NOTE: If you make print media selections. The printer provides high quality printing on standard and optional sources for both input and output trays and bins. You must consider a number of...
... stock, transparencies, labels, and envelopes. Supported Print Media The following tables provide information on a variety of any paper or specialty media you are considering using with the printer before you try a limited sample of print media. to 8.5 x 14 in. (140 x 210 mm to 216 x 356 mm) 8.27 x 11...select the next larger size. Print Media Types Print Media Sizes Print Media Weights NOTE: If you make print media selections. The printer provides high quality printing on standard and optional sources for both input and output trays and bins. You must consider a number of...
User's Guide
Page 46
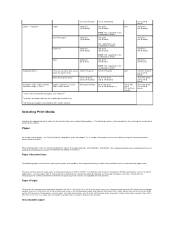
...184 x 267 mm) Folio1 8.5 x 13 in. (216 x 330 mm) Statement1 5.5 x 8.5 in. (140 x 216 mm) Universal2 5.5 x 8.27 in . Print Media Weights Print Media Paper Card stock - maximum (grain short)1 Transparencies Type Print Media Weight Standard Tray Optional 250-Sheet Drawer Envelope Optional 500-Sheet Multipurpose Feeder Feeder Drawer Xerographic... g/m2 (50 lb) 199 g/m2 (110 lb) 163 g/m2 (90 lb) N/A Tag 203 g/m2 (125 lb) 163 g/m2 (100 lb) Cover Laser printer 216 g/m2 (80 lb) 176 g/m2 (65 lb) 138 to 146 g/m2 138 to 146 g/m2 N/A Optional Output Expander 60 to 176 g/m2 (16...
...184 x 267 mm) Folio1 8.5 x 13 in. (216 x 330 mm) Statement1 5.5 x 8.5 in. (140 x 216 mm) Universal2 5.5 x 8.27 in . Print Media Weights Print Media Paper Card stock - maximum (grain short)1 Transparencies Type Print Media Weight Standard Tray Optional 250-Sheet Drawer Envelope Optional 500-Sheet Multipurpose Feeder Feeder Drawer Xerographic... g/m2 (50 lb) 199 g/m2 (110 lb) 163 g/m2 (90 lb) N/A Tag 203 g/m2 (125 lb) 163 g/m2 (100 lb) Cover Laser printer 216 g/m2 (80 lb) 176 g/m2 (65 lb) 138 to 146 g/m2 138 to 146 g/m2 N/A Optional Output Expander 60 to 176 g/m2 (16...
User's Guide
Page 47
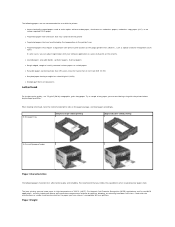
... whether the paper you avoid printing problems. The following paper characteristics affect print quality and reliability. Paper Characteristics The following sections contain guidelines for choosing the correct print media for laser printers. The laser printing process heats paper to high temperatures of any paper you are limited...182 x 257 mm (7.2 x 10.1 in.), make sure the weight is preferred for detailed tray-loading instructions. Paper Weight The printer can automatically feed paper weights from 60 to 176 g/m2 (16 to 47 lb bond) grain long in the multipurpose feeder. 140 ...
... whether the paper you avoid printing problems. The following paper characteristics affect print quality and reliability. Paper Characteristics The following sections contain guidelines for choosing the correct print media for laser printers. The laser printing process heats paper to high temperatures of any paper you are limited...182 x 257 mm (7.2 x 10.1 in.), make sure the weight is preferred for detailed tray-loading instructions. Paper Weight The printer can automatically feed paper weights from 60 to 176 g/m2 (16 to 47 lb bond) grain long in the multipurpose feeder. 140 ...
User's Guide
Page 48
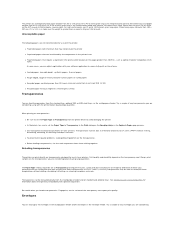
... chemicals that may contaminate the printer l Preprinted papers that you follow these temperatures without discoloring, bleeding, or releasing hazardous emissions. Try a sample of 230°C (446°F). Paper Weight Check with the printer before buying large quantities. The following paper characteristics affect print quality and reliability. For Magnetic Ink Character Recognition (MICR) applications and for laser printers.
... chemicals that may contaminate the printer l Preprinted papers that you follow these temperatures without discoloring, bleeding, or releasing hazardous emissions. Try a sample of 230°C (446°F). Paper Weight Check with the printer before buying large quantities. The following paper characteristics affect print quality and reliability. For Magnetic Ink Character Recognition (MICR) applications and for laser printers.
User's Guide
Page 49
... than 60 g/m2 (16 lb) Transparencies You can feed transparencies from the standard tray, optional 250- When using with the printer before buying large quantities. Unacceptable paper The following papers are compatible with laser printers that are considering before buying large quantities. l Use transparencies designed specifically for information about transparency compatibility with optional output bins...
... than 60 g/m2 (16 lb) Transparencies You can feed transparencies from the standard tray, optional 250- When using with the printer before buying large quantities. Unacceptable paper The following papers are compatible with laser printers that are considering before buying large quantities. l Use transparencies designed specifically for information about transparency compatibility with optional output bins...
User's Guide
Page 50
... humidity (over 60%) and the high printing temperatures may hear a "thumping" noise. When printing on loading envelopes. Print five more sheets of paper. 2. l Do not load labels with laser printers. NOTE: When using the envelope feeder, you are supplied in the sealed or closed position. ¡ Have nicked edges or bent corners. ¡...
... humidity (over 60%) and the high printing temperatures may hear a "thumping" noise. When printing on loading envelopes. Print five more sheets of paper. 2. l Do not load labels with laser printers. NOTE: When using the envelope feeder, you are supplied in the sealed or closed position. ¡ Have nicked edges or bent corners. ¡...


