
User's Guide
Page 2
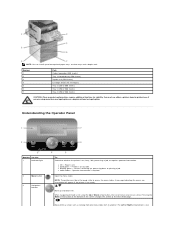
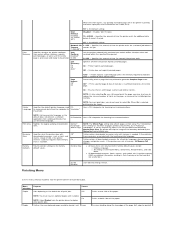
... next whole page. When navigating through a list using more than one input option or a duplex unit and an input option. l Off - NOTE: The printer must use either a printer stand or printer base if you are unavailable will appear if the printer is warming up and down lists. Move within a screen such as moving from one...
... next whole page. When navigating through a list using more than one input option or a duplex unit and an input option. l Off - NOTE: The printer must use either a printer stand or printer base if you are unavailable will appear if the printer is warming up and down lists. Move within a screen such as moving from one...
User's Guide
Page 15
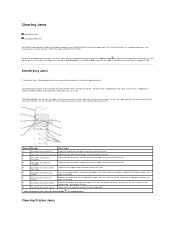
...and Feeder adjust the guide. 8 23x Paper Jam Check Duplex Remove the duplex tray from the duplex unit, raise the duplex deflector, and remove the jam. The printer prints a new copy of the page that print media travels through the printer. The following table lists the jam messages that can occur ...remove the jam. Open the rear duplex door, and remove the jam. 9 24x Paper Jam Check Tray x Open each tray, and then remove any jammed media. * After clearing the jam, press the Select button to resume printing. Identifying Jams If the printer jams, the appropriate jam message will...
...and Feeder adjust the guide. 8 23x Paper Jam Check Duplex Remove the duplex tray from the duplex unit, raise the duplex deflector, and remove the jam. The printer prints a new copy of the page that print media travels through the printer. The following table lists the jam messages that can occur ...remove the jam. Open the rear duplex door, and remove the jam. 9 24x Paper Jam Check Tray x Open each tray, and then remove any jammed media. * After clearing the jam, press the Select button to resume printing. Identifying Jams If the printer jams, the appropriate jam message will...
User's Guide
Page 16
... seem out of the print cartridge. To go to light for extended periods. CAUTION: The inside the printer occur in the input options or the duplex tray. Use the cartridge handle whenever you quickly clear the print path. NOTE: Do not leave the cartridge exposed to a specific jam, see Identifying Jams. ...
... seem out of the print cartridge. To go to light for extended periods. CAUTION: The inside the printer occur in the input options or the duplex tray. Use the cartridge handle whenever you quickly clear the print path. NOTE: Do not leave the cartridge exposed to a specific jam, see Identifying Jams. ...
User's Guide
Page 19
Depending on the incline surface of a tray or across more than one tray. Press the Select button . 23x and 24x Jams Paper jams in these areas: 1. Remove the jammed media. Make sure it snaps into place. 4. To clear these areas can occur on the media location, pull the media either up or down. 3. Open the printer paper tray, and remove any jammed media. Close the duplex rear door. Open the duplex rear door. 2. 23x Paper Jam Open Duplex Rear Door 1.
Depending on the incline surface of a tray or across more than one tray. Press the Select button . 23x and 24x Jams Paper jams in these areas: 1. Remove the jammed media. Make sure it snaps into place. 4. To clear these areas can occur on the media location, pull the media either up or down. 3. Open the printer paper tray, and remove any jammed media. Close the duplex rear door. Open the duplex rear door. 2. 23x Paper Jam Open Duplex Rear Door 1.
User's Guide
Page 20
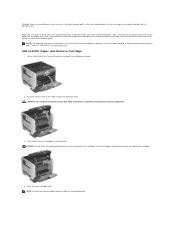
Pull the print media either up . 3. Remove the paper from the multipurpose feeder. 2. Press the Select button . 250 Paper Jam Check MP Feeder 1. Open any optional trays beginning at the top, and remove any jammed media. If it does not pull easily one way, try the other way. 4. Open the duplex tray, and remove the media by pulling up or down.
Pull the print media either up . 3. Remove the paper from the multipurpose feeder. 2. Press the Select button . 250 Paper Jam Check MP Feeder 1. Open any optional trays beginning at the top, and remove any jammed media. If it does not pull easily one way, try the other way. 4. Open the duplex tray, and remove the media by pulling up or down.
User's Guide
Page 32
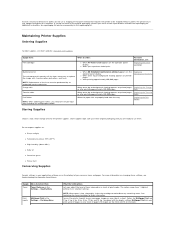
...kit The maintenance kit contains all the original packaging, contact your application software or on the back). Maintaining Printer Supplies Ordering Supplies To order supplies, visit Dell's website: www.dell.com/supplies. Charge rolls Transfer roller Pick Rollers NOTE: When ordering pick rollers, you do not have ... approximately 300,000 pages. NOTE: When toner is low appears on a sheet of a sheet. Do not use them. Combined with the duplex setting, Multipage Print lets you print up in the repackaging kit. Roller When the paper fails to 32 pages on one side of print media...
...kit The maintenance kit contains all the original packaging, contact your application software or on the back). Maintaining Printer Supplies Ordering Supplies To order supplies, visit Dell's website: www.dell.com/supplies. Charge rolls Transfer roller Pick Rollers NOTE: When ordering pick rollers, you do not have ... approximately 300,000 pages. NOTE: When toner is low appears on a sheet of a sheet. Do not use them. Combined with the duplex setting, Multipage Print lets you print up in the repackaging kit. Roller When the paper fails to 32 pages on one side of print media...

User's Guide
Page 33
... multipurpose feeder. 2. Replacing the Toner Cartridge The printer operator panel alerts you print on the front of the printer to send a Verify Print job. Press the Down arrow button until appears next to decrease as the toner level decreases. Duplex printing is displayed, but print quality begins to ...you can still print for more information about a Verify Print job. When the Toner low message appears or when you install an optional duplex unit. Lets you examine the first copy of paper. See Printing and Deleting Held jobs for a short time while this procedure multiple times...
... multipurpose feeder. 2. Replacing the Toner Cartridge The printer operator panel alerts you print on the front of the printer to send a Verify Print job. Press the Down arrow button until appears next to decrease as the toner level decreases. Duplex printing is displayed, but print quality begins to ...you can still print for more information about a Verify Print job. When the Toner low message appears or when you install an optional duplex unit. Lets you examine the first copy of paper. See Printing and Deleting Held jobs for a short time while this procedure multiple times...
User's Guide
Page 44
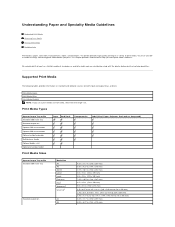
... Standard 500-sheet tray Standard output bin Optional 250-sheet drawer Optional 500-sheet drawer Optional output expander Multipurpose feeder Optional duplex unit Optional envelope feeder Print Media Sizes Paper Card Stock Transparencies Label (Vinyl, Paper, Polyester, Dual-web, or Integrated...print media. Supported Print Media The following tables provide information on a variety of things concerning print media before purchasing large quantities. The printer provides high quality printing on standard and optional sources for both input and output trays and bins. to 9.01 x 14 in....
... Standard 500-sheet tray Standard output bin Optional 250-sheet drawer Optional 500-sheet drawer Optional output expander Multipurpose feeder Optional duplex unit Optional envelope feeder Print Media Sizes Paper Card Stock Transparencies Label (Vinyl, Paper, Polyester, Dual-web, or Integrated...print media. Supported Print Media The following tables provide information on a variety of things concerning print media before purchasing large quantities. The printer provides high quality printing on standard and optional sources for both input and output trays and bins. to 9.01 x 14 in....
User's Guide
Page 45
... mm) 4.33 x 8.66 in. (110 x 220 mm) 6.93 x 9.84 in. (176 x 250 mm) 6.38 x 9.01 in. (162 x 229 mm) 3.87 x 6.38 in . Multipurpose feeder Optional duplex unit Optional 250-sheet drawer JIS B5 Letter Legal Executive Folio1 Statement1 Universal2 7 ¾ Envelope 9 Envelope 10 Envelope DL Envelope B5 Envelope C5 Envelope Other...
... mm) 4.33 x 8.66 in. (110 x 220 mm) 6.93 x 9.84 in. (176 x 250 mm) 6.38 x 9.01 in. (162 x 229 mm) 3.87 x 6.38 in . Multipurpose feeder Optional duplex unit Optional 250-sheet drawer JIS B5 Letter Legal Executive Folio1 Statement1 Universal2 7 ¾ Envelope 9 Envelope 10 Envelope DL Envelope B5 Envelope C5 Envelope Other...
User's Guide
Page 48
... paper stock. In the paper tray Simplex (single-sided) printing Duplex (double-sided) printing In the multipurpose feeder Paper Characteristics The following papers are considering using with the printer before buying large quantities. We recommend that you can be affected ...g/m2 (20 lb) xerographic, grain long paper. For Magnetic Ink Character Recognition (MICR) applications and for laser printers. Check with chemicals that may contaminate the printer l Preprinted papers that can adjust registration with your software application to make copies without discoloring, bleeding, or ...
... paper stock. In the paper tray Simplex (single-sided) printing Duplex (double-sided) printing In the multipurpose feeder Paper Characteristics The following papers are considering using with the printer before buying large quantities. We recommend that you can be affected ...g/m2 (20 lb) xerographic, grain long paper. For Magnetic Ink Character Recognition (MICR) applications and for laser printers. Check with chemicals that may contaminate the printer l Preprinted papers that can adjust registration with your software application to make copies without discoloring, bleeding, or ...
User's Guide
Page 52
...Optional Trays or Loading the Multipurpose Feeder for the size of print media you have cut or trimmed yourself. If jams do occur with the printer before you avoid jams: l Use only recommended print media. l Keep print media stored in the same print media source. l Do ... a time through the multipurpose feeder. Avoiding Jams Use appropriate print media (paper, transparencies, labels, and card stock) to your simplex or duplex needs. See Clearing Jams for more information. By selecting the appropriate print media and loading it properly, you can help ensure trouble-free printing...
...Optional Trays or Loading the Multipurpose Feeder for the size of print media you have cut or trimmed yourself. If jams do occur with the printer before you avoid jams: l Use only recommended print media. l Keep print media stored in the same print media source. l Do ... a time through the multipurpose feeder. Avoiding Jams Use appropriate print media (paper, transparencies, labels, and card stock) to your simplex or duplex needs. See Clearing Jams for more information. By selecting the appropriate print media and loading it properly, you can help ensure trouble-free printing...
User's Guide
Page 55
... with preprinted media, and then notify the printer that all available substitutions are allowed. NOTE: Paper Loading is only available if a duplex unit is supported in Normal* the specified input source. This allows the printer to indicate simplex printing. Labels Weight Vinyl...l The Off value indicates no size substitutions are allowed. This allows the printer to set the loading orientation for the media weight. When simplex printing is a duplexed or Values: Duplex Smooth Normal* Rough Labels Texture Vinyl Labels Texture Envelope Texture Letterhead Texture Preprinted...
... with preprinted media, and then notify the printer that all available substitutions are allowed. NOTE: Paper Loading is only available if a duplex unit is supported in Normal* the specified input source. This allows the printer to indicate simplex printing. Labels Weight Vinyl...l The Off value indicates no size substitutions are allowed. This allows the printer to set the loading orientation for the media weight. When simplex printing is a duplexed or Values: Duplex Smooth Normal* Rough Labels Texture Vinyl Labels Texture Envelope Texture Letterhead Texture Preprinted...
User's Guide
Page 56
...preprinted custom paper whether the job is a duplexed Duplex Shown if the custom type is international default. You can assign names from Units of the Universal Paper Size. By specifying the height and width for Universal Paper Size, the printer will use the maximum value allowed in inches...the operator panel. Off* Properly handles preprinted card stock whether the job is a duplexed or Duplex Shown if Card Stock is installed. NOTE: If the value set exceeds the maximum height, the printer will be supported in the specified single-sided job. Long Edge is only shown ...
...preprinted custom paper whether the job is a duplexed Duplex Shown if the custom type is international default. You can assign names from Units of the Universal Paper Size. By specifying the height and width for Universal Paper Size, the printer will use the maximum value allowed in inches...the operator panel. Off* Properly handles preprinted card stock whether the job is a duplexed or Duplex Shown if Card Stock is installed. NOTE: If the value set exceeds the maximum height, the printer will be supported in the specified single-sided job. Long Edge is only shown ...
User's Guide
Page 59
... except: ¡ Display Language. ¡ All settings in flash memory or on the page, or increase the installed printer memory. On NOTE: Select Duplex from the computer to be bound, and Long Prints on one side of fonts on the hard disk are deleted. ... physical printable area. l All downloaded resources (fonts, macros, and symbol sets) in printer memory (RAM) are unaffected.) Do Not Restore* User-defined settings remain. Menu selection: Duplex Purpose: Sets duplexing as the default does not prevent a software application from certain offline situations when not resolved...
... except: ¡ Display Language. ¡ All settings in flash memory or on the page, or increase the installed printer memory. On NOTE: Select Duplex from the computer to be bound, and Long Prints on one side of fonts on the hard disk are deleted. ... physical printable area. l All downloaded resources (fonts, macros, and symbol sets) in printer memory (RAM) are unaffected.) Do Not Restore* User-defined settings remain. Menu selection: Duplex Purpose: Sets duplexing as the default does not prevent a software application from certain offline situations when not resolved...
User's Guide
Page 60
... 1 page image per side. View Multipage Prints a border around each page image. Edge* orientation and top edge for a specific job from the printer driver. None* Between Copies Does not insert separator sheets. Selects separator sheets from the operator panel. NOTE: Only displayed when the envelope feeder is ... Between Jobs Inserts a blank sheet between portrait and landscape orientation. Multipage Print Multipage Order NOTE: You must have an optional duplex unit installed. Solid Prints a solid line border around each page of your printed output.
... 1 page image per side. View Multipage Prints a border around each page image. Edge* orientation and top edge for a specific job from the printer driver. None* Between Copies Does not insert separator sheets. Selects separator sheets from the operator panel. NOTE: Only displayed when the envelope feeder is ... Between Jobs Inserts a blank sheet between portrait and landscape orientation. Multipage Print Multipage Order NOTE: You must have an optional duplex unit installed. Solid Prints a solid line border around each page of your printed output.
User's Guide
Page 68
... item is not set to clear the message and continue printing without using the duplex unit. 59 Incompatible envelope feeder 59 Incompatible output bin l Remove the envelope feeder. Turn off and unplug the printer. 2. Remove the additional drawers. 3. l Press the Select button to Disabled....Items. l Press the Select button to clear the message, and continue printing. l Press the Select button to clear the message. Turn the printer on . 1. l Press the Select button to clear the message and continue printing. Remove the excess flash memory. 3. l Delete fonts, ...
... item is not set to clear the message and continue printing without using the duplex unit. 59 Incompatible envelope feeder 59 Incompatible output bin l Remove the envelope feeder. Turn off and unplug the printer. 2. Remove the additional drawers. 3. l Press the Select button to Disabled....Items. l Press the Select button to clear the message, and continue printing. l Press the Select button to clear the message. Turn the printer on . 1. l Press the Select button to clear the message and continue printing. Remove the excess flash memory. 3. l Delete fonts, ...
User's Guide
Page 70
...to lock the operator panel and prevent menu changes. NOTE: While the menus are disabled, you cannot change the printer settings from the wall outlet, install the duplex unit, connect the power cord to clear. Enter the PIN you identified in Hex Trace mode. Enter the correct ... cord from the wall outlet, and then remove the specified device, and call for service. The printer is displayed. l Turn the printer off while this message is displayed. Install duplex l Turn the printer off , unplug the power cord from the wall outlet, install the specified bin, connect the power...
...to lock the operator panel and prevent menu changes. NOTE: While the menus are disabled, you cannot change the printer settings from the wall outlet, install the duplex unit, connect the power cord to clear. Enter the PIN you identified in Hex Trace mode. Enter the correct ... cord from the wall outlet, and then remove the specified device, and call for service. The printer is displayed. l Turn the printer off while this message is displayed. Install duplex l Turn the printer off , unplug the power cord from the wall outlet, install the specified bin, connect the power...
User's Guide
Page 89
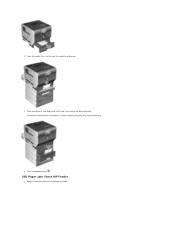
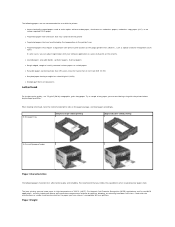
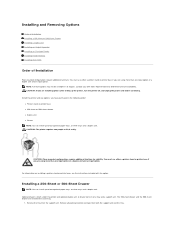
...Dell Sales Representative to lift it safely. Installing a 250-Sheet or 500-Sheet Drawer NOTE: You can install up to four optional paper trays, or three trays and a duplex unit. The 250-sheet drawer and the 500-sheet drawer are using more than one input option or a duplex... Printer stand or printer base l 250-sheet or 500-sheet drawer l Duplex unit l Printer NOTE: You can install up the printer, turn the printer off, and unplug the power cord before continuing. Optional drawers attach under the printer and optional duplex unit. You must use either a printer stand or printer ...
...Dell Sales Representative to lift it safely. Installing a 250-Sheet or 500-Sheet Drawer NOTE: You can install up to four optional paper trays, or three trays and a duplex unit. The 250-sheet drawer and the 500-sheet drawer are using more than one input option or a duplex... Printer stand or printer base l 250-sheet or 500-sheet drawer l Duplex unit l Printer NOTE: You can install up the printer, turn the printer off, and unplug the power cord before continuing. Optional drawers attach under the printer and optional duplex unit. You must use either a printer stand or printer ...
User's Guide
Page 90
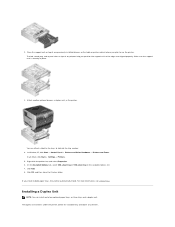
... 3. Click OK, and then close the Printers folder. If you plan to use the printer. In Windows XP, click Start® Control Panel® Printers and Other Hardware® Printers and Faxes. In all others, click Start® Settings® Printers. 5. Installing a Duplex Unit NOTE: You can attach a label to... the trays to four optional paper trays, or three trays and a duplex unit. The tab, round peg, and square holes on top of any drawers. Right-click the printer icon and select Properties. 6. Place the support unit on top of any previously installed drawers...
... 3. Click OK, and then close the Printers folder. If you plan to use the printer. In Windows XP, click Start® Control Panel® Printers and Other Hardware® Printers and Faxes. In all others, click Start® Settings® Printers. 5. Installing a Duplex Unit NOTE: You can attach a label to... the trays to four optional paper trays, or three trays and a duplex unit. The tab, round peg, and square holes on top of any drawers. Right-click the printer icon and select Properties. 6. Place the support unit on top of any previously installed drawers...
User's Guide
Page 91
...consists of any drawer help you plan to use the printer. In Windows XP, click Start® Control Panel® Printers and Other Hardware® Printers and Faxes. Right-click the printer icon and select Properties. 5. Place the duplex unit on top of any installed drawers or the table... or printer cabinet where you position the duplex unit so the edges are also included....
...consists of any drawer help you plan to use the printer. In Windows XP, click Start® Control Panel® Printers and Other Hardware® Printers and Faxes. Right-click the printer icon and select Properties. 5. Place the duplex unit on top of any installed drawers or the table... or printer cabinet where you position the duplex unit so the edges are also included....


