DNS-320L Datasheet
Page 1
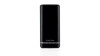
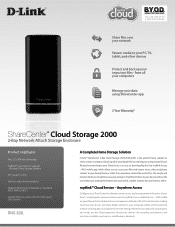
...Attach Storage Enclosure Product Highlights Two 3.5" SATA Hard Drive Bays mydlink™ Cloud Service Support - NAS mobile on your computer, tablet, and Smartphone without the use of D-Link's industry-leading Cloud Services. BRING YOUR OWN DRIVE YOU CAN ADD UP TO 2 SATA DISK ... scalable solution for your own personal Cloud. Anywhere Access Configure your ShareCenter for High Speed Data Transfer DNS-320L A Complete Home Storage Solution D-Link® ShareCenter 2-Bay Cloud Storage 2000 (DNS-320L) is as easy as downloading the free mydlink Access - simply log into your home or small...
...Attach Storage Enclosure Product Highlights Two 3.5" SATA Hard Drive Bays mydlink™ Cloud Service Support - NAS mobile on your computer, tablet, and Smartphone without the use of D-Link's industry-leading Cloud Services. BRING YOUR OWN DRIVE YOU CAN ADD UP TO 2 SATA DISK ... scalable solution for your own personal Cloud. Anywhere Access Configure your ShareCenter for High Speed Data Transfer DNS-320L A Complete Home Storage Solution D-Link® ShareCenter 2-Bay Cloud Storage 2000 (DNS-320L) is as easy as downloading the free mydlink Access - simply log into your home or small...
DNS-320L Datasheet
Page 3
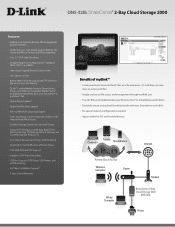
...8226; 24/7 Basic Installation Support8 • 3-Year Limited Warranty9 Benefits of mydlink™ • Create your Home Personal Cloud. D-Link does not view, store or access your files • Simple and secure file access and management through mydlink.com • Transfer ...Remote File Management over the Internet • mydlink Access - NAS Mobile App for iOS and Android devices Computer Tablets Smartphones Internet Remote Cloud Access Wireless Computer Router Modem Wired Computer ShareCenter 2-Bay Cloud Storage 2000 DNS-320L Printer Files are safe and secure -
...8226; 24/7 Basic Installation Support8 • 3-Year Limited Warranty9 Benefits of mydlink™ • Create your Home Personal Cloud. D-Link does not view, store or access your files • Simple and secure file access and management through mydlink.com • Transfer ...Remote File Management over the Internet • mydlink Access - NAS Mobile App for iOS and Android devices Computer Tablets Smartphones Internet Remote Cloud Access Wireless Computer Router Modem Wired Computer ShareCenter 2-Bay Cloud Storage 2000 DNS-320L Printer Files are safe and secure -
DNS-320L Datasheet
Page 4
.... See inside package for People D-Link, the D-Link logo, D-Link Green, the D-Link Green logo, ShareCenter, and the D-Link RoHS logo are trademarks or registered trademarks of two (2) SATA drives. Updated 7/10/12 Building Networks for warranty details. DNS-320L ShareCenter® 2-Bay Cloud Storage 2000.... 7Computer must be formatted before use SATA drives with a product. In certain circumstances data loss may differ from PC to NAS (D-Link ShareCenter Sync) • Scheduled local backups • Scheduled remote backup • Apple Time Machine support • USB backup...
.... See inside package for People D-Link, the D-Link logo, D-Link Green, the D-Link Green logo, ShareCenter, and the D-Link RoHS logo are trademarks or registered trademarks of two (2) SATA drives. Updated 7/10/12 Building Networks for warranty details. DNS-320L ShareCenter® 2-Bay Cloud Storage 2000.... 7Computer must be formatted before use SATA drives with a product. In certain circumstances data loss may differ from PC to NAS (D-Link ShareCenter Sync) • Scheduled local backups • Scheduled remote backup • Apple Time Machine support • USB backup...
DNS-320L Manual
Page 3
...image 134 Admin Password 135 Network Management 136 LAN Setup 136 IPv6 Settings 139 IPv6 Setup 140 Link Speed and LLTD Settings 142 DDNS 143 Port Forwarding 144 Application Management 148 FTP server 148 UPnP... Device 159 System Settings 160 Power Management 161 Notifications 163 Email Settings 163 SMS Settings 164 D-Link ShareCenter DNS-320L User Manual Adding an SMS Service Provider 165 Event Settings 166 Logs 167 Firmware Upgrade 168 USB... Slideshow Toolbar 194 Cooliris 195 Photo Album - Upload from NAS 196 Photo Gallery 199 My Files 200 Upload 201 Download 203 ii
...image 134 Admin Password 135 Network Management 136 LAN Setup 136 IPv6 Settings 139 IPv6 Setup 140 Link Speed and LLTD Settings 142 DDNS 143 Port Forwarding 144 Application Management 148 FTP server 148 UPnP... Device 159 System Settings 160 Power Management 161 Notifications 163 Email Settings 163 SMS Settings 164 D-Link ShareCenter DNS-320L User Manual Adding an SMS Service Provider 165 Event Settings 166 Logs 167 Firmware Upgrade 168 USB... Slideshow Toolbar 194 Cooliris 195 Photo Album - Upload from NAS 196 Photo Gallery 199 My Files 200 Upload 201 Download 203 ii
DNS-320L Manual
Page 4
.../ Renaiming Folder.......... 238 mydlink Settings Details 239 ShareCenter NAS Status 240 Deleting the device from mydlink account. 241 RAID Options 244 UPS Connectivity 246 Deleting a UPS Slave 250 USB Print Server 252 Contacting Technical Support 255 Warranty 256 Registration 261 Knowledge Base 242 What is RAID 242 D-Link ShareCenter DNS-320L User Manual iii
.../ Renaiming Folder.......... 238 mydlink Settings Details 239 ShareCenter NAS Status 240 Deleting the device from mydlink account. 241 RAID Options 244 UPS Connectivity 246 Deleting a UPS Slave 250 USB Print Server 252 Contacting Technical Support 255 Warranty 256 Registration 261 Knowledge Base 242 What is RAID 242 D-Link ShareCenter DNS-320L User Manual iii
DNS-320L Manual
Page 8
... Users can assign to multiple Groups • Batch User Creation/ Import Users • Backup Management • Schedule Backup from PC to NAS (D-Link ShareCenter Sync) • Apple Time Machine support • Local Backup • USB Backups (External storage and digital camera) • ...NAS - Users can see the status of a NAS. • User/Group Management • User/group assignment for Network sharing and FTP server • Quota for user and group • Users can list, download, upload or delete files/folders from a NAS - Section 1 - Slideshows D-Link ShareCenter DNS-320L ...
... Users can assign to multiple Groups • Batch User Creation/ Import Users • Backup Management • Schedule Backup from PC to NAS (D-Link ShareCenter Sync) • Apple Time Machine support • Local Backup • USB Backups (External storage and digital camera) • ...NAS - Users can see the status of a NAS. • User/Group Management • User/group assignment for Network sharing and FTP server • Quota for user and group • Users can list, download, upload or delete files/folders from a NAS - Section 1 - Slideshows D-Link ShareCenter DNS-320L ...
DNS-320L Manual
Page 11
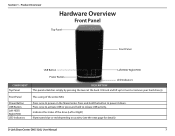
Press and hold to power on activity (see the next page for details) D-Link ShareCenter DNS-320L User Manual 7 Unhook and lift up to power it down. Product Overview Hardware Overview Front Panel Top Panel Front Panel USB Button Left HDD/ Right ... HDD LED Indicators The casing of the drive (Left or Right) Illuminates blue or red depending on the ShareCenter. Indicates the status of the entire NAS Press once to release USB activity. Section 1 -
Press and hold to power on activity (see the next page for details) D-Link ShareCenter DNS-320L User Manual 7 Unhook and lift up to power it down. Product Overview Hardware Overview Front Panel Top Panel Front Panel USB Button Left HDD/ Right ... HDD LED Indicators The casing of the drive (Left or Right) Illuminates blue or red depending on the ShareCenter. Indicates the status of the entire NAS Press once to release USB activity. Section 1 -
DNS-320L Manual
Page 13
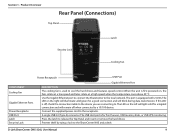
... Power Receptacle USB Port Latch Security Lock Power Receptacle USB Port Gigabit Ethernet Port DESCRIPTION The cooling fan is off when connected to the ShareCenter NAS and a desk D-Link ShareCenter DNS-320L User Manual 9
... Power Receptacle USB Port Latch Security Lock Power Receptacle USB Port Gigabit Ethernet Port DESCRIPTION The cooling fan is off when connected to the ShareCenter NAS and a desk D-Link ShareCenter DNS-320L User Manual 9
DNS-320L Manual
Page 20
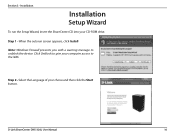
Step 2 - Installation Installation Setup Wizard To run the Setup Wizard, insert the ShareCenter CD into your choice and then click the Start button. Click Unblock to give your computer access to unblock the device. D-Link ShareCenter DNS-320L User Manual 16 When the autorun screen appears, click Install Note: Windows Firewall presents you with a warning message to the NAS. Select the Language of your CD-ROM drive. Step 1 - Section 3 -
Step 2 - Installation Installation Setup Wizard To run the Setup Wizard, insert the ShareCenter CD into your choice and then click the Start button. Click Unblock to give your computer access to unblock the device. D-Link ShareCenter DNS-320L User Manual 16 When the autorun screen appears, click Install Note: Windows Firewall presents you with a warning message to the NAS. Select the Language of your CD-ROM drive. Step 1 - Section 3 -
DNS-320L Manual
Page 25
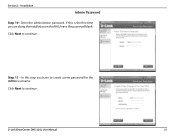
Enter the administrator password. Click Next to continue. In this step you are doing the installation on this is the first time you have to create a new password for the Admin username. Step 11 - Installation Admin Password Step 10 - Click Next to continue. If this NAS, leave the password blank. D-Link ShareCenter DNS-320L User Manual 21 Section 3 -
Enter the administrator password. Click Next to continue. In this step you are doing the installation on this is the first time you have to create a new password for the Admin username. Step 11 - Installation Admin Password Step 10 - Click Next to continue. If this NAS, leave the password blank. D-Link ShareCenter DNS-320L User Manual 21 Section 3 -
DNS-320L Manual
Page 35
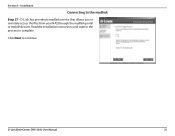
Read the installation instructions and wait for the process to remotely access the files from your NAS through the mydlink portal or mobile devices. D-Link has provided a mydlink service that allows you to complete. Click Next to the mydlink Step 27 - Installation Connecting to continue. D-Link ShareCenter DNS-320L User Manual 31 Section 3 -
Read the installation instructions and wait for the process to remotely access the files from your NAS through the mydlink portal or mobile devices. D-Link has provided a mydlink service that allows you to complete. Click Next to the mydlink Step 27 - Installation Connecting to continue. D-Link ShareCenter DNS-320L User Manual 31 Section 3 -
DNS-320L Manual
Page 43
... device configuration Configures disk volumes, RAID, and performs disk diagnostics Configures user and group management, network shares Configures LAN, Dynamic DNS, and Port Forwarding Configures FTP, UPnP, iTunes server configurations, AFP, and NFS services Configures language, time and date, device...applications you use on your NAS via a web browser Create, modify, and delete your DNS-320L ShareCenter Web UI (User Interface) is divided into three main sections: 1. Configuration Configuration Managing your Amazon S3© settings D-Link ShareCenter DNS-320L User Manual 39 The ...
... device configuration Configures disk volumes, RAID, and performs disk diagnostics Configures user and group management, network shares Configures LAN, Dynamic DNS, and Port Forwarding Configures FTP, UPnP, iTunes server configurations, AFP, and NFS services Configures language, time and date, device...applications you use on your NAS via a web browser Create, modify, and delete your DNS-320L ShareCenter Web UI (User Interface) is divided into three main sections: 1. Configuration Configuration Managing your Amazon S3© settings D-Link ShareCenter DNS-320L User Manual 39 The ...
DNS-320L Manual
Page 56
Partitioning will now begin . A graphical bar will appear to inform you would like to continue. Click Yes to change your NAS during this stage, click Exit. Please be formatted and erased. D-Link ShareCenter DNS-320L User Manual 52 Once the partition is completed, the formatting process will be patient while this process. Do not turn...
Partitioning will now begin . A graphical bar will appear to inform you would like to continue. Click Yes to change your NAS during this stage, click Exit. Please be formatted and erased. D-Link ShareCenter DNS-320L User Manual 52 Once the partition is completed, the formatting process will be patient while this process. Do not turn...
DNS-320L Manual
Page 57
Do not turn off your settings at this stage, click Exit. If you have installed it. The system will now update all of the changes made. D-Link ShareCenter DNS-320L User Manual 53 Section 4 - Please be patient during this process. Configuration The Wizard starts to partition the second drive if you would like to change your NAS during this process.
Do not turn off your settings at this stage, click Exit. If you have installed it. The system will now update all of the changes made. D-Link ShareCenter DNS-320L User Manual 53 Section 4 - Please be patient during this process. Configuration The Wizard starts to partition the second drive if you would like to change your NAS during this process.
DNS-320L Manual
Page 65
D-Link ShareCenter DNS-320L User Manual 61 Do not turn off your settings at this process. The system formats the First Volume. If you would like to change your NAS during this stage, click Exit. Configuration Partitioning will now begin. Please be patient while this process takes place. Section 4 -
D-Link ShareCenter DNS-320L User Manual 61 Do not turn off your settings at this process. The system formats the First Volume. If you would like to change your NAS during this stage, click Exit. Configuration Partitioning will now begin. Please be patient while this process takes place. Section 4 -

DNS-320L Manual
Page 66
The system will now format the second Volume. D-Link ShareCenter DNS-320L User Manual 62 Do not turn off your NAS during this process. Please be patient during this process. Please be patient during this process. Configuration The system will now update all of the changes made. Section 4 - Do not turn off your NAS during this process.
The system will now format the second Volume. D-Link ShareCenter DNS-320L User Manual 62 Do not turn off your NAS during this process. Please be patient during this process. Please be patient during this process. Configuration The system will now update all of the changes made. Section 4 - Do not turn off your NAS during this process.
DNS-320L Manual
Page 70
Configuration A warning message will appear to inform you would like to continue. Click Yes to change your NAS during this process takes place. The system formats the Volume. Do not turn off your settings at this stage, click Exit. Please be formatted and erased. Partitioning will be patient while this process. D-Link ShareCenter DNS-320L User Manual 66 If you that all volumes and data will now begin. Section 4 -
Configuration A warning message will appear to inform you would like to continue. Click Yes to change your NAS during this process takes place. The system formats the Volume. Do not turn off your settings at this stage, click Exit. Please be formatted and erased. Partitioning will be patient while this process. D-Link ShareCenter DNS-320L User Manual 66 If you that all volumes and data will now begin. Section 4 -
DNS-320L Manual
Page 89
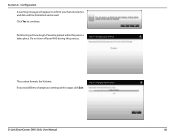
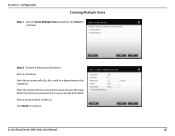
Section 4 - Enter the following information: Enter a username. Enter the account prefix (Eg. Enter a password and confirm it. D-Link ShareCenter DNS-320L User Manual 85 Enter the amount of users you want to the NAS. Next to the input field is the remaining amount of users you can add to create. this could be a department in the company). Configuration Creating Multiple Users Step 1 - Step 2 - Select Create Multiple Users and then click Next to continue. Click Next to continue.
Section 4 - Enter the following information: Enter a username. Enter the account prefix (Eg. Enter a password and confirm it. D-Link ShareCenter DNS-320L User Manual 85 Enter the amount of users you want to the NAS. Next to the input field is the remaining amount of users you can add to create. this could be a department in the company). Configuration Creating Multiple Users Step 1 - Step 2 - Select Create Multiple Users and then click Next to continue. Click Next to continue.
DNS-320L Manual
Page 132
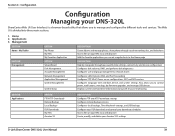
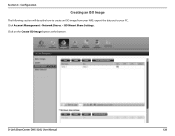
Configuration Creating an ISO Image The following section will describe how to create an ISO image from your NAS, export the data out to your PC. Section 4 - Click Account Management > Network Shares > ISO Mount Share Settings. Click on the Create ISO Image button at the bottom. D-Link ShareCenter DNS-320L User Manual 128
Configuration Creating an ISO Image The following section will describe how to create an ISO image from your NAS, export the data out to your PC. Section 4 - Click Account Management > Network Shares > ISO Mount Share Settings. Click on the Create ISO Image button at the bottom. D-Link ShareCenter DNS-320L User Manual 128
DNS-320L Manual
Page 135
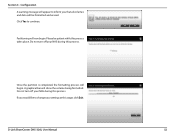
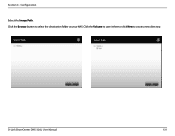
Click the Browse button to create a new directory. D-Link ShareCenter DNS-320L User Manual 131 Section 4 - Click the Volume to save it there or click New to select the destination folder on your NAS. Configuration Select the Image Path.
Click the Browse button to create a new directory. D-Link ShareCenter DNS-320L User Manual 131 Section 4 - Click the Volume to save it there or click New to select the destination folder on your NAS. Configuration Select the Image Path.


