DNS-320L Manual
Page 18
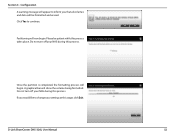
... before logging in or you are displayed here. Apply: Click Apply to save changes to disconnect the selected mapped volume. Exit: Click Exit to be assigned an IP address via DHCP. D-Link ShareCenter DNS-320L User Manual 14 If it detects on , during the initial boot sequence, the ShareCenter will automatically assign a 169.254...
... before logging in or you are displayed here. Apply: Click Apply to save changes to disconnect the selected mapped volume. Exit: Click Exit to be assigned an IP address via DHCP. D-Link ShareCenter DNS-320L User Manual 14 If it detects on , during the initial boot sequence, the ShareCenter will automatically assign a 169.254...
DNS-320L Manual
Page 27
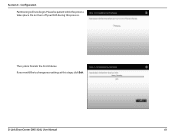
... to continue. Click the Yes radio button if you already have a DDNS account to continue. Click Next to use for the device, and a description. D-Link ShareCenter DNS-320L User Manual 23 The name you map one of a Windows Workgroup network, enter the workgroup name, a name for the ShareCenter DDNS. If you want your...
... to continue. Click the Yes radio button if you already have a DDNS account to continue. Click Next to use for the device, and a description. D-Link ShareCenter DNS-320L User Manual 23 The name you map one of a Windows Workgroup network, enter the workgroup name, a name for the ShareCenter DDNS. If you want your...
DNS-320L Manual
Page 30
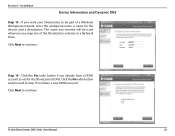
Step 20 - If you to certain operational conditions and drive status conditions to continue. Installation Email Settings and Volume Information Step 19 - These alerts can configure messages to be sent alerting you do not want to configure your ...your e-mail settings, click Skip to continue. This step is informational and shows any currently configured Volumes previously setup on the ShareCenter™. You can prove helpful with the management and safeguarding of important data. D-Link ShareCenter DNS-320L User Manual 26 Section 3 - Click Next to your e-mail account.
Step 20 - If you to certain operational conditions and drive status conditions to continue. Installation Email Settings and Volume Information Step 19 - These alerts can configure messages to be sent alerting you do not want to configure your ...your e-mail settings, click Skip to continue. This step is informational and shows any currently configured Volumes previously setup on the ShareCenter™. You can prove helpful with the management and safeguarding of important data. D-Link ShareCenter DNS-320L User Manual 26 Section 3 - Click Next to your e-mail account.

DNS-320L Manual
Page 31
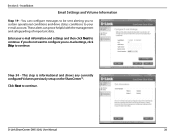
Click Next to the Knowledge Base section in this manual. Clicking on each RAID type radio button will display a description. Select one of the volume RAID types. For more information concerning the different RAID Disk Formats please refer to continue. Installation RAID Configuration Step 21 - D-Link ShareCenter DNS-320L User Manual 27 Section 3 -
Click Next to the Knowledge Base section in this manual. Clicking on each RAID type radio button will display a description. Select one of the volume RAID types. For more information concerning the different RAID Disk Formats please refer to continue. Installation RAID Configuration Step 21 - D-Link ShareCenter DNS-320L User Manual 27 Section 3 -
DNS-320L Manual
Page 32
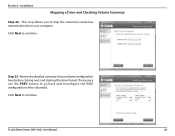
If necessary use the PREV button to map the volume(s) created as network drive(s) on your volume configuration here before clicking next and starting the drive format. Review the detailed summary of the volume(s). Step 23 - Click Next to continue. Section 3 - Click Next to continue. This step allows you to go back and reconfigure the RAID configuration of your computer. D-Link ShareCenter DNS-320L User Manual 28 Installation Mapping a Drive and Checking Volume Summary Step 22 -
If necessary use the PREV button to map the volume(s) created as network drive(s) on your volume configuration here before clicking next and starting the drive format. Review the detailed summary of the volume(s). Step 23 - Click Next to continue. Section 3 - Click Next to continue. This step allows you to go back and reconfigure the RAID configuration of your computer. D-Link ShareCenter DNS-320L User Manual 28 Installation Mapping a Drive and Checking Volume Summary Step 22 -

DNS-320L Manual
Page 33
During the formatting process the wizard displays a percentage complete bar for each hard drive. Click Next to inform you click Next, a warning message will be lost. When you that all data on the drive(s) will appear to continue. Click Yes to proceed or No to exit. Step 25 - D-Link ShareCenter DNS-320L User Manual 29 Installation Formatting Volumes Step 24 - Section 3 -
During the formatting process the wizard displays a percentage complete bar for each hard drive. Click Next to inform you click Next, a warning message will be lost. When you that all data on the drive(s) will appear to continue. Click Yes to proceed or No to exit. Step 25 - D-Link ShareCenter DNS-320L User Manual 29 Installation Formatting Volumes Step 24 - Section 3 -
DNS-320L Manual
Page 39
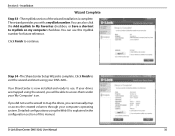
...The wizard provides you can also click the Add mydlink to My Favorites checkbox, or Save a shortcut to access them under your DNS-320L. Click Finish to exit the wizard and start using your 'My Computer' icon. Click Finish to continue. Detailed configurations using the ... - Your ShareCenter is complete. If your computers operating system. D-Link ShareCenter DNS-320L User Manual 35 Step 34 - The mydlink section of this mydlink number for future reference. You can manually map or access the created volumes through your drives are mapped using the Web UI is complete....
...The wizard provides you can also click the Add mydlink to My Favorites checkbox, or Save a shortcut to access them under your DNS-320L. Click Finish to exit the wizard and start using your 'My Computer' icon. Click Finish to continue. Detailed configurations using the ... - Your ShareCenter is complete. If your computers operating system. D-Link ShareCenter DNS-320L User Manual 35 Step 34 - The mydlink section of this mydlink number for future reference. You can manually map or access the created volumes through your drives are mapped using the Web UI is complete....

DNS-320L Manual
Page 41
Step 4 - Click on your network including your ShareCenter to see the volumes you wish to access and click OK. Then select the volume that you created earlier. D-Link ShareCenter DNS-320L User Manual 37 Section 3 - Installation Step 3 - Windows will automatically detect all devices on your ShareCenter.
Step 4 - Click on your network including your ShareCenter to see the volumes you wish to access and click OK. Then select the volume that you created earlier. D-Link ShareCenter DNS-320L User Manual 37 Section 3 - Installation Step 3 - Windows will automatically detect all devices on your ShareCenter.

DNS-320L Manual
Page 42
Section 3 - This means the drive is active and ready for use. The drive will then appear in your volume, click Finish to proceed. After selecting your Windows® Explorer under Network. Step 6 - D-Link ShareCenter DNS-320L User Manual 38 Installation Step 5 -
Section 3 - This means the drive is active and ready for use. The drive will then appear in your volume, click Finish to proceed. After selecting your Windows® Explorer under Network. Step 6 - D-Link ShareCenter DNS-320L User Manual 38 Installation Step 5 -
DNS-320L Manual
Page 43
..., share photos through password & time settings, connectivity, and device configuration Configures disk volumes, RAID, and performs disk diagnostics Configures user and group management, network shares Configures LAN, Dynamic DNS, and Port Forwarding Configures FTP, UPnP, iTunes server configurations, AFP, and NFS services... your P2P downloads and control your download schedules Access files on your NAS via a web browser Create, modify, and delete your DNS-320L ShareCenter Web UI (User Interface) is divided into three main sections: 1. The Web UI is a browser-based utility that allows...
..., share photos through password & time settings, connectivity, and device configuration Configures disk volumes, RAID, and performs disk diagnostics Configures user and group management, network shares Configures LAN, Dynamic DNS, and Port Forwarding Configures FTP, UPnP, iTunes server configurations, AFP, and NFS services... your P2P downloads and control your download schedules Access files on your NAS via a web browser Create, modify, and delete your DNS-320L ShareCenter Web UI (User Interface) is divided into three main sections: 1. The Web UI is a browser-based utility that allows...
DNS-320L Manual
Page 53
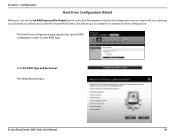
Configuration Hard Drive Configuration Wizard When you click on the Set RAID type and Re-Format button in the Disk Management-Hard Drive Configuration menu a wizard will start, allowing you to format your drives and create the volume RAID format. The following is an example of a standard volume configuration: The Hard Drive Configuration page displays the current RAID configuration under 'Current RAID Type'. Section 4 - D-Link ShareCenter DNS-320L User Manual 49 The Setup Wizard begins. Click Set RAID Type and Re-Format.
Configuration Hard Drive Configuration Wizard When you click on the Set RAID type and Re-Format button in the Disk Management-Hard Drive Configuration menu a wizard will start, allowing you to format your drives and create the volume RAID format. The following is an example of a standard volume configuration: The Hard Drive Configuration page displays the current RAID configuration under 'Current RAID Type'. Section 4 - D-Link ShareCenter DNS-320L User Manual 49 The Setup Wizard begins. Click Set RAID Type and Re-Format.

DNS-320L Manual
Page 55
The 'Volume Configuration Summary' shows details on the list and click Format to continue or click Previous to make changes. Check the details on all of the configured drives. Section 4 - Configuration Select Standard to continue. Click Next to create separate volumes for each individual drive. D-Link ShareCenter DNS-320L User Manual 51
The 'Volume Configuration Summary' shows details on the list and click Format to continue or click Previous to make changes. Check the details on all of the configured drives. Section 4 - Configuration Select Standard to continue. Click Next to create separate volumes for each individual drive. D-Link ShareCenter DNS-320L User Manual 51
DNS-320L Manual
Page 56
Please be formatted and erased. D-Link ShareCenter DNS-320L User Manual 52 Configuration A warning message will appear to inform you would like to continue. Once the partition is completed, the formatting process will be ... your NAS during this stage, click Exit. Do not turn off your settings at this process. A graphical bar will now begin . If you that all volumes and data will begin . Partitioning will show the...
Please be formatted and erased. D-Link ShareCenter DNS-320L User Manual 52 Configuration A warning message will appear to inform you would like to continue. Once the partition is completed, the formatting process will be ... your NAS during this stage, click Exit. Do not turn off your settings at this process. A graphical bar will now begin . If you that all volumes and data will begin . Partitioning will show the...

DNS-320L Manual
Page 58
Configuration The wizard is now complete. D-Link ShareCenter DNS-320L User Manual 54 Click Finish to complete the process and start using your DNS-320L. It will show the volume number(s), file system selected, the type of RAID, and the disk information in the RAID. Section 4 -
Configuration The wizard is now complete. D-Link ShareCenter DNS-320L User Manual 54 Click Finish to complete the process and start using your DNS-320L. It will show the volume number(s), file system selected, the type of RAID, and the disk information in the RAID. Section 4 -

DNS-320L Manual
Page 59
Section 4 - Click Next to make changes. Click Format to continue or Previous to continue. Configuration JBOD Select JBOD to create a single volume from all of the drives you want to convert to JBOD. D-Link ShareCenter DNS-320L User Manual 55 The wizard displays a Volume Configuration Summary of the drives.
Section 4 - Click Next to make changes. Click Format to continue or Previous to continue. Configuration JBOD Select JBOD to create a single volume from all of the drives you want to convert to JBOD. D-Link ShareCenter DNS-320L User Manual 55 The wizard displays a Volume Configuration Summary of the drives.

DNS-320L Manual
Page 60
Wait for the Wizard to inform you that all volumes and data will be formatted and erased. D-Link ShareCenter DNS-320L User Manual 56 Configuration A warning message will appear to prepare the drive for configuration. Click Yes to continue. Section 4 -
Wait for the Wizard to inform you that all volumes and data will be formatted and erased. D-Link ShareCenter DNS-320L User Manual 56 Configuration A warning message will appear to prepare the drive for configuration. Click Yes to continue. Section 4 -

DNS-320L Manual
Page 62
D-Link ShareCenter DNS-320L User Manual 58 Section 4 - Configuration The wizard is now complete. The wizard returns you can see the current RAID Type. It will show the volume number, file system, they type of RAID and the disk information in the RAID. Here you to complete the process and start using your DNS-320L. Click Finish to the main screen.
D-Link ShareCenter DNS-320L User Manual 58 Section 4 - Configuration The wizard is now complete. The wizard returns you can see the current RAID Type. It will show the volume number, file system, they type of RAID and the disk information in the RAID. Here you to complete the process and start using your DNS-320L. Click Finish to the main screen.

DNS-320L Manual
Page 64
D-Link ShareCenter DNS-320L User Manual 60 Click Yes to inform you that all of the configured drives. Configuration The 'Volume Configuration Summary' shows details on the list and click Format to continue or click Previous to make changes. Check the details on all volumes and data will be formatted and erased. A warning message will appear to continue. Section 4 -
D-Link ShareCenter DNS-320L User Manual 60 Click Yes to inform you that all of the configured drives. Configuration The 'Volume Configuration Summary' shows details on the list and click Format to continue or click Previous to make changes. Check the details on all volumes and data will be formatted and erased. A warning message will appear to continue. Section 4 -
DNS-320L Manual
Page 65
Section 4 - Do not turn off your settings at this stage, click Exit. D-Link ShareCenter DNS-320L User Manual 61 Please be patient while this process. The system formats the First Volume. Configuration Partitioning will now begin. If you would like to change your NAS during this process takes place.
Section 4 - Do not turn off your settings at this stage, click Exit. D-Link ShareCenter DNS-320L User Manual 61 Please be patient while this process. The system formats the First Volume. Configuration Partitioning will now begin. If you would like to change your NAS during this process takes place.

DNS-320L Manual
Page 66
The system will now format the second Volume. Please be patient during this process. Do not turn off your NAS during this process. Do not turn off your NAS during this process. D-Link ShareCenter DNS-320L User Manual 62 Configuration The system will now update all of the changes made. Section 4 - Please be patient during this process.
The system will now format the second Volume. Please be patient during this process. Do not turn off your NAS during this process. Do not turn off your NAS during this process. D-Link ShareCenter DNS-320L User Manual 62 Configuration The system will now update all of the changes made. Section 4 - Please be patient during this process.