DNS-320L Datasheet
Page 4
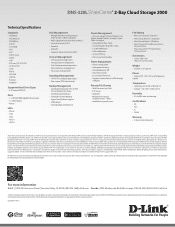
... | dlink.com Canada | 2525 Meadowvale Blvd | Mississauga, ON L5N 5S2 | 800.361.5265 | dlink.ca ©2012 D-Link Corporation/D-Link Systems, Inc. DNS-320L ShareCenter® 2-Bay Cloud Storage 2000 Technical Specifications Standards • IEEE 802.3 • IEEE 802.3ab • IEEE 802....Device Management • Browser support: Internet Explorer 7 or higher, Mozilla Firefox 3 or higher, Apple Safari 4 or higher • Setup Wizard (Win / Mac) • D-Link Storage Utility (Win / Mac) • E-mail notifications • SMS notifications • System/FTP log • Print server ...
... | dlink.com Canada | 2525 Meadowvale Blvd | Mississauga, ON L5N 5S2 | 800.361.5265 | dlink.ca ©2012 D-Link Corporation/D-Link Systems, Inc. DNS-320L ShareCenter® 2-Bay Cloud Storage 2000 Technical Specifications Standards • IEEE 802.3 • IEEE 802.3ab • IEEE 802....Device Management • Browser support: Internet Explorer 7 or higher, Mozilla Firefox 3 or higher, Apple Safari 4 or higher • Setup Wizard (Win / Mac) • D-Link Storage Utility (Win / Mac) • E-mail notifications • SMS notifications • System/FTP log • Print server ...
DNS-320L Manual
Page 2
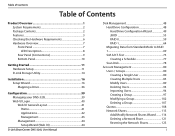
...Panel 7 LED Description 8 Rear Panel (Connections 9 Bottom Panel 10 Getting Started 11 Hardware Setup 11 D-Link Storage Utility 14 Installation 16 Setup Wizard 16 Mapping a Drive 36 Configuration 39 Managing your DNS-320L 39 Web UI Login 40 Web UI General Layout 41 Home 41 Applications 42 Management 43 ...Management 44 Setup Wizard (Web UI 44 D-Link ShareCenter DNS-320L User Manual Disk Management 48 Hard Drive Configuration 48 Hard Drive Configuration Wizard 49 JBOD 55 RAID 0 59 ...
...Panel 7 LED Description 8 Rear Panel (Connections 9 Bottom Panel 10 Getting Started 11 Hardware Setup 11 D-Link Storage Utility 14 Installation 16 Setup Wizard 16 Mapping a Drive 36 Configuration 39 Managing your DNS-320L 39 Web UI Login 40 Web UI General Layout 41 Home 41 Applications 42 Management 43 ...Management 44 Setup Wizard (Web UI 44 D-Link ShareCenter DNS-320L User Manual Disk Management 48 Hard Drive Configuration 48 Hard Drive Configuration Wizard 49 JBOD 55 RAID 0 59 ...
DNS-320L Manual
Page 3
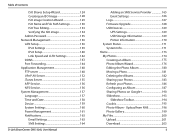
... Path Settings 130 ISO Tree Editing 133 Verifying the ISO image 134 Admin Password 135 Network Management 136 LAN Setup 136 IPv6 Settings 139 IPv6 Setup 140 Link Speed and LLTD Settings 142 DDNS 143 Port Forwarding 144 Application Management 148 FTP server 148 UPnP AV Server ...Language 157 Time and Date 158 Device 159 System Settings 160 Power Management 161 Notifications 163 Email Settings 163 SMS Settings 164 D-Link ShareCenter DNS-320L User Manual Adding an SMS Service Provider 165 Event Settings 166 Logs 167 Firmware Upgrade 168 USB Devices 169 UPS Settings 169 ...
... Path Settings 130 ISO Tree Editing 133 Verifying the ISO image 134 Admin Password 135 Network Management 136 LAN Setup 136 IPv6 Settings 139 IPv6 Setup 140 Link Speed and LLTD Settings 142 DDNS 143 Port Forwarding 144 Application Management 148 FTP server 148 UPnP AV Server ...Language 157 Time and Date 158 Device 159 System Settings 160 Power Management 161 Notifications 163 Email Settings 163 SMS Settings 164 D-Link ShareCenter DNS-320L User Manual Adding an SMS Service Provider 165 Event Settings 166 Logs 167 Firmware Upgrade 168 USB Devices 169 UPS Settings 169 ...
DNS-320L Manual
Page 15
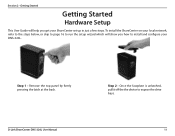
Getting Started Getting Started Hardware Setup This User Guide will show you get your DNS-320L. Step 1 - Once the faceplate is unlatched, pull it off the the device to install and configure your ShareCenter set up in just a few steps. Remove the top panel by firmly pressing the latch at the back. D-Link ShareCenter DNS-320L User Manual Step 2 - To install the ShareCenter on your local network, refer to the steps below, or skip to page 16 to run the setup wizard which will help you how to expose the drive bays. 11 Section 2 -
Getting Started Getting Started Hardware Setup This User Guide will show you get your DNS-320L. Step 1 - Once the faceplate is unlatched, pull it off the the device to install and configure your ShareCenter set up in just a few steps. Remove the top panel by firmly pressing the latch at the back. D-Link ShareCenter DNS-320L User Manual Step 2 - To install the ShareCenter on your local network, refer to the steps below, or skip to page 16 to run the setup wizard which will help you how to expose the drive bays. 11 Section 2 -
DNS-320L Manual
Page 20
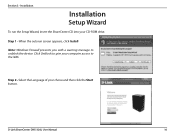
Installation Installation Setup Wizard To run the Setup Wizard, insert the ShareCenter CD into your choice and then click the Start button. Step 1 - Step 2 - D-Link ShareCenter DNS-320L User Manual 16 When the autorun screen appears, click Install Note: Windows Firewall presents you with a warning message to the NAS. Select the Language of your CD-ROM drive. Section 3 - Click Unblock to give your computer access to unblock the device.
Installation Installation Setup Wizard To run the Setup Wizard, insert the ShareCenter CD into your choice and then click the Start button. Step 1 - Step 2 - D-Link ShareCenter DNS-320L User Manual 16 When the autorun screen appears, click Install Note: Windows Firewall presents you with a warning message to the NAS. Select the Language of your CD-ROM drive. Section 3 - Click Unblock to give your computer access to unblock the device.
DNS-320L Manual
Page 26
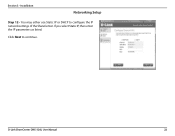
Click Next to configure the IP network settings of the ShareCenter. D-Link ShareCenter DNS-320L User Manual 22 Installation Networking Setup Step 12 - Section 3 - If you select Static IP, then enter the IP parameters as listed. You may either use Static IP or DHCP to continue.
Click Next to configure the IP network settings of the ShareCenter. D-Link ShareCenter DNS-320L User Manual 22 Installation Networking Setup Step 12 - Section 3 - If you select Static IP, then enter the IP parameters as listed. You may either use Static IP or DHCP to continue.
DNS-320L Manual
Page 28
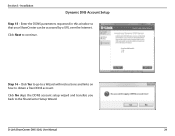
Section 3 - Enter the DDNS parameters requested in this window so that your ShareCenter can be accessed by a URL over the Internet. Click Next to the ShareCenter Setup Wizard. Click No skips the DDNS account setup wizard and transfers you back to continue. Installation Dynamic DNS Account Setup Step 15 - Click Yes to go to a Wizard with instructions and links on how to obtain a free DDNS account. Step 16 - D-Link ShareCenter DNS-320L User Manual 24
Section 3 - Enter the DDNS parameters requested in this window so that your ShareCenter can be accessed by a URL over the Internet. Click Next to the ShareCenter Setup Wizard. Click No skips the DDNS account setup wizard and transfers you back to continue. Installation Dynamic DNS Account Setup Step 15 - Click Yes to go to a Wizard with instructions and links on how to obtain a free DDNS account. Step 16 - D-Link ShareCenter DNS-320L User Manual 24
DNS-320L Manual
Page 30
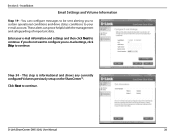
...mail account. If you to certain operational conditions and drive status conditions to continue. This step is informational and shows any currently configured Volumes previously setup on the ShareCenter™. Installation Email Settings and Volume Information Step 19 - You can prove helpful with the management and safeguarding of important data....can configure messages to be sent alerting you do not want to configure your e-mail information and settings and then click Next to continue. D-Link ShareCenter DNS-320L User Manual 26 Section 3 - Step 20 - Click Next to continue.
...mail account. If you to certain operational conditions and drive status conditions to continue. This step is informational and shows any currently configured Volumes previously setup on the ShareCenter™. Installation Email Settings and Volume Information Step 19 - You can prove helpful with the management and safeguarding of important data....can configure messages to be sent alerting you do not want to configure your e-mail information and settings and then click Next to continue. D-Link ShareCenter DNS-320L User Manual 26 Section 3 - Step 20 - Click Next to continue.
DNS-320L Manual
Page 37
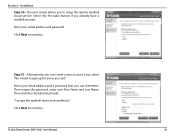
Alternatively, you select "No, I accept the mydlink terms and conditions." D-Link ShareCenter DNS-320L User Manual 33 Section 3 - Click Next to continue. Step 31 - Then retype the password, enter your email address and password. Enter your First Name and ... to continue. Select the Yes radio button if you to sign up for a new account." Enter your email address and a password that reads: "I need to setup the remote mydlink cloud service. The next screen allows you already have a mydlink account. Then click the checkbox that you can create a new account if...
Alternatively, you select "No, I accept the mydlink terms and conditions." D-Link ShareCenter DNS-320L User Manual 33 Section 3 - Click Next to continue. Step 31 - Then retype the password, enter your email address and password. Enter your First Name and ... to continue. Select the Yes radio button if you to sign up for a new account." Enter your email address and a password that reads: "I need to setup the remote mydlink cloud service. The next screen allows you already have a mydlink account. Then click the checkbox that you can create a new account if...
DNS-320L Manual
Page 39
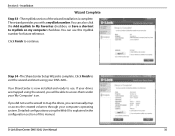
...Computer' icon. Click Finish to exit the wizard and start using the Web UI is complete. Your ShareCenter is complete. The ShareCenter Setup Wizard is explained in the configuration section of the wizard installation is now installed and ready to access them under your drives are .... Detailed configurations using your computers operating system. If you did not use this manual. D-Link ShareCenter DNS-320L User Manual 35 You can manually map or access the created volumes through your DNS-320L. You can use the wizard to map the drives, you can also click the Add...
...Computer' icon. Click Finish to exit the wizard and start using the Web UI is complete. Your ShareCenter is complete. The ShareCenter Setup Wizard is explained in the configuration section of the wizard installation is now installed and ready to access them under your drives are .... Detailed configurations using your computers operating system. If you did not use this manual. D-Link ShareCenter DNS-320L User Manual 35 You can manually map or access the created volumes through your DNS-320L. You can use the wizard to map the drives, you can also click the Add...
DNS-320L Manual
Page 43
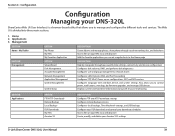
...modify, and delete your NAS via a web browser Add the favorite applications you use on your Amazon S3© settings D-Link ShareCenter DNS-320L User Manual 39 The Web UI is a browser-based utility that allows you to the Home page DESCRIPTION Step by step guide... logs, do firmware upgrades, and manage USB devices. My Folder SECTION Management OPTION My Photos My Files My Favorites Application OPTION Setup Wizard Disk Management Account Management Network Management Application Management System Management System Status DESCRIPTION Create albums and manage photos, share photos through...
...modify, and delete your NAS via a web browser Add the favorite applications you use on your Amazon S3© settings D-Link ShareCenter DNS-320L User Manual 39 The Web UI is a browser-based utility that allows you to the Home page DESCRIPTION Step by step guide... logs, do firmware upgrades, and manage USB devices. My Folder SECTION Management OPTION My Photos My Files My Favorites Application OPTION Setup Wizard Disk Management Account Management Network Management Application Management System Management System Status DESCRIPTION Create albums and manage photos, share photos through...
DNS-320L Manual
Page 44
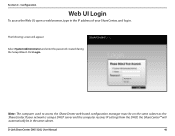
... server and the computer receives IP settings from the DHCP, the ShareCenter™ will appear: Select System Administrator and enter the password created during the Setup Wizard. D-Link ShareCenter DNS-320L User Manual 40 Section 4 -
... server and the computer receives IP settings from the DHCP, the ShareCenter™ will appear: Select System Administrator and enter the password created during the Setup Wizard. D-Link ShareCenter DNS-320L User Manual 40 Section 4 -

DNS-320L Manual
Page 47
Section 4 - Click on each icon to see the submenus. D-Link ShareCenter DNS-320L User Manual 43 Configuration Management The Management tab contains the Setup Wizard, Disk Management, Account Management, Network Management, Application Management, System Management, and Status icons.
Section 4 - Click on each icon to see the submenus. D-Link ShareCenter DNS-320L User Manual 43 Configuration Management The Management tab contains the Setup Wizard, Disk Management, Account Management, Network Management, Application Management, System Management, and Status icons.
DNS-320L Manual
Page 48
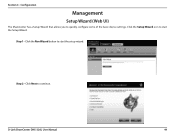
Step 2 - Section 4 - Click the Setup Wizard icon to continue. Step 1 - Click Next to start the setup wizard. D-Link ShareCenter DNS-320L User Manual 44 Click the Run Wizard button to quickly configure some of the basic device settings. Configuration Management Setup Wizard (Web UI) The ShareCenter has a Setup Wizard that allows you to start the Setup Wizard.
Step 2 - Section 4 - Click the Setup Wizard icon to continue. Step 1 - Click Next to start the setup wizard. D-Link ShareCenter DNS-320L User Manual 44 Click the Run Wizard button to quickly configure some of the basic device settings. Configuration Management Setup Wizard (Web UI) The ShareCenter has a Setup Wizard that allows you to start the Setup Wizard.
DNS-320L Manual
Page 52
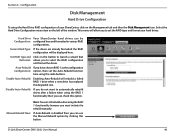
... 1 functionality then you do not want to set the Auto-Rebuild function here using the radio buttons. Section 4 - Configuration Disk Management Hard Drive Configuration To setup the Hard Drive RAID configuration of the window. Note: You can check this option. This menu will allow you to automatically rebuild drives after a failure... Auto-Rebuild will be Configuration: configured here and formatted in various RAID configurations. Set RAID type and Click on the left of your hard drives. D-Link ShareCenter DNS-320L User Manual 48
... 1 functionality then you do not want to set the Auto-Rebuild function here using the radio buttons. Section 4 - Configuration Disk Management Hard Drive Configuration To setup the Hard Drive RAID configuration of the window. Note: You can check this option. This menu will allow you to automatically rebuild drives after a failure... Auto-Rebuild will be Configuration: configured here and formatted in various RAID configurations. Set RAID type and Click on the left of your hard drives. D-Link ShareCenter DNS-320L User Manual 48
DNS-320L Manual
Page 53
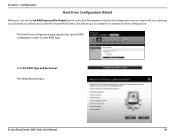
The following is an example of a standard volume configuration: The Hard Drive Configuration page displays the current RAID configuration under 'Current RAID Type'. The Setup Wizard begins. Click Set RAID Type and Re-Format. Configuration Hard Drive Configuration Wizard When you click on the Set RAID type and Re-Format button in the Disk Management-Hard Drive Configuration menu a wizard will start, allowing you to format your drives and create the volume RAID format. D-Link ShareCenter DNS-320L User Manual 49 Section 4 -
The following is an example of a standard volume configuration: The Hard Drive Configuration page displays the current RAID configuration under 'Current RAID Type'. The Setup Wizard begins. Click Set RAID Type and Re-Format. Configuration Hard Drive Configuration Wizard When you click on the Set RAID type and Re-Format button in the Disk Management-Hard Drive Configuration menu a wizard will start, allowing you to format your drives and create the volume RAID format. D-Link ShareCenter DNS-320L User Manual 49 Section 4 -
DNS-320L Manual
Page 78
Section 4 - Step 10 - Setup is completed when it shows final information on the slot, vendor, model number, and serial number. Click Finish to the main Hard Drive Configuration . Configuration Step 9 - D-Link ShareCenter DNS-320L User Manual 74 The wizard returns to continue.
Section 4 - Step 10 - Setup is completed when it shows final information on the slot, vendor, model number, and serial number. Click Finish to the main Hard Drive Configuration . Configuration Step 9 - D-Link ShareCenter DNS-320L User Manual 74 The wizard returns to continue.
DNS-320L Manual
Page 84
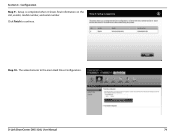
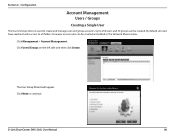
However access rules can be created and edited in the Network Shares menu. The User Setup Wizard will appear. Click Next to create and manage user and group accounts. Configuration Account Management Users / Groups Creating a Single User The Users/Groups menu is used to continue. Click Users/Groups on the left side and then click Create. Section 4 - Click Management > Account Management. D-Link ShareCenter DNS-320L User Manual 80 By default, all folders. Up to all users have read and write access to 256 users and 32 groups can be created.
However access rules can be created and edited in the Network Shares menu. The User Setup Wizard will appear. Click Next to create and manage user and group accounts. Configuration Account Management Users / Groups Creating a Single User The Users/Groups menu is used to continue. Click Users/Groups on the left side and then click Create. Section 4 - Click Management > Account Management. D-Link ShareCenter DNS-320L User Manual 80 By default, all folders. Up to all users have read and write access to 256 users and 32 groups can be created.
DNS-320L Manual
Page 93
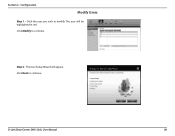
Click Next to modify. D-Link ShareCenter DNS-320L User Manual 89 Step 2 - The User Setup Wizard will be highlighted in red. The user will appear. Click the user you wish to continue. Configuration Modify Users Step 1 - Click Modify to continue. Section 4 -
Click Next to modify. D-Link ShareCenter DNS-320L User Manual 89 Step 2 - The User Setup Wizard will be highlighted in red. The user will appear. Click the user you wish to continue. Configuration Modify Users Step 1 - Click Modify to continue. Section 4 -
DNS-320L Manual
Page 101
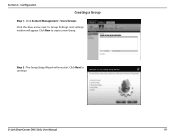
Section 4 - Click New to continue. D-Link ShareCenter DNS-320L User Manual 97 Click Account Management > Users/Groups. Click the blue arrow next to Group Settings and settings window will now start. Configuration Creating a Group Step 1 - Click Next to create a new Group. The Group Setup Wizard will appear. Step 2 -
Section 4 - Click New to continue. D-Link ShareCenter DNS-320L User Manual 97 Click Account Management > Users/Groups. Click the blue arrow next to Group Settings and settings window will now start. Configuration Creating a Group Step 1 - Click Next to create a new Group. The Group Setup Wizard will appear. Step 2 -