DNS-320L Datasheet
Page 1
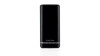
...Multiple Hard Drive Configurations: Standard, JBOD, RAID 0, RAID 1 Gigabit Ethernet connectivity for High Speed Data Transfer DNS-320L A Complete Home Storage Solution D-Link® ShareCenter 2-Bay Cloud Storage 2000 (DNS-320L) is as easy as downloading the free mydlink Access - NAS mobile app, which allows you easily add ...your own personal Cloud. simply log into your hand - Access and share digital content to your device without worrying about complicated network settings. BRING YOUR OWN DRIVE YOU CAN ADD UP TO 2 SATA DISK DRIVES Share files over your network Stream media to share,...
...Multiple Hard Drive Configurations: Standard, JBOD, RAID 0, RAID 1 Gigabit Ethernet connectivity for High Speed Data Transfer DNS-320L A Complete Home Storage Solution D-Link® ShareCenter 2-Bay Cloud Storage 2000 (DNS-320L) is as easy as downloading the free mydlink Access - NAS mobile app, which allows you easily add ...your own personal Cloud. simply log into your hand - Access and share digital content to your device without worrying about complicated network settings. BRING YOUR OWN DRIVE YOU CAN ADD UP TO 2 SATA DISK DRIVES Share files over your network Stream media to share,...
DNS-320L Datasheet
Page 2
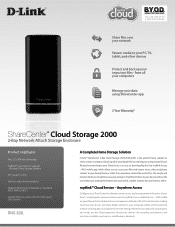
DNS-320L ShareCenter® 2-Bay Cloud Storage 2000 Manage your ShareCenter with the mydlink Access - Share • Share documents, files and digital media with everyone on your ... PC backup utility Manage • Intuitive web-based user interface for easy file access and management • Set file and folder permissions for specific users and groups Package Contents • ShareCenter® Cloud Storage 2000 (DNS-320L) • Ethernet Cable • Power Adapter • Hard Drive Mounting Kit • Quick Install Guide •...
DNS-320L ShareCenter® 2-Bay Cloud Storage 2000 Manage your ShareCenter with the mydlink Access - Share • Share documents, files and digital media with everyone on your ... PC backup utility Manage • Intuitive web-based user interface for easy file access and management • Set file and folder permissions for specific users and groups Package Contents • ShareCenter® Cloud Storage 2000 (DNS-320L) • Ethernet Cable • Power Adapter • Hard Drive Mounting Kit • Quick Install Guide •...
DNS-320L Manual
Page 3
... Editing 133 Verifying the ISO image 134 Admin Password 135 Network Management 136 LAN Setup 136 IPv6 Settings 139 IPv6 Setup 140 Link Speed and LLTD Settings 142 DDNS 143 Port Forwarding 144 Application Management 148 FTP server 148 UPnP AV Server 152 iTunes ... and Date 158 Device 159 System Settings 160 Power Management 161 Notifications 163 Email Settings 163 SMS Settings 164 D-Link ShareCenter DNS-320L User Manual Adding an SMS Service Provider 165 Event Settings 166 Logs 167 Firmware Upgrade 168 USB Devices 169 UPS Settings 169 USB Storage Information 169 Printer...
... Editing 133 Verifying the ISO image 134 Admin Password 135 Network Management 136 LAN Setup 136 IPv6 Settings 139 IPv6 Setup 140 Link Speed and LLTD Settings 142 DDNS 143 Port Forwarding 144 Application Management 148 FTP server 148 UPnP AV Server 152 iTunes ... and Date 158 Device 159 System Settings 160 Power Management 161 Notifications 163 Email Settings 163 SMS Settings 164 D-Link ShareCenter DNS-320L User Manual Adding an SMS Service Provider 165 Event Settings 166 Logs 167 Firmware Upgrade 168 USB Devices 169 UPS Settings 169 USB Storage Information 169 Printer...
DNS-320L Manual
Page 4
...Machine 214 USB Backups 215 MTP Backups 216 USB Backups 216 MTP Backup Process 217 USB Backup Process 219 P2P Downloads 221 Settings 221 Downloads 222 My Files 223 Amazon S3 224 Creating an AWS Account 225 mydlink 230 mydlink Verification 231 mydlink Java ...mydlink Settings Details 239 ShareCenter NAS Status 240 Deleting the device from mydlink account. 241 RAID Options 244 UPS Connectivity 246 Deleting a UPS Slave 250 USB Print Server 252 Contacting Technical Support 255 Warranty 256 Registration 261 Knowledge Base 242 What is RAID 242 D-Link ShareCenter DNS-320L ...
...Machine 214 USB Backups 215 MTP Backups 216 USB Backups 216 MTP Backup Process 217 USB Backup Process 219 P2P Downloads 221 Settings 221 Downloads 222 My Files 223 Amazon S3 224 Creating an AWS Account 225 mydlink 230 mydlink Verification 231 mydlink Java ...mydlink Settings Details 239 ShareCenter NAS Status 240 Deleting the device from mydlink account. 241 RAID Options 244 UPS Connectivity 246 Deleting a UPS Slave 250 USB Print Server 252 Contacting Technical Support 255 Warranty 256 Registration 261 Knowledge Base 242 What is RAID 242 D-Link ShareCenter DNS-320L ...
DNS-320L Manual
Page 15
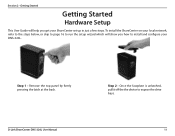
Remove the top panel by firmly pressing the latch at the back. Step 1 - Section 2 - To install the ShareCenter on your local network, refer to the steps below, or skip to page 16 to run the setup wizard which will help you how to expose the drive bays. 11 D-Link ShareCenter DNS-320L User Manual Step 2 - Once the faceplate is unlatched, pull it off the the device to install and configure your ShareCenter set up in just a few steps. Getting Started Getting Started Hardware Setup This User Guide will show you get your DNS-320L.
Remove the top panel by firmly pressing the latch at the back. Step 1 - Section 2 - To install the ShareCenter on your local network, refer to the steps below, or skip to page 16 to run the setup wizard which will help you how to expose the drive bays. 11 D-Link ShareCenter DNS-320L User Manual Step 2 - Once the faceplate is unlatched, pull it off the the device to install and configure your ShareCenter set up in just a few steps. Getting Started Getting Started Hardware Setup This User Guide will show you get your DNS-320L.
DNS-320L Manual
Page 16
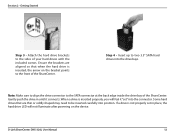
... drive bay of the ShareCenter. Note: Make sure to align the drive connector to the sides of the ShareCenter. D-Link ShareCenter DNS-320L User Manual 12 If a drive is not properly set " into the connector. Section 2 - Gently push the drive in place, the hard drive LED will feel it... "set in until it connects. Step 4 - Getting Started Step 3 - Insert up to be inserted carefully into the drive bays. Some ...
... drive bay of the ShareCenter. Note: Make sure to align the drive connector to the sides of the ShareCenter. D-Link ShareCenter DNS-320L User Manual 12 If a drive is not properly set " into the connector. Section 2 - Gently push the drive in place, the hard drive LED will feel it... "set in until it connects. Step 4 - Getting Started Step 3 - Insert up to be inserted carefully into the drive bays. Some ...
DNS-320L Manual
Page 18
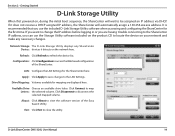
...About: Click About to be assigned an IP address via DHCP. Section 2 - It is recommended that you can use the included D-Link Storage Utility software when accessing and configuring the ShareCenter for the first time. If it detects on , during the initial boot sequence,...utility. Apply: Click Apply to save changes to refresh the device list. Refresh: Click Refresh to the LAN Settings. D-Link ShareCenter DNS-320L User Manual 14 Getting Started D-Link Storage Utility When first powered on the network here. Available Drive Choose an available drive letter. Exit: Click ...
...About: Click About to be assigned an IP address via DHCP. Section 2 - It is recommended that you can use the included D-Link Storage Utility software when accessing and configuring the ShareCenter for the first time. If it detects on , during the initial boot sequence,...utility. Apply: Click Apply to save changes to refresh the device list. Refresh: Click Refresh to the LAN Settings. D-Link ShareCenter DNS-320L User Manual 14 Getting Started D-Link Storage Utility When first powered on the network here. Available Drive Choose an available drive letter. Exit: Click ...
DNS-320L Manual
Page 19
... the same subnet. Make sure the browser is using a DHCP server and the computer receives IP settings from the list and click the Configuration button. Note: The computer used to use a proxy server. D-Link ShareCenter DNS-320L User Manual 15 Getting Started Select the ShareCenter from DHCP server, the ShareCenter will launch the computer...
... the same subnet. Make sure the browser is using a DHCP server and the computer receives IP settings from the list and click the Configuration button. Note: The computer used to use a proxy server. D-Link ShareCenter DNS-320L User Manual 15 Getting Started Select the ShareCenter from DHCP server, the ShareCenter will launch the computer...
DNS-320L Manual
Page 26
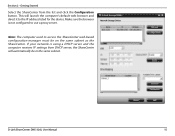
You may either use Static IP or DHCP to continue. Click Next to configure the IP network settings of the ShareCenter. If you select Static IP, then enter the IP parameters as listed. Section 3 - Installation Networking Setup Step 12 - D-Link ShareCenter DNS-320L User Manual 22
You may either use Static IP or DHCP to continue. Click Next to configure the IP network settings of the ShareCenter. If you select Static IP, then enter the IP parameters as listed. Section 3 - Installation Networking Setup Step 12 - D-Link ShareCenter DNS-320L User Manual 22
DNS-320L Manual
Page 29
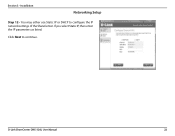
Follow the steps listed here in order to create a DDNS account and configure your LAN equipment and ShareCenter to continue. Click Close to work with the new settings. You can set the time and date manually, from an NTP server, or from your time zone and then set the time and date. Click Next to continue. Select your computer. D-Link ShareCenter DNS-320L User Manual 25 Step 18 - Section 3 - Installation DDNS Account and System Time Step 17 -
Follow the steps listed here in order to create a DDNS account and configure your LAN equipment and ShareCenter to continue. Click Close to work with the new settings. You can set the time and date manually, from an NTP server, or from your time zone and then set the time and date. Click Next to continue. Select your computer. D-Link ShareCenter DNS-320L User Manual 25 Step 18 - Section 3 - Installation DDNS Account and System Time Step 17 -
DNS-320L Manual
Page 30
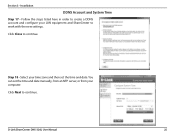
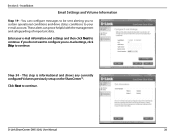
... configure your e-mail information and settings and then click Next to your e-mail account. Section 3 - Step 20 - This step is informational and shows any currently configured Volumes previously setup on the ShareCenter™. Installation Email Settings and Volume Information Step 19 - Enter your e-mail settings, click Skip to continue. D-Link ShareCenter DNS-320L User Manual 26
... configure your e-mail information and settings and then click Next to your e-mail account. Section 3 - Step 20 - This step is informational and shows any currently configured Volumes previously setup on the ShareCenter™. Installation Email Settings and Volume Information Step 19 - Enter your e-mail settings, click Skip to continue. D-Link ShareCenter DNS-320L User Manual 26
DNS-320L Manual
Page 40
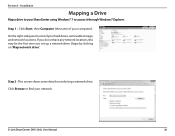
..., then Computer (the name of your network. Begin by clicking on selecting a network drive. Step 2 - D-Link ShareCenter DNS-320L User Manual 36 If you do not have any network locations, this may be the first time you set up a network drive. This screen shows some details on 'Map network drive'. Step 1 - Click Browse to...
..., then Computer (the name of your network. Begin by clicking on selecting a network drive. Step 2 - D-Link ShareCenter DNS-320L User Manual 36 If you do not have any network locations, this may be the first time you set up a network drive. This screen shows some details on 'Map network drive'. Step 1 - Click Browse to...
DNS-320L Manual
Page 43
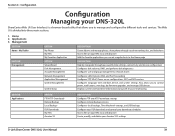
... user and group management, network shares Configures LAN, Dynamic DNS, and Port Forwarding Configures FTP, UPnP, iTunes server configurations, AFP, and NFS services Configures language, time and date, device, and system settings. Displays system and hard drive information along with resource monitoring...browser Create, modify, and delete your NAS via a web browser Add the favorite applications you use on your Amazon S3© settings D-Link ShareCenter DNS-320L User Manual 39 Section 4 - Home 2. The Web UI is a browser-based utility that allows you to manage and configure ...
... user and group management, network shares Configures LAN, Dynamic DNS, and Port Forwarding Configures FTP, UPnP, iTunes server configurations, AFP, and NFS services Configures language, time and date, device, and system settings. Displays system and hard drive information along with resource monitoring...browser Create, modify, and delete your NAS via a web browser Add the favorite applications you use on your Amazon S3© settings D-Link ShareCenter DNS-320L User Manual 39 Section 4 - Home 2. The Web UI is a browser-based utility that allows you to manage and configure ...
DNS-320L Manual
Page 44
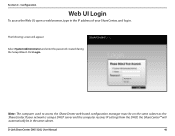
... the IP address of your network is using a DHCP server and the computer receives IP settings from the DHCP, the ShareCenter™ will appear: Select System Administrator and enter the password created during the Setup Wizard. D-Link ShareCenter DNS-320L User Manual 40 Section 4 - The following screen will automatically be on the same subnet...
... the IP address of your network is using a DHCP server and the computer receives IP settings from the DHCP, the ShareCenter™ will appear: Select System Administrator and enter the password created during the Setup Wizard. D-Link ShareCenter DNS-320L User Manual 40 Section 4 - The following screen will automatically be on the same subnet...
DNS-320L Manual
Page 48
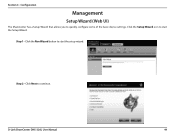
Section 4 - Click the Setup Wizard icon to start the Setup Wizard. Step 1 - Click Next to quickly configure some of the basic device settings. Configuration Management Setup Wizard (Web UI) The ShareCenter has a Setup Wizard that allows you to continue. Click the Run Wizard button to start the setup wizard. Step 2 - D-Link ShareCenter DNS-320L User Manual 44
Section 4 - Click the Setup Wizard icon to start the Setup Wizard. Step 1 - Click Next to quickly configure some of the basic device settings. Configuration Management Setup Wizard (Web UI) The ShareCenter has a Setup Wizard that allows you to continue. Click the Run Wizard button to start the setup wizard. Step 2 - D-Link ShareCenter DNS-320L User Manual 44
DNS-320L Manual
Page 49
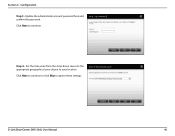
Section 4 - Click Next to ignore these settings. D-Link ShareCenter DNS-320L User Manual 45 Step 4 - Update the administrator account password here and confirm the password. Configuration Step 3 - Click Next to continue or click Skip to continue. Set the time zone from the drop-down menu to the appropriate geographical zone closest to your location.
Section 4 - Click Next to ignore these settings. D-Link ShareCenter DNS-320L User Manual 45 Step 4 - Update the administrator account password here and confirm the password. Configuration Step 3 - Click Next to continue or click Skip to continue. Set the time zone from the drop-down menu to the appropriate geographical zone closest to your location.

DNS-320L Manual
Page 50
... with a short description. Here you can assign a workgroup and name to ignore these settings. Select DHCP to obtain IP settings automatically from a DHCP server (router) or Static to ignore these settings. DNS Servers: Enter the IP address(es) of your DNS server(s). DNS1 is usually the IP address of your router. Step 6 - Subnet Mask...address of your gateway (usually the local IP of your router). Section 4 - Click Next to continue or click Skip to assign the parameters below manually. D-Link ShareCenter DNS-320L User Manual 46 IP Address: Enter an IP address for the...
... with a short description. Here you can assign a workgroup and name to ignore these settings. Select DHCP to obtain IP settings automatically from a DHCP server (router) or Static to ignore these settings. DNS Servers: Enter the IP address(es) of your DNS server(s). DNS1 is usually the IP address of your router. Step 6 - Subnet Mask...address of your gateway (usually the local IP of your router). Section 4 - Click Next to continue or click Skip to assign the parameters below manually. D-Link ShareCenter DNS-320L User Manual 46 IP Address: Enter an IP address for the...
DNS-320L Manual
Page 51
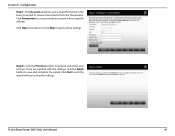
Click Account and enter your settings. Step 8 - D-Link ShareCenter DNS-320L User Manual 47 If you are satisfied with no specific settings. Click Exit to go back and check your e-mail information in the boxes provided to save and complete the wizard. Click the Previous button to end the wizard without saving the settings. Click Next to continue or click Skip to create a random account with the settings, click the Finish button to receive Event Alerts from the ShareCenter. Configuration Step 7 - Click Anonymous to ignore these settings. Section 4 -
Click Account and enter your settings. Step 8 - D-Link ShareCenter DNS-320L User Manual 47 If you are satisfied with no specific settings. Click Exit to go back and check your e-mail information in the boxes provided to save and complete the wizard. Click the Previous button to end the wizard without saving the settings. Click Next to continue or click Skip to create a random account with the settings, click the Finish button to receive Event Alerts from the ShareCenter. Configuration Step 7 - Click Anonymous to ignore these settings. Section 4 -
DNS-320L Manual
Page 52
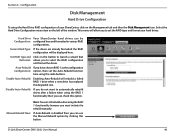
...set the Auto-Rebuild function here using the radio buttons. Current Raid Type: If the drives are already formatted the RAID configuration will allow you can use the Manual Rebuild option by clicking this option. Disable Auto-Rebuild: If you must initiate the rebuild manually. D-Link ShareCenter DNS-320L...then the Disk Management icon. Configuration Disk Management Hard Drive Configuration To setup the Hard Drive RAID configuration of the window. Set RAID type and Click on this button to launch a wizard that Reformat: allows you to automatically rebuild drives after a ...
...set the Auto-Rebuild function here using the radio buttons. Current Raid Type: If the drives are already formatted the RAID configuration will allow you can use the Manual Rebuild option by clicking this option. Disable Auto-Rebuild: If you must initiate the rebuild manually. D-Link ShareCenter DNS-320L...then the Disk Management icon. Configuration Disk Management Hard Drive Configuration To setup the Hard Drive RAID configuration of the window. Set RAID type and Click on this button to launch a wizard that Reformat: allows you to automatically rebuild drives after a ...
DNS-320L Manual
Page 53
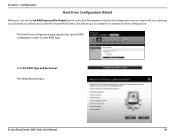
The Setup Wizard begins. Click Set RAID Type and Re-Format. Configuration Hard Drive Configuration Wizard When you click on the Set RAID type and Re-Format button in the Disk Management-Hard Drive Configuration menu a wizard will start, allowing you to format your drives and create the volume RAID format. D-Link ShareCenter DNS-320L User Manual 49 The following is an example of a standard volume configuration: The Hard Drive Configuration page displays the current RAID configuration under 'Current RAID Type'. Section 4 -
The Setup Wizard begins. Click Set RAID Type and Re-Format. Configuration Hard Drive Configuration Wizard When you click on the Set RAID type and Re-Format button in the Disk Management-Hard Drive Configuration menu a wizard will start, allowing you to format your drives and create the volume RAID format. D-Link ShareCenter DNS-320L User Manual 49 The following is an example of a standard volume configuration: The Hard Drive Configuration page displays the current RAID configuration under 'Current RAID Type'. Section 4 -
