Product Manual
Page 4
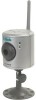
... Supporting TCP/IP networking, HTTP, and other Internet/Intranet applications because of the DCS-900W Internet Camera! All that transmits high quality video images for monitoring. The DCS-900W works with a 10Mbps Ethernet based network or 100Mbps Fast Ethernet based network for traditional wired environments and works with your purchase of its standards-based features. 802.11b Wireless or...
... Supporting TCP/IP networking, HTTP, and other Internet/Intranet applications because of the DCS-900W Internet Camera! All that transmits high quality video images for monitoring. The DCS-900W works with a 10Mbps Ethernet based network or 100Mbps Fast Ethernet based network for traditional wired environments and works with your purchase of its standards-based features. 802.11b Wireless or...
Product Manual
Page 13
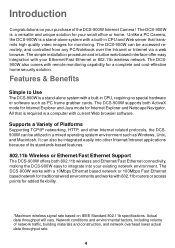
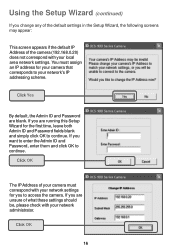
To change the Admin ID and Password immediately to begin You must change the Admin ID and Password, select both Change boxes and enter a New ID and New Password. By default, the Admin ID and Password are blank. Using the Setup Wizard (continued) To run the Setup Wizard, click on Start->Programs->DCS-900W Series Setup Wizard. Click Next 13 Your camera's IP Address will be displayed here if it is valid. Click Wizard to protect your camera against unauthorized access.
To change the Admin ID and Password immediately to begin You must change the Admin ID and Password, select both Change boxes and enter a New ID and New Password. By default, the Admin ID and Password are blank. Using the Setup Wizard (continued) To run the Setup Wizard, click on Start->Programs->DCS-900W Series Setup Wizard. Click Next 13 Your camera's IP Address will be displayed here if it is valid. Click Wizard to protect your camera against unauthorized access.
Product Manual
Page 14
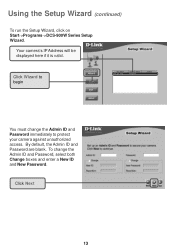
... for a peer-to your network. If you to work. The Network Name, Wireless Channel, and Encryption Keys MUST correspond with your wireless network settings for the camera to access the camera. Using the Setup Wizard (continued) The IP Address, Subnet Mask of your camera, Gateway, and DNS addresses must correspond with your network settings for you...
... for a peer-to your network. If you to work. The Network Name, Wireless Channel, and Encryption Keys MUST correspond with your wireless network settings for the camera to access the camera. Using the Setup Wizard (continued) The IP Address, Subnet Mask of your camera, Gateway, and DNS addresses must correspond with your network settings for you...
Product Manual
Page 16
... leave both Admin ID and Password fields blank and simply click OK to continue. If you are unsure of the camera (192.168.0.20) does not correspond with your network's IP addressing scheme. Click OK 16 If you are blank. If you want to enter the Admin ID and Password, enter...Setup Wizard for you change any of the default settings in the Setup Wizard, the following screens may appear: This screen appears if the default IP Address of what these settings should be, please check with your local area network settings. You must correspond with your network administrator. Using the...
... leave both Admin ID and Password fields blank and simply click OK to continue. If you are unsure of the camera (192.168.0.20) does not correspond with your network's IP addressing scheme. Click OK 16 If you are blank. If you want to enter the Admin ID and Password, enter...Setup Wizard for you change any of the default settings in the Setup Wizard, the following screens may appear: This screen appears if the default IP Address of what these settings should be, please check with your local area network settings. You must correspond with your network administrator. Using the...
Product Manual
Page 17
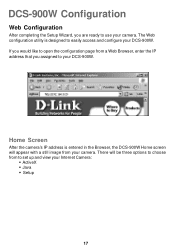
... to set up and view your Internet Camera: ƒ ActiveX ƒ Java ƒ Setup 17 Home Screen After the camera's IP address is designed to easily access and configure your camera. There will appear with a still image from your DCS-900W. The Web configuration utility is entered in the Browser, the DCS-900W Home screen will be three options...
... to set up and view your Internet Camera: ƒ ActiveX ƒ Java ƒ Setup 17 Home Screen After the camera's IP address is designed to easily access and configure your camera. There will appear with a still image from your DCS-900W. The Web configuration utility is entered in the Browser, the DCS-900W Home screen will be three options...
Product Manual
Page 20
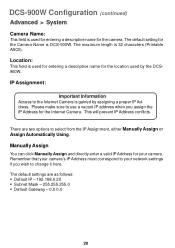
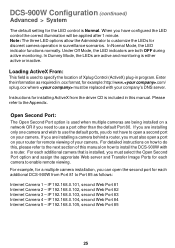
... entering a descriptive name for the camera. IP Assignment: Important Information Access to change it here. This will prevent IP Address conflicts. The default setting for the Internet Camera. Please make sure to use a vacant IP address when you wish to the Internet Camera is gained by the DCS900W. DCS-900W Configuration (continued) Advanced > System Camera Name: This field is used by...
... entering a descriptive name for the camera. IP Assignment: Important Information Access to change it here. This will prevent IP Address conflicts. The default setting for the Internet Camera. Please make sure to use a vacant IP address when you wish to the Internet Camera is gained by the DCS900W. DCS-900W Configuration (continued) Advanced > System Camera Name: This field is used by...
Product Manual
Page 22
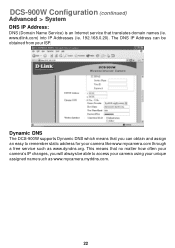
... no matter how often your camera's IP changes, you can be able to remember static address for your camera like www.mycamera.com through a free service such as www.mycamera.myddns.com. 22 Dynamic DNS The DCS-900W supports Dynamic DNS which means ...that translates domain names (ie. www.dlink.com) into IP Addresses (ie. 192.168.0.20). DCS-900W Configuration (continued) Advanced > System DNS IP Address: DNS (Domain Name Service) is an Internet...
... no matter how often your camera's IP changes, you can be able to remember static address for your camera like www.mycamera.com through a free service such as www.mycamera.myddns.com. 22 Dynamic DNS The DCS-900W supports Dynamic DNS which means ...that translates domain names (ie. www.dlink.com) into IP Addresses (ie. 192.168.0.20). DCS-900W Configuration (continued) Advanced > System DNS IP Address: DNS (Domain Name Service) is an Internet...
Product Manual
Page 25
... be applied after 1 minute. IP 192.168.0.104, second Web Port 84 Internet Camera 5 - In Dummy Mode, the LEDs are both OFF during active monitoring. Instructions for installing ActiveX from Port 81 to install the DCS-900W with your camera. For detailed instructions on how to...correct illumination will be replaced with a router. IP 192.168.0.105, second Web Port 85 25 DCS-900W Configuration (continued) Advanced > System The default setting for discreet camera operation in surveillance scenarios. IP 192.168.0.102, second Web Port 82 Internet Camera 3 - Under Off Mode, the LED ...
... be applied after 1 minute. IP 192.168.0.104, second Web Port 84 Internet Camera 5 - In Dummy Mode, the LEDs are both OFF during active monitoring. Instructions for installing ActiveX from Port 81 to install the DCS-900W with your camera. For detailed instructions on how to...correct illumination will be replaced with a router. IP 192.168.0.105, second Web Port 85 25 DCS-900W Configuration (continued) Advanced > System The default setting for discreet camera operation in surveillance scenarios. IP 192.168.0.102, second Web Port 82 Internet Camera 3 - Under Off Mode, the LED ...
Product Manual
Page 26
...multiple DCS-900W and wish to use with your camera for Port Mapping--this will enable remote viewing of IP Address. Please refer to your router's instruction manual on setting up your router, please refer to the next section on how to avoid conflict of multiple cameras via the Internet.... For additional help on configuring your camera to work with a router. You can alternatively click on the Apply button to or retrieved from the DCS-900W. 26 IMPORTANT: You MUST also set up ports. Apply...
...multiple DCS-900W and wish to use with your camera for Port Mapping--this will enable remote viewing of IP Address. Please refer to your router's instruction manual on setting up your router, please refer to the next section on how to avoid conflict of multiple cameras via the Internet.... For additional help on configuring your camera to work with a router. You can alternatively click on the Apply button to or retrieved from the DCS-900W. 26 IMPORTANT: You MUST also set up ports. Apply...

Product Manual
Page 27
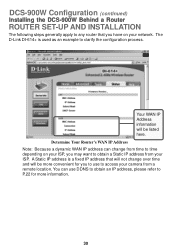
DCS-900W Configuration (continued) Installing the DCS-900W Behind a Router Single Camera Installation If you are installing a single camera on your network the installation is an easy 4-step procedure: 1) Identify Your Camera on the Network 2) Assign a Local IP Address for Your Camera 3) Determine Your Router's WAN IP Address (Enable Remote Viewing) 4) Open Virtual Server Ports for Your Router (Enable Remote Viewing...
DCS-900W Configuration (continued) Installing the DCS-900W Behind a Router Single Camera Installation If you are installing a single camera on your network the installation is an easy 4-step procedure: 1) Identify Your Camera on the Network 2) Assign a Local IP Address for Your Camera 3) Determine Your Router's WAN IP Address (Enable Remote Viewing) 4) Open Virtual Server Ports for Your Router (Enable Remote Viewing...

Product Manual
Page 28
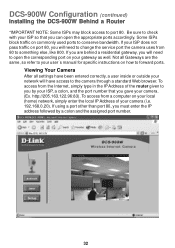
... on your network PC,click on the Advanced Tab, and select System. DCS-900W Configuration (continued) Installing the DCS-900W Behind a Router 1) Identify Your Camera on the Network Once you are using a DLink router) Enter a valid IP address for Your Camera A Local IP Address is required to configure your camera and to view your camera within your local (home) network.
... on your network PC,click on the Advanced Tab, and select System. DCS-900W Configuration (continued) Installing the DCS-900W Behind a Router 1) Identify Your Camera on the Network Once you are using a DLink router) Enter a valid IP address for Your Camera A Local IP Address is required to configure your camera and to view your camera within your local (home) network.
Product Manual
Page 30
... the configuration process. The D-Link DI-614+ is a fixed IP address that you have on your ISP, you to use to access your camera from a remote location. Your WAN IP Address information will be listed here. You can change over time and will be more information. 30 DCS-900W Configuration (continued) Installing the DCS-900W Behind a Router ROUTER...
... the configuration process. The D-Link DI-614+ is a fixed IP address that you have on your ISP, you to use to access your camera from a remote location. Your WAN IP Address information will be listed here. You can change over time and will be more information. 30 DCS-900W Configuration (continued) Installing the DCS-900W Behind a Router ROUTER...

Product Manual
Page 31
... • In the Virtual Servers List, a check mark appearing before the camera name will indicate that the ports are installing multiple cameras, be opened for web server. DCS-900W Configuration (continued) Installing the DCS-900W Behind a Router ASSIGNING AND OPENING VIRTUAL SERVER PORTS 5) Open Virtual Server Ports... • Select Enabled to save your settings. Opening Virtual Server Ports on Your Router 31 for remote access to your camera's Local IP Address in the Private IP field. • Select TCP under Protocol Type. • If you are enabled. • Click Apply to enable ...
... • In the Virtual Servers List, a check mark appearing before the camera name will indicate that the ports are installing multiple cameras, be opened for web server. DCS-900W Configuration (continued) Installing the DCS-900W Behind a Router ASSIGNING AND OPENING VIRTUAL SERVER PORTS 5) Open Virtual Server Ports... • Select Enabled to save your settings. Opening Virtual Server Ports on Your Router 31 for remote access to your camera's Local IP Address in the Private IP field. • Select TCP under Protocol Type. • If you are enabled. • Click Apply to enable ...
Product Manual
Page 32
... on how to open the appropriate ports accordingly. To access from the Internet, simply type in the IP Address of your camera. (Ex. Not all settings have access to something else, like 800. Viewing Your Camera After all Gateways are behind a residential gateway, you by a colon .... If using a port other than port 80, you must enter the IP address followed by your ISP, a colon, and the port number that you gave your camera (i.e. 192.168.0.20). DCS-900W Configuration (continued) Installing the DCS-900W Behind a Router *IMPORTANT NOTE: Some ISPs may block access to conserve...
... on how to open the appropriate ports accordingly. To access from the Internet, simply type in the IP Address of your camera. (Ex. Not all settings have access to something else, like 800. Viewing Your Camera After all Gateways are behind a residential gateway, you by a colon .... If using a port other than port 80, you must enter the IP address followed by your ISP, a colon, and the port number that you gave your camera (i.e. 192.168.0.20). DCS-900W Configuration (continued) Installing the DCS-900W Behind a Router *IMPORTANT NOTE: Some ISPs may block access to conserve...

Product Manual
Page 36
... is used primarily by Linux users. IP Address: Enter the IP Address of operation. This is recommended for time/date accuracy for the DCS-900W. The IP address will set the time server. DCS-900W Configuration (continued) Tools > Time The Time menu sets the DCS-900W's time and date requirements to provide ... and the time will be listed with the time server information on the web. 36 The NTP server IP address listed below : DateTime: Select Synchronized with your camera is the default setting for your region of the Time Server in the Time settings are accessing from a...
... is used primarily by Linux users. IP Address: Enter the IP Address of operation. This is recommended for time/date accuracy for the DCS-900W. The IP address will set the time server. DCS-900W Configuration (continued) Tools > Time The Time menu sets the DCS-900W's time and date requirements to provide ... and the time will be listed with the time server information on the web. 36 The NTP server IP address listed below : DateTime: Select Synchronized with your camera is the default setting for your region of the Time Server in the Time settings are accessing from a...

Product Manual
Page 48
The Browse Camera dialog box will appear (see below ). An Add Camera dialog box will appear with a blank screen (see below ). 48 Click on Browse. IPView Lite (continued) How to Change the IP Address Changing the IP Address To change an IP Address for a camera, select Camera > Add.
The Browse Camera dialog box will appear (see below ). An Add Camera dialog box will appear with a blank screen (see below ). 48 Click on Browse. IPView Lite (continued) How to Change the IP Address Changing the IP Address To change an IP Address for a camera, select Camera > Add.
Product Manual
Page 49
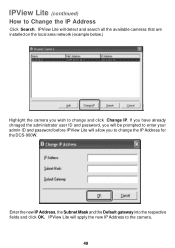
... ID and password before IPView Lite will detect and search all the available cameras that are installed on the local area network (example below.) Highlight the camera you to change the IP Address for the DCS-900W. IPView Lite (continued) How to the camera. 49 IPView Lite will allow you wish to change and click Change...
... ID and password before IPView Lite will detect and search all the available cameras that are installed on the local area network (example below.) Highlight the camera you to change the IP Address for the DCS-900W. IPView Lite (continued) How to the camera. 49 IPView Lite will allow you wish to change and click Change...
Product Manual
Page 50
...DCS-900W Configuration, Installation Behind a Router section of the error. Remember that if your camera is behind a router, you will appear. (See below .) Note: Only cameras on your camera is entered incorrectly or if you must enter in IPView Lite. To add cameras in the specified field and click Add. Please refer to add a camera via the Internet..., you have Internet access. An Add Camera dialog box will need to notify you are unsure of the IP Address of the camera in ...
...DCS-900W Configuration, Installation Behind a Router section of the error. Remember that if your camera is behind a router, you will appear. (See below .) Note: Only cameras on your camera is entered incorrectly or if you must enter in IPView Lite. To add cameras in the specified field and click Add. Please refer to add a camera via the Internet..., you have Internet access. An Add Camera dialog box will need to notify you are unsure of the IP Address of the camera in ...

Product Manual
Page 51
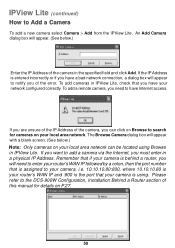
.... 51 Highlight the camera you wish to add and the Add Camera dialog box will appear once again with the IP Address entered. The camera will automatically be added into the IPView Lite list view. The Add Camera dialog box will appear once again with the IP Address entered. Alternatively,... you can double-click on the camera you wish to Add a Camera Click on Search. Click...
.... 51 Highlight the camera you wish to add and the Add Camera dialog box will appear once again with the IP Address entered. The camera will automatically be added into the IPView Lite list view. The Add Camera dialog box will appear once again with the IP Address entered. Alternatively,... you can double-click on the camera you wish to Add a Camera Click on Search. Click...
Product Manual
Page 57
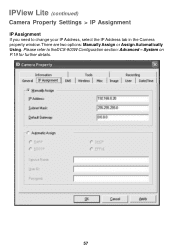
System on P.19 for further details. 57 IPView Lite (continued) Camera Property Settings > IP Assignment IP Assignment If you need to theDCS-900W Configuration section: Advanced - Please refer to change your IP Address, select the IP Address tab in the Camera property window. There are two options: Manually Assign or Assign Automatically Using.
System on P.19 for further details. 57 IPView Lite (continued) Camera Property Settings > IP Assignment IP Assignment If you need to theDCS-900W Configuration section: Advanced - Please refer to change your IP Address, select the IP Address tab in the Camera property window. There are two options: Manually Assign or Assign Automatically Using.


