User Manual
Page 3
1) Identify Your Camera on the Network ...42 2) Assign a Local IP Address and Port for Your Camera ...43 3) Open the HTTP Port ...44 4) Open Virtual Server Ports to Enable Remote Image Viewing ...46 Viewing Your Camera Over the Internet ...47 Viewing Your Camera Over the Internet Behind a Router...47 Frequently Asked Questions...48 Internet Camera Features ...48 Internet Camera Installation ...49 How to Ping Your IP Address...51 Time Zone Table ...53 DI/DO Input specifications ...54 Technical Specifications...55 ii
1) Identify Your Camera on the Network ...42 2) Assign a Local IP Address and Port for Your Camera ...43 3) Open the HTTP Port ...44 4) Open Virtual Server Ports to Enable Remote Image Viewing ...46 Viewing Your Camera Over the Internet ...47 Viewing Your Camera Over the Internet Behind a Router...47 Frequently Asked Questions...48 Internet Camera Features ...48 Internet Camera Installation ...49 How to Ping Your IP Address...51 Time Zone Table ...53 DI/DO Input specifications ...54 Technical Specifications...55 ii
User Manual
Page 7
..., recording images to a hard drive, viewing up to 32 cameras on one screen, and taking snapshots. „ Broad Range of Platforms: Supports TCP/IP networking, HTTP, and other Internet/Intranet applications because of a dedicated PC for storing recorded video. „ Low Light Recording: The DCS-2102/2121's 0.5 lux light sensitivity allows you to view and...
..., recording images to a hard drive, viewing up to 32 cameras on one screen, and taking snapshots. „ Broad Range of Platforms: Supports TCP/IP networking, HTTP, and other Internet/Intranet applications because of a dedicated PC for storing recorded video. „ Low Light Recording: The DCS-2102/2121's 0.5 lux light sensitivity allows you to view and...
User Manual
Page 18
... also highly recommended that you through initial network setup of cameras after rescanning for all available cameras connected to use in order to keep your camera's network setup. The Setup Wizard will appear with its MAC address, current IP address, and camera name. You can choose from the following... options from the buttons on StartÆ ProgramsÆ D-Link Setup Wizard ...
... also highly recommended that you through initial network setup of cameras after rescanning for all available cameras connected to use in order to keep your camera's network setup. The Setup Wizard will appear with its MAC address, current IP address, and camera name. You can choose from the following... options from the buttons on StartÆ ProgramsÆ D-Link Setup Wizard ...
User Manual
Page 19
.... After entering your settings, click Next. (DCS-2121 only) The availability of what these settings should use with a router or Adhoc for a peer-to your wireless network settings for you use a static IP, the camera's IP Address, Subnet Mask, Gateway, and DNS addresses must correspond with your network. The Network Name, Wireless Channel, Security Mode, and Authentication...
.... After entering your settings, click Next. (DCS-2121 only) The availability of what these settings should use with a router or Adhoc for a peer-to your wireless network settings for you use a static IP, the camera's IP Address, Subnet Mask, Gateway, and DNS addresses must correspond with your network. The Network Name, Wireless Channel, Security Mode, and Authentication...
User Manual
Page 21
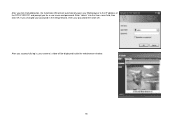
Enter "admin" into the User name field, then click OK. If you changed your password in , your camera's video will automatically open your password then click OK. After you click the Link button, the Installation Wizard will be displayed inside the web browser window. 18 After you successfully log in the Setup Wizard, enter your Web browser to the IP address of the DCS-2102/2121 and prompt you for a user name and password.
Enter "admin" into the User name field, then click OK. If you changed your password in , your camera's video will automatically open your password then click OK. After you click the Link button, the Installation Wizard will be displayed inside the web browser window. 18 After you successfully log in the Setup Wizard, enter your Web browser to the IP address of the DCS-2102/2121 and prompt you for a user name and password.
User Manual
Page 24
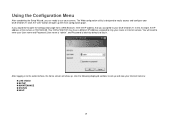
...home screen will open the configuration page from a Web Browser, enter the IP address that you are ready to use your DCS-2102/2121. The Web configuration utility is designed to easily access and configure your camera. Click the "Link" button will show up and view your User name and Password (User... name is "admin", and Password is 192.168.0.20. If you would like to open up the main configuration page. Your DCS-2102/2121 may have a different IP Address assigned to ...
...home screen will open the configuration page from a Web Browser, enter the IP address that you are ready to use your DCS-2102/2121. The Web configuration utility is designed to easily access and configure your camera. Click the "Link" button will show up and view your User name and Password (User... name is "admin", and Password is 192.168.0.20. If you would like to open up the main configuration page. Your DCS-2102/2121 may have a different IP Address assigned to ...
User Manual
Page 25
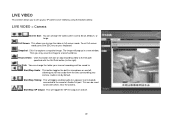
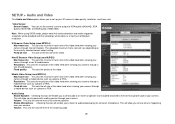
...Start/Stop GP Output: This will start or stop recording video to the file path specified with others near the camera. Then you to the right). Audio is on your camera. Start/Stop Talking: This will pop up your manual recordings will be used to talk with the Set Path ...full screen mode. Snapshot: Click it to Small, Medium, or Large. Set Path: You can be saved to the camera's Audio Out port. The image will toggle sending audio to a speaker (not included) connected to . LIVE VIDEO > Camera Screen Size: You can change the folder your IP camera's live video by default.
...Start/Stop GP Output: This will start or stop recording video to the file path specified with others near the camera. Then you to the right). Audio is on your camera. Start/Stop Talking: This will pop up your manual recordings will be used to talk with the Set Path ...full screen mode. Snapshot: Click it to Small, Medium, or Large. Set Path: You can be saved to the camera's Audio Out port. The image will toggle sending audio to a speaker (not included) connected to . LIVE VIDEO > Camera Screen Size: You can change the folder your IP camera's live video by default.

User Manual
Page 26
... initial setup of your camera. Alternatively, you can manually set up your IP camera. Simply follow the instructions given in Audio and Video, Motion Detection and Motion Triggered Snapshots are disabled. 23 You can use the Internet Connection Setup Wizard for initial network setup, and you can...the Motion Detection Setup Wizard to set up motion detection and snapshots. Note: If the camera is set up your IP camera. You can also see these settings by clicking on the left side (Network Setup / Wireless Setup / Motion Detection / Snapshot). SETUP This section allows you to further...
... initial setup of your camera. Alternatively, you can manually set up your IP camera. Simply follow the instructions given in Audio and Video, Motion Detection and Motion Triggered Snapshots are disabled. 23 You can use the Internet Connection Setup Wizard for initial network setup, and you can...the Motion Detection Setup Wizard to set up motion detection and snapshots. Note: If the camera is set up your IP camera. You can also see these settings by clicking on the left side (Network Setup / Wireless Setup / Motion Detection / Snapshot). SETUP This section allows you to further...
User Manual
Page 27
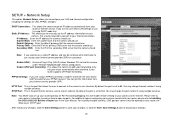
... 24 By default the port is set to get this information from your camera. Note: You MUST also set the IP address information for your router or Internet service. this camera under "Network Neighborhood" without configuration. After making any changes, click the Save Settings button ...camera should use , try using multiple cameras. This may change the port number if using DHCP mode first. You may be opened on configuring your camera to work with your Internet service provider (ISP). Static IP Address: This allows you do not know what information to Installing the DCS-2102...
... 24 By default the port is set to get this information from your camera. Note: You MUST also set the IP address information for your router or Internet service. this camera under "Network Neighborhood" without configuration. After making any changes, click the Save Settings button ...camera should use , try using multiple cameras. This may change the port number if using DHCP mode first. You may be opened on configuring your camera to work with your Internet service provider (ISP). Static IP Address: This allows you do not know what information to Installing the DCS-2102...
User Manual
Page 28
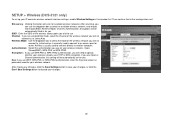
...making any changes, click the Save Settings button to save your changes, or click the Don't Save Settings button to discard your IP camera's wireless network interface settings, enable Wireless Settings in for you. Authentication: Select the authentication you will be automatically set up your changes. 25... authentication, this button will be automatically filled in this window first. Infrastructure is usually used for your wireless network - SETUP > Wireless (DCS-2121 only) To set for you wish to connect to. Site survey: Clicking this setting will scan for available wireless...
...making any changes, click the Save Settings button to save your changes, or click the Don't Save Settings button to discard your IP camera's wireless network interface settings, enable Wireless Settings in for you. Authentication: Select the authentication you will be automatically set up your changes. 25... authentication, this button will be automatically filled in this window first. Infrastructure is usually used for your wireless network - SETUP > Wireless (DCS-2121 only) To set for you wish to connect to. Site survey: Clicking this setting will scan for available wireless...
User Manual
Page 29
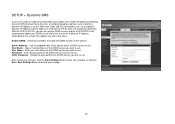
...the Host Name of that specific connection. Depending on the service, this checkbox to enable the DDNS function of keeping a domain name linked to a dynamic IP address, is used only for the DDNS service you wish to use . Password: Enter the password for the duration of the DDNS...you have a DSL or Cable service provider that changes your modem IP address periodically, Dynamic DNS (Domain Name Service), a method of the camera. Verify Password: Retype the password for the DDNS service you wish to use . With the DCS-2102/2121, you wish to use . Server Address: Use the ...
...the Host Name of that specific connection. Depending on the service, this checkbox to enable the DDNS function of keeping a domain name linked to a dynamic IP address, is used only for the DDNS service you wish to use . Password: Enter the password for the duration of the DDNS...you have a DSL or Cable service provider that changes your modem IP address periodically, Dynamic DNS (Domain Name Service), a method of the camera. Verify Password: Retype the password for the DDNS service you wish to use . With the DCS-2102/2121, you wish to use . Server Address: Use the ...
User Manual
Page 30
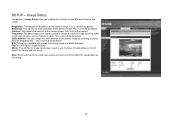
... the settings for your left side will be used if you to mount the DCS-2102/2121 upside down on the left side of the screen and vice versa. Brightness: This adjusts the brightness of the camera image. This is set to Auto by selecting a setting from the dropdown box.... This is set to 0 by default. Note: Mirror and Flip can change the camera image into black and white. Flip: This will change the white balance of the camera image by default. SETUP > Image Setup The options in such a way that your IP camera sensor and image.
... the settings for your left side will be used if you to mount the DCS-2102/2121 upside down on the left side of the screen and vice versa. Brightness: This adjusts the brightness of the camera image. This is set to Auto by selecting a setting from the dropdown box.... This is set to 0 by default. Note: Mirror and Flip can change the camera image into black and white. Flip: This will change the white balance of the camera image by default. SETUP > Image Setup The options in such a way that your IP camera sensor and image.
User Manual
Page 31
... PDA. This will allow you to the external speaker jack of the video feed when viewing your camera through your camera through a non-IE web browser. Resolution: This sets the resolution of your IP camera's video quality, resolution, and frame rate. Volume: This sets the volume level of the video... feed when viewing your camera. Non-IE Browser Video Setup (uses MJPEG) Max frame rate: This sets the maximum frame ...
... PDA. This will allow you to the external speaker jack of the video feed when viewing your camera through your camera through a non-IE web browser. Resolution: This sets the resolution of your IP camera's video quality, resolution, and frame rate. Volume: This sets the volume level of the video... feed when viewing your camera. Non-IE Browser Video Setup (uses MJPEG) Max frame rate: This sets the maximum frame ...

User Manual
Page 33
...window and draw motion detection zones by clicking and dragging your mouse. In order to discard your changes. Sensitivity: This setting adjusts how sensitive the camera will be the least sensitive setting. Drawing Mode: This will allow you to motion, where 100% will be the most sensitive setting and 0% ...will clear all motion detection zones. Note: If the camera is disabled. 30 SETUP > Motion Detection This option allows you to SXGA mode in Audio and Video, Motion Detection is set to set up Motion...
...window and draw motion detection zones by clicking and dragging your mouse. In order to discard your changes. Sensitivity: This setting adjusts how sensitive the camera will be the least sensitive setting. Drawing Mode: This will allow you to motion, where 100% will be the most sensitive setting and 0% ...will clear all motion detection zones. Note: If the camera is disabled. 30 SETUP > Motion Detection This option allows you to SXGA mode in Audio and Video, Motion Detection is set to set up Motion...

User Manual
Page 42
STATUS The Status section provides the detail information about your IP camera. STATUS> Device Info This screen shows you various information about your camera and its current settings. 39
STATUS The Status section provides the detail information about your IP camera. STATUS> Device Info This screen shows you various information about your camera and its current settings. 39
User Manual
Page 45
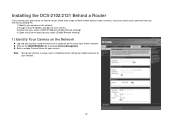
Installing the DCS-2102/2121 Behind a Router If you connect your cameras to an Internet router, follow these steps to allow remote access to your cameras, so you can access your cameras from any Internet-connected PC: 1) Identify your camera on the network 2) Assign a local IP address and port for your camera 3) Determine your router's WAN IP Address (Enable Remote Viewing...
Installing the DCS-2102/2121 Behind a Router If you connect your cameras to an Internet router, follow these steps to allow remote access to your cameras, so you can access your cameras from any Internet-connected PC: 1) Identify your camera on the network 2) Assign a local IP address and port for your camera 3) Determine your router's WAN IP Address (Enable Remote Viewing...
User Manual
Page 46
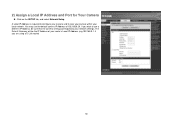
The Default Gateway will be sure that the camera settings correspond to your network settings. You may use a different IP Address, be the IP Address of 192.168.0.20. If you are using a D-Link router) 43 2) Assign a Local IP Address and Port for Your Camera „ Click on the SETUP tab, and select Network Setup A Local IP Address is required to configure your camera and to view your camera within your router's Local IP Address (e.g.192.168.0.1, if you wish to use the default camera IP Address of your local network.
The Default Gateway will be sure that the camera settings correspond to your network settings. You may use a different IP Address, be the IP Address of 192.168.0.20. If you are using a D-Link router) 43 2) Assign a Local IP Address and Port for Your Camera „ Click on the SETUP tab, and select Network Setup A Local IP Address is required to configure your camera and to view your camera within your router's Local IP Address (e.g.192.168.0.1, if you wish to use the default camera IP Address of your local network.
User Manual
Page 47
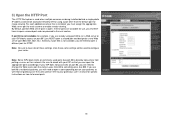
.... 3) Open the HTTP Port The HTTP Port option is used when multiple cameras are being installed behind a residential gateway, you will need to change the Web server port the camera uses from putting a server on their network. If you are available for RTSP. If these same settings will need to... Web server port (800, 801, 802, etc.). Note: Be sure to take note of these settings since these ports are behind a single public IP address and will be used ports like 800. Note: Some ISPs block traffic on commonly used to disallow consumers from 80 to the next section...
.... 3) Open the HTTP Port The HTTP Port option is used when multiple cameras are being installed behind a residential gateway, you will need to change the Web server port the camera uses from putting a server on their network. If you are available for RTSP. If these same settings will need to... Web server port (800, 801, 802, etc.). Note: Be sure to take note of these settings since these ports are behind a single public IP address and will be used ports like 800. Note: Some ISPs block traffic on commonly used to disallow consumers from 80 to the next section...

User Manual
Page 48
... your ISP. A Static IP address is used as an example to access your network. Router Setup The following window. Note: Because a dynamic WAN IP address can use to clarify the configuration process. The D-Link DIR-300 is a fixed IP address that you have on your camera from your ISP, you... to use DDNS to obtain an IP address, please refer...
... your ISP. A Static IP address is used as an example to access your network. Router Setup The following window. Note: Because a dynamic WAN IP address can use to clarify the configuration process. The D-Link DIR-300 is a fixed IP address that you have on your camera from your ISP, you... to use DDNS to obtain an IP address, please refer...

User Manual
Page 49
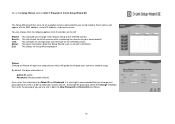
... can be opened for remote access to your camera. If you are enabled. „ Click Apply to as follows: „ Select Enabled to enable virtual server settings. „ Select a camera name. „ Enter your camera's Local IP Address in the private/local IP field. „ Select TCP under Protocol Type.... „ Enter 80 for your public port, and whatever port your camera's HTTP port is set to use port 80 for your...
... can be opened for remote access to your camera. If you are enabled. „ Click Apply to as follows: „ Select Enabled to enable virtual server settings. „ Select a camera name. „ Enter your camera's Local IP Address in the private/local IP field. „ Select TCP under Protocol Type.... „ Enter 80 for your public port, and whatever port your camera's HTTP port is set to use port 80 for your...


