
Reference Guide
Page 6
... Problems 6-6 Infrared Problems 6-6 Keyboard and Pointing Device Problems 6-7 Local Area Network (LAN) Problems 6-8 Memory Problems 6-9 Modem Problems 6-10 PC Card (PCMCIA) Problems 6-13 Performance Problems 6-14 Power and Battery Pack Problems 6-15 Printing Problems 6-18 Serial, Parallel and USB Problems 6-19 Startup Problems 6-20 Wireless Problems 6-21 Configuring Your Notebook 6-23 To Run...
... Problems 6-6 Infrared Problems 6-6 Keyboard and Pointing Device Problems 6-7 Local Area Network (LAN) Problems 6-8 Memory Problems 6-9 Modem Problems 6-10 PC Card (PCMCIA) Problems 6-13 Performance Problems 6-14 Power and Battery Pack Problems 6-15 Printing Problems 6-18 Serial, Parallel and USB Problems 6-19 Startup Problems 6-20 Wireless Problems 6-21 Configuring Your Notebook 6-23 To Run...

Reference Guide
Page 8
Getting Started with Your Notebook Front Panel and Right Panel Components 1 Main status lights (left to right): power mode, hard drive activity, and battery 2 TouchPad, scroll pad, Click buttons, and an on-off button 3 Power button: turns the notebook on and off 4 Keyboard status lights 5 One-Touch buttons 6 Notebook open/close latch 7 CD-ROM, DVD, or other drive 8 Battery pack 9 Wireless on-off button and indicator light (select models only) - Infrared port (select models only) q Hard drive 1-2 Reference Guide
Getting Started with Your Notebook Front Panel and Right Panel Components 1 Main status lights (left to right): power mode, hard drive activity, and battery 2 TouchPad, scroll pad, Click buttons, and an on-off button 3 Power button: turns the notebook on and off 4 Keyboard status lights 5 One-Touch buttons 6 Notebook open/close latch 7 CD-ROM, DVD, or other drive 8 Battery pack 9 Wireless on-off button and indicator light (select models only) - Infrared port (select models only) q Hard drive 1-2 Reference Guide

Reference Guide
Page 11
... and battery status, drive activity, and keyboard functions such as Caps Lock and Num Lock. Getting Started with Your Notebook Status Lights The notebook includes a number of the notebook. 1 Power mode ■ On-notebook is on (even if the display is off) ■ Blinking-notebook is in Standby ■ Off-notebook is off or in Hibernation 2 Hard...
... and battery status, drive activity, and keyboard functions such as Caps Lock and Num Lock. Getting Started with Your Notebook Status Lights The notebook includes a number of the notebook. 1 Power mode ■ On-notebook is on (even if the display is off) ■ Blinking-notebook is in Standby ■ Off-notebook is off or in Hibernation 2 Hard...
Reference Guide
Page 12
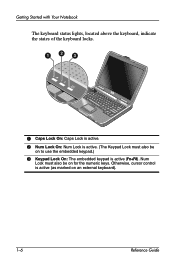
Num Lock must also be on an external keyboard). 1-6 Reference Guide Otherwise, cursor control is active (as marked on for the numeric keys. Getting Started with Your Notebook The keyboard status lights, located above the keyboard, indicate the states of the keyboard locks. 1 Caps Lock On: Caps Lock is active. 2 Num Lock On: Num Lock is active. (The Keypad Lock must also be on to use the embedded keypad.) 3 Keypad Lock On: The embedded keypad is active (Fn+F8).
Num Lock must also be on an external keyboard). 1-6 Reference Guide Otherwise, cursor control is active (as marked on for the numeric keys. Getting Started with Your Notebook The keyboard status lights, located above the keyboard, indicate the states of the keyboard locks. 1 Caps Lock On: Caps Lock is active. 2 Num Lock On: Num Lock is active. (The Keypad Lock must also be on to use the embedded keypad.) 3 Keypad Lock On: The embedded keypad is active (Fn+F8).
Reference Guide
Page 16
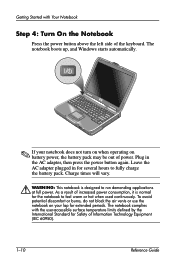
...the AC adapter plugged in the AC adapter, then press the power button again. The notebook complies with Your Notebook Step 4: Turn On the Notebook Press the power button above the left side of the keyboard. The notebook boots up, and Windows starts automatically. ✎ If your lap for several hours ...to run demanding applications at full power. To avoid potential discomfort or burns, do not block the air vents or use the notebook on your notebook does not turn on...
...the AC adapter plugged in the AC adapter, then press the power button again. The notebook complies with Your Notebook Step 4: Turn On the Notebook Press the power button above the left side of the keyboard. The notebook boots up, and Windows starts automatically. ✎ If your lap for several hours ...to run demanding applications at full power. To avoid potential discomfort or burns, do not block the air vents or use the notebook on your notebook does not turn on...
Reference Guide
Page 23
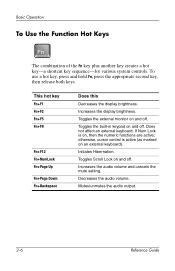
... the audio output. 2-6 Reference Guide Increases the display brightness. Toggles the built-in keypad on an external keyboard). Initiates Hibernation. Increases the audio volume and cancels the mute setting. Does not affect an external keyboard. Decreases the audio volume. otherwise, cursor control is on, then the numeric functions are active; Toggles Scroll...
... the audio output. 2-6 Reference Guide Increases the display brightness. Toggles the built-in keypad on an external keyboard). Initiates Hibernation. Increases the audio volume and cancels the mute setting. Does not affect an external keyboard. Decreases the audio volume. otherwise, cursor control is on, then the numeric functions are active; Toggles Scroll...

Reference Guide
Page 26
Basic Operation To Type Alternate Graphics Using the ALT GR Key Non-U.S. keyboards have an ALT GR key, you want to display. ✎ If your keyboard does not have an ALT GR key to get the same result. These special characters appear on the lower-right corner of the spacebar and ...keys on the keyboard. Reference Guide 2-9 For example: 1 3 2 1 Shifted 2 Unshifted 3 ALT GR » To type an ALT GR character, press and hold the ALT GR key, then press the...
Basic Operation To Type Alternate Graphics Using the ALT GR Key Non-U.S. keyboards have an ALT GR key, you want to display. ✎ If your keyboard does not have an ALT GR key to get the same result. These special characters appear on the lower-right corner of the spacebar and ...keys on the keyboard. Reference Guide 2-9 For example: 1 3 2 1 Shifted 2 Unshifted 3 ALT GR » To type an ALT GR character, press and hold the ALT GR key, then press the...

Reference Guide
Page 34
Do not use an excessively wet cloth, and take care to keep water out of the keyboard). ■ If you are using a screen saver or other software that prevents the notebook from changing to shut off the display after a timeout period. Instead, apply the cleaner to the display. Basic ...Now! Reference Guide 2-17 Do not apply any cleaner directly to a soft cloth, then gently wipe the display. To Clean Your Notebook ■ You can clean the notebook with a soft cloth dampened with clean water or with water containing a mild detergent. If you are not using an external monitor,...
Do not use an excessively wet cloth, and take care to keep water out of the keyboard). ■ If you are using a screen saver or other software that prevents the notebook from changing to shut off the display after a timeout period. Instead, apply the cleaner to the display. Basic ...Now! Reference Guide 2-17 Do not apply any cleaner directly to a soft cloth, then gently wipe the display. To Clean Your Notebook ■ You can clean the notebook with a soft cloth dampened with clean water or with water containing a mild detergent. If you are not using an external monitor,...
Reference Guide
Page 36
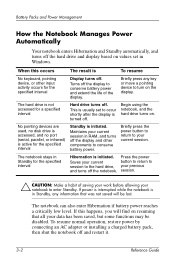
... the display to your notebook to turn on the display. This is usually set in Standby, any key or move a pointing device to enter Standby. If this occurs The result is To resume No keyboard, pointing device, or other components to the hard drive, your ...current button to return to session to conserve battery power. Battery Packs and Power Management How the Notebook Manages Power Automatically Your notebook enters Hibernation and Standby automatically, and turns...
... the display to your notebook to turn on the display. This is usually set in Standby, any key or move a pointing device to enter Standby. If this occurs The result is To resume No keyboard, pointing device, or other components to the hard drive, your ...current button to return to session to conserve battery power. Battery Packs and Power Management How the Notebook Manages Power Automatically Your notebook enters Hibernation and Standby automatically, and turns...

Reference Guide
Page 54
..., select the Advanced button, then the Display or Monitor tab. Reference Guide 5-5 Adjusting Monitor Resolution and Other Settings 1. One-Touch button, which is to the notebook, your keyboard to switch the display to the External Monitor (Select Models Only) Press the TV Now!
..., select the Advanced button, then the Display or Monitor tab. Reference Guide 5-5 Adjusting Monitor Resolution and Other Settings 1. One-Touch button, which is to the notebook, your keyboard to switch the display to the External Monitor (Select Models Only) Press the TV Now!

Reference Guide
Page 64
... information for help and support. Reference Guide 6-1 6 Troubleshooting Troubleshooting Your Notebook This chapter contains solutions to many types of the keyboard. ■ See the Microsoft Windows manual shipped with your notebook. Try the solutions one at the top of problems you might have ...with the notebook. ■ Refer to the Worldwide Telephone Numbers booklet to contact a Customer...
... information for help and support. Reference Guide 6-1 6 Troubleshooting Troubleshooting Your Notebook This chapter contains solutions to many types of the keyboard. ■ See the Microsoft Windows manual shipped with your notebook. Try the solutions one at the top of problems you might have ...with the notebook. ■ Refer to the Worldwide Telephone Numbers booklet to contact a Customer...

Reference Guide
Page 67
... a CD The system is cold, allow it is in Display-off mode. ■ If the notebook is trying to open a .doc file in WordPad, but cannot find the Wordpad.exe program file.... To view the standard format, flip the disc over and play the other side. Display Problems If the Notebook Is On, But the Screen Is Blank ■ Move the mouse or tap the TouchPad. If a DVD... combo-type drive, try using a different media brand. One-Touch button at the top and bottom of the keyboard to switch to one display. In the dialog box, type C:\Program Files\Accessories. The system displays an error ...
... a CD The system is cold, allow it is in Display-off mode. ■ If the notebook is trying to open a .doc file in WordPad, but cannot find the Wordpad.exe program file.... To view the standard format, flip the disc over and play the other side. Display Problems If the Notebook Is On, But the Screen Is Blank ■ Move the mouse or tap the TouchPad. If a DVD... combo-type drive, try using a different media brand. One-Touch button at the top and bottom of the keyboard to switch to one display. In the dialog box, type C:\Program Files\Accessories. The system displays an error ...

Reference Guide
Page 70
...on the light. ■ Do not touch the TouchPad while the notebook is rebooting or resuming from Standby mode. You can change this setting with the BIOS Setup utility. Select Start > Turn Off Computer > Restart. Keyboard and Pointing Device Problems ✎ Use these suggestions for built-in ...pointing devices are normally disabled. If the TouchPad Does Not Work ■ Press the TouchPad on the keyboard to restore normal operation. ■ If an external mouse is using the infrared port. Reference Guide 6-7 On the Hardware tab, select Device...
...on the light. ■ Do not touch the TouchPad while the notebook is rebooting or resuming from Standby mode. You can change this setting with the BIOS Setup utility. Select Start > Turn Off Computer > Restart. Keyboard and Pointing Device Problems ✎ Use these suggestions for built-in ...pointing devices are normally disabled. If the TouchPad Does Not Work ■ Press the TouchPad on the keyboard to restore normal operation. ■ If an external mouse is using the infrared port. Reference Guide 6-7 On the Hardware tab, select Device...
Reference Guide
Page 86
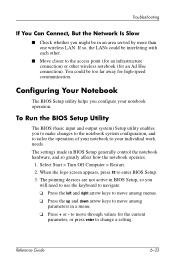
... and output system) Setup utility enables you to make changes to the notebook system configuration, and to tailor the operation of your notebook to move among parameters in BIOS Setup, so you will need to use the keyboard to navigate: ❏ Press the left and right arrow keys to your... notebook operation. When the logo screen appears, press F2 to the access point (for an infrastructure connection) or other wireless notebook (for an Ad Hoc connection). The pointing ...
... and output system) Setup utility enables you to make changes to the notebook system configuration, and to tailor the operation of your notebook to move among parameters in BIOS Setup, so you will need to use the keyboard to navigate: ❏ Press the left and right arrow keys to your... notebook operation. When the logo screen appears, press F2 to the access point (for an infrastructure connection) or other wireless notebook (for an Ad Hoc connection). The pointing ...

Reference Guide
Page 88
... enabled, the notebook uses increased power while it is connected. Disables the internal pointing devices when an external pointing device is shut down. Default Auto Auto Enabled Disabled Reference Guide 6-25 Troubleshooting Main Menu (Continued) Setting Service ID UUID MAC Address Description Displays an identifier used for USB mouse, keyboard, and diskette... value of the internal (wired) LAN. Displays the MAC network address of the 16-byte UUID (Universally Unique ID) as 32 hex characters. Lets the notebook be turned on via the LAN port. Enables BIOS support for repair service.
... enabled, the notebook uses increased power while it is connected. Disables the internal pointing devices when an external pointing device is shut down. Default Auto Auto Enabled Disabled Reference Guide 6-25 Troubleshooting Main Menu (Continued) Setting Service ID UUID MAC Address Description Displays an identifier used for USB mouse, keyboard, and diskette... value of the internal (wired) LAN. Displays the MAC network address of the 16-byte UUID (Universally Unique ID) as 32 hex characters. Lets the notebook be turned on via the LAN port. Enables BIOS support for repair service.

Reference Guide
Page 97
... 2-12 inserting CD 2-10 location 1-2 removing CD 2-10 troubleshooting 6-3 changing the boot device 2-3 cleaning the notebook 2-17 Click buttons 1-2 components back panel 1-3 bottom panel 1-4 front panel 1-2 keyboard status lights 1-2 left panel 1-3 right panel 1-2 status lights 1-1 configuring modem 4-4 notebook 6-23 connecting 1394 device 5-7 AC power 1-8 audio device 5-3 external devices 5-1 local area network (LAN) 4-5 phone...
... 2-12 inserting CD 2-10 location 1-2 removing CD 2-10 troubleshooting 6-3 changing the boot device 2-3 cleaning the notebook 2-17 Click buttons 1-2 components back panel 1-3 bottom panel 1-4 front panel 1-2 keyboard status lights 1-2 left panel 1-3 right panel 1-2 status lights 1-1 configuring modem 4-4 notebook 6-23 connecting 1394 device 5-7 AC power 1-8 audio device 5-3 external devices 5-1 local area network (LAN) 4-5 phone...

Reference Guide
Page 98
... keys 2-6 I identifying components 1-1 increasing display brightness 2-6 infrared port connecting a device 5-7 location 1-2 transferring files 5-8 troubleshooting 6-6 using the port 5-8 inserting battery pack 1-7 CD 2-10 DVD 2-10 PC Card 5-1 RAM (memory) 5-9 K keyboard status lights 1-2, 1-6 troubleshooting 6-7 keys ALT GR 2-9 Applications 2-8 Fn (Function) 2-6 Windows 2-8 L LAN connection 4-5 troubleshooting 6-8 left panel components 1-3 locking the hard drive 2-15 low-battery...
... keys 2-6 I identifying components 1-1 increasing display brightness 2-6 infrared port connecting a device 5-7 location 1-2 transferring files 5-8 troubleshooting 6-6 using the port 5-8 inserting battery pack 1-7 CD 2-10 DVD 2-10 PC Card 5-1 RAM (memory) 5-9 K keyboard status lights 1-2, 1-6 troubleshooting 6-7 keys ALT GR 2-9 Applications 2-8 Fn (Function) 2-6 Windows 2-8 L LAN connection 4-5 troubleshooting 6-8 left panel components 1-3 locking the hard drive 2-15 low-battery...

Reference Guide
Page 100
...notebook connect phone line 1-9 connect power 1-8 install battery pack 1-7 power on 1-10 set up Windows 1-11 troubleshooting 6-20 settings, BIOS 6-24 setup utility 6-23 slot location cable lock 1-3 PC Card and CardBus 1-3 software, restoring 6-32 software, updating 6-28 Standby mode 2-2 status lights battery charge 1-5 hard drive 1-5 keyboard... 2-4 functions 2-5 troubleshooting audio 6-2 battery packs 6-15 CD-ROM drive 6-3 display 6-4 DVD drive 6-3 hard drive 6-5 heat 6-6 infrared 6-6 keyboard 6-7 LAN 6-8 modem 6-10 parallel 6-20 PC Cards 6-13 power 6-15 printing 6-18 Reference Guide Index-5
...notebook connect phone line 1-9 connect power 1-8 install battery pack 1-7 power on 1-10 set up Windows 1-11 troubleshooting 6-20 settings, BIOS 6-24 setup utility 6-23 slot location cable lock 1-3 PC Card and CardBus 1-3 software, restoring 6-32 software, updating 6-28 Standby mode 2-2 status lights battery charge 1-5 hard drive 1-5 keyboard... 2-4 functions 2-5 troubleshooting audio 6-2 battery packs 6-15 CD-ROM drive 6-3 display 6-4 DVD drive 6-3 hard drive 6-5 heat 6-6 infrared 6-6 keyboard 6-7 LAN 6-8 modem 6-10 parallel 6-20 PC Cards 6-13 power 6-15 printing 6-18 Reference Guide Index-5
HP Compaq nx9020, nx9030 and nx9040 Notebook PCs- Startup Guide
Page 6
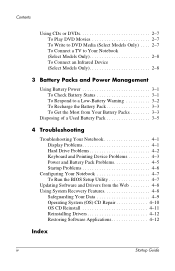
...Play DVD Movies 2-7 To Write to DVD Media (Select Models Only) . . . . 2-7 To Connect a TV to Your Notebook (Select Models Only 2-8 To Connect an Infrared Device (Select Models Only 2-8 3 Battery Packs and Power Management Using Battery Power ...Packs 3-3 Disposing of a Used Battery Pack 3-5 4 Troubleshooting Troubleshooting Your Notebook 4-1 Display Problems 4-1 Hard Drive Problems 4-2 Keyboard and Pointing Device Problems 4-3 Power and Battery Pack Problems 4-5 Startup Problems 4-6 Configuring Your Notebook 4-7 To Run the BIOS Setup Utility 4-7 Updating Software and Drivers from...
...Play DVD Movies 2-7 To Write to DVD Media (Select Models Only) . . . . 2-7 To Connect a TV to Your Notebook (Select Models Only 2-8 To Connect an Infrared Device (Select Models Only 2-8 3 Battery Packs and Power Management Using Battery Power ...Packs 3-3 Disposing of a Used Battery Pack 3-5 4 Troubleshooting Troubleshooting Your Notebook 4-1 Display Problems 4-1 Hard Drive Problems 4-2 Keyboard and Pointing Device Problems 4-3 Power and Battery Pack Problems 4-5 Startup Problems 4-6 Configuring Your Notebook 4-7 To Run the BIOS Setup Utility 4-7 Updating Software and Drivers from...
HP Compaq nx9020, nx9030 and nx9040 Notebook PCs- Startup Guide
Page 9
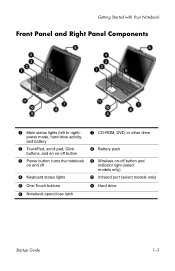
Getting Started with Your Notebook Front Panel and Right Panel Components 1 Main status lights (left to right): power mode, hard drive activity, and battery 2 TouchPad, scroll pad, Click buttons, and an on-off button 3 Power button: turns the notebook on and off 4 Keyboard status lights 5 One-Touch buttons 6 Notebook open/close latch 7 CD-ROM, DVD, or other drive 8 Battery pack 9 Wireless on-off button and indicator light (select models only) - Infrared port (select models only) q Hard drive Startup Guide 1-3
Getting Started with Your Notebook Front Panel and Right Panel Components 1 Main status lights (left to right): power mode, hard drive activity, and battery 2 TouchPad, scroll pad, Click buttons, and an on-off button 3 Power button: turns the notebook on and off 4 Keyboard status lights 5 One-Touch buttons 6 Notebook open/close latch 7 CD-ROM, DVD, or other drive 8 Battery pack 9 Wireless on-off button and indicator light (select models only) - Infrared port (select models only) q Hard drive Startup Guide 1-3


