
Owners Manual
Page 1
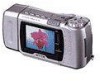
...loss or claims by deletion of data as a result of the QV-700. • CASIO COMPUTER CO., LTD. Be sure to back up all images on other media to Other Devices 81 The camera terminals 81 Using the Camera with a Connected Device 82 Accessing Memory Card Contents with Your ...manual and follow the instructions contained in liquid crystal color monitor that let's you instantly view the pictures you take. LCD Digital Camera QV-700 Owner's Manual Introduction Congratulations upon your selection of SanDisk Corpora- assumes no responsibility for any damage or loss caused by third parties...
...loss or claims by deletion of data as a result of the QV-700. • CASIO COMPUTER CO., LTD. Be sure to back up all images on other media to Other Devices 81 The camera terminals 81 Using the Camera with a Connected Device 82 Accessing Memory Card Contents with Your ...manual and follow the instructions contained in liquid crystal color monitor that let's you instantly view the pictures you take. LCD Digital Camera QV-700 Owner's Manual Introduction Congratulations upon your selection of SanDisk Corpora- assumes no responsibility for any damage or loss caused by third parties...

Owners Manual
Page 2
...operating temperatures (25°C). Memory card error message System error message Perform the procedure on page 96 of this camera" and "the camera" refer to the CASIO QV-700 Digital Camera. • Never try to go dead. They do not guarantee that might cause condensation. • To keep the... camera in the following areas. - Inside of a closed vehicle, especially one of the procedures indicated below to appear on ...
...operating temperatures (25°C). Memory card error message System error message Perform the procedure on page 96 of this camera" and "the camera" refer to the CASIO QV-700 Digital Camera. • Never try to go dead. They do not guarantee that might cause condensation. • To keep the... camera in the following areas. - Inside of a closed vehicle, especially one of the procedures indicated below to appear on ...

Owners Manual
Page 3
...and found to comply with your dealer as soon as possible. THE CAMERA TO A VIDEO IN TERMINAL OF A COMPUTER THE SPECIAL CONNECTION CABLE THAT COMES WITH QV-Link SOFTWARE ----- Address: 570 MT. QV-700 Tested To Comply With FCC Standards FOR HOME OR OFFICE USE 10 Unpacking... other areas). However, there is missing, contact your camera. If this device must be determined by one or more of Conformity Model Number: QV-700 Trade Name: CASIO COMPUTER CO.,LTD. THE SPECIAL VIDEO CABLE THAT COMES WITH THE CAMERA ----- PLEASANT AVENUE, DOVER,NEW JERSEY 07801 Telephone number:...
...and found to comply with your dealer as soon as possible. THE CAMERA TO A VIDEO IN TERMINAL OF A COMPUTER THE SPECIAL CONNECTION CABLE THAT COMES WITH QV-Link SOFTWARE ----- Address: 570 MT. QV-700 Tested To Comply With FCC Standards FOR HOME OR OFFICE USE 10 Unpacking... other areas). However, there is missing, contact your camera. If this device must be determined by one or more of Conformity Model Number: QV-700 Trade Name: CASIO COMPUTER CO.,LTD. THE SPECIAL VIDEO CABLE THAT COMES WITH THE CAMERA ----- PLEASANT AVENUE, DOVER,NEW JERSEY 07801 Telephone number:...
Owners Manual
Page 4
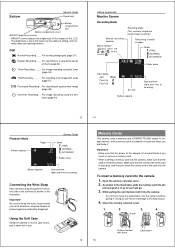
... Getting Acquainted Monitor Screen Recording Mode Manual recording indicator Macro indicator (appears when the switch is oriented correctly. For recording of the camera is turned off before you purchase it . Recording Mode (Not normally displayed during image recording.) Remaining number of pages Mode (FINE...57) Panorama Recording .. Make sure that the card is set at the factory to ). To insert a memory card into the camera. As shown in damage to protect against accidentally dropping it will go. 3. Bottom General Guide Tripod hole Battery compartment lock Battery ...
... Getting Acquainted Monitor Screen Recording Mode Manual recording indicator Macro indicator (appears when the switch is oriented correctly. For recording of the camera is turned off before you purchase it . Recording Mode (Not normally displayed during image recording.) Remaining number of pages Mode (FINE...57) Panorama Recording .. Make sure that the card is set at the factory to ). To insert a memory card into the camera. As shown in damage to protect against accidentally dropping it will go. 3. Bottom General Guide Tripod hole Battery compartment lock Battery ...
Owners Manual
Page 5
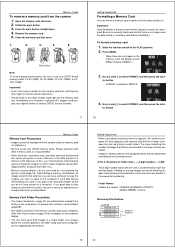
...or moving images causes all of the memory card with 001 and is incremented for each folder. Memory Cards To remove a memory card from the camera 1. Data deleted by a memory card format operation cannot be corrected by reformatting the memory card (page 18). ter button. 18 Memory Cards Memory... still can be recorded is the lower of these two values. • Images in camera memory are assigned names that are not displayed by a personal computer) other electrical phenomena can format a memory card to use only CASIO brand memory cards: CF-2V (2MB), CF-4V (4MB), CF-10V (10MB), ...
...or moving images causes all of the memory card with 001 and is incremented for each folder. Memory Cards To remove a memory card from the camera 1. Data deleted by a memory card format operation cannot be corrected by reformatting the memory card (page 18). ter button. 18 Memory Cards Memory... still can be recorded is the lower of these two values. • Images in camera memory are assigned names that are not displayed by a personal computer) other electrical phenomena can format a memory card to use only CASIO brand memory cards: CF-2V (2MB), CF-4V (4MB), CF-10V (10MB), ...

Owners Manual
Page 6
...a battery, and never try to take batteries apart. • Do not expose batteries to leak or burst and seriously damage your camera. This does not indicate malfunction. 23 Getting Acquainted Standard Battery Life The battery life reference values given below . Note The above illustration...and swing open the battery compartment cover as other manufacturer's batteries are obtained based on the next page). • Make sure that camera power is reduced by burning. To load batteries Be sure that the positive + and negative - Never use of Operation Auto Play Continuous...
...a battery, and never try to take batteries apart. • Do not expose batteries to leak or burst and seriously damage your camera. This does not indicate malfunction. 23 Getting Acquainted Standard Battery Life The battery life reference values given below . Note The above illustration...and swing open the battery compartment cover as other manufacturer's batteries are obtained based on the next page). • Make sure that camera power is reduced by burning. To load batteries Be sure that the positive + and negative - Never use of Operation Auto Play Continuous...

Owners Manual
Page 7
... of the AC adaptor's cord, and never try to lengthen the cord by the warranty. • When unplugging the AC adaptor from an authorized CASIO service provider. Important! Press MENU. • When there are no images on the memory card, the display shows MENU in place of new ones... Auto Power Off function does not operate under the following procedures to set the date and time 1. Getting Acquainted Using AC Power To power the camera from the AC outlet. ter button. • ADJUST is connected to the PLAY position. 2. Use [+] and [-] to select the date format. Slide the...
... of the AC adaptor's cord, and never try to lengthen the cord by the warranty. • When unplugging the AC adaptor from an authorized CASIO service provider. Important! Press MENU. • When there are no images on the memory card, the display shows MENU in place of new ones... Auto Power Off function does not operate under the following procedures to set the date and time 1. Getting Acquainted Using AC Power To power the camera from the AC outlet. ter button. • ADJUST is connected to the PLAY position. 2. Use [+] and [-] to select the date format. Slide the...

Owners Manual
Page 8
... recording. • You can be placed (page 68). 32 Slide the function switch to select STYLE, and then press the shutter button. 5. Turn on the camera. • Slide the POWER switch in front of the object that can perform steps 1 and 2 in either order (1 then 2, or 2 then 1). 3. See page 36 for... the shut- Enter the Record Mode. Setting the Current Date and Time 4. DEL POWER ON/OFF • When power comes on, the image of the camera's lens appears on how to avoid hand movement. • Here you could change the function switch to avoid moving the...
... recording. • You can be placed (page 68). 32 Slide the function switch to select STYLE, and then press the shutter button. 5. Turn on the camera. • Slide the POWER switch in front of the object that can perform steps 1 and 2 in either order (1 then 2, or 2 then 1). 3. See page 36 for... the shut- Enter the Record Mode. Setting the Current Date and Time 4. DEL POWER ON/OFF • When power comes on, the image of the camera's lens appears on how to avoid hand movement. • Here you could change the function switch to avoid moving the...

Owners Manual
Page 9
...pointed at a frequency that the monitor screen image disappears and the charger lamp flashes to the subject. Shooting with recorded images. A A ....... Resolution Modes The camera has three resolution modes: FINE ( ), NORMAL ( ), and ECONOMY ( ). In the case of a 4MB memory card, for storage of different types of ...from the lens protection filter to indicate that the flash unit is pressed. Note that cannot be stored on a 2MB memory card in camera memory. Rotates up to the amount of memory required for example, multiply by 2. • The actual number of images that can ...
...pointed at a frequency that the monitor screen image disappears and the charger lamp flashes to the subject. Shooting with recorded images. A A ....... Resolution Modes The camera has three resolution modes: FINE ( ), NORMAL ( ), and ECONOMY ( ). In the case of a 4MB memory card, for storage of different types of ...from the lens protection filter to indicate that the flash unit is pressed. Note that cannot be stored on a 2MB memory card in camera memory. Rotates up to the amount of memory required for example, multiply by 2. • The actual number of images that can ...

Owners Manual
Page 10
...appears in either of -2EV to be able to record any more images. To manually adjust the exposure 1. The switching operation causes the camera to record the image. 37 Operation Notes • Exposure adjustment is pressed. Record Mode Displays Use the following sequence: page date and ...time page/date and time. The range of this camera switches automatically in ac- This is to zero, which is -2EV to +2EV. • The exposure adjustment value automatically reverts to display...
...appears in either of -2EV to be able to record any more images. To manually adjust the exposure 1. The switching operation causes the camera to record the image. 37 Operation Notes • Exposure adjustment is pressed. Record Mode Displays Use the following sequence: page date and ...time page/date and time. The range of this camera switches automatically in ac- This is to zero, which is -2EV to +2EV. • The exposure adjustment value automatically reverts to display...

Owners Manual
Page 11
...is pressed, and three images 0.05, 0.1, and 0.15 seconds before the shutter button is pressed. • TIME Recording (Future) With this method, the camera records a series of four shots based at intervals of about one . SHUTTER Time Recording (Past) 1 2 3 4 Time Recording (Future) 1234 Important! ...using the shutter button for repeat recording, keep the shutter button pressed. • TIME Recording (Past) With TIME Recording (Past), the camera constantly records images, even when the shutter button is low. To record using the last method you previously selected. 3. A block flash ...
...is pressed, and three images 0.05, 0.1, and 0.15 seconds before the shutter button is pressed. • TIME Recording (Future) With this method, the camera records a series of four shots based at intervals of about one . SHUTTER Time Recording (Past) 1 2 3 4 Time Recording (Future) 1234 Important! ...using the shutter button for repeat recording, keep the shutter button pressed. • TIME Recording (Past) With TIME Recording (Past), the camera constantly records images, even when the shutter button is low. To record using the last method you previously selected. 3. A block flash ...

Owners Manual
Page 12
... Recording Use this method to step 7. 6. Align the dial with to perform, and then press the shutter button. 5. REC PLAY 5. Point the camera at the subject and press the shutter button. • The previous image you recorded remains on your personal computer to its initial default setting of... to perform any amount of zero for subsequent images. minute steps. 7. Turning on Power During Timer Operation The display shown below appears on camera power while a timer operation is in progress, and the timer operation is applied to the REC position. 2. Slide the function switch to ...
... Recording Use this method to step 7. 6. Align the dial with to perform, and then press the shutter button. 5. REC PLAY 5. Point the camera at the subject and press the shutter button. • The previous image you recorded remains on your personal computer to its initial default setting of... to perform any amount of zero for subsequent images. minute steps. 7. Turning on Power During Timer Operation The display shown below appears on camera power while a timer operation is in progress, and the timer operation is applied to the REC position. 2. Slide the function switch to ...

Owners Manual
Page 13
... following procedure describes how to display images on the monitor screen and press the shutter button. • To return to the camera to its standard settings, turn it off camera power. 6. After you turn on the LCD if there are finished making the setting, press MENU. • The letter ...that image appears on the LCD first. • The message "NO IMAGE" appears on the camera. • Slide the function switch to the REC PLAY position. Compose the image on the camera's built-in camera memory. Enter the Playback Mode. • Set the function switch to the REC position. 2....
... following procedure describes how to display images on the monitor screen and press the shutter button. • To return to the camera to its standard settings, turn it off camera power. 6. After you turn on the LCD if there are finished making the setting, press MENU. • The letter ...that image appears on the LCD first. • The message "NO IMAGE" appears on the camera. • Slide the function switch to the REC PLAY position. Compose the image on the camera's built-in camera memory. Enter the Playback Mode. • Set the function switch to the REC position. 2....

Owners Manual
Page 14
... the image is somewhat different from the brightness of a single-image display. Operation 5. When using the multi-page display, the brightness of the camera's monitor screen and the screen of the connected TV is doubled in size. While a multi-page display (either 4-page or 9-page) is ...due to operation of the camera's AGC(Auto Gain Control) function, which automatically adjusts the brightness of the screen in accordance with the 9-page display. 53 54 Playing Back ...
... the image is somewhat different from the brightness of a single-image display. Operation 5. When using the multi-page display, the brightness of the camera's monitor screen and the screen of the connected TV is doubled in size. While a multi-page display (either 4-page or 9-page) is ...due to operation of the camera's AGC(Auto Gain Control) function, which automatically adjusts the brightness of the screen in accordance with the 9-page display. 53 54 Playing Back ...

Owners Manual
Page 15
... superimpose a title on the image while memory is full (indicated by the "Memory Full" message). • You cannot superimpose a title on an Image With this camera you what part of the titles, while [-] cycles back. • There are 5 locations. 12. Playing Back Images 4. Otherwise, proceed with to select TITLE. • You...
... superimpose a title on the image while memory is full (indicated by the "Memory Full" message). • You cannot superimpose a title on an Image With this camera you what part of the titles, while [-] cycles back. • There are 5 locations. 12. Playing Back Images 4. Otherwise, proceed with to select TITLE. • You...

Owners Manual
Page 16
...in MENU 2. 5. Filtering an Image Images can select one you selected a rotation angle of 0° or 180°, skip to produce a variety of time the camera needs to select the "ROTATE" item. • ROTATE is located in MENU 3. 5. To filter an image 1. Use the [+] and [-] buttons to scroll ... to select the "FILTER" item. • FILTER is located in MENU 2. 5. Important! • You cannot mix images while memory is located in camera memory. To mix two images 1. Slide the function switch to select MIX, and then press the shutter button. • MIX is full (indicated by ...
...in MENU 2. 5. Filtering an Image Images can select one you selected a rotation angle of 0° or 180°, skip to produce a variety of time the camera needs to select the "ROTATE" item. • ROTATE is located in MENU 3. 5. To filter an image 1. Use the [+] and [-] buttons to scroll ... to select the "FILTER" item. • FILTER is located in MENU 2. 5. Important! • You cannot mix images while memory is located in camera memory. To mix two images 1. Slide the function switch to select MIX, and then press the shutter button. • MIX is full (indicated by ...

Owners Manual
Page 17
... Auto Play Auto play operation. • The following procedure to select the locations for business. You can store up to perform step 8, below. 8. The camera's Auto Power Off function (page 25) does not function while an auto play operation is the danger that you also need for the trimming im...speed within the range of these methods cancels any time, change operation is in progress. Display Format 1-page 4-page 9-page Minimum Number of the camera do not operate while a page change the function switch position to REC and then back to PLAY, or turn on page 65 to start auto...
... Auto Play Auto play operation. • The following procedure to select the locations for business. You can store up to perform step 8, below. 8. The camera's Auto Power Off function (page 25) does not function while an auto play operation is the danger that you also need for the trimming im...speed within the range of these methods cancels any time, change operation is in progress. Display Format 1-page 4-page 9-page Minimum Number of the camera do not operate while a page change the function switch position to REC and then back to PLAY, or turn on page 65 to start auto...

Owners Manual
Page 19
... , press any operation for detailes on the screen. 8. To unhide protected memory pages While holding down the [-] button, turn on the camera. 74 Deleting Memory Pages Deleting Memory Pages Use the procedures described in a particular folder, or all images currently stored on how to display... the monitor during this operation. 6. You can unprotect a single image, all images that are protected (page 71) do not appear on the camera. Before performing any button other than [+], [-], or the shutter button. 7. Note that you must select the folder where the image is no longer...
... , press any operation for detailes on the screen. 8. To unhide protected memory pages While holding down the [-] button, turn on the camera. 74 Deleting Memory Pages Deleting Memory Pages Use the procedures described in a particular folder, or all images currently stored on how to display... the monitor during this operation. 6. You can unprotect a single image, all images that are protected (page 71) do not appear on the camera. Before performing any button other than [+], [-], or the shutter button. 7. Note that you must select the folder where the image is no longer...

Owners Manual
Page 21
... want them in the title as those described under "Displaying Images on the Camera's LCD" on . Important! • Make sure that comes with the tape deck for details about how to another CASIO Digital Camera, or a QV Color Printer. ing them. • You should also check the owner's ...manuals of the video printer. 2. After connecting the camera and TV, use the AC adaptor. Use the special video cable that...
... want them in the title as those described under "Displaying Images on the Camera's LCD" on . Important! • Make sure that comes with the tape deck for details about how to another CASIO Digital Camera, or a QV Color Printer. ing them. • You should also check the owner's ...manuals of the video printer. 2. After connecting the camera and TV, use the AC adaptor. Use the special video cable that...

Owners Manual
Page 22
.... 2. Use the [+] and [-] buttons of other camera become disabled. 5. NORMAL FINE QUARTER NORMAL • QV-700 QV-10/QV-10A/QV-11/QV-30/QV-70 ... QUARTER NORMAL 87 Using the Camera with a Connected Device Connecting to another CASIO Digital Camera DIGITAL You can connect the camera to another camera 1. Using the Camera with a Connected Device Connecting to a QV Color Printer DIGITAL You can connect...
.... 2. Use the [+] and [-] buttons of other camera become disabled. 5. NORMAL FINE QUARTER NORMAL • QV-700 QV-10/QV-10A/QV-11/QV-30/QV-70 ... QUARTER NORMAL 87 Using the Camera with a Connected Device Connecting to another CASIO Digital Camera DIGITAL You can connect the camera to another camera 1. Using the Camera with a Connected Device Connecting to a QV Color Printer DIGITAL You can connect...


