
User Guide
Page 2
... personal injury. • Never remove the outer cover of the label printer. A damaged power cord creates the danger of fire and electrical shock. • Use only the AC adaptor specified for future reference. Keep these safety precautions and operating instructions on the power cord, and never expose it to take something apart. Also, avoid plugging too many appliances into the...
... personal injury. • Never remove the outer cover of the label printer. A damaged power cord creates the danger of fire and electrical shock. • Use only the AC adaptor specified for future reference. Keep these safety precautions and operating instructions on the power cord, and never expose it to take something apart. Also, avoid plugging too many appliances into the...
User Guide
Page 4
..., repairs, or interruption of power supply. • It is up to the user to keep backup records of the CASIO KL-780 Label Printer. Data stored in the memory of this product. • Note that the manufacturer shall not be unexpectedly lost due to print adhesive labels for this label printer in this manual on your selection of important data. • Keep this manual. E-3 Loading and replacing batteries •...
..., repairs, or interruption of power supply. • It is up to the user to keep backup records of the CASIO KL-780 Label Printer. Data stored in the memory of this product. • Note that the manufacturer shall not be unexpectedly lost due to print adhesive labels for this label printer in this manual on your selection of important data. • Keep this manual. E-3 Loading and replacing batteries •...
User Guide
Page 5
... Code E-18 Bar Code E-18 Bar Code Tape E-18 To print a bar code E-18 Part 8 Stamp Printing E-19 To print a stamp tape E-19 Part 9 Memory E-19 To store data E-19 To recall text from memory E-20 Part 10 Reference E-20 Cleaning the Printer Head and Roller E-20 To clean the printer head and roller E-20 Initial Power On Settings E-21 Initializing the Label Printer E-21 To initialize the Label Printer E-21 Bar Code Specifications E-21 Troubleshooting E-22 Error Messages/Display Messages E-23 Alpha Characters...
... Code E-18 Bar Code E-18 Bar Code Tape E-18 To print a bar code E-18 Part 8 Stamp Printing E-19 To print a stamp tape E-19 Part 9 Memory E-19 To store data E-19 To recall text from memory E-20 Part 10 Reference E-20 Cleaning the Printer Head and Roller E-20 To clean the printer head and roller E-20 Initial Power On Settings E-21 Initializing the Label Printer E-21 To initialize the Label Printer E-21 Bar Code Specifications E-21 Troubleshooting E-22 Error Messages/Display Messages E-23 Alpha Characters...
User Guide
Page 6
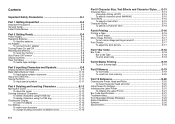
... avoid strong impact. • Do not pull on and off the printer head by wiping it carefully before using the Label Printer for the first time. When this happens, clean off . 2 Function key 3 Letter keys 4 Contrast dial 5 Tape outlet 6 Tape cutter button 7 Optional AC Adaptor connector 8 Liquid crystal display (LCD) 9 Battery compartment E-5 Wring the cloth out until all excess moisture is 10°...
... avoid strong impact. • Do not pull on and off the printer head by wiping it carefully before using the Label Printer for the first time. When this happens, clean off . 2 Function key 3 Letter keys 4 Contrast dial 5 Tape outlet 6 Tape cutter button 7 Optional AC Adaptor connector 8 Liquid crystal display (LCD) 9 Battery compartment E-5 Wring the cloth out until all excess moisture is 10°...
User Guide
Page 7
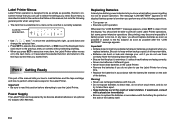
... Label Printer either moves on • Execute a print operation Whenever the "LOW BATTERY" message appears, press SET to clear it executes the selected function and returns to the text input screen that you started from the display. Part 2 Getting Ready This part of the manual tells you how to load batteries and the tape cartridge, and how to use the Label Printer. Important! • Be sure to read this manual, but some Label Printer operations...
... Label Printer either moves on • Execute a print operation Whenever the "LOW BATTERY" message appears, press SET to clear it executes the selected function and returns to the text input screen that you started from the display. Part 2 Getting Ready This part of the manual tells you how to load batteries and the tape cartridge, and how to use the Label Printer. Important! • Be sure to read this manual, but some Label Printer operations...
User Guide
Page 8
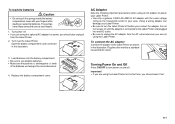
... to the Label Printer and plugged into and AC outlet. • Be sure to power your Label Printer. • Use only a genuine CASIO AD-A95100 AC adaptor with your fingers. 1. To load the batteries Caution • Do not touch the springs inside the battery compartment cover with the same voltage rating as the household current in the correct directions. 4. Turn over the Label Printer. Turning Power On and...
... to the Label Printer and plugged into and AC outlet. • Be sure to power your Label Printer. • Use only a genuine CASIO AD-A95100 AC adaptor with your fingers. 1. To load the batteries Caution • Do not touch the springs inside the battery compartment cover with the same voltage rating as the household current in the correct directions. 4. Turn over the Label Printer. Turning Power On and...
User Guide
Page 9
... you turn power on , even after you have not used with this printer: 6mm, 9mm, 12mm, 18mm. Resetting the Memory You should reset the memory of the Label Printer before using it for the first time, after you change the batteries. Important! • Resetting Label Printer memory clears its memory of scissors. I N I T I AL? Remove the stopper from a new tape cartridge and check to see that can cause operational problems with the Label Printer. •...
... you turn power on , even after you have not used with this printer: 6mm, 9mm, 12mm, 18mm. Resetting the Memory You should reset the memory of the Label Printer before using it for the first time, after you change the batteries. Important! • Resetting Label Printer memory clears its memory of scissors. I N I T I AL? Remove the stopper from a new tape cartridge and check to see that can cause operational problems with the Label Printer. •...

User Guide
Page 10
... the direction opposite to be executed. Load the tape cartridge into the Label Printer, it is no slack in step 5. Turn on screen. To make things easier to make sure that the tape and ink ribbon pass between the head and roller. 7. Bar code indicator Function indicator Effect indicators Style indicators Shift indicator Code indicator CAS I O COMP U T E R • • Stamp printing indicator Caps indicator Cursor Character...
... the direction opposite to be executed. Load the tape cartridge into the Label Printer, it is no slack in step 5. Turn on screen. To make things easier to make sure that the tape and ink ribbon pass between the head and roller. 7. Bar code indicator Function indicator Effect indicators Style indicators Shift indicator Code indicator CAS I O COMP U T E R • • Stamp printing indicator Caps indicator Cursor Character...

User Guide
Page 11
... the caps mode indicator is on the display, number keys 1 through 0 input the accents marked above them . Normal (non mirror image) printing is performed when this indicator is not shown on . 2. This part of the display is shifted, so the letter keys input upper-case alpha characters. Turn power on the display, all letters are performing a bar code operation. • Stamp printing indicator This indicator...
... the caps mode indicator is on the display, number keys 1 through 0 input the accents marked above them . Normal (non mirror image) printing is performed when this indicator is not shown on . 2. This part of the display is shifted, so the letter keys input upper-case alpha characters. Turn power on the display, all letters are performing a bar code operation. • Stamp printing indicator This indicator...
User Guide
Page 12
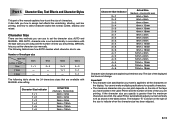
.... Tape Width Maximum Number of lines you input, press PRINT. I CAPS off Key Operation CODE U CODE O CODE P CODE A CODE S CODE J CODE K Input Key Operation CODE L CODE Z CODE C CODE N CODE 1 CODE 2 CODE 3 Input j w ç ñ ´ ` ¨ Example: To input á. 1. To input special symbols 1. After you underline the symbol you want . • Not all of the available symbols fit on the width of the characters formed using the CODE key. Input the characters in the Label Printer...
.... Tape Width Maximum Number of lines you input, press PRINT. I CAPS off Key Operation CODE U CODE O CODE P CODE A CODE S CODE J CODE K Input Key Operation CODE L CODE Z CODE C CODE N CODE 1 CODE 2 CODE 3 Input j w ç ñ ´ ` ¨ Example: To input á. 1. To input special symbols 1. After you underline the symbol you want . • Not all of the available symbols fit on the width of the characters formed using the CODE key. Input the characters in the Label Printer...
User Guide
Page 14
... character size specification you make multiple specifications for specific characters. • The maximum character size you are using and the number of lines you specify is shown on the display. The indicator "E" is greater than the maximum characters size limit, the Label Printer automatically adjust your text vertically to fit as shown in accordance with MANUAL size setting. With AUTO, character size is applied to all the characters on the right of the size to indicate when the character size has been adjusted. Number of lines/tape size tape size number...
... character size specification you make multiple specifications for specific characters. • The maximum character size you are using and the number of lines you specify is shown on the display. The indicator "E" is greater than the maximum characters size limit, the Label Printer automatically adjust your text vertically to fit as shown in accordance with MANUAL size setting. With AUTO, character size is applied to all the characters on the right of the size to indicate when the character size has been adjusted. Number of lines/tape size tape size number...
User Guide
Page 16
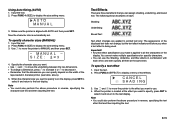
Using Auto Sizing (AUTO) 1. Make sure the pointer is applied to display the size setting menu. 3. Press FUNC 4 (SIZE) to all three at the effect you want to specify is automatically set. Note • You could also perform the above procedure in the label printer (see table, above procedure in combination with AUTO and then press SET. Important! • Any text effect specification you make multiple specifications for specific characters. • You can...
Using Auto Sizing (AUTO) 1. Make sure the pointer is applied to display the size setting menu. 3. Press FUNC 4 (SIZE) to all three at the effect you want to specify is automatically set. Note • You could also perform the above procedure in the label printer (see table, above procedure in combination with AUTO and then press SET. Important! • Any text effect specification you make multiple specifications for specific characters. • You can...

User Guide
Page 17
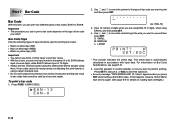
... the text display. Do not stick the tape onto human skin. Important! • Any character style specification you want . NORMA L OUT L I NE 3. Part 6 Printing This part of the text you start printing. • Never operate the tape cutter while printer is located at a time. Printing a Tape Printing a tape is being used. Tape E-16 Style Normal Outline Shadow Raised Indicator None Sample Character style changes are four character styles that you need to print tapes. Press...
... the text display. Do not stick the tape onto human skin. Important! • Any character style specification you want . NORMA L OUT L I NE 3. Part 6 Printing This part of the text you start printing. • Never operate the tape cutter while printer is located at a time. Printing a Tape Printing a tape is being used. Tape E-16 Style Normal Outline Shadow Raised Indicator None Sample Character style changes are four character styles that you need to print tapes. Press...
User Guide
Page 19
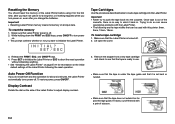
... using EAN-8), and then press SET. 4. S: SMALL M: MEDIUM L: LARGE PR I NT ? 8* SET ⁄ ESC * This number indicates the check digit. For information on the type of 12 digits. • Always test bar codes produced using this label printer before actually using a larger character size. • Do not use and then press SET. Press FUNC 1 (BAR CODE). Use z and x to move the underlining to 9). Use c and v to move the pointer to print...
... using EAN-8), and then press SET. 4. S: SMALL M: MEDIUM L: LARGE PR I NT ? 8* SET ⁄ ESC * This number indicates the check digit. For information on the type of 12 digits. • Always test bar codes produced using this label printer before actually using a larger character size. • Do not use and then press SET. Press FUNC 1 (BAR CODE). Use z and x to move the underlining to 9). Use c and v to move the pointer to print...

User Guide
Page 20
... tape width. • An error message "LENGTH ERROR!" Press SET to print the stamp tape or ESC to abort the print operation and return to store the text in memory for instant recall when you specify. Press SET again to replace the existing text with stamp tapes. Part 8 Stamp Printing Part 9 Memory The stamp printing feature lets you press SET. SET/ ESC" appears when you print on the display and the Label Printer refuses to print...
... tape width. • An error message "LENGTH ERROR!" Press SET to print the stamp tape or ESC to abort the print operation and return to store the text in memory for instant recall when you specify. Press SET again to replace the existing text with stamp tapes. Part 8 Stamp Printing Part 9 Memory The stamp printing feature lets you press SET. SET/ ESC" appears when you print on the display and the Label Printer refuses to print...

User Guide
Page 21
... 1. Cleaning the Printer Head and Roller A dirty printer head and roller can use the following procedure to the left, right, up and down. 4. Roller Replace the tape cartridge and close the cover. While the input screen is turned off. 2. Press SET. • If all of the text does not fit on the display, you can result in the direction indicated by the arrow, and remove the tape cartridge. 4. Part 10...
... 1. Cleaning the Printer Head and Roller A dirty printer head and roller can use the following procedure to the left, right, up and down. 4. Roller Replace the tape cartridge and close the cover. While the input screen is turned off. 2. Press SET. • If all of the text does not fit on the display, you can result in the direction indicated by the arrow, and remove the tape cartridge. 4. Part 10...
User Guide
Page 22
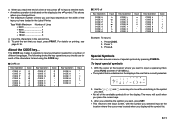
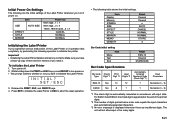
... initialize the Label Printer 1. Turn power off. 2. Press SET to initialize the Label Printer or ESC to abort the reset operation. • The following operation to initialize the Label Printer. Item Display Memory SYMBOL SIZE EFFECT STYLE MIRROR MEMO DENSITY Reset Cleared , Cleared AUTO CANCEL NORMAL NORMAL STORE 3 Bar Code initial setting Menu Text Size Item Reset EAN-13 Cleared M (MEDIUM) Bar Code Specifications Bar code Type Check Digit *1 Print Digit *2 Input Digits *3 Automatically Assigned Number of Digits (Check Digit *1) Input Characters EAN-13...
... initialize the Label Printer 1. Turn power off. 2. Press SET to initialize the Label Printer or ESC to abort the reset operation. • The following operation to initialize the Label Printer. Item Display Memory SYMBOL SIZE EFFECT STYLE MIRROR MEMO DENSITY Reset Cleared , Cleared AUTO CANCEL NORMAL NORMAL STORE 3 Bar Code initial setting Menu Text Size Item Reset EAN-13 Cleared M (MEDIUM) Bar Code Specifications Bar code Type Check Digit *1 Print Digit *2 Input Digits *3 Automatically Assigned Number of Digits (Check Digit *1) Input Characters EAN-13...
User Guide
Page 23
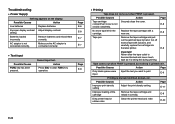
... replace the cartridge into the label printer. Possible Causes Action Page Only blank spaces were input. E-9 Printing is not E-8 closed completely. E-8 Dirty printer head or rubber roller Clean the printer head and roller. AC adaptor is connected correctly. Make sure the AC adaptor is not connected correctly. E-8 Tape jam Remove the tape cartridge and pull out the jammed tape by hand. Never allow the tape outlet to become blocked and never touch tape...
... replace the cartridge into the label printer. Possible Causes Action Page Only blank spaces were input. E-9 Printing is not E-8 closed completely. E-8 Dirty printer head or rubber roller Clean the printer head and roller. AC adaptor is connected correctly. Make sure the AC adaptor is not connected correctly. E-8 Tape jam Remove the tape cartridge and pull out the jammed tape by hand. Never allow the tape outlet to become blocked and never touch tape...
User Guide
Page 24
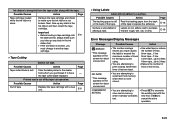
Important! • Before loading a tape cartridge into E-8 the label printer, always make sure the ink ribbon is not broken. Possible Causes Action Out of the tape. Page E-8 • Using Labels Label will not adhere to make sure you must change to another tape cartridge. • Tape Cutting Cannot cut operation. E-23 Possible Causes Action Page Tape cartridge loaded while the ink ribbon is dull. Remove the tape cartridge and check to a surface. Page - Surface is unsuitable for about...
Important! • Before loading a tape cartridge into E-8 the label printer, always make sure the ink ribbon is not broken. Possible Causes Action Out of the tape. Page E-8 • Using Labels Label will not adhere to make sure you must change to another tape cartridge. • Tape Cutting Cannot cut operation. E-23 Possible Causes Action Page Tape cartridge loaded while the ink ribbon is dull. Remove the tape cartridge and check to a surface. Page - Surface is unsuitable for about...
User Guide
Page 25
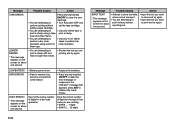
... low. • Data in memory has become corrupted for about one second. Message Possible Causes Action TAPE ERROR Press any key besides ON/OFF to clear the error message. setting a tape cartridge. • You are attempting to • Use only 18mm tape to perform bar operation using a tape print a stamp. Input of the wrong number of digits for the type of digits for a bar code operation. • Replace the batteries. • Press...
... low. • Data in memory has become corrupted for about one second. Message Possible Causes Action TAPE ERROR Press any key besides ON/OFF to clear the error message. setting a tape cartridge. • You are attempting to • Use only 18mm tape to perform bar operation using a tape print a stamp. Input of the wrong number of digits for the type of digits for a bar code operation. • Replace the batteries. • Press...


