Owners Manual
Page 1
K817PCM2DKX E Digital Camera EX-Z70 User's Guide Thank you for purchasing this CASIO product. • Before using it, be sure to read the precautions contained in this User's Guide. • Keep the User's Guide in a safe place for future reference. • For the most up-to-date information about this product, visit the official EXILIM Website at http://www.exilim.com/.
K817PCM2DKX E Digital Camera EX-Z70 User's Guide Thank you for purchasing this CASIO product. • Before using it, be sure to read the precautions contained in this User's Guide. • Keep the User's Guide in a safe place for future reference. • For the most up-to-date information about this product, visit the official EXILIM Website at http://www.exilim.com/.
Owners Manual
Page 2
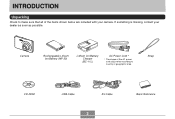
Camera Rechargeable Lithium Ion Battery (NP-20) Lithium Ion Battery Charger (BC-11L) AC Power Cord * * The shape of the AC power cord plug varies according to make sure that all of the items shown below are included with your dealer as soon as possible. If something is missing, contact your camera. Strap CD-ROM USB Cable AV Cable 2 Basic Reference INTRODUCTION INTRODUCTION Unpacking Check to country or geographic area.
Camera Rechargeable Lithium Ion Battery (NP-20) Lithium Ion Battery Charger (BC-11L) AC Power Cord * * The shape of the AC power cord plug varies according to make sure that all of the items shown below are included with your dealer as soon as possible. If something is missing, contact your camera. Strap CD-ROM USB Cable AV Cable 2 Basic Reference INTRODUCTION INTRODUCTION Unpacking Check to country or geographic area.
Owners Manual
Page 3
...record an image 19 To view a recorded image 20 To delete an image 20 21 GETTING READY About This Manual 21 General Guide 22 Camera 22 Lithium Ion Battery Charger 24 Monitor Screen Contents 25 REC Mode 25 PLAY Mode 27 Changing the Contents of the Monitor Screen 29 ...To charge the battery 31 To load the battery 34 Low Battery Indicator 36 To replace the battery 37 Power Supply Precautions 38 Turning the Camera On and Off 41 Configuring Power Saving Settings 42 Using the On-screen Menus 44 Configuring Display Language and Clock Settings ... 46 To configure...
...record an image 19 To view a recorded image 20 To delete an image 20 21 GETTING READY About This Manual 21 General Guide 22 Camera 22 Lithium Ion Battery Charger 24 Monitor Screen Contents 25 REC Mode 25 PLAY Mode 27 Changing the Contents of the Monitor Screen 29 ...To charge the battery 31 To load the battery 34 Low Battery Indicator 36 To replace the battery 37 Power Supply Precautions 38 Turning the Camera On and Off 41 Configuring Power Saving Settings 42 Using the On-screen Menus 44 Configuring Display Language and Clock Settings ... 46 To configure...

Owners Manual
Page 4
INTRODUCTION 50 BASIC IMAGE RECORDING Recording an Image 50 Aiming the Camera 50 Recording an Image 51 Using the easy Mode 55 Recording Precautions 57 Using Zoom 59 Optical Zoom 59 Digital Zoom 61 Using the Flash 63 Flash Unit Status 65 Changing the Flash Intensity Setting 66 Using Flash Assist 66 Using the Self-timer...
INTRODUCTION 50 BASIC IMAGE RECORDING Recording an Image 50 Aiming the Camera 50 Recording an Image 51 Using the easy Mode 55 Recording Precautions 57 Using Zoom 59 Optical Zoom 59 Digital Zoom 61 Using the Flash 63 Flash Unit Status 65 Changing the Flash Intensity Setting 66 Using Flash Assist 66 Using the Self-timer...
Owners Manual
Page 5
... Filter Function 120 Specifying Outline Sharpness 120 Specifying Color Saturation 121 Specifying Contrast 121 Date Stamping Snapshots 122 Resetting the Camera 123 Zooming the Display Image 126 Resizing an Image 127 Cropping an Image 128 Keystone Correction 130 Using Color Restoration to Correct ...the Display Image 144 Adding Audio to a Snapshot 145 To re-record audio 146 Playing Back a Voice Recording File 147 Displaying Camera Images on a TV Screen 148 Selecting the Video Output System 150 124 PLAYBACK Basic Playback Operation 124 Playing an Audio Snapshot ...
... Filter Function 120 Specifying Outline Sharpness 120 Specifying Color Saturation 121 Specifying Contrast 121 Date Stamping Snapshots 122 Resetting the Camera 123 Zooming the Display Image 126 Resizing an Image 127 Cropping an Image 128 Keystone Correction 130 Using Color Restoration to Correct ...the Display Image 144 Adding Audio to a Snapshot 145 To re-record audio 146 Playing Back a Voice Recording File 147 Displaying Camera Images on a TV Screen 148 Selecting the Video Output System 150 124 PLAYBACK Basic Playback Operation 124 Playing an Audio Snapshot ...

Owners Manual
Page 6
... [ ] (PLAY) Power On/Off Functions 169 Formatting Built-in Memory 170 171 USING A MEMORY CARD Using a Memory Card 172 To insert a memory card into the camera 172 To replace the memory card 173 Formatting a Memory Card 174 Copying Files 175 To copy all the files in built-in memory to a memory...
... [ ] (PLAY) Power On/Off Functions 169 Formatting Built-in Memory 170 171 USING A MEMORY CARD Using a Memory Card 172 To insert a memory card into the camera 172 To replace the memory card 173 Formatting a Memory Card 174 Copying Files 175 To copy all the files in built-in memory to a memory...
Owners Manual
Page 7
... 200 Memory Data 201 DCF Protocol 201 Memory Folder Structure 202 Image Files Supported by the Camera 203 205 USING THE CAMERA WITH A COMPUTER Using the Camera with a Windows Computer ......... 205 Selecting the Software You Need 205 Computer System Requirements 207 Managing...Snapshot 211 Playing a Movie 213 Viewing User Documentation (PDF Files) 214 User Registration 214 Exiting the Menu Application 214 Using the Camera with a Macintosh Computer ....... 215 Selecting the Software You Need 215 Computer System Requirements 216 Managing Images on a Macintosh 217 ...
... 200 Memory Data 201 DCF Protocol 201 Memory Folder Structure 202 Image Files Supported by the Camera 203 205 USING THE CAMERA WITH A COMPUTER Using the Camera with a Windows Computer ......... 205 Selecting the Software You Need 205 Computer System Requirements 207 Managing...Snapshot 211 Playing a Movie 213 Viewing User Documentation (PDF Files) 214 User Registration 214 Exiting the Menu Application 214 Using the Camera with a Macintosh Computer ....... 215 Selecting the Software You Need 215 Computer System Requirements 216 Managing Images on a Macintosh 217 ...
Owners Manual
Page 8
...any damages or losses suffered by third parties which may arise due to CASIO COMPUTER CO., LTD. 8 assumes no responsibility for any damage or loss caused by the screens and configuration of the actual camera. • The SD logo is a trademark of Infineon Technologies AG...by deletion of data as stipulated above, all copyrights and other related rights to these applications revert to the use or malfunction of the EX-Z70. • CASIO COMPUTER CO., LTD. INTRODUCTION IMPORTANT! • The contents of this manual are trademarks of Apple Computer, Inc. • MultiMediaCard is ...
...any damages or losses suffered by third parties which may arise due to CASIO COMPUTER CO., LTD. 8 assumes no responsibility for any damage or loss caused by the screens and configuration of the actual camera. • The SD logo is a trademark of Infineon Technologies AG...by deletion of data as stipulated above, all copyrights and other related rights to these applications revert to the use or malfunction of the EX-Z70. • CASIO COMPUTER CO., LTD. INTRODUCTION IMPORTANT! • The contents of this manual are trademarks of Apple Computer, Inc. • MultiMediaCard is ...
Owners Manual
Page 9
... set up (page 41) Press [ ] (REC) or [ ] (PLAY) to turn on the camera and enter the mode you want to use. • easy mode (page 55) This feature eliminates troublesome setups. • 12X zoom (page 59) 3X optical zoom, 4X digital zoom • Flash Assist (page 66) This feature compensates when flash intensity is not...
... set up (page 41) Press [ ] (REC) or [ ] (PLAY) to turn on the camera and enter the mode you want to use. • easy mode (page 55) This feature eliminates troublesome setups. • 12X zoom (page 59) 3X optical zoom, 4X digital zoom • Flash Assist (page 66) This feature compensates when flash intensity is not...
Owners Manual
Page 10
... keystoning, which occurs when you record the image of built-in this section to restore an old, faded photograph with the color provided by modern digital camera technology. • Movie recording with audio (page 102) VGA size, 30 fps, Motion JPEG format • Audio Snapshot mode (page 106) ...Use this mode to Auto Focus. • Auto Focus Area Selection (page 77) When " Multi" is selected for the Auto Focus area, the camera takes simultaneous meter readings at nine different points and automatically selects the best one of a collection of a blackboard or poster from an angle. •...
... keystoning, which occurs when you record the image of built-in this section to restore an old, faded photograph with the color provided by modern digital camera technology. • Movie recording with audio (page 102) VGA size, 30 fps, Motion JPEG format • Audio Snapshot mode (page 106) ...Use this mode to Auto Focus. • Auto Focus Area Selection (page 77) When " Multi" is selected for the Auto Focus area, the camera takes simultaneous meter readings at nine different points and automatically selects the best one of a collection of a blackboard or poster from an angle. •...
Owners Manual
Page 11
...printer. A printer that are suitable for printing. • Calendar screen (page 140) A simple operation displays a full-month calendar on the camera's monitor screen. INTRODUCTION • Color Correction (page 131) Simply record the image of the first file recorded for that date, which helps...; World Time (page 165) A simple operation sets the current time for memory expansion (page 171) • Digital Print Order Format (DPOF) (page 179) Images can be used when specifying images and quantities for Camera File system) data storage protocol provides image compatibility between the...
...printer. A printer that are suitable for printing. • Calendar screen (page 140) A simple operation displays a full-month calendar on the camera's monitor screen. INTRODUCTION • Color Correction (page 131) Simply record the image of the first file recorded for that date, which helps...; World Time (page 165) A simple operation sets the current time for memory expansion (page 171) • Digital Print Order Format (DPOF) (page 179) Images can be used when specifying images and quantities for Camera File system) data storage protocol provides image compatibility between the...

Owners Manual
Page 12
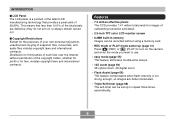
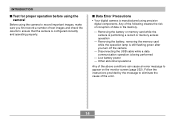
... maintenance and repair work up to observe the following important precautions whenever using the EX-Z70. Precautions I General Precautions Be sure to a CASIO authorized service center. • Keep the small parts and accessories of this manual to "camera" refer to the CASIO EX-Z70 Digital Camera. • Never try to take pictures or use the built-in display while...
... maintenance and repair work up to observe the following important precautions whenever using the EX-Z70. Precautions I General Precautions Be sure to a CASIO authorized service center. • Keep the small parts and accessories of this manual to "camera" refer to the CASIO EX-Z70 Digital Camera. • Never try to take pictures or use the built-in display while...
Owners Manual
Page 13
...'s eyes. This is being recorded. Always keep backup copies of fire and electric shock. Never attempt your dealer or nearest CASIO authorized service center. Next, remove the camera's battery and/or unplug the AC power cord from the power outlet, and contact your dealer or nearest... at least one meter (3.3´) from the power outlet, and contact your dealer or nearest CASIO authorized service center. Dust build up around the prongs of the subject. • Keep the camera away from water and other area where its memory to rough treatment, immediately turn it off...
...'s eyes. This is being recorded. Always keep backup copies of fire and electric shock. Never attempt your dealer or nearest CASIO authorized service center. Next, remove the camera's battery and/or unplug the AC power cord from the power outlet, and contact your dealer or nearest... at least one meter (3.3´) from the power outlet, and contact your dealer or nearest CASIO authorized service center. Dust build up around the prongs of the subject. • Keep the camera away from water and other area where its memory to rough treatment, immediately turn it off...
Owners Manual
Page 14
...). Disconnecting the USB cable while a data communication operation is performing a record or memory access operation - INTRODUCTION I Data Error Precautions • Your digital camera is manufactured using precision digital components. Low battery power - Before using the camera to ensure that the camera is configured correctly and operating properly. Removing the battery or memory card while the...
...). Disconnecting the USB cable while a data communication operation is performing a record or memory access operation - INTRODUCTION I Data Error Precautions • Your digital camera is manufactured using precision digital components. Low battery power - Before using the camera to ensure that the camera is configured correctly and operating properly. Removing the battery or memory card while the...
Owners Manual
Page 15
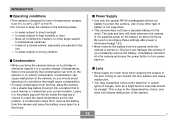
... sunlight - Inside of battery is turned on interior components. If condensation does form, remove the battery from the camera while the camera is not supported. • This camera does not have a separate battery for use or keep condensation from 0°C to 40°C (32°F...or colder than your current location. If you mistakenly remove the battery, immediately reinsert it to temperature extremes - I Operating conditions • This camera is not supplied power by the battery for a few hours. I Condensation • When you should be straight. Use of any other ...
... sunlight - Inside of battery is turned on interior components. If condensation does form, remove the battery from the camera while the camera is not supported. • This camera does not have a separate battery for use or keep condensation from 0°C to 40°C (32°F...or colder than your current location. If you mistakenly remove the battery, immediately reinsert it to temperature extremes - I Operating conditions • This camera is not supplied power by the battery for a few hours. I Condensation • When you should be straight. Use of any other ...
Owners Manual
Page 16
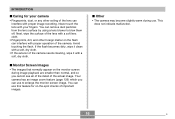
...matter on the flash can remove dust particles from the lens surface by using a lens blower to enlarge the monitor screen image. Your camera has an image zoom feature (page 126) which you cannot see all of the detail of the actual image. This does not indicate malfunction. 16 B Never... touch the lens with proper image recording. You can interfere with a soft, dry cloth. I Other • The camera may become slightly warm during image ...
...matter on the flash can remove dust particles from the lens surface by using a lens blower to enlarge the monitor screen image. Your camera has an image zoom feature (page 126) which you cannot see all of the detail of the actual image. This does not indicate malfunction. 16 B Never... touch the lens with proper image recording. You can interfere with a soft, dry cloth. I Other • The camera may become slightly warm during image ...
Owners Manual
Page 17
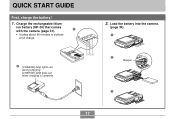
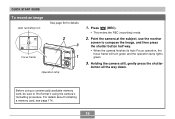
Load the battery into the camera. (page 34). 1 2 [CHARGE] lamp lights red during charging. [CHARGE] lamp goes out when charging is complete. -T+ 2 Stopper 3 17 Charge the rechargeable litium ion battery (NP-20) that comes 1 with the camera (page 31). • It takes about 90 minutes to achieve a full charge. 2. QUICK START GUIDE QUICK START GUIDE First, charge the battery! 1.
Load the battery into the camera. (page 34). 1 2 [CHARGE] lamp lights red during charging. [CHARGE] lamp goes out when charging is complete. -T+ 2 Stopper 3 17 Charge the rechargeable litium ion battery (NP-20) that comes 1 with the camera (page 31). • It takes about 90 minutes to achieve a full charge. 2. QUICK START GUIDE QUICK START GUIDE First, charge the battery! 1.
Owners Manual
Page 18
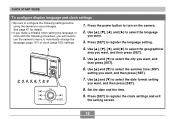
... images. QUICK START GUIDE To configure display language and clock settings • Be sure to configure the following procedure, you will need to use the camera's menu to select the date format setting you want , and then press [SET]. [̆] [̇] [̈] [̄] [SET] 8. Use [̆... 1. See page 47 for details. • If you make a mistake when setting the language or clock with the following settings before using the camera to register the clock settings and exit the setting screen. 18 Use [̆] and [̄] to register the language setting. 1 4. Press [...
... images. QUICK START GUIDE To configure display language and clock settings • Be sure to configure the following procedure, you will need to use the camera's menu to select the date format setting you want , and then press [SET]. [̆] [̇] [̈] [̄] [SET] 8. Use [̆... 1. See page 47 for details. • If you make a mistake when setting the language or clock with the following settings before using the camera to register the clock settings and exit the setting screen. 18 Use [̆] and [̄] to register the language setting. 1 4. Press [...
Owners Manual
Page 19
...2 3 1 Operation lamp 1. For details about formatting a memory card, see page 174. 19 Press [ ] (REC). • This enters the REC (recording) mode. 2. Point the camera at the subject, use the monitor screen to first format it using a commercially available memory card, be sure to compose the image, and then press... the shutter button half way. • When the camera finishes its Auto Focus operation, the focus frame will turn green and the operation lamp lights green. 3. Before using the...
...2 3 1 Operation lamp 1. For details about formatting a memory card, see page 174. 19 Press [ ] (REC). • This enters the REC (recording) mode. 2. Point the camera at the subject, use the monitor screen to first format it using a commercially available memory card, be sure to compose the image, and then press... the shutter button half way. • When the camera finishes its Auto Focus operation, the focus frame will turn green and the operation lamp lights green. 3. Before using the...
Owners Manual
Page 21
...GETTING READY GETTING READY This section contains information about things you need to know about the conventions used in this manual: "camera" "file memory" "battery" "digital noise" Means this manual. I On-screen Text On-screen text is currently storing images you need to know in order ... information you record (page 51) The NP-20 Rechargeable Lithium Ion Battery Tiny flecks or "snow" in this : The CASIO EX-Z70 Digital Camera The location where the camera is always enclosed by the button name inside of brackets ([ ]). This term as used in a recorded image or on the...
...GETTING READY GETTING READY This section contains information about things you need to know about the conventions used in this manual: "camera" "file memory" "battery" "digital noise" Means this manual. I On-screen Text On-screen text is currently storing images you need to know in order ... information you record (page 51) The NP-20 Rechargeable Lithium Ion Battery Tiny flecks or "snow" in this : The CASIO EX-Z70 Digital Camera The location where the camera is always enclosed by the button name inside of brackets ([ ]). This term as used in a recorded image or on the...


