Owners Manual
Page 3
... view a recorded image 20 To delete an image 20 21 GETTING READY About This Manual 21 General Guide 22 Camera 22 Lithium Ion Battery Charger 24 Monitor Screen Contents 25 REC Mode 25 PLAY Mode 27 Changing the Contents of the Monitor Screen 29 Attaching the Strap 30 Power Requirements 31 To charge the battery 31 To load the battery 34 Low Battery Indicator 36 To replace the battery 37 Power Supply Precautions 38 Turning the Camera...
... view a recorded image 20 To delete an image 20 21 GETTING READY About This Manual 21 General Guide 22 Camera 22 Lithium Ion Battery Charger 24 Monitor Screen Contents 25 REC Mode 25 PLAY Mode 27 Changing the Contents of the Monitor Screen 29 Attaching the Strap 30 Power Requirements 31 To charge the battery 31 To load the battery 34 Low Battery Indicator 36 To replace the battery 37 Power Supply Precautions 38 Turning the Camera...
Owners Manual
Page 5
... Mode 118 Using the Filter Function 120 Specifying Outline Sharpness 120 Specifying Color Saturation 121 Specifying Contrast 121 Date Stamping Snapshots 122 Resetting the Camera 123 Zooming the Display Image 126 Resizing an Image 127 Cropping an Image 128 Keystone Correction 130 Using Color Restoration to Correct the Color of an Old Photograph 131 Playing and Editing a Movie 133 Playing a Movie 133 Editing a Movie 134 Capturing a Still Image from a Movie (MOTION PRINT) 138 Displaying the 9-image View...
... Mode 118 Using the Filter Function 120 Specifying Outline Sharpness 120 Specifying Color Saturation 121 Specifying Contrast 121 Date Stamping Snapshots 122 Resetting the Camera 123 Zooming the Display Image 126 Resizing an Image 127 Cropping an Image 128 Keystone Correction 130 Using Color Restoration to Correct the Color of an Old Photograph 131 Playing and Editing a Movie 133 Playing a Movie 133 Editing a Movie 134 Capturing a Still Image from a Movie (MOTION PRINT) 138 Displaying the 9-image View...
Owners Manual
Page 7
...Snapshot 211 Playing a Movie 213 Viewing User Documentation (PDF Files) 214 User Registration 214 Exiting the Menu Application 214 Using the Camera with a Macintosh Computer ....... 215 Selecting the Software You Need 215 Computer System Requirements 216 Managing Images on a Macintosh 217 Playing a Movie 218 Viewing User Documentation (PDF Files) 218 To register as a camera user 219 220 APPENDIX Menu Reference 220 Indicator Lamp Reference 223 Troubleshooting Guide 226 If you have problems installing the USB driver... 231 Display Messages 232 Specifications 234...
...Snapshot 211 Playing a Movie 213 Viewing User Documentation (PDF Files) 214 User Registration 214 Exiting the Menu Application 214 Using the Camera with a Macintosh Computer ....... 215 Selecting the Software You Need 215 Computer System Requirements 216 Managing Images on a Macintosh 217 Playing a Movie 218 Viewing User Documentation (PDF Files) 218 To register as a camera user 219 220 APPENDIX Menu Reference 220 Indicator Lamp Reference 223 Troubleshooting Guide 226 If you have problems installing the USB driver... 231 Display Messages 232 Specifications 234...
Owners Manual
Page 8
..., repairs, or battery replacement. INTRODUCTION IMPORTANT! • The contents of this manual. • CASIO COMPUTER CO., LTD. assumes no responsibility for any third party due to change without notice. • CASIO COMPUTER CO., LTD. assumes no responsibility for any damage or loss caused by the screens and configuration of the actual camera. • The SD logo is a registered trademark. • Windows...
..., repairs, or battery replacement. INTRODUCTION IMPORTANT! • The contents of this manual. • CASIO COMPUTER CO., LTD. assumes no responsibility for any third party due to change without notice. • CASIO COMPUTER CO., LTD. assumes no responsibility for any damage or loss caused by the screens and configuration of the actual camera. • The SD logo is a registered trademark. • Windows...
Owners Manual
Page 11
... make searching for a particular file quicker and easier. • Connect the camera to a TV and use the TV screen for image recording and viewing (page 148) • World Time (page 165) A simple operation sets the current time for your images come out just the way you intended when you recorded them. • Transfer images to a computer simply by professional print services. • PictBridge and USB DIRECT-PRINT support (page 183) Connect directly to a PictBridge or USB DIRECT-PRINT compatible printer...
... make searching for a particular file quicker and easier. • Connect the camera to a TV and use the TV screen for image recording and viewing (page 148) • World Time (page 165) A simple operation sets the current time for your images come out just the way you intended when you recorded them. • Transfer images to a computer simply by professional print services. • PictBridge and USB DIRECT-PRINT support (page 183) Connect directly to a PictBridge or USB DIRECT-PRINT compatible printer...
Owners Manual
Page 14
... error. 14 INTRODUCTION I Data Error Precautions • Your digital camera is manufactured using the camera! Before using the camera to ensure that the camera is still flashing green after you first record a number of data in file memory. - Any of the following creates the risk of corruption of test images and check the results to record important images, make sure you turn off the camera - Disconnecting the USB cable while a data communication operation is performing a record or memory access operation - Low battery power...
... error. 14 INTRODUCTION I Data Error Precautions • Your digital camera is manufactured using the camera! Before using the camera to ensure that the camera is still flashing green after you first record a number of data in file memory. - Any of the following creates the risk of corruption of test images and check the results to record important images, make sure you turn off the camera - Disconnecting the USB cable while a data communication operation is performing a record or memory access operation - Low battery power...
Owners Manual
Page 42
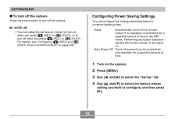
... of time in the REC mode. Configuring Power Saving Settings You can setup the camera so it does not turn on . Performing any operation for a specified amount of time. 1. Press [MENU]. 3. Use [̆] and [̄] to select the feature whose setting you do not perform any button operation causes the monitor screen to turn off power if you want to turn back on when you press [ ] (REC) or [ ] (PLAY), or...
... of time in the REC mode. Configuring Power Saving Settings You can setup the camera so it does not turn on . Performing any operation for a specified amount of time. 1. Press [MENU]. 3. Use [̆] and [̄] to select the feature whose setting you do not perform any button operation causes the monitor screen to turn off power if you want to turn back on when you press [ ] (REC) or [ ] (PLAY), or...

Owners Manual
Page 43
... disabled in the following cases. - While playing back a movie 43 When the camera is in the Sleep state immediately turns the monitor screen back on. • The Auto Power Off and Sleep features are : "2 min" and "5 min". • Note that the Sleep feature does not operate in the PLAY mode. • Pressing any button while the camera is connected to use menus. While playing back a voice recording file...
... disabled in the following cases. - While playing back a movie 43 When the camera is in the Sleep state immediately turns the monitor screen back on. • The Auto Power Off and Sleep features are : "2 min" and "5 min". • Note that the Sleep feature does not operate in the PLAY mode. • Pressing any button while the camera is connected to use menus. While playing back a voice recording file...
Owners Manual
Page 47
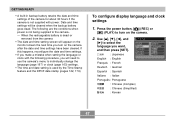
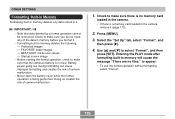
... the date and time settings. • If you make a mistake when setting the language or clock with power. The following procedure, you will need to use the camera's menu to individually change the language (page 167) or clock (page 163) settings. • The time and date setting is not being supplied to the camera. - Press the power button, [ ] (REC) or [ ] (PLAY) to select the language you want, and then press [SET]. : Japanese English : English Fran...
... the date and time settings. • If you make a mistake when setting the language or clock with power. The following procedure, you will need to use the camera's menu to individually change the language (page 167) or clock (page 163) settings. • The time and date setting is not being supplied to the camera. - Press the power button, [ ] (REC) or [ ] (PLAY) to select the language you want, and then press [SET]. : Japanese English : English Fran...

Owners Manual
Page 78
... change. 1. Select the "REC" tab, select "Focus", and then press [̈]. 3. Press the shutter button to record the image. • The focus and image recording operations are identical to focus on the monitor screen as shown below to tell you need to those in the Macro mode. In the REC mode, press [MENU]. 2. NOTE • When the Macro mode cannot focus properly because the subject is optimized for macro recording. 78 OTHER RECORDING FUNCTIONS Using...
... change. 1. Select the "REC" tab, select "Focus", and then press [̈]. 3. Press the shutter button to record the image. • The focus and image recording operations are identical to focus on the monitor screen as shown below to tell you need to those in the Macro mode. In the REC mode, press [MENU]. 2. NOTE • When the Macro mode cannot focus properly because the subject is optimized for macro recording. 78 OTHER RECORDING FUNCTIONS Using...
Owners Manual
Page 90
... you want to save your settings for later use, save a BEST SHOT user setup (page 93). BEST SHOT scene settings revert to their default presets whenever you select another screen of 12-sample scenes. • If you expect. • You can change certain settings. Make sure that some BEST SHOT scenes do not perform any camera button operations until the image recording operation is recorded, pressing the shutter button starts and stops movie recording (page 104). Scrolling...
... you want to save your settings for later use, save a BEST SHOT user setup (page 93). BEST SHOT scene settings revert to their default presets whenever you select another screen of 12-sample scenes. • If you expect. • You can change certain settings. Make sure that some BEST SHOT scenes do not perform any camera button operations until the image recording operation is recorded, pressing the shutter button starts and stops movie recording (page 104). Scrolling...
Owners Manual
Page 115
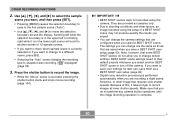
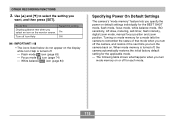
... select the setting you select an icon on mode memory for the BEST SHOT mode, flash mode, focus mode, white balance mode, ISO sensitivity, AF Area, metering, self-timer, flash intensity, digital zoom mode, manual focus position and zoom position. OTHER RECORDING FUNCTIONS 3. White balance AWB icon (page 84) Specifying Power On Default Settings The camera's "mode memory" feature lets you specify the power on or off , the camera automatically restores the initial factory default setting for each mode. 115 Turning on the monitor screen. Focus mode icon (page 74) - Use [̆] and...
... select the setting you select an icon on mode memory for the BEST SHOT mode, flash mode, focus mode, white balance mode, ISO sensitivity, AF Area, metering, self-timer, flash intensity, digital zoom mode, manual focus position and zoom position. OTHER RECORDING FUNCTIONS 3. White balance AWB icon (page 84) Specifying Power On Default Settings The camera's "mode memory" feature lets you specify the power on or off , the camera automatically restores the initial factory default setting for each mode. 115 Turning on the monitor screen. Focus mode icon (page 74) - Use [̆] and...
Owners Manual
Page 123
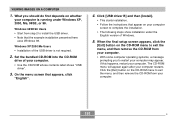
... [SET]. • To cancel the procedure without resetting, select "Cancel" and press [SET]. Video Out 123 OTHER RECORDING FUNCTIONS Resetting the Camera Use the following are not initialized when you reset the camera (page 221). - Use [̆] and [̄] to their initial defaults as shown under "Menu Reference" on page 220. 1. Time setting - Home Time setup - Select the "Set Up" tab, select "Reset", and then press [̈]. 3. Language - World Time setup - Press [MENU]. 2. Date Style...
... [SET]. • To cancel the procedure without resetting, select "Cancel" and press [SET]. Video Out 123 OTHER RECORDING FUNCTIONS Resetting the Camera Use the following are not initialized when you reset the camera (page 221). - Use [̆] and [̄] to their initial defaults as shown under "Menu Reference" on page 220. 1. Time setting - Home Time setup - Select the "Set Up" tab, select "Reset", and then press [̈]. 3. Language - World Time setup - Press [MENU]. 2. Date Style...

Owners Manual
Page 152
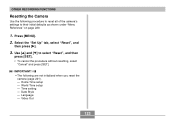
... folder. Make sure you delete it . • You cannot use the procedures in memory. Especially when deleting all files, make sure you check all files in memory are protected (page 156). • Deleting an audio snapshot deletes both the image file and the audio file attached to delete the file. • Repeat steps 2 through files and display the one you delete a file, it first (page 155). • Delete cannot be undone. In the PLAY mode...
... folder. Make sure you delete it . • You cannot use the procedures in memory. Especially when deleting all files, make sure you check all files in memory are protected (page 156). • Deleting an audio snapshot deletes both the image file and the audio file attached to delete the file. • Repeat steps 2 through files and display the one you delete a file, it first (page 155). • Delete cannot be undone. In the PLAY mode...
Owners Manual
Page 170
... of the data in memory before you do not need any data stored in it. IMPORTANT! • Note that the camera's battery is not low. FAVORITE folder images - Doing so creates the risk of camera malfunction. • Never open the battery cover while the format operation is a memory card loaded in the camera, remove it (page 173). 2. Select the "Set Up" tab, select "Format", and then press [̈]. 4. Press [MENU]. 3. BEST SHOT mode user setups -
... of the data in memory before you do not need any data stored in it. IMPORTANT! • Note that the camera's battery is not low. FAVORITE folder images - Doing so creates the risk of camera malfunction. • Never open the battery cover while the format operation is a memory card loaded in the camera, remove it (page 173). 2. Select the "Set Up" tab, select "Format", and then press [̈]. 4. Press [MENU]. 3. BEST SHOT mode user setups -
Owners Manual
Page 191
... installation presented here uses Windows 98. If this happens, restart your computer restarts. Set the bundled CD-ROM into the CD-ROM drive of Windows. 5. Click [USB driver B] and then [Install]. • This starts installation. • Follow the instructions that appear on your computer is not required. 2. The CD-ROM menu will appear again after your computer. When the final setup screen appears, click the [Exit] button...
... installation presented here uses Windows 98. If this happens, restart your computer restarts. Set the bundled CD-ROM into the CD-ROM drive of Windows. 5. Click [USB driver B] and then [Install]. • This starts installation. • Follow the instructions that appear on your computer is not required. 2. The CD-ROM menu will appear again after your computer. When the final setup screen appears, click the [Exit] button...

Owners Manual
Page 193
... a USB connection between the camera and your computer to install the USB driver every time. You do not need to create a hardware profile for camera's built-in memory or the memory card loaded in memory or its memory card when you want to light green. Turn on the camera. • This will cause your computer. • This will cause the camera's operation lamp to view. • For information about file names, see "Memory Folder Structure...
... a USB connection between the camera and your computer to install the USB driver every time. You do not need to create a hardware profile for camera's built-in memory or the memory card loaded in memory or its memory card when you want to light green. Turn on the camera. • This will cause your computer. • This will cause the camera's operation lamp to view. • For information about file names, see "Memory Folder Structure...
Owners Manual
Page 205
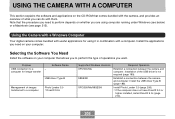
... a connection between the camera and computer. Install Photo Loader 3.0 (page 208). * If the computer does not have DirectX 9.0 or higher installed, install DirectX 9.0c (page 210). 205 Installation of images transferred to a computer Photo Loader 3.0 * DirectX 9.0c Supported Windows Versions XP/2000/Me 98SE/98 XP/2000/Me/98SE/98 Required Operation Establish a connection between the camera and computer. Install the USB driver Type B (page 189). computer for using...
... a connection between the camera and computer. Install Photo Loader 3.0 (page 208). * If the computer does not have DirectX 9.0 or higher installed, install DirectX 9.0c (page 210). 205 Installation of images transferred to a computer Photo Loader 3.0 * DirectX 9.0c Supported Windows Versions XP/2000/Me 98SE/98 XP/2000/Me/98SE/98 Required Operation Establish a connection between the camera and computer. Install the USB driver Type B (page 189). computer for using...
Owners Manual
Page 228
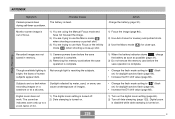
... Image Recording Symptom Camera powers down before the save operation is complete. 2) Removing the memory card before the save operation is complete. 1) When the battery indicator shows " ", charge the battery as soon as possible (page 31). 2) Do not remove the memory card before the save operation is complete. Possible Cause The battery is reaching the subjects. • Change the flash mode setting to use Auto Focus or the Infinity mode ( ) when shooting a close-up to a zoom factor of 3.0. 1) The digital zoom setting is turned off. 2) Date stamping...
... Image Recording Symptom Camera powers down before the save operation is complete. 2) Removing the memory card before the save operation is complete. 1) When the battery indicator shows " ", charge the battery as soon as possible (page 31). 2) Do not remove the memory card before the save operation is complete. Possible Cause The battery is reaching the subjects. • Change the flash mode setting to use Auto Focus or the Infinity mode ( ) when shooting a close-up to a zoom factor of 3.0. 1) The digital zoom setting is turned off. 2) Date stamping...
Owners Manual
Page 230
... accessing camera memory, disconnect the USB cable. 1) Check all connections. 2) Install the USB driver on your retailer or a CASIO service center. Possible Cause Circuit problem caused by electrostatic charge, impact, etc. Display language setting screen appears when the camera is turned off . After that the camera's built-in memory management area has been restored. Other 230 If the same message appears after you turn power back on . 1) Camera's display language, Home city, date style, date and time, and other settings...
... accessing camera memory, disconnect the USB cable. 1) Check all connections. 2) Install the USB driver on your retailer or a CASIO service center. Possible Cause Circuit problem caused by electrostatic charge, impact, etc. Display language setting screen appears when the camera is turned off . After that the camera's built-in memory management area has been restored. Other 230 If the same message appears after you turn power back on . 1) Camera's display language, Home city, date style, date and time, and other settings...


