Owners Manual
Page 2
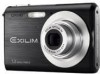
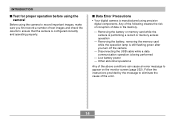
INTRODUCTION INTRODUCTION Unpacking Check to make sure that all of the AC power cord plug varies according to country or geographic area. If something is missing, contact your camera. Camera Rechargeable Lithium Ion Battery (NP-20) Lithium Ion Battery Charger (BC-11L) AC Power Cord * * The shape of the items shown below are included with your dealer as soon as possible. Strap CD-ROM USB Cable AV Cable 2 Basic Reference
INTRODUCTION INTRODUCTION Unpacking Check to make sure that all of the AC power cord plug varies according to country or geographic area. If something is missing, contact your camera. Camera Rechargeable Lithium Ion Battery (NP-20) Lithium Ion Battery Charger (BC-11L) AC Power Cord * * The shape of the items shown below are included with your dealer as soon as possible. Strap CD-ROM USB Cable AV Cable 2 Basic Reference

Owners Manual
Page 6
... Time screen 165 To configure World Time settings 165 Editing the Date and Time of an Image 166 Changing the Display Language 167 Changing the USB Port Protocol 168 Configuring [ ] (REC) and [ ] (PLAY) Power On/Off Functions 169 Formatting Built-in Memory 170 171 USING A MEMORY CARD ...Using a Memory Card 172 To insert a memory card into the camera 172 To replace the memory card 173 Formatting a Memory Card 174 Copying Files 175 To copy all the files in built-in memory to a memory...
... Time screen 165 To configure World Time settings 165 Editing the Date and Time of an Image 166 Changing the Display Language 167 Changing the USB Port Protocol 168 Configuring [ ] (REC) and [ ] (PLAY) Power On/Off Functions 169 Formatting Built-in Memory 170 171 USING A MEMORY CARD ...Using a Memory Card 172 To insert a memory card into the camera 172 To replace the memory card 173 Formatting a Memory Card 174 Copying Files 175 To copy all the files in built-in memory to a memory...
Owners Manual
Page 7
... for all images 181 Using PictBridge or USB DIRECT-PRINT 183 Date Printing 187 PRINT Image Matching III 188 Exif Print 188 189 VIEWING IMAGES ON A COMPUTER Using the Camera with a Windows Computer ......... 189 Using the Camera with a Macintosh Computer ....... 196 Using ... Snapshot 211 Playing a Movie 213 Viewing User Documentation (PDF Files) 214 User Registration 214 Exiting the Menu Application 214 Using the Camera with a Macintosh Computer ....... 215 Selecting the Software You Need 215 Computer System Requirements 216 Managing Images on a Macintosh 217 Playing ...
... for all images 181 Using PictBridge or USB DIRECT-PRINT 183 Date Printing 187 PRINT Image Matching III 188 Exif Print 188 189 VIEWING IMAGES ON A COMPUTER Using the Camera with a Windows Computer ......... 189 Using the Camera with a Macintosh Computer ....... 196 Using ... Snapshot 211 Playing a Movie 213 Viewing User Documentation (PDF Files) 214 User Registration 214 Exiting the Menu Application 214 Using the Camera with a Macintosh Computer ....... 215 Selecting the Software You Need 215 Computer System Requirements 216 Managing Images on a Macintosh 217 Playing ...
Owners Manual
Page 11
... viewing (page 148) • World Time (page 165) A simple operation sets the current time for Camera File system) data storage protocol provides image compatibility between the digital camera and printers. 11 DPOF can also be printed easily in 32 time zones. • Support for SD ... recorded them. • Transfer images to a computer simply by professional print services. • PictBridge and USB DIRECT-PRINT support (page 183) Connect directly to a PictBridge or USB DIRECT-PRINT compatible printer and you want using a DPOF compatible printer. Each day of the full-month calendar...
... viewing (page 148) • World Time (page 165) A simple operation sets the current time for Camera File system) data storage protocol provides image compatibility between the digital camera and printers. 11 DPOF can also be printed easily in 32 time zones. • Support for SD ... recorded them. • Transfer images to a computer simply by professional print services. • PictBridge and USB DIRECT-PRINT support (page 183) Connect directly to a PictBridge or USB DIRECT-PRINT compatible printer and you want using a DPOF compatible printer. Each day of the full-month calendar...
Owners Manual
Page 14
...to appear on the monitor screen (page 232). INTRODUCTION I Data Error Precautions • Your digital camera is manufactured using the camera to record important images, make sure you turn off the camera - Removing the battery, removing the memory card while the operation lamp is still flashing green after... you first record a number of test images and check the results to ensure that the camera is configured correctly and operating properly. Disconnecting the USB cable while a data communication operation is performing a record or memory access operation -
...to appear on the monitor screen (page 232). INTRODUCTION I Data Error Precautions • Your digital camera is manufactured using the camera to record important images, make sure you turn off the camera - Removing the battery, removing the memory card while the operation lamp is still flashing green after... you first record a number of test images and check the results to ensure that the camera is configured correctly and operating properly. Disconnecting the USB cable while a data communication operation is performing a record or memory access operation -

Owners Manual
Page 23
GETTING READY I Back 78 F E DC 9 : A [̆] B [̇] [̄] 7 Operation lamp 8 Zoom button 9 Strap ring 0 [ ] (PLAY mode) button A [ ] (REC mode) button B C [SET] button D [BS] (BEST SHOT) button E [MENU] button F Monitor Screen [̈] [SET] I Bottom G Memory card slot H Stopper I 23 M Speaker GH ML K J I Battery cover J Battery compartment K USB/AV connector L Tripod screw hole * Use this hole when attaching to a tripod.
GETTING READY I Back 78 F E DC 9 : A [̆] B [̇] [̄] 7 Operation lamp 8 Zoom button 9 Strap ring 0 [ ] (PLAY mode) button A [ ] (REC mode) button B C [SET] button D [BS] (BEST SHOT) button E [MENU] button F Monitor Screen [̈] [SET] I Bottom G Memory card slot H Stopper I 23 M Speaker GH ML K J I Battery cover J Battery compartment K USB/AV connector L Tripod screw hole * Use this hole when attaching to a tripod.
Owners Manual
Page 38
... - Do not use or leave the battery near open flame. - Do not immerse the battery in this camera. - Never try to use any other charging device. • Failure to the CASIO NP-20 Rechargeable Lithium Ion Battery. • Use only the battery charger (BC-11L) that comes with ...items that can conduct electricity (necklaces, pencil lead, etc.) - Never carry or store the battery together with the camera or the optionally available USB cradle (CA-32) to ...
... - Do not use or leave the battery near open flame. - Do not immerse the battery in this camera. - Never try to use any other charging device. • Failure to the CASIO NP-20 Rechargeable Lithium Ion Battery. • Use only the battery charger (BC-11L) that comes with ...items that can conduct electricity (necklaces, pencil lead, etc.) - Never carry or store the battery together with the camera or the optionally available USB cradle (CA-32) to ...
Owners Manual
Page 148
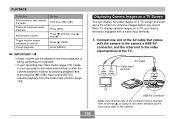
... [̆] (DISP). Yellow White (Video) (Audio) AV cable Video input terminal 148 TV USB/AV connector Make sure that the side of the connector that comes with the camera to the camera's USB/AV connector, and the other end to compose images before or after the current playback location by... pausing playback and then pressing [̇] or [̈]. Press [MENU]. Displaying Camera Images on a TV Screen You can display ...
... [̆] (DISP). Yellow White (Video) (Audio) AV cable Video input terminal 148 TV USB/AV connector Make sure that the side of the connector that comes with the camera to the camera's USB/AV connector, and the other end to compose images before or after the current playback location by... pausing playback and then pressing [̇] or [̈]. Press [MENU]. Displaying Camera Images on a TV Screen You can display ...
Owners Manual
Page 168
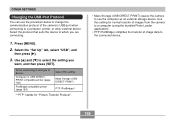
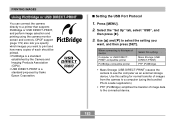
... Use this setting: Mass Storage (USB DIRECT-PRINT) PTP (PictBridge)* * "PTP" stands for normal transfer of images from the camera to a computer (using the bundled Photo Loader application). • PTP (PictBridge) simplifies the transfer of the camera's USB port when connecting to select the... setting you are connecting. 1. Press [MENU]. 2. Use [̆] and [̄] to a computer, printer, or other external device. OTHER SETTINGS Changing the USB Port Protocol You can use the procedure...
... Use this setting: Mass Storage (USB DIRECT-PRINT) PTP (PictBridge)* * "PTP" stands for normal transfer of images from the camera to a computer (using the bundled Photo Loader application). • PTP (PictBridge) simplifies the transfer of the camera's USB port when connecting to select the... setting you are connecting. 1. Press [MENU]. 2. Use [̆] and [̄] to a computer, printer, or other external device. OTHER SETTINGS Changing the USB Port Protocol You can use the procedure...
Owners Manual
Page 178
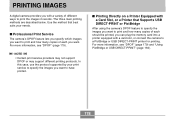
..." (page 179). I Printing Directly on a Printer Equipped with a card slot, or connect the camera to have printed. For more information, see "DPOF" (page 179) and "Using PictBridge or USB DIRECT-PRINT" (page 183). 178 PRINTING IMAGES PRINTING IMAGES A digital camera provides you with a variety of different ways to print and how many copies of...
..." (page 179). I Printing Directly on a Printer Equipped with a card slot, or connect the camera to have printed. For more information, see "DPOF" (page 179) and "Using PictBridge or USB DIRECT-PRINT" (page 183). 178 PRINTING IMAGES PRINTING IMAGES A digital camera provides you with a variety of different ways to print and how many copies of...
Owners Manual
Page 183
...for normal transfer of images from the camera to the connected device. 183 Use this setting: Mass Storage (USB DIRECT-PRINT) PTP (PictBridge) • Mass Storage (USB DIRECT-PRINT) causes the camera to a printer that supports PictBridge or USB DIRECT-PRINT, and perform image selection ... PTP (PictBridge) simplifies the transfer of each should be printed. • PictBridge is a standard established by the Camera and Imaging Products Association (CIPA). • USB DIRECT-PRINT is a standard proposed by Seiko Epson Corporation. DPOF support (page 179) also lets you specify which images...
...for normal transfer of images from the camera to the connected device. 183 Use this setting: Mass Storage (USB DIRECT-PRINT) PTP (PictBridge) • Mass Storage (USB DIRECT-PRINT) causes the camera to a printer that supports PictBridge or USB DIRECT-PRINT, and perform image selection ... PTP (PictBridge) simplifies the transfer of each should be printed. • PictBridge is a standard established by the Camera and Imaging Products Association (CIPA). • USB DIRECT-PRINT is a standard proposed by Seiko Epson Corporation. DPOF support (page 179) also lets you specify which images...
Owners Manual
Page 184
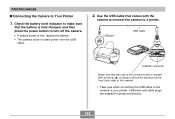
... connector Make sure that the side of the camera. • Take care when connecting the USB cable to a printer. Check the battery level indicator to make sure that is marked with the camera to connect the camera to the camera or your printer. USB ports and cable plugs are shaped for proper ...positioning. 184 Use the USB cable that comes with an arrow (̆) is facing in the same direction as...
... connector Make sure that the side of the camera. • Take care when connecting the USB cable to a printer. Check the battery level indicator to make sure that is marked with the camera to connect the camera to the camera or your printer. USB ports and cable plugs are shaped for proper ...positioning. 184 Use the USB cable that comes with an arrow (̆) is facing in the same direction as...
Owners Manual
Page 186
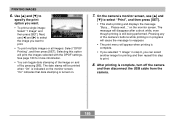
.... Selecting this step to select "Print", and then press [SET]. • This starts printing and displays the message "Busy.... On the camera's monitor screen, use [̇] and [̈] to select the image you want to specify the print option you can toggle date stamping of the... camera's buttons while printing is indicated on and off the camera and then disconnect the USB cable from the camera. 186 Pressing any of the image on the monitor screen. Use [̆] and [̄] ...
.... Selecting this step to select "Print", and then press [SET]. • This starts printing and displays the message "Busy.... On the camera's monitor screen, use [̇] and [̈] to select the image you want to specify the print option you can toggle date stamping of the... camera's buttons while printing is indicated on and off the camera and then disconnect the USB cable from the camera. 186 Pressing any of the image on the monitor screen. Use [̆] and [̄] ...
Owners Manual
Page 187
...printer manufacturer for details. The Photohands User's Guide is in progress. I Printing Precautions • See the documentation that comes with your camera. • Specifying date printing when having printing done by a print service - Some printers may have settings that some professional print ...the Photohands software that comes with your service for details about models that support PictBridge and USB DIRECT-PRINT, upgrades, etc. • Never disconnect the USB cable or perform any camera operation while printing is provided as a PDF file on it (page 122), the two ...
...printer manufacturer for details. The Photohands User's Guide is in progress. I Printing Precautions • See the documentation that comes with your camera. • Specifying date printing when having printing done by a print service - Some printers may have settings that some professional print ...the Photohands software that comes with your service for details about models that support PictBridge and USB DIRECT-PRINT, upgrades, etc. • Never disconnect the USB cable or perform any camera operation while printing is provided as a PDF file on it (page 122), the two ...
Owners Manual
Page 189
..., you can find details about each operation in file memory and copy images to your computer's hard disk or other information about USB connections, etc. 1. Using the Camera with the camera onto your computer. View and copy the images you want. 189 Note that you should also refer to the documentation that comes...
..., you can find details about each operation in file memory and copy images to your computer's hard disk or other information about USB connections, etc. 1. Using the Camera with the camera onto your computer. View and copy the images you want. 189 Note that you should also refer to the documentation that comes...
Owners Manual
Page 190
... is, remove the memory card from the camera before installing the USB driver onto the computer. I Install the USB driver onto your computer Do not try to establish a connection between the camera and computer before you plan to transfer file data from the camera's built-in memory to your computer, make... required in the case of Windows XP, 2000, and Me. 190 Do not connect the camera to a computer running one of the above operating systems without installing the USB driver first. • USB driver installation is required in the case of Windows 98SE and 98. VIEWING IMAGES ON A ...
... is, remove the memory card from the camera before installing the USB driver onto the computer. I Install the USB driver onto your computer Do not try to establish a connection between the camera and computer before you plan to transfer file data from the camera's built-in memory to your computer, make... required in the case of Windows XP, 2000, and Me. 190 Do not connect the camera to a computer running one of the above operating systems without installing the USB driver first. • USB driver installation is required in the case of Windows 98SE and 98. VIEWING IMAGES ON A ...
Owners Manual
Page 191
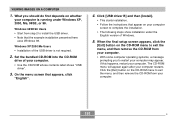
...the example installation presented here uses Windows 98. VIEWING IMAGES ON A COMPUTER 1. Windows 98SE/98 Users • Start from your computer. 191 B Click [USB driver B] and then [Install]. • This starts installation. • Follow the instructions that appear on the CD-ROM menu to exit the menu, and.... When the final setup screen appears, click the [Exit] button on your computer. • Use the CD-ROM whose contents label shows "USB driver". 3. The CD-ROM menu will appear again after your computer may appear. What you to exit the menu, and then remove the CD...
...the example installation presented here uses Windows 98. VIEWING IMAGES ON A COMPUTER 1. Windows 98SE/98 Users • Start from your computer. 191 B Click [USB driver B] and then [Install]. • This starts installation. • Follow the instructions that appear on the CD-ROM menu to exit the menu, and.... When the final setup screen appears, click the [Exit] button on your computer. • Use the CD-ROM whose contents label shows "USB driver". 3. The CD-ROM menu will appear again after your computer may appear. What you to exit the menu, and then remove the CD...
Owners Manual
Page 192
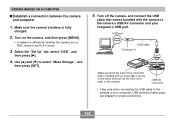
...;] and [̄] to the camera's USB/AV connector and your computer. Turn off the camera, and connect the USB cable that the side of the camera. Select the "Set Up" tab, select "USB", and then press [̈]. 4. USB/AV connector • Take care when connecting the USB cable to the camera or your computer's USB port. USB ports and cable plugs...
...;] and [̄] to the camera's USB/AV connector and your computer. Turn off the camera, and connect the USB cable that the side of the camera. Select the "Set Up" tab, select "USB", and then press [̈]. 4. USB/AV connector • Take care when connecting the USB cable to the camera or your computer's USB port. USB ports and cable plugs...

Owners Manual
Page 193
... operating systems will cause the camera's operation lamp to install the USB driver every time. On your computer, double-click "My Computer". • If you want 1. Double-click the file that contains the image you establish a USB connection between the camera and your computer to view.... • For information about file names, see "Memory Folder Structure" on the camera. • This will cause your computer. • This will display a ...
... operating systems will cause the camera's operation lamp to install the USB driver every time. On your computer, double-click "My Computer". • If you want 1. Double-click the file that contains the image you establish a USB connection between the camera and your computer to view.... • For information about file names, see "Memory Folder Structure" on the camera. • This will cause your computer. • This will display a ...
Owners Manual
Page 195
...delete, move , or rename images stored in the camera's file memory. Next, disconnect the USB cable from the computer. After making sure that the camera's operation lamp is not lit green, disconnect the camera from the camera, and then turn off the camera. 195 VIEWING IMAGES ON A COMPUTER NOTE • ...your computer before saving a new "DCIM" folder. Always copy images to terminate the USB connection. Doing so can cause problems with the newly saved folder. Windows XP/98SE/98 Users Press the camera's power button. If you are running, use your computer screen, and disable the...
...delete, move , or rename images stored in the camera's file memory. Next, disconnect the USB cable from the computer. After making sure that the camera's operation lamp is not lit green, disconnect the camera from the camera, and then turn off the camera. 195 VIEWING IMAGES ON A COMPUTER NOTE • ...your computer before saving a new "DCIM" folder. Always copy images to terminate the USB connection. Doing so can cause problems with the newly saved folder. Windows XP/98SE/98 Users Press the camera's power button. If you are running, use your computer screen, and disable the...


