Owners Manual
Page 1
C K871PCM1DMX-2 The same procedures also apply to -date information about this product, visit the official Exilim Website at http://www.exilim.com/. All example procedures in a safe place for purchasing this CASIO Product. • Before using it, be sure to read the precautions contained in this User's Guide. • Keep the User's Guide in this User's Guide are based on the EX-Z40. E Digital Camera EX-Z30/EX-Z40 User's Guide Thank you for future reference. • For the most up-to the EX-Z30, unless specifically noted otherwise.
C K871PCM1DMX-2 The same procedures also apply to -date information about this product, visit the official Exilim Website at http://www.exilim.com/. All example procedures in a safe place for purchasing this CASIO Product. • Before using it, be sure to read the precautions contained in this User's Guide. • Keep the User's Guide in this User's Guide are based on the EX-Z40. E Digital Camera EX-Z30/EX-Z40 User's Guide Thank you for future reference. • For the most up-to the EX-Z30, unless specifically noted otherwise.
Owners Manual
Page 2
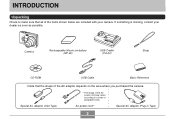
Special AC Adaptor (Inlet Type) * The shape of the AC power cord plug varies according to make sure that the shape of the items shown below are included with your dealer as soon as possible. AC power cord * Special AC Adaptor (Plug-in Type) 2 Camera Rechargeable lithium ion battery (NP-40) USB Cradle (CA-24) Strap CD-ROM USB Cable Basic Reference • Note that all of the AC adaptor depends on the area where you purchased the camera. If something is missing, contact your camera. INTRODUCTION INTRODUCTION Unpacking Check to country or geographic area.
Special AC Adaptor (Inlet Type) * The shape of the AC power cord plug varies according to make sure that the shape of the items shown below are included with your dealer as soon as possible. AC power cord * Special AC Adaptor (Plug-in Type) 2 Camera Rechargeable lithium ion battery (NP-40) USB Cradle (CA-24) Strap CD-ROM USB Cable Basic Reference • Note that all of the AC adaptor depends on the area where you purchased the camera. If something is missing, contact your camera. INTRODUCTION INTRODUCTION Unpacking Check to country or geographic area.
Owners Manual
Page 3
... record an image 17 To view a recorded image 17 To delete an image 18 19 GETTING READY About This Manual 19 General Guide 20 Camera 20 USB Cradle 21 Monitor Screen Contents 22 REC mode 22 PLAY mode 24 Changing the Contents of the Monitor Screen 25 Indicator Lamps 25... 26 Power Requirements 26 To load the battery 26 To remove the battery 28 To charge the battery 28 Power Supply Precautions 33 Turning the Camera On and Off 37 Configuring Power Saving Settings 38 Using the On-screen Menus 39 Configuring Display Language and Clock Settings ... 42 To configure...
... record an image 17 To view a recorded image 17 To delete an image 18 19 GETTING READY About This Manual 19 General Guide 20 Camera 20 USB Cradle 21 Monitor Screen Contents 22 REC mode 22 PLAY mode 24 Changing the Contents of the Monitor Screen 25 Indicator Lamps 25... 26 Power Requirements 26 To load the battery 26 To remove the battery 28 To charge the battery 28 Power Supply Precautions 33 Turning the Camera On and Off 37 Configuring Power Saving Settings 38 Using the On-screen Menus 39 Configuring Display Language and Clock Settings ... 42 To configure...

Owners Manual
Page 4
...BASIC IMAGE RECORDING Recording an Image 45 Aiming the Camera 45 Recording an Image 46 Recording Precautions 48 About Auto Focus 49 About the REC Mode Monitor Screen 49 Using the Optical Viewfinder 50 Using Zoom 51 Optical Zoom 51 Digital Zoom 52 Using the Flash 53 Flash Unit Status... Using the Movie Mode 79 Recording Audio 81 Adding Audio to a Snapshot 81 Recording Your Voice 83 Using the Histogram 84 REC Mode Camera Settings 86 Specifying ISO Sensitivity 86 Turning the On-screen Grid On and Off 88 Turning Image Review On and Off 88 Assigning Functions...
...BASIC IMAGE RECORDING Recording an Image 45 Aiming the Camera 45 Recording an Image 46 Recording Precautions 48 About Auto Focus 49 About the REC Mode Monitor Screen 49 Using the Optical Viewfinder 50 Using Zoom 51 Optical Zoom 51 Digital Zoom 52 Using the Flash 53 Flash Unit Status... Using the Movie Mode 79 Recording Audio 81 Adding Audio to a Snapshot 81 Recording Your Voice 83 Using the Histogram 84 REC Mode Camera Settings 86 Specifying ISO Sensitivity 86 Turning the On-screen Grid On and Off 88 Turning Image Review On and Off 88 Assigning Functions...

Owners Manual
Page 6
...in Memory 135 136 USING A MEMORY CARD Using a Memory Card 137 To insert a memory card into the camera 137 To remove a memory card from the camera 138 Formatting a Memory Card 138 Memory Card Precautions 139 Copying Files 140 To copy all the files in ...Printing Precautions 149 PRINT Image Matching II 150 Exif Print 150 151 VIEWING IMAGES ON A COMPUTER Using the Camera with a Windows Computer ........ 151 USB Connection Precautions 157 Using the Camera with a Macintosh Computer ....... 157 USB Connection Precautions 161 Operations You Can Perform from Your Computer . ...
...in Memory 135 136 USING A MEMORY CARD Using a Memory Card 137 To insert a memory card into the camera 137 To remove a memory card from the camera 138 Formatting a Memory Card 138 Memory Card Precautions 139 Copying Files 140 To copy all the files in ...Printing Precautions 149 PRINT Image Matching II 150 Exif Print 150 151 VIEWING IMAGES ON A COMPUTER Using the Camera with a Windows Computer ........ 151 USB Connection Precautions 157 Using the Camera with a Macintosh Computer ....... 157 USB Connection Precautions 161 Operations You Can Perform from Your Computer . ...

Owners Manual
Page 7
... Album Files 171 Saving an Album 173 To delete an album 174 Installing the Software from the CD-ROM 174 About the bundled CD-ROM (CASIO Digital Camera Software) 174 Computer System Requirements 176 Installing Software from the CD-ROM in Windows 177 Getting Started 178 Selecting a Language 178 Viewing the Contents of...
... Album Files 171 Saving an Album 173 To delete an album 174 Installing the Software from the CD-ROM 174 About the bundled CD-ROM (CASIO Digital Camera Software) 174 Computer System Requirements 176 Installing Software from the CD-ROM in Windows 177 Getting Started 178 Selecting a Language 178 Viewing the Contents of...
Owners Manual
Page 9
...8226; High-resolution CCD for beautiful prints EX-Z30: 3.20 million pixels (3.34 million total pixels) EX-Z40: 4.00 million pixels (4.23 million total pixels) • 2.0-inch TFT color LCD monitor screen • Long battery life The camera's low-power design combines with a ...largecapacity battery to provide more recording and playback between charges. • 12X seamless zoom (page 51) 3X optical zoom, 4X digital...
...8226; High-resolution CCD for beautiful prints EX-Z30: 3.20 million pixels (3.34 million total pixels) EX-Z40: 4.00 million pixels (4.23 million total pixels) • 2.0-inch TFT color LCD monitor screen • Long battery life The camera's low-power design combines with a ...largecapacity battery to provide more recording and playback between charges. • 12X seamless zoom (page 51) 3X optical zoom, 4X digital...
Owners Manual
Page 10
... incorporated into Web pages quickly and easily. • Calendar screen (page 101) A simple operation displays a full-month calendar on the camera's monitor screen. Each day of the full-month calendar shows a thumbnail of the first image recorded for that date, which makes shooting ...of recorded images. Album contents can be used in the sequence you turn on time for Camera File system) data storage protocol provides image inter-compatibility between the digital camera and printers. • Digital Print Order Format (DPOF) (page 143) Images can also be viewed and printed using ...
... incorporated into Web pages quickly and easily. • Calendar screen (page 101) A simple operation displays a full-month calendar on the camera's monitor screen. Each day of the full-month calendar shows a thumbnail of the first image recorded for that date, which makes shooting ...of recorded images. Album contents can be used in the sequence you turn on time for Camera File system) data storage protocol provides image inter-compatibility between the digital camera and printers. • Digital Print Order Format (DPOF) (page 143) Images can also be viewed and printed using ...
Owners Manual
Page 11
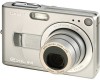
... print and start the print operation directly from the camera. • PictBridge support (page 146) Your camera supports the PictBridge standard of this camera" and "the camera" refer to the CASIO EX-Z30/EX-Z40 Digital Camera. • Never try to open the case of the camera or attempt your images come out just the way you intended when you can...
... print and start the print operation directly from the camera. • PictBridge support (page 146) Your camera supports the PictBridge standard of this camera" and "the camera" refer to the CASIO EX-Z30/EX-Z40 Digital Camera. • Never try to open the case of the camera or attempt your images come out just the way you intended when you can...
Owners Manual
Page 12
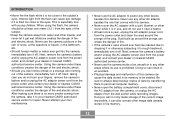
...AC adaptor to be at the seashore or beach, in file memory. 12 Never attempt your dealer or nearest CASIO authorized service center. Never use any other device besides this camera can also corrupt other image data already stored in the bathroom, etc. • Should foreign matter or ...damage and malfunction of fire and electric shock. This is too close to your dealer or nearest CASIO authorized service center. • Never use the camera outdoors in the rain or snow, at least one that comes with this camera. • Never cover the AC adaptor with young children. Using the...
...AC adaptor to be at the seashore or beach, in file memory. 12 Never attempt your dealer or nearest CASIO authorized service center. Never use any other device besides this camera can also corrupt other image data already stored in the bathroom, etc. • Should foreign matter or ...damage and malfunction of fire and electric shock. This is too close to your dealer or nearest CASIO authorized service center. • Never use the camera outdoors in the rain or snow, at least one that comes with this camera. • Never cover the AC adaptor with young children. Using the...

Owners Manual
Page 13
... the AC adaptor from 0°C to 40°C (32°F to record important images, make sure you turn off the camera - Data Error Precautions • Your digital camera is being performed - Any of data in the sun - Low battery power - Near air conditioners, heaters, or other areas ... or memory access operation - Removing the battery, removing the memory card, or placing the camera onto the USB cradle while the operation lamp is designed for proper operation before using precision digital components. Inside of test images and check the results to appear on the monitor screen (...
... the AC adaptor from 0°C to 40°C (32°F to record important images, make sure you turn off the camera - Data Error Precautions • Your digital camera is being performed - Any of data in the sun - Low battery power - Near air conditioners, heaters, or other areas ... or memory access operation - Removing the battery, removing the memory card, or placing the camera onto the USB cradle while the operation lamp is designed for proper operation before using precision digital components. Inside of test images and check the results to appear on the monitor screen (...
Owners Manual
Page 14
... location. Next, wipe the surface of the lens with a soft, dry cloth. 14 If condensation does form, remove the battery from the camera and leave the battery compartment cover open for a few hours. Leave it with a soft lens cloth. INTRODUCTION Condensation • When you should... avoid exposing it to conditions that might cause condensation. • To keep condensation from forming, place the camera into a plastic bag before moving it into a location that is the possibility that condensation can form on the exterior or on a cold day...
... location. Next, wipe the surface of the lens with a soft, dry cloth. 14 If condensation does form, remove the battery from the camera and leave the battery compartment cover open for a few hours. Leave it with a soft lens cloth. INTRODUCTION Condensation • When you should... avoid exposing it to conditions that might cause condensation. • To keep condensation from forming, place the camera into a plastic bag before moving it into a location that is the possibility that condensation can form on the exterior or on a cold day...
Owners Manual
Page 15
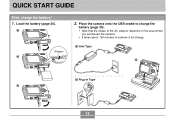
Place the camera onto the USB cradle to charge the battery (page 28). • Note that the shape of the AC adaptor depends on the area where you purchased the camera. • It takes about 190 minutes to achieve a full charge. 1 Inlet Type Stopper 2 2 1 Plug-in Type 3 15 QUICK START GUIDE QUICK START GUIDE First, charge the battery! 1. Load the battery (page 26). 1 2.
Place the camera onto the USB cradle to charge the battery (page 28). • Note that the shape of the AC adaptor depends on the area where you purchased the camera. • It takes about 190 minutes to achieve a full charge. 1 Inlet Type Stopper 2 2 1 Plug-in Type 3 15 QUICK START GUIDE QUICK START GUIDE First, charge the battery! 1. Load the battery (page 26). 1 2.
Owners Manual
Page 16
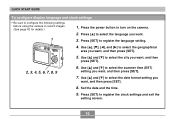
... page 42 for details.) 1. QUICK START GUIDE To configure display language and clock settings • Be sure to configure the following settings before using the camera to register the clock settings and exit the setting screen. 16 Press the power button to register the language setting. 4. Press [̆] to select the...
... page 42 for details.) 1. QUICK START GUIDE To configure display language and clock settings • Be sure to configure the following settings before using the camera to register the clock settings and exit the setting screen. 16 Press the power button to register the language setting. 4. Press [̆] to select the...

Owners Manual
Page 17
... way. • When proper focus is achieved, the focus frame turns green and the green operation lamp lights. 3. Holding the camera still, gently press the shutter release button. 17 2 1. Point the camera at the subject, use the procedure under "Using the On-screen Menus" (page 39) to change the "REC Mode" setting...
... way. • When proper focus is achieved, the focus frame turns green and the green operation lamp lights. 3. Holding the camera still, gently press the shutter release button. 17 2 1. Point the camera at the subject, use the procedure under "Using the On-screen Menus" (page 39) to change the "REC Mode" setting...
Owners Manual
Page 19
This term as used in this : The CASIO EX-Z30/EX-Z40 Digital Camera The location where the camera is currently storing images you need to know about and do before trying to the location where your camera is currently storing the images you record. File memory can be any one of brackets ([ ]). I File Memory The term "file memory...
This term as used in this : The CASIO EX-Z30/EX-Z40 Digital Camera The location where the camera is currently storing images you need to know about and do before trying to the location where your camera is currently storing the images you record. File memory can be any one of brackets ([ ]). I File Memory The term "file memory...

Owners Manual
Page 20
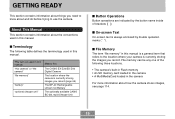
GETTING READY General Guide The following illustrations show the names of each component, button, and switch on the camera. Camera I Front I Back 12 3 4 5 6 1 Shutter release button 2 Power button 3 Flash 4 Microphone 5 Self-timer lamp 6 Lens 7 8 90AB H G FE D C 7 Viewfinder 8 Operation lamp 9 [ ] (PLAY mode) 0 [ ] (REC mode) A [MENU] button B Zoom button C Strap ring D [SET] button E F [DISP] button G Monitor Screen H Speaker 20
GETTING READY General Guide The following illustrations show the names of each component, button, and switch on the camera. Camera I Front I Back 12 3 4 5 6 1 Shutter release button 2 Power button 3 Flash 4 Microphone 5 Self-timer lamp 6 Lens 7 8 90AB H G FE D C 7 Viewfinder 8 Operation lamp 9 [ ] (PLAY mode) 0 [ ] (REC mode) A [MENU] button B Zoom button C Strap ring D [SET] button E F [DISP] button G Monitor Screen H Speaker 20

Owners Manual
Page 21
... attaching to a printer for printing (page 146) • Viewing of images to a computer (page 151) • Direct connection to a tripod. L USB Cradle Simply placing your CASIO digital camera onto the USB cradle lets you perform the following tasks. • Battery charging (page 28) • Automatic transfer of images using the Photo Stand slideshow...
... attaching to a printer for printing (page 146) • Viewing of images to a computer (page 151) • Direct connection to a tripod. L USB Cradle Simply placing your CASIO digital camera onto the USB cradle lets you perform the following tasks. • Battery charging (page 28) • Automatic transfer of images using the Photo Stand slideshow...
Owners Manual
Page 22
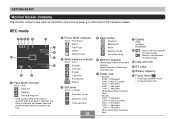
... 1536 pixels 2048 ҂ 1360 (3:2) pixels 1600 ҂ 1200 pixels 1280 ҂ 960 pixels 640 ҂ 480 pixels Movie Recording: recording time • EX-Z40 2304 ҂ 1728 pixels 2304 ҂ 1536 (3:2) pixels 1600 ҂ 1200 pixels 1280 ҂ 960 pixels 640 ҂ 480 pixels Movie Recording: recording...: Red REC mode 1234 5 C 6 7 8 9 0 BA 1 Flash Mode indicator None Auto Flash Off Flash On Red-eye reduction • If the camera detects that flash is required while auto flash is selected, the flash on indicator will appear when the shutter release button is pressed half way...
... 1536 pixels 2048 ҂ 1360 (3:2) pixels 1600 ҂ 1200 pixels 1280 ҂ 960 pixels 640 ҂ 480 pixels Movie Recording: recording time • EX-Z40 2304 ҂ 1728 pixels 2304 ҂ 1536 (3:2) pixels 1600 ҂ 1200 pixels 1280 ҂ 960 pixels 640 ҂ 480 pixels Movie Recording: recording...: Red REC mode 1234 5 C 6 7 8 9 0 BA 1 Flash Mode indicator None Auto Flash Off Flash On Red-eye reduction • If the camera detects that flash is required while auto flash is selected, the flash on indicator will appear when the shutter release button is pressed half way...
Owners Manual
Page 24
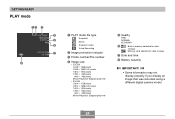
... mode file type Snapshot Movie Snapshot Audio Voice Recording 2 Image protection indicator 3 Folder number/File number 4 Image size • EX-Z30 2048 ҂ 1536 pixels 2048 ҂ 1360 (3:2) pixels 1600 ҂ 1200 pixels 1280 ҂ 960 pixels 640 ...҂ 480 pixels Movie Playback: Elapsed play time • EX-Z40 2304 ҂ 1728 pixels 2304 ҂ 1536 (3:2) pixels 1600 ҂ 1200 pixels 1280 ҂ 960 pixels 640...display an image that was recorded using a different digital camera model. 24 Memory card selected for data storage.
... mode file type Snapshot Movie Snapshot Audio Voice Recording 2 Image protection indicator 3 Folder number/File number 4 Image size • EX-Z30 2048 ҂ 1536 pixels 2048 ҂ 1360 (3:2) pixels 1600 ҂ 1200 pixels 1280 ҂ 960 pixels 640 ...҂ 480 pixels Movie Playback: Elapsed play time • EX-Z40 2304 ҂ 1728 pixels 2304 ҂ 1536 (3:2) pixels 1600 ҂ 1200 pixels 1280 ҂ 960 pixels 640...display an image that was recorded using a different digital camera model. 24 Memory card selected for data storage.


