Owners Manual
Page 3
... for proper operation before using the camera! 13 Data Error Precautions 13 Operating conditions 13 Condensation 14 Lens 14 Other 14 15 QUICK START GUIDE First, charge the battery 15 To configure display language and clock settings ..... 16 To record an image 17 To view a recorded image 17 To delete an image 18 19 GETTING READY About This Manual 19 General Guide 20 Camera 20 USB Cradle 21 Monitor Screen Contents 22 REC mode 22 PLAY mode 24 Changing the Contents...
... for proper operation before using the camera! 13 Data Error Precautions 13 Operating conditions 13 Condensation 14 Lens 14 Other 14 15 QUICK START GUIDE First, charge the battery 15 To configure display language and clock settings ..... 16 To record an image 17 To view a recorded image 17 To delete an image 18 19 GETTING READY About This Manual 19 General Guide 20 Camera 20 USB Cradle 21 Monitor Screen Contents 22 REC mode 22 PLAY mode 24 Changing the Contents...

Owners Manual
Page 4
... Screen 49 Using the Optical Viewfinder 50 Using Zoom 51 Optical Zoom 51 Digital Zoom 52 Using the Flash 53 Flash Unit Status 55 Flash Precautions 55 Using the Self-timer 56 Specifying Image Size and Quality 58 To specify the image size 58 To specify image quality 60 61 OTHER RECORDING FUNCTIONS Selecting the Focus Mode 61 Using Auto Focus 62 Using the Macro Mode 64 Using the Pan Focus Mode 64 Using the Infinity Mode 65 Using Manual Focus 65 Using Focus Lock 66 4 Exposure Compensation (EV Shift 67 Adjusting White Balance...
... Screen 49 Using the Optical Viewfinder 50 Using Zoom 51 Optical Zoom 51 Digital Zoom 52 Using the Flash 53 Flash Unit Status 55 Flash Precautions 55 Using the Self-timer 56 Specifying Image Size and Quality 58 To specify the image size 58 To specify image quality 60 61 OTHER RECORDING FUNCTIONS Selecting the Focus Mode 61 Using Auto Focus 62 Using the Macro Mode 64 Using the Pan Focus Mode 64 Using the Infinity Mode 65 Using Manual Focus 65 Using Focus Lock 66 4 Exposure Compensation (EV Shift 67 Adjusting White Balance...

Owners Manual
Page 6
... configure summer time (DST) settings 131 Changing the Display Language 132 Changing the USB Port Protocol 132 Configuring [ ] (REC) and [ ] (PLAY) Buttons Power On/Off Functions 133 Formatting Built-in Memory 135 136 USING A MEMORY CARD Using a Memory Card 137 To insert a memory card into the camera 137 To remove a memory card from the camera 138 Formatting a Memory Card 138 Memory Card Precautions 139 Copying Files 140 To copy all the files in built-in memory to a memory card 140 To copy a file from a memory card to built-in memory 141 142 PRINTING IMAGES DPOF...
... configure summer time (DST) settings 131 Changing the Display Language 132 Changing the USB Port Protocol 132 Configuring [ ] (REC) and [ ] (PLAY) Buttons Power On/Off Functions 133 Formatting Built-in Memory 135 136 USING A MEMORY CARD Using a Memory Card 137 To insert a memory card into the camera 137 To remove a memory card from the camera 138 Formatting a Memory Card 138 Memory Card Precautions 139 Copying Files 140 To copy all the files in built-in memory to a memory card 140 To copy a file from a memory card to built-in memory 141 142 PRINTING IMAGES DPOF...
Owners Manual
Page 8
... use of this manual are trademarks of Adobe Systems Incorporated. • The USB driver (mass storage) uses Phoenix Technologies Ltd. Except as a result of malfunction, repairs, or battery replacement. Distribution to change without permission of the copyright holder, whether for profit or for the purposes of your own personal enjoyment, unauthorized copying of snapshot files, movie files, and audio files violates copyright laws and international...
... use of this manual are trademarks of Adobe Systems Incorporated. • The USB driver (mass storage) uses Phoenix Technologies Ltd. Except as a result of malfunction, repairs, or battery replacement. Distribution to change without permission of the copyright holder, whether for profit or for the purposes of your own personal enjoyment, unauthorized copying of snapshot files, movie files, and audio files violates copyright laws and international...
Owners Manual
Page 9
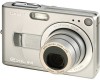
...) EX-Z40: 4.00 million pixels (4.23 million total pixels) • 2.0-inch TFT color LCD monitor screen • Long battery life The camera's low-power design combines with a largecapacity battery to provide more recording and playback between charges. • 12X seamless zoom (page 51) 3X optical zoom, 4X digital zoom • 9.7MB Flash memory Images can be recorded without waiting for Auto Focus to be played while the camera is on the camera and enter the mode...
...) EX-Z40: 4.00 million pixels (4.23 million total pixels) • 2.0-inch TFT color LCD monitor screen • Long battery life The camera's low-power design combines with a largecapacity battery to provide more recording and playback between charges. • 12X seamless zoom (page 51) 3X optical zoom, 4X digital zoom • 9.7MB Flash memory Images can be recorded without waiting for Auto Focus to be played while the camera is on the camera and enter the mode...
Owners Manual
Page 10
... makes shooting under difficult lighting conditions easier than ever before. • World Time (page 129) A simple operation sets the current time for printing by professional print services. 10 You can select from among 162 cities in 32 time zones. • Alarm (page 126) A built-in alarm helps to keep you on time for Camera File system) data storage protocol provides image inter-compatibility between the digital camera and printers. • Digital Print Order Format...
... makes shooting under difficult lighting conditions easier than ever before. • World Time (page 129) A simple operation sets the current time for printing by professional print services. 10 You can select from among 162 cities in 32 time zones. • Alarm (page 126) A built-in alarm helps to keep you on time for Camera File system) data storage protocol provides image inter-compatibility between the digital camera and printers. • Digital Print Order Format...
Owners Manual
Page 11
... reach of electric shock when exposed. All references in this manual to "this camera" and "the camera" refer to the CASIO EX-Z30/EX-Z40 Digital Camera. • Never try to take pictures or use the built-in the direction of this data and adjusts the printed image accordingly, so your physician immediately. • Never fire the flash in display while operating a motor vehicle or while walking. A printer that makes image retouching quick and easy.
... reach of electric shock when exposed. All references in this manual to "this camera" and "the camera" refer to the CASIO EX-Z30/EX-Z40 Digital Camera. • Never try to take pictures or use the built-in the direction of this data and adjusts the printed image accordingly, so your physician immediately. • Never fire the flash in display while operating a motor vehicle or while walking. A printer that makes image retouching quick and easy.

Owners Manual
Page 13
... using precision digital components. Removing the battery or memory card, or setting the camera onto the USB cradle while the camera is manufactured using the camera! In areas subject to 104°F). • Do not use in temperatures ranging from the USB cradle while a data communication operation is still flashing after you first record a number of the error. 13 Near air conditioners, heaters, or other areas subject to direct sunlight - Low battery power...
... using precision digital components. Removing the battery or memory card, or setting the camera onto the USB cradle while the camera is manufactured using the camera! In areas subject to 104°F). • Do not use in temperatures ranging from the USB cradle while a data communication operation is still flashing after you first record a number of the error. 13 Near air conditioners, heaters, or other areas subject to direct sunlight - Low battery power...

Owners Manual
Page 17
... green operation lamp lights. 3. Point the camera at the subject, use the monitor screen or viewfinder to compose the image, and then press the shutter release button half way. • When proper focus is not on the monitor screen, use the procedure under "Using the On-screen Menus" (page 39) to change the "REC Mode" setting to scroll through the images. Use [̇] and [̈] to " Snapshot". 2. QUICK START GUIDE To record an image Green operation...
... green operation lamp lights. 3. Point the camera at the subject, use the monitor screen or viewfinder to compose the image, and then press the shutter release button half way. • When proper focus is not on the monitor screen, use the procedure under "Using the On-screen Menus" (page 39) to change the "REC Mode" setting to scroll through the images. Use [̇] and [̈] to " Snapshot". 2. QUICK START GUIDE To record an image Green operation...
Owners Manual
Page 31
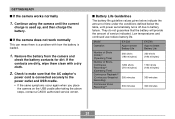
... of service indicated. Low temperatures and continued use reduce battery life. GETTING READY I If the camera does not work normally This can mean there is used up, and then charge the battery. They do not guarantee that the AC adaptor's power cord is loaded. 1. Model Operation Number of Shots (CIPA)*1 (Operating Time) Number of time under the conditions defined below indicate the amount of Shots, Continuous Recording*2 (Operating Time) Continuous Playback*3 (Continuous Snapshot Recording) Continuous Voice Recording*4 EX-Z30 Apporoximate Battery Life 360 shots (180...
... of service indicated. Low temperatures and continued use reduce battery life. GETTING READY I If the camera does not work normally This can mean there is used up, and then charge the battery. They do not guarantee that the AC adaptor's power cord is loaded. 1. Model Operation Number of Shots (CIPA)*1 (Operating Time) Number of time under the conditions defined below indicate the amount of Shots, Continuous Recording*2 (Operating Time) Continuous Playback*3 (Continuous Snapshot Recording) Continuous Voice Recording*4 EX-Z30 Apporoximate Battery Life 360 shots (180...

Owners Manual
Page 39
... not operate in the PLAY mode. • Pressing any button while the camera is in the Sleep state immediately turns the monitor screen back on. • The Auto Power Off and Sleep features are in progress - Press the power button or the [ ] (REC) button. • If you can use menus. While playing back a voice recording file Using the On-screen Menus Pressing [MENU] displays menus on whether you are disabled in...
... not operate in the PLAY mode. • Pressing any button while the camera is in the Sleep state immediately turns the monitor screen back on. • The Auto Power Off and Sleep features are in progress - Press the power button or the [ ] (REC) button. • If you can use menus. While playing back a voice recording file Using the On-screen Menus Pressing [MENU] displays menus on whether you are disabled in...

Owners Manual
Page 64
.... OTHER RECORDING FUNCTIONS Using the Macro Mode The Macro mode lets you press the shutter release button half way, the focus distance will appear on the monitor screen. Keep pressing [̆] ( ) until the focus mode indicator shows "PF". 2. The focus range depends on the zoom setting, the amount of the focus frame and green operation lamp are recorded without Auto Focus. Focus range IMPORTANT! • When using the flash, it is recommended that your camera performs Auto Focus to 19...
.... OTHER RECORDING FUNCTIONS Using the Macro Mode The Macro mode lets you press the shutter release button half way, the focus distance will appear on the monitor screen. Keep pressing [̆] ( ) until the focus mode indicator shows "PF". 2. The focus range depends on the zoom setting, the amount of the focus frame and green operation lamp are recorded without Auto Focus. Focus range IMPORTANT! • When using the flash, it is recommended that your camera performs Auto Focus to 19...

Owners Manual
Page 94
... PLAY mode, use the above procedure to flip an image while a zoomed image, 9-image screen, calendar screen image, a movie image, an audio snapshot, or a voice recording file image is displayed. • You cannot use [̇] and [̈] to its normal orientation, press any other than or [̈]. IMPORTANT! • Note that you want . 2. PLAYBACK Flipping the Display The following procedure flips the image 180 degrees. While holding down the shutter release button, press [SET...
... PLAY mode, use the above procedure to flip an image while a zoomed image, 9-image screen, calendar screen image, a movie image, an audio snapshot, or a voice recording file image is displayed. • You cannot use [̇] and [̈] to its normal orientation, press any other than or [̈]. IMPORTANT! • Note that you want . 2. PLAYBACK Flipping the Display The following procedure flips the image 180 degrees. While holding down the shutter release button, press [SET...
Owners Manual
Page 98
... the message "This function is not supported for this file." Press [SET] to cancel the procedure at any point, press [MENU]. Use and [̈] to move the cropping boundary up, down, left, or right until the area of the image enclosed in memory. • An image recorded using the 2048 x 1360 (3:2) pixel size (EX-Z30) and the 2304 x 1536 (3:2) pixel size (EX-Z40) cannot be cropped. • Movie...
... the message "This function is not supported for this file." Press [SET] to cancel the procedure at any point, press [MENU]. Use and [̈] to move the cropping boundary up, down, left, or right until the area of the image enclosed in memory. • An image recorded using the 2048 x 1360 (3:2) pixel size (EX-Z30) and the 2304 x 1536 (3:2) pixel size (EX-Z40) cannot be cropped. • Movie...
Owners Manual
Page 104
... registering the setting. 104 Use [̆] and [̄] to use is also played back. PLAYBACK To specify the slideshow images 1. Use [̆] and [̄] to the menu screen without changing it. Select "One image", and then press [̈]. 2. Press [SET] to register your selection and return to the menu screen. • Pressing [MENU] instead of audio snapshot and voice recording files is on the USB cradle (Photo Stand feature...
... registering the setting. 104 Use [̆] and [̄] to use is also played back. PLAYBACK To specify the slideshow images 1. Use [̆] and [̄] to the menu screen without changing it. Select "One image", and then press [̈]. 2. Press [SET] to register your selection and return to the menu screen. • Pressing [MENU] instead of audio snapshot and voice recording files is on the USB cradle (Photo Stand feature...
Owners Manual
Page 142
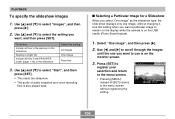
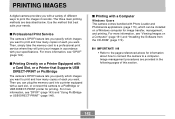
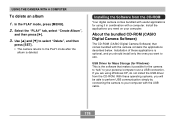
... your specifications. Use the method that Supports USB DIRECT-PRINT or PictBridge The camera's DPOF feature lets you specify which images you want to a computer. I Printing with a Computer Windows Users The camera comes bundled with a card slot, or connect the camera to a PictBridge or USB DIRECT-PRINT printer for information about how to connect the camera to print and how many copies of each you want . For more information, see "Viewing Images on a Windows computer for image transfer...
... your specifications. Use the method that Supports USB DIRECT-PRINT or PictBridge The camera's DPOF feature lets you specify which images you want to a computer. I Printing with a Computer Windows Users The camera comes bundled with a card slot, or connect the camera to a PictBridge or USB DIRECT-PRINT printer for information about how to connect the camera to print and how many copies of each you want . For more information, see "Viewing Images on a Windows computer for image transfer...
Owners Manual
Page 152
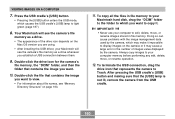
... the English version of Windows. 152 I Windows 98/Me/2000 Users • Start from the camera's built-in memory to a computer, make sure that appears, click "English". 4. Set the bundled CD-ROM (CASIO Digital Camera Software) into the CD-ROM drive of your computer is running one of the above operating systems without the AC adaptor, make sure there is no memory card loaded in the camera before installing the USB driver...
... the English version of Windows. 152 I Windows 98/Me/2000 Users • Start from the camera's built-in memory to a computer, make sure that appears, click "English". 4. Set the bundled CD-ROM (CASIO Digital Camera Software) into the CD-ROM drive of your computer is running one of the above operating systems without the AC adaptor, make sure there is no memory card loaded in the camera before installing the USB driver...
Owners Manual
Page 160
... the image you want to Trash. Press the USB cradle's [USB] button. • Pressing the [USB] button enters the USB mode, which causes the USB cradle's [USB] lamp to edit, delete, move , or rename operation. 12. Double-click the file that represents the camera to copy it may cause a large error in file memory to your computer to light green (page 187). 8. IMPORTANT! • Never use your Macintosh hard disk, drag the "DCIM" folder...
... the image you want to Trash. Press the USB cradle's [USB] button. • Pressing the [USB] button enters the USB mode, which causes the USB cradle's [USB] lamp to edit, delete, move , or rename operation. 12. Double-click the file that represents the camera to copy it may cause a large error in file memory to your computer to light green (page 187). 8. IMPORTANT! • Never use your Macintosh hard disk, drag the "DCIM" folder...
Owners Manual
Page 174
... simply by connecting the camera to use. Installing the Software from the CD-ROM. Installation of these operating systems, you want to your computer. If you need on your computer with a computer. Install the applications you are using Windows XP, do not install the USB driver from the CD-ROM Your digital camera comes bundled with useful applications for using it possible for Windows) This is deleted. USING THE CAMERA WITH A COMPUTER...
... simply by connecting the camera to use. Installing the Software from the CD-ROM. Installation of these operating systems, you want to your computer. If you need on your computer with a computer. Install the applications you are using Windows XP, do not install the USB driver from the CD-ROM Your digital camera comes bundled with useful applications for using it possible for Windows) This is deleted. USING THE CAMERA WITH A COMPUTER...
Owners Manual
Page 190
Remove the battery from another camera is shining directly into the lens. Other 190 Action Position the camera so sunlight does not shine directly into the lens during recording. Monitor screen is turned off. Circuit problem caused by electrostatic charge, impact, etc. Cannot transfer files over a USB connection. 1) Camera is not set securely on the USB cradle. 2) USB cable is not connected securely. 3) USB driver is not installed. 4) Camera is off. Images are disabled. All buttons and switches are not displayed. This camera cannot...
Remove the battery from another camera is shining directly into the lens. Other 190 Action Position the camera so sunlight does not shine directly into the lens during recording. Monitor screen is turned off. Circuit problem caused by electrostatic charge, impact, etc. Cannot transfer files over a USB connection. 1) Camera is not set securely on the USB cradle. 2) USB cable is not connected securely. 3) USB driver is not installed. 4) Camera is off. Images are disabled. All buttons and switches are not displayed. This camera cannot...


