Owners Manual
Page 6
... USING A MEMORY CARD Using a Memory Card 146 To insert a memory card into the camera 146 To remove a memory card from the camera 147 Formatting a Memory Card 147 Copying Files 149 To copy all the files in built-in memory to a memory card 149 To copy a specific file from a memory card to built-in memory 150 151 PRINTING...Album 181 To delete an album 182 Installing the Software from the CD-ROM 182 About the bundled CD-ROM (CASIO Digital Camera Software) 182 Computer System Requirements 184 Installing Software from the CD-ROM in Windows .. 185 Getting Started 186 ...
... USING A MEMORY CARD Using a Memory Card 146 To insert a memory card into the camera 146 To remove a memory card from the camera 147 Formatting a Memory Card 147 Copying Files 149 To copy all the files in built-in memory to a memory card 149 To copy a specific file from a memory card to built-in memory 150 151 PRINTING...Album 181 To delete an album 182 Installing the Software from the CD-ROM 182 About the bundled CD-ROM (CASIO Digital Camera Software) 182 Computer System Requirements 184 Installing Software from the CD-ROM in Windows .. 185 Getting Started 186 ...
Owners Manual
Page 9
.... Distribution to third parties of such files over the Internet without using a memory card. • REC mode or PLAY mode power up (page 39) Press [ ] (REC) or [ ] (PLAY) to turn on the camera and enter the mode you want to use. • Multi Auto Focus ...digital zoom • 9.3MB flash memory Images can be recorded without permission of snapshot files, movie files, and audio files violates copyright laws and international contracts. Features • 3.2 million effective pixels The CCD provides 3.34 million total pixels of very highresolution for the Auto Focus area, the camera...
.... Distribution to third parties of such files over the Internet without using a memory card. • REC mode or PLAY mode power up (page 39) Press [ ] (REC) or [ ] (PLAY) to turn on the camera and enter the mode you want to use. • Multi Auto Focus ...digital zoom • 9.3MB flash memory Images can be recorded without permission of snapshot files, movie files, and audio files violates copyright laws and international contracts. Features • 3.2 million effective pixels The CCD provides 3.34 million total pixels of very highresolution for the Auto Focus area, the camera...
Owners Manual
Page 10
... reached. 10 INTRODUCTION • Auto Pan Focus (page 68) When you wait for the camera to Auto Focus. • Support for SD memory cards and MMC (MultiMedia Cards) for memory expansion (page 145) • Bundled with a USB Cradle (pages 31, 118, 155, 159) The bundled USB cradle can...8226; Real-time histogram (page 96) An on-screen histogram lets you adjust exposure as you add a subject to record and the camera performs troublesome setups automatically for beautiful pictures every time. • Business Shot (page 88) Business Shot automatically corrects rectangular shapes when recording ...
... reached. 10 INTRODUCTION • Auto Pan Focus (page 68) When you wait for the camera to Auto Focus. • Support for SD memory cards and MMC (MultiMedia Cards) for memory expansion (page 145) • Bundled with a USB Cradle (pages 31, 118, 155, 159) The bundled USB cradle can...8226; Real-time histogram (page 96) An on-screen histogram lets you adjust exposure as you add a subject to record and the camera performs troublesome setups automatically for beautiful pictures every time. • Business Shot (page 88) Business Shot automatically corrects rectangular shapes when recording ...
Owners Manual
Page 14
... extremes - Removing the battery or memory card, or setting the camera onto the USB cradle while the camera is being performed - Low battery power - In areas subject to ensure that the camera is designed for proper operation before using the camera! Before using precision digital components. I Data Error Precautions • Your digital camera is still flashing green after you...
... extremes - Removing the battery or memory card, or setting the camera onto the USB cradle while the camera is being performed - Low battery power - In areas subject to ensure that the camera is designed for proper operation before using the camera! Before using precision digital components. I Data Error Precautions • Your digital camera is still flashing green after you...
Owners Manual
Page 21
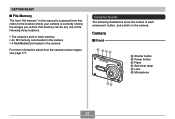
General Guide The following three locations. • The camera's built-in flash memory • An SD memory card loaded in the camera • A MultiMediaCard loaded in this manual is a general term that refers to the location where your camera is currently storing the images you record. GETTING READY I Front 1 234 1 Shutter button 2 Power button 3 Flash 4 Self-timer...
General Guide The following three locations. • The camera's built-in flash memory • An SD memory card loaded in the camera • A MultiMediaCard loaded in this manual is a general term that refers to the location where your camera is currently storing the images you record. GETTING READY I Front 1 234 1 Shutter button 2 Power button 3 Flash 4 Self-timer...
Owners Manual
Page 22
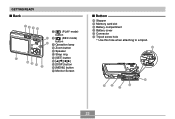
Zoom button A Speaker B Strap ring G C [SET] button FE D C D E [DISP] button F [MENU] button G Monitor Screen I Bottom H Stopper I M LK J 22 H I Memory card slot J Battery compartment K Battery cover L Connector M Tripod screw hole * Use this hole when attaching to a tripod. GETTING READY I Back 78 9 0 7 [ ] (PLAY mode) button A 8 [ ] (REC mode) B button 9 Operation lamp ;
Zoom button A Speaker B Strap ring G C [SET] button FE D C D E [DISP] button F [MENU] button G Monitor Screen I Bottom H Stopper I M LK J 22 H I Memory card slot J Battery compartment K Battery cover L Connector M Tripod screw hole * Use this hole when attaching to a tripod. GETTING READY I Back 78 9 0 7 [ ] (PLAY mode) button A 8 [ ] (REC mode) B button 9 Operation lamp ;
Owners Manual
Page 25
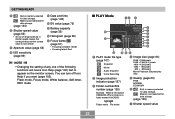
...in a folder named 100CASIO 100-0023 Folder name File name 5 Quality (page 65) FINE NORMAL ECONOMY 6 Built-in memory selected for data storage. You can turn amber. A Aperture value (page 52) B ISO sensitivity (page 99) ...of range aperture or shutter speed causes the corresponding monitor screen value to appear on the monitor screen. Memory card selected for data storage. (page 145) 0 Shutter speed value (page 52) • An ... 102). GETTING READY 9 Built-in memory selected for data storage. Memory card selected for data storage. (page 145) 7 Shutter speed value 25
...in a folder named 100CASIO 100-0023 Folder name File name 5 Quality (page 65) FINE NORMAL ECONOMY 6 Built-in memory selected for data storage. You can turn amber. A Aperture value (page 52) B ISO sensitivity (page 99) ...of range aperture or shutter speed causes the corresponding monitor screen value to appear on the monitor screen. Memory card selected for data storage. (page 145) 0 Shutter speed value (page 52) • An ... 102). GETTING READY 9 Built-in memory selected for data storage. Memory card selected for data storage. (page 145) 7 Shutter speed value 25
Owners Manual
Page 34
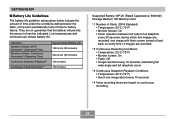
...*4 Apporoximate Battery Life 180 shots (90 minutes) 540 shots (90 minutes) 150 minutes 150 minutes Supported Battery: NP-20 (Rated Capacitance: 680mAh) Storage Medium: SD Memory Card *1 Number of service indicated. power turned off due to full telephoto every 30 seconds, during which two images are recorded, one image about every 10...
...*4 Apporoximate Battery Life 180 shots (90 minutes) 540 shots (90 minutes) 150 minutes 150 minutes Supported Battery: NP-20 (Rated Capacitance: 680mAh) Storage Medium: SD Memory Card *1 Number of service indicated. power turned off due to full telephoto every 30 seconds, during which two images are recorded, one image about every 10...
Owners Manual
Page 50
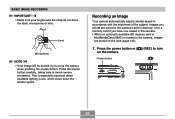
Recording an Image Your camera automatically adjusts shutter speed in the camera. • When an optionally available SD memory card or MultiMediaCard (MMC) is low, which slows down the shutter speed. BASIC IMAGE RECORDING IMPORTANT! • Make sure your fingers and... the brightness of the subject. Images you record are stored on the camera. This is especially important when available lighting is loaded in the camera, images are stored in the camera's built-in memory, or to a memory card if you move the camera when pressing the shutter button. Press the power button or [ ] ...
Recording an Image Your camera automatically adjusts shutter speed in the camera. • When an optionally available SD memory card or MultiMediaCard (MMC) is low, which slows down the shutter speed. BASIC IMAGE RECORDING IMPORTANT! • Make sure your fingers and... the brightness of the subject. Images you record are stored on the camera. This is especially important when available lighting is loaded in the camera, images are stored in the camera's built-in memory, or to a memory card if you move the camera when pressing the shutter button. Press the power button or [ ] ...

Owners Manual
Page 53
... be detected by the human eye. To protect against this , you need to guard against camera movement if you may experience some digital noise (graininess) to appear in bright sunlight. Subjects in file memory and even lead to the memory card. • Fluorescent lighting actually flickers at a frequency that are varying distances from the light...
... be detected by the human eye. To protect against this , you need to guard against camera movement if you may experience some digital noise (graininess) to appear in bright sunlight. Subjects in file memory and even lead to the memory card. • Fluorescent lighting actually flickers at a frequency that are varying distances from the light...
Owners Manual
Page 92
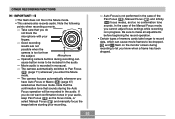
... beginning the record operation. • Certain types of memory cards take longer to record data, which can cause button noise to be dropped. Good recording results are not possible when the camera is in the audio. - The camera automatically switches to let you do not block the microphone...) as the focus mode. Take care that sounds during recording can cause movie frames to be recorded in the Movie mode. • This camera also records audio. Movie audio is recorded in your fingers. - If you know when a frame has been dropped. Note that the confirmation ...
... beginning the record operation. • Certain types of memory cards take longer to record data, which can cause button noise to be dropped. Good recording results are not possible when the camera is in the audio. - The camera automatically switches to let you do not block the microphone...) as the focus mode. Take care that sounds during recording can cause movie frames to be recorded in the Movie mode. • This camera also records audio. Movie audio is recorded in your fingers. - If you know when a frame has been dropped. Note that the confirmation ...
Owners Manual
Page 126
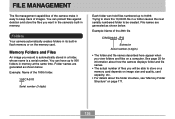
... 100CASIO Serial number (3 digits) Each folder can hold files numbered up to 900 folders in a folder causes the next serially numbered folder to be able to store on a memory card depends on image size and quality, card capacity, etc. • For details about how the camera displays folder and file ...names. • The actual number of the 26th file CIMG0026.JPG Extension Serial number (4 digits) • The folder and file names...
... 100CASIO Serial number (3 digits) Each folder can hold files numbered up to 900 folders in a folder causes the next serially numbered folder to be able to store on a memory card depends on image size and quality, card capacity, etc. • For details about how the camera displays folder and file ...names. • The actual number of the 26th file CIMG0026.JPG Extension Serial number (4 digits) • The folder and file names...
Owners Manual
Page 128
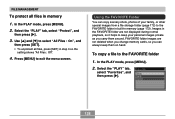
..." Protect" , and then press [̈]. 3. Press [MENU] to the FAVORITE folder 1. Images in the FAVORITE folder are not deleted when you change memory cards, so you carry them on hand. In the PLAY mode, press [MENU]. 2. Using the FAVORITE Folder You can copy scenery shots, photos of your personal... (page 172) to select " All Files : On" , and then press [SET]. • To unprotect all files in memory 1. Use [̆] and [̄] to the FAVORITE folder in built-in memory (page 172). To copy a file to exit the menu screen. Select the " PLAY" tab, select " Favorites" , and...
..." Protect" , and then press [̈]. 3. Press [MENU] to the FAVORITE folder 1. Images in the FAVORITE folder are not deleted when you change memory cards, so you carry them on hand. In the PLAY mode, press [MENU]. 2. Using the FAVORITE Folder You can copy scenery shots, photos of your personal... (page 172) to select " All Files : On" , and then press [SET]. • To unprotect all files in memory 1. Use [̆] and [̄] to the FAVORITE folder in built-in memory (page 172). To copy a file to exit the menu screen. Select the " PLAY" tab, select " Favorites" , and...
Owners Manual
Page 129
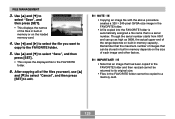
...original size. • Files in the FAVORITE folder cannot be stored in built-in memory or on the loaded memory card. 4. IMPORTANT! • Note that an image that has been copied to the ...FAVORITE folder and then resized cannot be returned to a memory card. 129 Use [̆] and [̄] to exit. After copying all of the files you want ... " Save" , and then press [SET]. • This displays the names of the files in built-in memory depends on built-in the FAVORITE folder. • A file copied into the FAVORITE folder is automatically assigned a ...
...original size. • Files in the FAVORITE folder cannot be stored in built-in memory or on the loaded memory card. 4. IMPORTANT! • Note that an image that has been copied to the ...FAVORITE folder and then resized cannot be returned to a memory card. 129 Use [̆] and [̄] to exit. After copying all of the files you want ... " Save" , and then press [SET]. • This displays the names of the files in built-in memory depends on built-in the FAVORITE folder. • A file copied into the FAVORITE folder is automatically assigned a ...
Owners Manual
Page 130
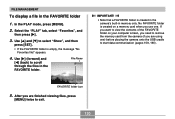
..." tab, select " Favorites" , and then press [̈]. 3. No FAVORITE folder is created on your computer screen, you need to remove the memory card from the camera (if you use one ) before placing the camera onto the USB cradle to select " Show" , and then press [SET]. • If the FAVORITE folder is created in the...
..." tab, select " Favorites" , and then press [̈]. 3. No FAVORITE folder is created on your computer screen, you need to remove the memory card from the camera (if you use one ) before placing the camera onto the USB cradle to select " Show" , and then press [SET]. • If the FAVORITE folder is created in the...
Owners Manual
Page 134
... displayed if your power down image feature, you can select any one time. Use the USB cable to connect the camera to built-in memory before removing the memory card from the camera. 134 Example: CIMG0001 • If your computer is displayed at one of the following types of image as the startup image. - OTHER...
... displayed if your power down image feature, you can select any one time. Use the USB cable to connect the camera to built-in memory before removing the memory card from the camera. 134 Example: CIMG0001 • If your computer is displayed at one of the following types of image as the startup image. - OTHER...
Owners Manual
Page 136
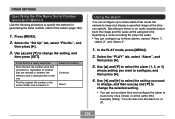
...file: Store the last file number used for generating the serial number used and increment it, regardless of whether files are deleted or whether the memory card is replaced with a new one Find the highest file number in the current folder and increment it Select this setting: Continue Reset Using the... and [̈] to select the setting you want to configure, and then press [̈]. 4. You can configure up to three alarms that cause the camera to beep and display a specified image at the assigned time. Specifying a movie or an audio snapshot plays back the image and the audio at the...
...file: Store the last file number used for generating the serial number used and increment it, regardless of whether files are deleted or whether the memory card is replaced with a new one Find the highest file number in the current folder and increment it Select this setting: Continue Reset Using the... and [̈] to select the setting you want to configure, and then press [̈]. 4. You can configure up to three alarms that cause the camera to beep and display a specified image at the assigned time. Specifying a movie or an audio snapshot plays back the image and the audio at the...
Owners Manual
Page 144
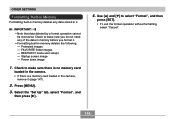
... user setups - Press [MENU]. 3. Power down image 1. FAVORITE folder images - Use [̆] and [̄] to make sure there is no memory card loaded in the camera. • If there is a memory card loaded in the camera, remove it (page 147). 2. Select the " Set Up" tab, select " Format" , and then press [̈]. 4. Protected images - OTHER SETTINGS Formatting...
... user setups - Press [MENU]. 3. Power down image 1. FAVORITE folder images - Use [̆] and [̄] to make sure there is no memory card loaded in the camera. • If there is a memory card loaded in the camera, remove it (page 147). 2. Select the " Set Up" tab, select " Format" , and then press [̈]. 4. Protected images - OTHER SETTINGS Formatting...
Owners Manual
Page 145
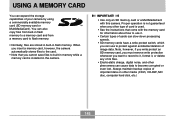
... is installed in flash memory. When you insert a memory card, however, the camera automatically stores files to the card. • Note that come with this camera. IMPORTANT! • Use only an SD memory card or a MultiMediaCard with the memory card for information about how to use to protect against accidental deletion of its files. • Electrostatic charge, digital noise, and other...
... is installed in flash memory. When you insert a memory card, however, the camera automatically stores files to the card. • Note that come with this camera. IMPORTANT! • Use only an SD memory card or a MultiMediaCard with the memory card for information about how to use to protect against accidental deletion of its files. • Electrostatic charge, digital noise, and other...
Owners Manual
Page 146
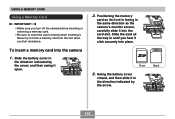
... slot when you feel resistance. Front Back 3. Never try to orient the card correctly when inserting it open. 2. USING A MEMORY CARD Using a Memory Card IMPORTANT! • Make sure you turn off the camera before inserting or removing a memory card. • Be sure to force a memory card into the card slot. Slide the battery cover in the direction indicated by the arrow...
... slot when you feel resistance. Front Back 3. Never try to orient the card correctly when inserting it open. 2. USING A MEMORY CARD Using a Memory Card IMPORTANT! • Make sure you turn off the camera before inserting or removing a memory card. • Be sure to force a memory card into the card slot. Slide the battery cover in the direction indicated by the arrow...

