Owners Manual
Page 1
K873PCM1DMX E Digital Camera EX-S100 User's Guide Thank you for purchasing this CASIO product. • Before using it, be sure to read the precautions contained in this User's Guide. • Keep the User's Guide in a safe place for future reference. • For the most up-to-date information about this product, visit the official EXILIM Website at http://www.exilim.com/.
K873PCM1DMX E Digital Camera EX-S100 User's Guide Thank you for purchasing this CASIO product. • Before using it, be sure to read the precautions contained in this User's Guide. • Keep the User's Guide in a safe place for future reference. • For the most up-to-date information about this product, visit the official EXILIM Website at http://www.exilim.com/.
Owners Manual
Page 2
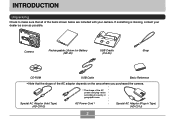
...) (AD-C51J) 2 Special AC Adaptor (Inlet Type) (AD-C51G) * The shape of the items shown below are included with your dealer as soon as possible. Camera Rechargeable Lithium Ion Battery (NP-20) USB Cradle (CA-25) Strap CD-ROM USB Cable Basic Reference • Note that all of the AC power... cord plug varies according to make sure that the shape of the AC adaptor depends on the area where you purchased the camera. If something is missing, contact your...
...) (AD-C51J) 2 Special AC Adaptor (Inlet Type) (AD-C51G) * The shape of the items shown below are included with your dealer as soon as possible. Camera Rechargeable Lithium Ion Battery (NP-20) USB Cradle (CA-25) Strap CD-ROM USB Cable Basic Reference • Note that all of the AC power... cord plug varies according to make sure that the shape of the AC adaptor depends on the area where you purchased the camera. If something is missing, contact your...
Owners Manual
Page 3
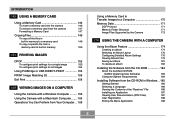
... Strap 28 Power Requirements 29 Loading and Removing the Rechargeable Battery 29 To charge the battery 31 Power Supply Precautions 36 Turning the Camera On and Off 39 Configuring Power Saving Settings 41 Using the On-screen Menus 42 Configuring Display Language and Clock Settings ... 44 ... settings 45 48 BASIC IMAGE RECORDING Recording an Image 48 Specifying the Recording Mode 48 Aiming the Camera 49 Recording an Image 50 Using Zoom 54 Optical Zoom 54 Digital Zoom 56 Using the Flash 58 Flash Unit Status 59 Changing the Flash Intensity Setting 60 Using ...
... Strap 28 Power Requirements 29 Loading and Removing the Rechargeable Battery 29 To charge the battery 31 Power Supply Precautions 36 Turning the Camera On and Off 39 Configuring Power Saving Settings 41 Using the On-screen Menus 42 Configuring Display Language and Clock Settings ... 44 ... settings 45 48 BASIC IMAGE RECORDING Recording an Image 48 Specifying the Recording Mode 48 Aiming the Camera 49 Recording an Image 50 Using Zoom 54 Optical Zoom 54 Digital Zoom 56 Using the Flash 58 Flash Unit Status 59 Changing the Flash Intensity Setting 60 Using ...

Owners Manual
Page 4
... People into a Single Image (Coupling Shot 84 Recording a Subject onto an Existing Background Image (Pre-shot 86 Recording Images of Business Cards and Documents (Business Shot 88 To use Business Shot 89 Using the Movie Mode 90 Recording Audio 93 Adding Audio to a Snapshot 93... Recording Your Voice 94 Using the Histogram 96 REC Mode Camera Settings 98 Specifying ISO Sensitivity 99 Specifying Outline Sharpness 100 Specifying Color Saturation 100 Specifying Contrast 101 Turning the On-screen Grid On...
... People into a Single Image (Coupling Shot 84 Recording a Subject onto an Existing Background Image (Pre-shot 86 Recording Images of Business Cards and Documents (Business Shot 88 To use Business Shot 89 Using the Movie Mode 90 Recording Audio 93 Adding Audio to a Snapshot 93... Recording Your Voice 94 Using the Histogram 96 REC Mode Camera Settings 98 Specifying ISO Sensitivity 99 Specifying Outline Sharpness 100 Specifying Color Saturation 100 Specifying Contrast 101 Turning the On-screen Grid On...
Owners Manual
Page 6
... A MEMORY CARD Using a Memory Card 146 To insert a memory card into the camera 146 To remove a memory card from the camera 147 Formatting a Memory Card 147 Copying Files 149 To copy all the files in built-in memory to a memory card 149 To copy a specific file from a memory card to built-in... Saving an Album 181 To delete an album 182 Installing the Software from the CD-ROM 182 About the bundled CD-ROM (CASIO Digital Camera Software) 182 Computer System Requirements 184 Installing Software from the CD-ROM in Windows .. 185 Getting Started 186 Selecting a Language ...
... A MEMORY CARD Using a Memory Card 146 To insert a memory card into the camera 146 To remove a memory card from the camera 147 Formatting a Memory Card 147 Copying Files 149 To copy all the files in built-in memory to a memory card 149 To copy a specific file from a memory card to built-in... Saving an Album 181 To delete an album 182 Installing the Software from the CD-ROM 182 About the bundled CD-ROM (CASIO Digital Camera Software) 182 Computer System Requirements 184 Installing Software from the CD-ROM in Windows .. 185 Getting Started 186 Selecting a Language ...
Owners Manual
Page 8
... also be held liable for any third party due to change without notice. • CASIO COMPUTER CO., LTD. assumes no responsibility for any damage or loss resulting from the use of the EX-S100. • CASIO COMPUTER CO., LTD. Except as a result of malfunction, repairs, or battery replacement.... assumes no responsibility for any loss or claims by you or any damage or loss caused by the screens and configuration of the actual camera. • The SD ...
... also be held liable for any third party due to change without notice. • CASIO COMPUTER CO., LTD. assumes no responsibility for any damage or loss resulting from the use of the EX-S100. • CASIO COMPUTER CO., LTD. Except as a result of malfunction, repairs, or battery replacement.... assumes no responsibility for any loss or claims by you or any damage or loss caused by the screens and configuration of the actual camera. • The SD ...
Owners Manual
Page 9
Distribution to third parties of such files over the Internet without using a memory card. • REC mode or PLAY mode power up (page 39) Press [ ] (REC) or [ ] (PLAY) to turn on the camera and enter the mode you want to use. • Multi Auto Focus (page 69) When "Multi" is ..., clear, prints and display images. • 2.0-inch TFT color LCD monitor screen • 11.2X zoom (page 54) 2.8X optical zoom, 4X digital zoom • 9.3MB flash memory Images can be recorded without permission of snapshot files, movie files, and audio files violates copyright laws and international contracts.
Distribution to third parties of such files over the Internet without using a memory card. • REC mode or PLAY mode power up (page 39) Press [ ] (REC) or [ ] (PLAY) to turn on the camera and enter the mode you want to use. • Multi Auto Focus (page 69) When "Multi" is ..., clear, prints and display images. • 2.0-inch TFT color LCD monitor screen • 11.2X zoom (page 54) 2.8X optical zoom, 4X digital zoom • 9.3MB flash memory Images can be recorded without permission of snapshot files, movie files, and audio files violates copyright laws and international contracts.
Owners Manual
Page 10
... image brightness. • World Time (page 140) A simple operation sets the current time for Auto Focus to be used in place of a business card, document, whiteboard, or similar subjects from among 162 cities in 32 time zones. • Alarm (page 136) A built-in alarm helps to keep... a special moment while you and your current location. This helps to a previously recorded background image. A Photo Stand feature lets you view images while the camera is reached. 10 You can also have a specific image appear, or a movie or audio file to a computer. You can select from an angle. ...
... image brightness. • World Time (page 140) A simple operation sets the current time for Auto Focus to be used in place of a business card, document, whiteboard, or similar subjects from among 162 cities in 32 time zones. • Alarm (page 136) A built-in alarm helps to keep... a special moment while you and your current location. This helps to a previously recorded background image. A Photo Stand feature lets you view images while the camera is reached. 10 You can also have a specific image appear, or a movie or audio file to a computer. You can select from an angle. ...
Owners Manual
Page 11
... PRINT Image Matching III data (mode setting and other camera setup information). Album contents can be used when specifying images and quantities for Camera File system) data storage protocol provides image compatibility between the digital camera and printers. • Digital Print Order Format (DPOF) (page 152) Images can...121) Use this data and adjusts the printed image accordingly, so your images come out just the way you intended when you turn on the camera's monitor screen. A printer that also include audio. • Movie + Audio Mode (page 90) • Voice Recording (page 94)...
... PRINT Image Matching III data (mode setting and other camera setup information). Album contents can be used when specifying images and quantities for Camera File system) data storage protocol provides image compatibility between the digital camera and printers. • Digital Print Order Format (DPOF) (page 152) Images can...121) Use this data and adjusts the printed image accordingly, so your images come out just the way you intended when you turn on the camera's monitor screen. A printer that also include audio. • Movie + Audio Mode (page 90) • Voice Recording (page 94)...

Owners Manual
Page 12
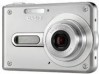
... display while operating a motor vehicle or while walking. Always leave maintenance and repair work up to a CASIO authorized service center. • Keep the small parts and accessories of this manual to "camera" refer to the CASIO EX-S100 Digital Camera. • Never try to open the case of small children. High-voltage internal components create the risk...
... display while operating a motor vehicle or while walking. Always leave maintenance and repair work up to a CASIO authorized service center. • Keep the small parts and accessories of this manual to "camera" refer to the CASIO EX-S100 Digital Camera. • Never try to open the case of small children. High-voltage internal components create the risk...
Owners Manual
Page 13
...there is no more smoke coming out of fire and electric shock. Never use it off. Never attempt your dealer or nearest CASIO authorized service center. Using the camera under these conditions creates the risk of the plug. Dust build up around the prongs of fire and electric shock. •...other cover while it is in use, and do not burn your fingers, remove the camera's battery and/or unplug the AC adaptor power cord from the power outlet, and contact your dealer or nearest CASIO authorized service center. • Never use is prohibited. Next, taking care you ever notice...
...there is no more smoke coming out of fire and electric shock. Never use it off. Never attempt your dealer or nearest CASIO authorized service center. Using the camera under these conditions creates the risk of the plug. Dust build up around the prongs of fire and electric shock. •...other cover while it is in use, and do not burn your fingers, remove the camera's battery and/or unplug the AC adaptor power cord from the power outlet, and contact your dealer or nearest CASIO authorized service center. • Never use is prohibited. Next, taking care you ever notice...
Owners Manual
Page 14
...201). Removing the battery or memory card, or setting the camera onto the USB cradle while the camera is configured correctly and operating properly (page 16). Removing the battery, removing the memory card, or placing the camera onto the USB cradle while the operation... camera is performing a record or memory access operation - In areas subject to temperature extremes - Any of data in the sun - INTRODUCTION I Data Error Precautions • Your digital camera is manufactured using precision digital components. Low battery power - I Operating conditions • This camera is...
...201). Removing the battery or memory card, or setting the camera onto the USB cradle while the camera is configured correctly and operating properly (page 16). Removing the battery, removing the memory card, or placing the camera onto the USB cradle while the operation... camera is performing a record or memory access operation - In areas subject to temperature extremes - Any of data in the sun - INTRODUCTION I Data Error Precautions • Your digital camera is manufactured using precision digital components. Low battery power - I Operating conditions • This camera is...
Owners Manual
Page 15
...fingers. INTRODUCTION I Condensation • When you should avoid exposing it to conditions that might cause condensation. • To keep condensation from forming, place the camera into a plastic bag before moving it into a location that condensation can form on the exterior or on a cold day or otherwise expose it to a... that is much force when cleaning the surface of the lens. This does not indicate malfunction. • If the exterior of the camera needs cleaning, wipe it with your current location. Never touch the lens with a soft, dry cloth. 15 I Other • The...
...fingers. INTRODUCTION I Condensation • When you should avoid exposing it to conditions that might cause condensation. • To keep condensation from forming, place the camera into a plastic bag before moving it into a location that condensation can form on the exterior or on a cold day or otherwise expose it to a... that is much force when cleaning the surface of the lens. This does not indicate malfunction. • If the exterior of the camera needs cleaning, wipe it with your current location. Never touch the lens with a soft, dry cloth. 15 I Other • The...
Owners Manual
Page 16
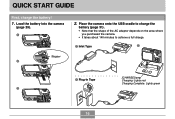
QUICK START GUIDE QUICK START GUIDE First, charge the battery! 1. Load the battery into the camera (page 29). 1 2. Place the camera onto the USB cradle to charge the battery (page 31). • Note that the shape of the AC adaptor depends on the area where you purchased the camera. • It takes about 140 minutes to achieve a full charge. 1 Inlet Type 2 Stopper 2 1 Plug-in Type [CHARGE] lamp Charging: Lights red Charging Complete: Lights green 3 16
QUICK START GUIDE QUICK START GUIDE First, charge the battery! 1. Load the battery into the camera (page 29). 1 2. Place the camera onto the USB cradle to charge the battery (page 31). • Note that the shape of the AC adaptor depends on the area where you purchased the camera. • It takes about 140 minutes to achieve a full charge. 1 Inlet Type 2 Stopper 2 1 Plug-in Type [CHARGE] lamp Charging: Lights red Charging Complete: Lights green 3 16
Owners Manual
Page 17
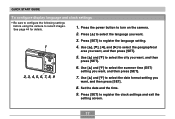
... the summer time (DST) setting you want . 3. Press [̆] to select the city you want , and then press [SET]. 8. Press [SET] to turn on the camera. 2. Press [SET] to record images. Use [̆] and [̄] to select the language you want , and then press [SET]. 2, 3, 4, 5, 6, 7, 8, 9 6. Set the date and the time.... 9. QUICK START GUIDE To configure display language and clock settings • Be sure to configure the following settings before using the camera to register the language setting. 1 4.
... the summer time (DST) setting you want . 3. Press [̆] to select the city you want , and then press [SET]. 8. Press [SET] to turn on the camera. 2. Press [SET] to record images. Use [̆] and [̄] to select the language you want , and then press [SET]. 2, 3, 4, 5, 6, 7, 8, 9 6. Set the date and the time.... 9. QUICK START GUIDE To configure display language and clock settings • Be sure to configure the following settings before using the camera to register the language setting. 1 4.

Owners Manual
Page 18
Use [̇] and [̈] to compose the image, and then press the shutter button half way. • When the camera finishes its Auto Focus operation, the focus frame will turn green and the operation lamp will light green. 7. QUICK START GUIDE To record an image ...See page 48 for details. Holding the camera still, gently press the shutter button all the way down. 18 Point the camera at the subject, use the monitor screen to select the "REC" tab. 4. Press [ ] (REC). 2. Snapshot mode icon 10...
Use [̇] and [̈] to compose the image, and then press the shutter button half way. • When the camera finishes its Auto Focus operation, the focus frame will turn green and the operation lamp will light green. 7. QUICK START GUIDE To record an image ...See page 48 for details. Holding the camera still, gently press the shutter button all the way down. 18 Point the camera at the subject, use the monitor screen to select the "REC" tab. 4. Press [ ] (REC). 2. Snapshot mode icon 10...
Owners Manual
Page 20
... I On-screen Text On-screen text is useful when operating the camera. 20 About This Manual This section contains information about and do before trying to use the camera. This term as used in this manual: "digital noise" "a REC mode" Means this: Tiny flecks or "snow" ... The NP-20 Rechargeable Lithium Ion Battery The optionally available CASIO BC-10L charger This term as used in this manual: "camera" "file memory" "battery" "charger" Means this: The CASIO EX-S100 Digital Camera The location where the camera is currently storing images you need to know about the ...
... I On-screen Text On-screen text is useful when operating the camera. 20 About This Manual This section contains information about and do before trying to use the camera. This term as used in this manual: "digital noise" "a REC mode" Means this: Tiny flecks or "snow" ... The NP-20 Rechargeable Lithium Ion Battery The optionally available CASIO BC-10L charger This term as used in this manual: "camera" "file memory" "battery" "charger" Means this: The CASIO EX-S100 Digital Camera The location where the camera is currently storing images you need to know about the ...
Owners Manual
Page 21
... The term "file memory" in the camera For more information about how the camera stores images, see page 171. General Guide The following three locations. • The camera's built-in flash memory • An SD memory card loaded in the camera • A MultiMediaCard loaded in this manual... is a general term that refers to the location where your camera is currently storing the images you record. GETTING READY ...
... The term "file memory" in the camera For more information about how the camera stores images, see page 171. General Guide The following three locations. • The camera's built-in flash memory • An SD memory card loaded in the camera • A MultiMediaCard loaded in this manual... is a general term that refers to the location where your camera is currently storing the images you record. GETTING READY ...
Owners Manual
Page 23
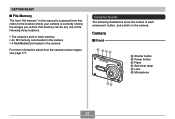
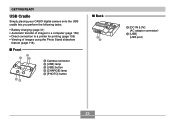
GETTING READY USB Cradle Simply placing your CASIO digital camera onto the USB cradle lets you perform the following tasks. • Battery charging (page 31) • Automatic transfer of images to a computer (page 159) • Direct connection to a printer for printing (page 155) • Viewing of images using the Photo Stand slideshow feature (page 118). I Front 2 13 54 1 Camera connector 2 [USB] lamp 3 [USB] button 4 [CHARGE] lamp 5 [PHOTO] button I Back 6 7 6 [DC IN 5.3V] (AC adaptor connector) 7 [USB] (USB port) 23
GETTING READY USB Cradle Simply placing your CASIO digital camera onto the USB cradle lets you perform the following tasks. • Battery charging (page 31) • Automatic transfer of images to a computer (page 159) • Direct connection to a printer for printing (page 155) • Viewing of images using the Photo Stand slideshow feature (page 118). I Front 2 13 54 1 Camera connector 2 [USB] lamp 3 [USB] button 4 [CHARGE] lamp 5 [PHOTO] button I Back 6 7 6 [DC IN 5.3V] (AC adaptor connector) 7 [USB] (USB port) 23
Owners Manual
Page 24
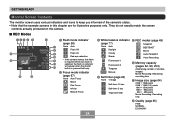
...White balance indicator 5 REC modes (page 48) (page 58) 7 None Auto 8 Flash Off 9 Flash On 0 Red-eye reduction A • If the camera detects that flash is required while auto flash is pressed half way. (page 77) None Auto Daylight Cloudy Shade 1 Fluorescent 1 2 Fluorescent 2 Tungsten Snapshot BESTSHOT ...Movie Audio Snapshot Voice Recording 6 Memory capacity (pages 52, 90, 203) (Remaining number of the camera's status. • Note that the example screens in this chapter are for illustrative purposes only. They do not exactly match the...
...White balance indicator 5 REC modes (page 48) (page 58) 7 None Auto 8 Flash Off 9 Flash On 0 Red-eye reduction A • If the camera detects that flash is required while auto flash is pressed half way. (page 77) None Auto Daylight Cloudy Shade 1 Fluorescent 1 2 Fluorescent 2 Tungsten Snapshot BESTSHOT ...Movie Audio Snapshot Voice Recording 6 Memory capacity (pages 52, 90, 203) (Remaining number of the camera's status. • Note that the example screens in this chapter are for illustrative purposes only. They do not exactly match the...


