
Owners Manual
Page 1
K831PCM1DMX E Digital Camera EX-P505 User's Guide Thank you for purchasing this CASIO product. • Before using it, be sure to read the precautions contained in this User's Guide. • Keep the User's Guide in a safe place for future reference. • For the most up-to-date information about this product, visit the official EXILIM Website at http://www.exilim.com/.
K831PCM1DMX E Digital Camera EX-P505 User's Guide Thank you for purchasing this CASIO product. • Before using it, be sure to read the precautions contained in this User's Guide. • Keep the User's Guide in a safe place for future reference. • For the most up-to-date information about this product, visit the official EXILIM Website at http://www.exilim.com/.
Owners Manual
Page 2
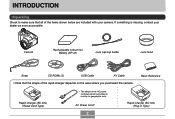
AC Power Cord * 2 Rapid Charger (BC-30L) (Plug-in Type) ON/OFF Camera Rechargeable Lithium Ion Battery (NP-40) Lens cap/cap holder Lens hood Strap CD-ROMs (2) USB Cable AV Cable • Note that all of the ... below are included with your dealer as soon as possible. INTRODUCTION INTRODUCTION Unpacking Check to country or geographic area. If something is missing, contact your camera. Basic Reference Rapid Charger (BC-30L) (Power Cord Type) * The shape of the AC power cord plug varies according to make sure that the shape...
AC Power Cord * 2 Rapid Charger (BC-30L) (Plug-in Type) ON/OFF Camera Rechargeable Lithium Ion Battery (NP-40) Lens cap/cap holder Lens hood Strap CD-ROMs (2) USB Cable AV Cable • Note that all of the ... below are included with your dealer as soon as possible. INTRODUCTION INTRODUCTION Unpacking Check to country or geographic area. If something is missing, contact your camera. Basic Reference Rapid Charger (BC-30L) (Power Cord Type) * The shape of the AC power cord plug varies according to make sure that the shape...
Owners Manual
Page 3
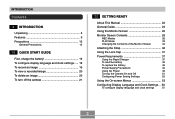
...display language and clock settings ..... 18 To record an image 19 To view a recorded image 20 To delete an image 20 To turn off the camera 21 22 GETTING READY About This Manual 22 General Guide 23 Using the Monitor Screen 26 Monitor Screen Contents 28 REC Modes 28 PLAY Mode... Using the Rapid Charger 37 To load the battery 42 To replace the battery 46 Power Supply Precautions 46 Using AC Power 49 Turning the Camera On and Off 51 Configuring Power Saving Settings 52 Using the On-screen Menus 53 Configuring Display Language and Clock Settings ... 56 To configure ...
...display language and clock settings ..... 18 To record an image 19 To view a recorded image 20 To delete an image 20 To turn off the camera 21 22 GETTING READY About This Manual 22 General Guide 23 Using the Monitor Screen 26 Monitor Screen Contents 28 REC Modes 28 PLAY Mode... Using the Rapid Charger 37 To load the battery 42 To replace the battery 46 Power Supply Precautions 46 Using AC Power 49 Turning the Camera On and Off 51 Configuring Power Saving Settings 52 Using the On-screen Menus 53 Configuring Display Language and Clock Settings ... 56 To configure ...
Owners Manual
Page 4
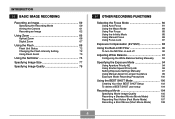
INTRODUCTION 59 BASIC IMAGE RECORDING Recording an Image 59 Specifying the Recording Mode 59 Aiming the Camera 61 Recording an Image 62 Using Zoom 66 Optical Zoom 66 Digital Zoom 67 Using the Flash 69 Flash Unit Status 72 Changing the Flash Intensity Setting 72 Using Flash Assist 73 Using the Self-timer...
INTRODUCTION 59 BASIC IMAGE RECORDING Recording an Image 59 Specifying the Recording Mode 59 Aiming the Camera 61 Recording an Image 62 Using Zoom 66 Optical Zoom 66 Digital Zoom 67 Using the Flash 69 Flash Unit Status 72 Changing the Flash Intensity Setting 72 Using Flash Assist 73 Using the Self-timer...
Owners Manual
Page 5
... Your Own MOVIE BEST SHOT Setup 112 Recording Audio 114 Adding Audio to a Snapshot 114 Using the Histogram 116 REC Mode Camera Settings 118 Specifying ISO Sensitivity 119 Selecting the Metering Mode 120 Using the Filter Function 121 Specifying Outline Sharpness 121 Specifying Color ...Help 124 Assigning Functions to the [̇] and [̈] Keys 125 Specifying Power On Default Settings 125 Resetting the Camera 127 Using the Shortcut Menu (EX Menu 128 Installing the Lens Hood and a Lens Filter 129 130 PLAYBACK Basic Playback Operation 130 Playing an Audio Snapshot...
... Your Own MOVIE BEST SHOT Setup 112 Recording Audio 114 Adding Audio to a Snapshot 114 Using the Histogram 116 REC Mode Camera Settings 118 Specifying ISO Sensitivity 119 Selecting the Metering Mode 120 Using the Filter Function 121 Specifying Outline Sharpness 121 Specifying Color ...Help 124 Assigning Functions to the [̇] and [̈] Keys 125 Specifying Power On Default Settings 125 Resetting the Camera 127 Using the Shortcut Menu (EX Menu 128 Installing the Lens Hood and a Lens Filter 129 130 PLAYBACK Basic Playback Operation 130 Playing an Audio Snapshot...
Owners Manual
Page 6
... Changing the USB Port Protocol 164 Formatting Built-in Memory 165 166 USING A MEMORY CARD Using a Memory Card 167 To insert a memory card into the camera 167 To replace the memory card 168 Formatting a Memory Card 169 Copying Files 170 To copy all the files in built-in memory to a memory... for all images 176 Using PictBridge 177 Date Printing 181 PRINT Image Matching III 182 Exif Print 182 183 VIEWING IMAGES ON A COMPUTER Using the Camera with a Windows Computer ........ 183 Using the...
... Changing the USB Port Protocol 164 Formatting Built-in Memory 165 166 USING A MEMORY CARD Using a Memory Card 167 To insert a memory card into the camera 167 To replace the memory card 168 Formatting a Memory Card 169 Copying Files 170 To copy all the files in built-in memory to a memory... for all images 176 Using PictBridge 177 Date Printing 181 PRINT Image Matching III 182 Exif Print 182 183 VIEWING IMAGES ON A COMPUTER Using the Camera with a Windows Computer ........ 183 Using the...
Owners Manual
Page 7
... Movie 209 Editing a Movie 212 Viewing User Documentation (PDF Files) 213 User Registration 214 Exiting the Menu Application 214 Using the Camera with a Macintosh Computer ....... 215 About the bundled CD-ROM 215 Computer System Requirements 216 Managing Images on a Macintosh 217 Viewing ...User Documentation (PDF Files) 218 To register as a camera user 218 219 APPENDIX Menu Reference 219 Indicator Lamp Reference 221 Troubleshooting Guide 224 If you have problems installing the USB driver...
... Movie 209 Editing a Movie 212 Viewing User Documentation (PDF Files) 213 User Registration 214 Exiting the Menu Application 214 Using the Camera with a Macintosh Computer ....... 215 About the bundled CD-ROM 215 Computer System Requirements 216 Managing Images on a Macintosh 217 Viewing ...User Documentation (PDF Files) 218 To register as a camera user 218 219 APPENDIX Menu Reference 219 Indicator Lamp Reference 221 Troubleshooting Guide 224 If you have problems installing the USB driver...
Owners Manual
Page 8
...any third party due to the use of the EX-P505. • CASIO COMPUTER CO., LTD. Except as a result of malfunction, repairs, or battery replacement. assumes no responsibility for any damage or loss resulting from the use of this manual. • CASIO COMPUTER CO., LTD. assumes no responsibility for any... damages or losses suffered by you or any loss or claims by the screens and configuration of the actual camera. • The SD logo is a registered trademark. •...
...any third party due to the use of the EX-P505. • CASIO COMPUTER CO., LTD. Except as a result of malfunction, repairs, or battery replacement. assumes no responsibility for any damage or loss resulting from the use of this manual. • CASIO COMPUTER CO., LTD. assumes no responsibility for any... damages or losses suffered by you or any loss or claims by the screens and configuration of the actual camera. • The SD logo is a registered trademark. •...
Owners Manual
Page 9
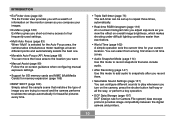
...for crisp, clear, prints and display images. • 2.0-inch TFT color LCD swivel monitor screen • 40X zoom (page 66) 5X optical zoom, 8X digital zoom • High-resolution movie recording with audio (page 104) VGA size, 30 fps, MPEG-4 AVI format • A choice of the copyright holder, ...(movie is a preset length that starts before the shutter button was pressed and ends after it is pressed), and a MOVIE BEST SHOT mode (instant camera setup based on MOVIE BEST SHOT sample scenes). • MOTION PRINT (page 141) Capture frames from a movie and create still images that less than...
...for crisp, clear, prints and display images. • 2.0-inch TFT color LCD swivel monitor screen • 40X zoom (page 66) 5X optical zoom, 8X digital zoom • High-resolution movie recording with audio (page 104) VGA size, 30 fps, MPEG-4 AVI format • A choice of the copyright holder, ...(movie is a preset length that starts before the shutter button was pressed and ends after it is pressed), and a MOVIE BEST SHOT mode (instant camera setup based on MOVIE BEST SHOT sample scenes). • MOTION PRINT (page 141) Capture frames from a movie and create still images that less than...
Owners Manual
Page 10
... (page 162) A simple operation sets the current time for Camera File system) data storage protocol provides image compatibility between the digital camera and printers. 10 INTRODUCTION • Ex Finder view (page 32) The Ex Finder view provides you with a wealth of image you are trying... to record and the camera performs troublesome setups automatically for beautiful pictures every ...
... (page 162) A simple operation sets the current time for Camera File system) data storage protocol provides image compatibility between the digital camera and printers. 10 INTRODUCTION • Ex Finder view (page 32) The Ex Finder view provides you with a wealth of image you are trying... to record and the camera performs troublesome setups automatically for beautiful pictures every ...
Owners Manual
Page 11
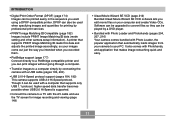
...by professional print services. • PRINT Image Matching III Compatible (page 182) Images include PRINT Image Matching III data (mode setting and other camera setup information). Software can be upgraded to convert files so they can print images without going through a computer. • Transfer images to ...and adjusts the printed image accordingly, so your PC. INTRODUCTION • Digital Print Order Format (DPOF) (page 174) Images can be used when specifying images and quantities for printing by connecting the camera with the AV cable and use the TV screen for image recording and...
...by professional print services. • PRINT Image Matching III Compatible (page 182) Images include PRINT Image Matching III data (mode setting and other camera setup information). Software can be upgraded to convert files so they can print images without going through a computer. • Transfer images to ...and adjusts the printed image accordingly, so your PC. INTRODUCTION • Digital Print Order Format (DPOF) (page 174) Images can be used when specifying images and quantities for printing by connecting the camera with the AV cable and use the TV screen for image recording and...
Owners Manual
Page 12
... etc. • Should foreign matter or water ever get wet. When using the EX-P505. Using the camera under these conditions creates the risk of the camera or attempt your dealer or nearest CASIO authorized service center. Doing so creates the risk of serious accident. • Never try... to your own maintenance. 12 Always leave maintenance and repair work up to a CASIO authorized service center. • Keep the small parts and accessories of this manual to "camera" refer to the CASIO EX-P505 Digital Camera. • Never try to open the case of fire and electric shock. Doing...
... etc. • Should foreign matter or water ever get wet. When using the EX-P505. Using the camera under these conditions creates the risk of the camera or attempt your dealer or nearest CASIO authorized service center. Doing so creates the risk of serious accident. • Never try... to your own maintenance. 12 Always leave maintenance and repair work up to a CASIO authorized service center. • Keep the small parts and accessories of this manual to "camera" refer to the CASIO EX-P505 Digital Camera. • Never try to open the case of fire and electric shock. Doing...
Owners Manual
Page 13
... AC adaptor power cord from the power outlet and clean the area around the prongs can create the risk of fire. • If the camera's case should ever become cracked due to dropping it or otherwise subjecting it to power any other AC adaptor besides the one that comes with...computer memory. • Never open the battery cover, disconnect the AC adaptor from the camera, or unplug the AC adaptor from the power outlet, and contact your dealer or nearest CASIO authorized service center. • Never use the camera inside of data by transferring them to be deleted. Doing so creates the risk...
... AC adaptor power cord from the power outlet and clean the area around the prongs can create the risk of fire. • If the camera's case should ever become cracked due to dropping it or otherwise subjecting it to power any other AC adaptor besides the one that comes with...computer memory. • Never open the battery cover, disconnect the AC adaptor from the camera, or unplug the AC adaptor from the power outlet, and contact your dealer or nearest CASIO authorized service center. • Never use the camera inside of data by transferring them to be deleted. Doing so creates the risk...
Owners Manual
Page 14
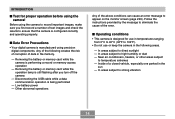
... results to appear on the monitor screen (page 229). I Data Error Precautions • Your digital camera is designed for proper operation before using the camera! In areas subject to direct sunlight - Before using precision digital components. I Operating conditions • This camera is manufactured using the camera to record important images, make sure you turn off the...
... results to appear on the monitor screen (page 229). I Data Error Precautions • Your digital camera is designed for proper operation before using the camera! In areas subject to direct sunlight - Before using precision digital components. I Operating conditions • This camera is manufactured using the camera to record important images, make sure you turn off the...
Owners Manual
Page 15
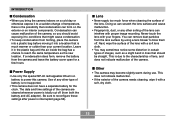
... condensation. • To keep condensation from the lens surface by using a lens blower to reconfigure these settings after power is not supported. • This camera does not have a separate battery for a few hours. Use of any other type of the lens can form on the exterior or on a cold day... or otherwise expose it to power this camera. I Lens • Never apply too much warmer or colder than your fingers. Doing so can scratch the lens surface and cause malfunction. • Fingerprints,...
... condensation. • To keep condensation from the lens surface by using a lens blower to reconfigure these settings after power is not supported. • This camera does not have a separate battery for a few hours. Use of any other type of the lens can form on the exterior or on a cold day... or otherwise expose it to power this camera. I Lens • Never apply too much warmer or colder than your fingers. Doing so can scratch the lens surface and cause malfunction. • Fingerprints,...
Owners Manual
Page 16
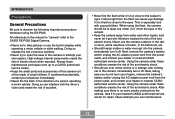
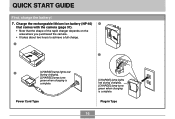
Charge the rechargeable lithium ion battery (NP-40) 1 that comes with the camera (page 37). • Note that the shape of the rapid charger depends on the area where you purchased the camera. • It takes about two hours to achieve a full charge. 1 2 2 [CHARGE] lamp lights red during charging. [CHARGE] lamp turns green when charging is complete. Plug-in Type 16 Power Cord Type [CHARGE] lamp lights red during charging. [CHARGE] lamp turns green when charging is complete. QUICK START GUIDE QUICK START GUIDE First, charge the battery! 1.
Charge the rechargeable lithium ion battery (NP-40) 1 that comes with the camera (page 37). • Note that the shape of the rapid charger depends on the area where you purchased the camera. • It takes about two hours to achieve a full charge. 1 2 2 [CHARGE] lamp lights red during charging. [CHARGE] lamp turns green when charging is complete. Plug-in Type 16 Power Cord Type [CHARGE] lamp lights red during charging. [CHARGE] lamp turns green when charging is complete. QUICK START GUIDE QUICK START GUIDE First, charge the battery! 1.
Owners Manual
Page 17
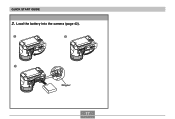
QUICK START GUIDE 2. Load the battery into the camera (page 42). 1 3 2 Stopper 17
QUICK START GUIDE 2. Load the battery into the camera (page 42). 1 3 2 Stopper 17

Owners Manual
Page 18
.... 9. QUICK START GUIDE To configure display language and clock settings • Be sure to configure the following settings before using the camera to turn on the camera. • You can also turn on the camera by pressing the power button. 2. Use and [̈] to select the language you want, and then press [SET]. 5.
.... 9. QUICK START GUIDE To configure display language and clock settings • Be sure to configure the following settings before using the camera to turn on the camera. • You can also turn on the camera by pressing the power button. 2. Use and [̈] to select the language you want, and then press [SET]. 5.
Owners Manual
Page 19
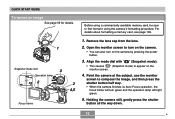
...also turn green and the operation lamp will turn on the monitor screen. 4. Open the monitor screen to appear on the camera by pressing the power button. 3. Holding the camera still, gently press the shutter button all the way down. 19 B QUICK START GUIDE To record an image See page...4,5 Focus frame Before using a commercially available memory card, be sure to compose the image, and then press the shutter button half way. • When the camera finishes its Auto Focus operation, the focus frame will light green. 5. For details about formatting a memory card, see page 169. 1.
...also turn green and the operation lamp will turn on the monitor screen. 4. Open the monitor screen to appear on the camera by pressing the power button. 3. Holding the camera still, gently press the shutter button all the way down. 19 B QUICK START GUIDE To record an image See page...4,5 Focus frame Before using a commercially available memory card, be sure to compose the image, and then press the shutter button half way. • When the camera finishes its Auto Focus operation, the focus frame will light green. 5. For details about formatting a memory card, see page 169. 1.

Owners Manual
Page 20
...;] and [̄] to delete. 5. Open the monitor screen to turn on the camera. • You can also turn on the camera by pressing the power button. 2. Open the monitor screen to turn on the camera. • You can also turn on the camera by pressing the power button. 2. Use [̇] and [̈] to delete...
...;] and [̄] to delete. 5. Open the monitor screen to turn on the camera. • You can also turn on the camera by pressing the power button. 2. Open the monitor screen to turn on the camera. • You can also turn on the camera by pressing the power button. 2. Use [̇] and [̈] to delete...


