Owners Manual
Page 3
... QUICK START GUIDE First, charge the battery 16 To configure display language and clock settings ..... 18 To record an image 19 To view a recorded image 20 To delete an image 20 To turn off the camera 21 22 GETTING READY About This Manual 22 General Guide 23 Using the Monitor Screen 26 Monitor Screen Contents 28 REC Modes 28 PLAY Mode 33 Changing the Contents of the Monitor Screen 34 Attaching the Strap 36 Using the Lens Cap 37 Power...
... QUICK START GUIDE First, charge the battery 16 To configure display language and clock settings ..... 18 To record an image 19 To view a recorded image 20 To delete an image 20 To turn off the camera 21 22 GETTING READY About This Manual 22 General Guide 23 Using the Monitor Screen 26 Monitor Screen Contents 28 REC Modes 28 PLAY Mode 33 Changing the Contents of the Monitor Screen 34 Attaching the Strap 36 Using the Lens Cap 37 Power...
Owners Manual
Page 4
... Digital Zoom 67 Using the Flash 69 Flash Unit Status 72 Changing the Flash Intensity Setting 72 Using Flash Assist 73 Using the Self-timer 75 Specifying Image Size 77 Specifying Image Quality 79 80 OTHER RECORDING FUNCTIONS Selecting the Focus Mode 80 Using Auto Focus 81 Using the Macro Mode 84 Using Pan Focus 85 Using the Infinity Mode 85 Using Manual Focus 86 Using Focus Lock 87 Exposure Compensation (EV Shift 88 Using the Built-in ND Filter 90 To turn the ND filter on and off 90 Adjusting White Balance...
... Digital Zoom 67 Using the Flash 69 Flash Unit Status 72 Changing the Flash Intensity Setting 72 Using Flash Assist 73 Using the Self-timer 75 Specifying Image Size 77 Specifying Image Quality 79 80 OTHER RECORDING FUNCTIONS Selecting the Focus Mode 80 Using Auto Focus 81 Using the Macro Mode 84 Using Pan Focus 85 Using the Infinity Mode 85 Using Manual Focus 86 Using Focus Lock 87 Exposure Compensation (EV Shift 88 Using the Built-in ND Filter 90 To turn the ND filter on and off 90 Adjusting White Balance...
Owners Manual
Page 6
... time and date 161 Changing the Date Format 161 Using World Time 162 To display the World Time screen 162 To configure World Time settings 162 Changing the Display Language 163 Changing the USB Port Protocol 164 Formatting Built-in Memory 165 166 USING A MEMORY CARD Using a Memory Card 167 To insert a memory card into the camera 167 To replace the memory card 168 Formatting a Memory Card 169 Copying Files 170 To copy all the files in built-in memory to a memory card 171 To copy a specific file from a memory card to built-in memory 171 173 PRINTING IMAGES...
... time and date 161 Changing the Date Format 161 Using World Time 162 To display the World Time screen 162 To configure World Time settings 162 Changing the Display Language 163 Changing the USB Port Protocol 164 Formatting Built-in Memory 165 166 USING A MEMORY CARD Using a Memory Card 167 To insert a memory card into the camera 167 To replace the memory card 168 Formatting a Memory Card 169 Copying Files 170 To copy all the files in built-in memory to a memory card 171 To copy a specific file from a memory card to built-in memory 171 173 PRINTING IMAGES...
Owners Manual
Page 7
... Playing a Movie 209 Editing a Movie 212 Viewing User Documentation (PDF Files) 213 User Registration 214 Exiting the Menu Application 214 Using the Camera with a Macintosh Computer ....... 215 About the bundled CD-ROM 215 Computer System Requirements 216 Managing Images on a Macintosh 217 Viewing User Documentation (PDF Files) 218 To register as a camera user 218 219 APPENDIX Menu Reference 219 Indicator Lamp Reference 221 Troubleshooting Guide 224 If you have problems installing the USB driver... 228 Display Messages 229 Specifications...
... Playing a Movie 209 Editing a Movie 212 Viewing User Documentation (PDF Files) 213 User Registration 214 Exiting the Menu Application 214 Using the Camera with a Macintosh Computer ....... 215 About the bundled CD-ROM 215 Computer System Requirements 216 Managing Images on a Macintosh 217 Viewing User Documentation (PDF Files) 218 To register as a camera user 218 219 APPENDIX Menu Reference 219 Indicator Lamp Reference 221 Troubleshooting Guide 224 If you have problems installing the USB driver... 228 Display Messages 229 Specifications...
Owners Manual
Page 8
... important data on other related rights to these applications revert to protect against its loss. • Note that the example screens and product illustrations shown in the United States and/or other countries. • Ulead is a trademark of Ulead Systems, Inc. • Other company, product and service names used herein may arise through the use of the EX-P505...
... important data on other related rights to these applications revert to protect against its loss. • Note that the example screens and product illustrations shown in the United States and/or other countries. • Ulead is a trademark of Ulead Systems, Inc. • Other company, product and service names used herein may arise through the use of the EX-P505...
Owners Manual
Page 10
... image brightness, which makes shooting under difficult lighting conditions easier than ever before. • World Time (page 162) A simple operation sets the current time for Camera File system) data storage protocol provides image compatibility between the digital camera and printers. 10 You can select from among 162 cities in 32 time zones. • Audio Snapshot Mode (page 114) Use this mode to play whenever you view the effect on the camera, press the shutter button...
... image brightness, which makes shooting under difficult lighting conditions easier than ever before. • World Time (page 162) A simple operation sets the current time for Camera File system) data storage protocol provides image compatibility between the digital camera and printers. 10 You can select from among 162 cities in 32 time zones. • Audio Snapshot Mode (page 114) Use this mode to play whenever you view the effect on the camera, press the shutter button...
Owners Manual
Page 12
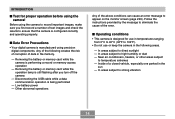
... . Always leave maintenance and repair work up to a CASIO authorized service center. • Keep the small parts and accessories of fire and electric shock. Next, remove the camera's battery and/or unplug the AC adaptor power cord from the flash can interfere with young children. Using the camera under these conditions creates the risk of this manual to "camera" refer to the CASIO EX-P505 Digital Camera. • Never try...
... . Always leave maintenance and repair work up to a CASIO authorized service center. • Keep the small parts and accessories of fire and electric shock. Next, remove the camera's battery and/or unplug the AC adaptor power cord from the flash can interfere with young children. Using the camera under these conditions creates the risk of this manual to "camera" refer to the CASIO EX-P505 Digital Camera. • Never try...
Owners Manual
Page 14
... record important images, make sure you turn off the camera - Removing the battery or memory card while the camera is being performed - Disconnecting the USB cable while a data communication operation is performing a record or memory access operation - Any of the following creates the risk of corruption of data in the following areas. - Removing the battery or memory card while the operation lamp is still flashing after you first record a number of the above conditions can cause an error message...
... record important images, make sure you turn off the camera - Removing the battery or memory card while the camera is being performed - Disconnecting the USB cable while a data communication operation is performing a record or memory access operation - Any of the following creates the risk of corruption of data in the following areas. - Removing the battery or memory card while the operation lamp is still flashing after you first record a number of the above conditions can cause an error message...
Owners Manual
Page 52
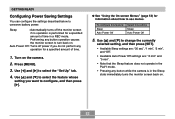
... battery power. Auto Power Off : Turns off the monitor screen if no operation is in the Sleep state immediately turns the monitor screen back on. 52 Press [MENU]. 3. GETTING READY Configuring Power Saving Settings You can configure the settings described below to use menus. Sleep : Automatically turns off power if you want to select the feature whose setting you do not perform any operation for a specified amount of time. 1. Turn on . Use...
... battery power. Auto Power Off : Turns off the monitor screen if no operation is in the Sleep state immediately turns the monitor screen back on. 52 Press [MENU]. 3. GETTING READY Configuring Power Saving Settings You can configure the settings described below to use menus. Sleep : Automatically turns off power if you want to select the feature whose setting you do not perform any operation for a specified amount of time. 1. Turn on . Use...
Owners Manual
Page 59
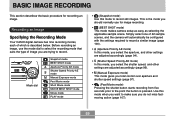
... mode makes camera setup as easy as selecting the applicable sample scene. This is described below. Use this mode when you want to record still images. Recording an Image Specifying the Recording Mode Your CASIO digital camera has nine recording modes, each of which is the mode you select the shutter speed, and other settings are trying to the point the button is pressed. Mode dial Snapshot mode BEST SHOT mode Aperture Priority AE mode Shutter Speed Priority AE mode Manual Exposure mode Past Movie mode Short Movie mode MOVIE...
... mode makes camera setup as easy as selecting the applicable sample scene. This is described below. Use this mode when you want to record still images. Recording an Image Specifying the Recording Mode Your CASIO digital camera has nine recording modes, each of which is the mode you select the shutter speed, and other settings are trying to the point the button is pressed. Mode dial Snapshot mode BEST SHOT mode Aperture Priority AE mode Shutter Speed Priority AE mode Manual Exposure mode Past Movie mode Short Movie mode MOVIE...
Owners Manual
Page 101
... want to record images at lower shutter speeds. They are provided as a BEST SHOT user setup. • Digital noise reduction processing is performed automatically when you select another BEST SHOT scene or turn off the camera. Record the image. OTHER RECORDING FUNCTIONS Scene Number 22 Scene Name Twilight Register User Scene (page 102) 1. Align the mode dial with " ", and then press [SET]. • This enters the BEST SHOT mode and displays a sample...
... want to record images at lower shutter speeds. They are provided as a BEST SHOT user setup. • Digital noise reduction processing is performed automatically when you select another BEST SHOT scene or turn off the camera. Record the image. OTHER RECORDING FUNCTIONS Scene Number 22 Scene Name Twilight Register User Scene (page 102) 1. Align the mode dial with " ", and then press [SET]. • This enters the BEST SHOT mode and displays a sample...
Owners Manual
Page 125
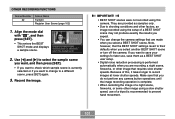
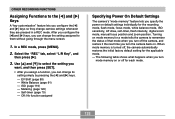
...you specify the power on or off , the camera automatically restores the initial factory default setting for the recording mode, flash mode, focus mode, white balance mode, ISO sensitivity, AF Area, self-timer, flash intensity, digital zoom mode, manual focus position and zoom position. Off: No function assigned Specifying Power On Default Settings The camera's "mode memory" feature lets you turn off the camera, and restore it the next time you can change the setting assigned to them without going through the menu screen. 1. OTHER RECORDING FUNCTIONS Assigning Functions to the...
...you specify the power on or off , the camera automatically restores the initial factory default setting for the recording mode, flash mode, focus mode, white balance mode, ISO sensitivity, AF Area, self-timer, flash intensity, digital zoom mode, manual focus position and zoom position. Off: No function assigned Specifying Power On Default Settings The camera's "mode memory" feature lets you turn off the camera, and restore it the next time you can change the setting assigned to them without going through the menu screen. 1. OTHER RECORDING FUNCTIONS Assigning Functions to the...
Owners Manual
Page 183
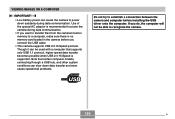
... following are using the USB cable to establish a USB connection between the camera and computer. 4. Install the USB driver onto your computer's hard disk or other information about each operation in file memory and copy images to your computer. • You need to install the USB driver located on whether you are the general steps for viewing and copying files from a computer running under Windows. In order to establish a USB connection with the camera onto your...
... following are using the USB cable to establish a USB connection between the camera and computer. 4. Install the USB driver onto your computer's hard disk or other information about each operation in file memory and copy images to your computer. • You need to install the USB driver located on whether you are the general steps for viewing and copying files from a computer running under Windows. In order to establish a USB connection with the camera onto your...
Owners Manual
Page 184
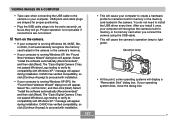
... speed data transfer becomes possible when USB 2.0 Hi-Speed is supported. If you connect the USB cable. • This camera supports USB 2.0 Hi-Speed protocol. Use of the special AC adaptor is no memory card loaded in the camera before installing the USB driver onto the computer. Though it can be used with a computer that certain computer models, connecting through a USB hub, and other system conditions can cause the camera to power down data transfer and even cause operational problems...
... speed data transfer becomes possible when USB 2.0 Hi-Speed is supported. If you connect the USB cable. • This camera supports USB 2.0 Hi-Speed protocol. Use of the special AC adaptor is no memory card loaded in the camera before installing the USB driver onto the computer. Though it can be used with a computer that certain computer models, connecting through a USB hub, and other system conditions can cause the camera to power down data transfer and even cause operational problems...
Owners Manual
Page 187
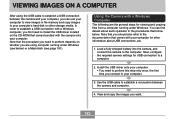
... operating systems will display a "Removable Disk" dialog box. CASIO has verified compatibility, so click [Continue Anyway] to proceed with Windows XP." USB ports and cable plugs are not correct. 10. The "Casio Digital Camera C has not passed Windows Logo testing to verify its compatibility with installation. 187 • This will cause your computer. Select "Install the software automatically (Recommended)", and then click [Next]. VIEWING IMAGES ON A COMPUTER • Take care when connecting...
... operating systems will display a "Removable Disk" dialog box. CASIO has verified compatibility, so click [Continue Anyway] to proceed with Windows XP." USB ports and cable plugs are not correct. 10. The "Casio Digital Camera C has not passed Windows Logo testing to verify its compatibility with installation. 187 • This will cause your computer. Select "Install the software automatically (Recommended)", and then click [Next]. VIEWING IMAGES ON A COMPUTER • Take care when connecting...

Owners Manual
Page 200
... 9.0 or higher installed, install DirectX 9.0c (page 204). Install the applications you need to a computer Software Name USB driver Type C Photo Loader 2.3 * DirectX 9.0c Snapshot retouching, reorientation, printing Photohands 1.0 CD-ROM Software Supported Windows Versions XP/2000/Me/98SE/98 Required Operation Install the USB driver (page 183). About the bundled CD-ROM The CD-ROM that comes bundled with a computer. USING THE CAMERA WITH A COMPUTER USING THE CAMERA WITH...
... 9.0 or higher installed, install DirectX 9.0c (page 204). Install the applications you need to a computer Software Name USB driver Type C Photo Loader 2.3 * DirectX 9.0c Snapshot retouching, reorientation, printing Photohands 1.0 CD-ROM Software Supported Windows Versions XP/2000/Me/98SE/98 Required Operation Install the USB driver (page 183). About the bundled CD-ROM The CD-ROM that comes bundled with a computer. USING THE CAMERA WITH A COMPUTER USING THE CAMERA WITH...
Owners Manual
Page 220
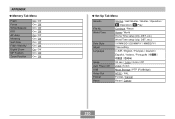
APPENDIX G Memory Tab Menu Flash Focus White Balance ISO AF Area Metering Self-timer Flash Intensity Digital Zoom MF Position Zoom Position On / Off On / Off On / Off On / Off On / Off On / Off On / Off On / Off On / Off On / Off On / Off G Set Up Tab Menu Sounds File No. World Time Date Style Adjust Language Sleep Auto Power Off USB Video Out Format Reset Startup / Half Shutter / Shutter / Operation / Operation / Play Continue / Reset Home / World Home Time setup (city, DST, etc.) World Time setup (city, DST, etc...
APPENDIX G Memory Tab Menu Flash Focus White Balance ISO AF Area Metering Self-timer Flash Intensity Digital Zoom MF Position Zoom Position On / Off On / Off On / Off On / Off On / Off On / Off On / Off On / Off On / Off On / Off On / Off G Set Up Tab Menu Sounds File No. World Time Date Style Adjust Language Sleep Auto Power Off USB Video Out Format Reset Startup / Half Shutter / Shutter / Operation / Operation / Play Continue / Reset Home / World Home Time setup (city, DST, etc.) World Time setup (city, DST, etc...
Owners Manual
Page 223
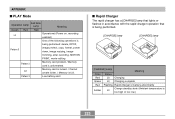
... I Rapid Charger The rapid charger has a [CHARGE] lamp that lights or flashes in accordance with the rapid charger operation that is being performed: delete, DPOF, Pattern 3 image protect, copy, format, power down, image resizing, image trimming, after recording, MOTION PRINT, movie editing Pattern 2 Memory card problem / Memory card is unformatted. Memory card is locked. / Cannot Lit create folder. / Memory is Lit too high or too low.) 223 Pattern 3 Low battery alert I PLAY Mode Self-timer Operation Lamp Lamp Meaning Green Red Red Operational (Power on, recording Lit enabled...
... I Rapid Charger The rapid charger has a [CHARGE] lamp that lights or flashes in accordance with the rapid charger operation that is being performed: delete, DPOF, Pattern 3 image protect, copy, format, power down, image resizing, image trimming, after recording, MOTION PRINT, movie editing Pattern 2 Memory card problem / Memory card is unformatted. Memory card is locked. / Cannot Lit create folder. / Memory is Lit too high or too low.) 223 Pattern 3 Low battery alert I PLAY Mode Self-timer Operation Lamp Lamp Meaning Green Red Red Operational (Power on, recording Lit enabled...
Owners Manual
Page 227
... monitor screen during recording. This camera cannot display non-DCF images recorded onto a memory card using another device. All buttons and switches are not displayed. Circuit problem caused by electrostatic charge, impact, etc. while the camera was connected to another digital camera. After confirming that the computer is in the camera. Remove the battery from another camera is loaded in progress. Cannot transfer files over a 1) USB cable is turned off . Monitor screen is shining directly into the lens. USB connection. 2) USB driver is not installed. 3) Camera...
... monitor screen during recording. This camera cannot display non-DCF images recorded onto a memory card using another device. All buttons and switches are not displayed. Circuit problem caused by electrostatic charge, impact, etc. while the camera was connected to another digital camera. After confirming that the computer is in the camera. Remove the battery from another camera is loaded in progress. Cannot transfer files over a 1) USB cable is turned off . Monitor screen is shining directly into the lens. USB connection. 2) USB driver is not installed. 3) Camera...
Owners Manual
Page 229
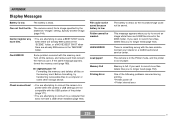
...; Printer power off the camera, and remove and then reinsert the memory card. LENS ERROR Load paper! IMPORTANT! Specify another image (page 144). Check connections! • You are attempting to connect the camera to record an image while there are already 999 scenes in the 999th folder. APPENDIX Display Messages Battery is low. If the same message appears, format the memory card (page 169). Before formatting, try to a printer while the camera's USB settings are not compatible with the memory card...
...; Printer power off the camera, and remove and then reinsert the memory card. LENS ERROR Load paper! IMPORTANT! Specify another image (page 144). Check connections! • You are attempting to connect the camera to record an image while there are already 999 scenes in the 999th folder. APPENDIX Display Messages Battery is low. If the same message appears, format the memory card (page 169). Before formatting, try to a printer while the camera's USB settings are not compatible with the memory card...


