Owners Manual
Page 2
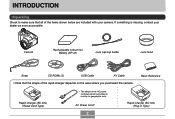
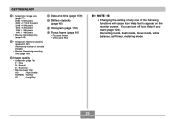
... Check to country or geographic area. ON/OFF Camera Rechargeable Lithium Ion Battery (NP-40) Lens cap/cap holder Lens hood Strap CD-ROMs (2) USB Cable AV Cable • Note that all of the rapid charger depends on the area where you purchased the camera. AC Power Cord * 2 Rapid Charger (BC-30L) (Plug... make sure that the shape of the items shown below are included with your dealer as soon as possible. If something is missing, contact your camera.
... Check to country or geographic area. ON/OFF Camera Rechargeable Lithium Ion Battery (NP-40) Lens cap/cap holder Lens hood Strap CD-ROMs (2) USB Cable AV Cable • Note that all of the rapid charger depends on the area where you purchased the camera. AC Power Cord * 2 Rapid Charger (BC-30L) (Plug... make sure that the shape of the items shown below are included with your dealer as soon as possible. If something is missing, contact your camera.
Owners Manual
Page 3
...General Precautions 12 16 QUICK START GUIDE First, charge the battery 16 To configure display language and clock settings ..... 18 To record an image 19 To view a recorded image 20 To delete an image 20 To turn off the camera 21 22 GETTING READY About This Manual 22 General Guide ...36 Using the Lens Cap 37 Power Requirements 37 Using the Rapid Charger 37 To load the battery 42 To replace the battery 46 Power Supply Precautions 46 Using AC Power 49 Turning the Camera On and Off 51 Configuring Power Saving Settings 52 Using the On-screen Menus 53 Configuring ...
...General Precautions 12 16 QUICK START GUIDE First, charge the battery 16 To configure display language and clock settings ..... 18 To record an image 19 To view a recorded image 20 To delete an image 20 To turn off the camera 21 22 GETTING READY About This Manual 22 General Guide ...36 Using the Lens Cap 37 Power Requirements 37 Using the Rapid Charger 37 To load the battery 42 To replace the battery 46 Power Supply Precautions 46 Using AC Power 49 Turning the Camera On and Off 51 Configuring Power Saving Settings 52 Using the On-screen Menus 53 Configuring ...
Owners Manual
Page 8
...may arise through the use of Photo Loader and/or Photohands. • CASIO COMPUTER CO., LTD. assumes no responsibility for any damages or losses suffered by the screens and configuration of the actual camera. • The SD logo is a registered trademark. • Windows,...Loader and Photohands are subject to the use of the EX-P505. • CASIO COMPUTER CO., LTD. Except as a result of malfunction, repairs, or battery replacement. assumes no responsibility for any third party due to change without notice. • CASIO COMPUTER CO., LTD. INTRODUCTION IMPORTANT! • The ...
...may arise through the use of Photo Loader and/or Photohands. • CASIO COMPUTER CO., LTD. assumes no responsibility for any damages or losses suffered by the screens and configuration of the actual camera. • The SD logo is a registered trademark. • Windows,...Loader and Photohands are subject to the use of the EX-P505. • CASIO COMPUTER CO., LTD. Except as a result of malfunction, repairs, or battery replacement. assumes no responsibility for any third party due to change without notice. • CASIO COMPUTER CO., LTD. INTRODUCTION IMPORTANT! • The ...
Owners Manual
Page 12
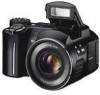
... get wet. Intense light from the power outlet, and contact your fingers, remove the camera's battery and/or unplug the AC adaptor power cord from the eyes of small children. Using the camera under these conditions creates the risk of fire and electric shock. • Should you ...is fired too close to the eyes. Always leave maintenance and repair work up to a CASIO authorized service center. • Keep the small parts and accessories of this manual to "camera" refer to the CASIO EX-P505 Digital Camera. • Never try to open the case of accident. • Never fire the ...
... get wet. Intense light from the power outlet, and contact your fingers, remove the camera's battery and/or unplug the AC adaptor power cord from the eyes of small children. Using the camera under these conditions creates the risk of fire and electric shock. • Should you ...is fired too close to the eyes. Always leave maintenance and repair work up to a CASIO authorized service center. • Keep the small parts and accessories of this manual to "camera" refer to the CASIO EX-P505 Digital Camera. • Never try to open the case of accident. • Never fire the ...
Owners Manual
Page 13
Next, remove the camera's battery and/or unplug the AC adaptor power cord from the power outlet, and contact your dealer or nearest CASIO authorized service center. • Never use the camera inside of an aircraft or in any other device besides this camera. Always keep backup copies of the plug. Doing so ... also corrupt other image data already stored in its memory to personal computer memory. • Never open the battery cover, disconnect the AC adaptor from the camera, or unplug the AC adaptor from the power outlet and clean the area around the prongs can create the risk of the ...
Next, remove the camera's battery and/or unplug the AC adaptor power cord from the power outlet, and contact your dealer or nearest CASIO authorized service center. • Never use the camera inside of an aircraft or in any other device besides this camera. Always keep backup copies of the plug. Doing so ... also corrupt other image data already stored in its memory to personal computer memory. • Never open the battery cover, disconnect the AC adaptor from the camera, or unplug the AC adaptor from the power outlet and clean the area around the prongs can create the risk of the ...
Owners Manual
Page 14
... memory. - In areas subject to temperature extremes - Any of the following areas. - In areas subject to direct sunlight - Removing the battery or memory card while the camera is manufactured using precision digital components. Disconnecting the USB cable while a data communication operation is configured correctly and operating properly. In areas subject to strong vibration...
... memory. - In areas subject to temperature extremes - Any of the following areas. - In areas subject to direct sunlight - Removing the battery or memory card while the camera is manufactured using precision digital components. Disconnecting the USB cable while a data communication operation is configured correctly and operating properly. In areas subject to strong vibration...
Owners Manual
Page 15
... the exterior of the lens can remove dust particles from the lens surface by using a lens blower to blow them off (from the camera and leave the battery cover open for the clock. The date and time settings of images, such as the new location. Doing so can scratch the lens...form on the exterior or on a cold day or otherwise expose it to a sudden change of temperature, there is not supported. • This camera does not have a separate battery for a few hours. You can interfere with a soft lens cloth. • You may become slightly warm during use. Use of any other type...
... the exterior of the lens can remove dust particles from the lens surface by using a lens blower to blow them off (from the camera and leave the battery cover open for the clock. The date and time settings of images, such as the new location. Doing so can scratch the lens...form on the exterior or on a cold day or otherwise expose it to a sudden change of temperature, there is not supported. • This camera does not have a separate battery for a few hours. You can interfere with a soft lens cloth. • You may become slightly warm during use. Use of any other type...
Owners Manual
Page 16
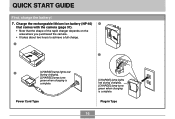
Plug-in Type 16 QUICK START GUIDE QUICK START GUIDE First, charge the battery! 1. Power Cord Type [CHARGE] lamp lights red during charging. [CHARGE] lamp turns green when charging is complete. Charge the rechargeable lithium ion battery (NP-40) 1 that comes with the camera (page 37). • Note that the shape of the rapid charger depends on the area where you purchased the camera. • It takes about two hours to achieve a full charge. 1 2 2 [CHARGE] lamp lights red during charging. [CHARGE] lamp turns green when charging is complete.
Plug-in Type 16 QUICK START GUIDE QUICK START GUIDE First, charge the battery! 1. Power Cord Type [CHARGE] lamp lights red during charging. [CHARGE] lamp turns green when charging is complete. Charge the rechargeable lithium ion battery (NP-40) 1 that comes with the camera (page 37). • Note that the shape of the rapid charger depends on the area where you purchased the camera. • It takes about two hours to achieve a full charge. 1 2 2 [CHARGE] lamp lights red during charging. [CHARGE] lamp turns green when charging is complete.
Owners Manual
Page 17
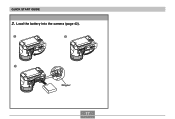
Load the battery into the camera (page 42). 1 3 2 Stopper 17 QUICK START GUIDE 2.
Load the battery into the camera (page 42). 1 3 2 Stopper 17 QUICK START GUIDE 2.
Owners Manual
Page 22
... contains information about things you record (page 62) The NP-40 Rechargeable Lithium Ion Battery The CASIO BC-30L Rapid Charger This term as used in this manual: "camera" "file memory" "battery" "rapid charger" Means this: The CASIO EX-P505 Digital Camera The location where the camera is always enclosed by the button name inside of brackets ([ ]). About This Manual...
... contains information about things you record (page 62) The NP-40 Rechargeable Lithium Ion Battery The CASIO BC-30L Rapid Charger This term as used in this manual: "camera" "file memory" "battery" "rapid charger" Means this: The CASIO EX-P505 Digital Camera The location where the camera is always enclosed by the button name inside of brackets ([ ]). About This Manual...
Owners Manual
Page 25
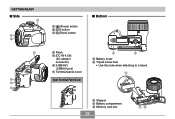
GETTING READY I Side H F G I J K L ON/OFF F [ ](Focus) button G [EX] button H [ ](Flash) button I Bottom I Flash J [DC IN 4.5V] (AC adaptor connector) K [USB/AV] (USB/AV port) L Terminal panel cover Open Terminal Panel Cover M N M Battery cover N Tripod screw hole • Use this hole when attaching to a tripod. O O Stopper P Battery compartment Q Memory card slot 25 PQ
GETTING READY I Side H F G I J K L ON/OFF F [ ](Focus) button G [EX] button H [ ](Flash) button I Bottom I Flash J [DC IN 4.5V] (AC adaptor connector) K [USB/AV] (USB/AV port) L Terminal panel cover Open Terminal Panel Cover M N M Battery cover N Tripod screw hole • Use this hole when attaching to a tripod. O O Stopper P Battery compartment Q Memory card slot 25 PQ
Owners Manual
Page 29
... quality • Snapshots (page 79) F : Fine N : Normal E : Economy • Movies (page 105) HQ : High Quality NORMAL : Normal LP : Long Play 0 Date and time (page 159) A Battery capacity (page 45) B Histogram (page 116) C Focus frame (page 81) • Focused: Green • Unfocused: Red NOTE • Changing the setting of any one of...
... quality • Snapshots (page 79) F : Fine N : Normal E : Economy • Movies (page 105) HQ : High Quality NORMAL : Normal LP : Long Play 0 Date and time (page 159) A Battery capacity (page 45) B Histogram (page 116) C Focus frame (page 81) • Focused: Green • Unfocused: Red NOTE • Changing the setting of any one of...
Owners Manual
Page 34
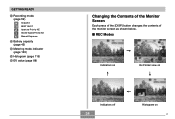
I REC Modes Indicators on Ex Finder view on Indicators off 34 Histogram on C GETTING READY B Recording mode (page 59) Snapshot BEST SHOT Aperture Priority AE Shutter Speed Priority AE Manual Exposure C Battery capacity (page 45) D Metering mode indicator (page 120) E Histogram (page 116) F EV value (page 88) Changing the Contents of the Monitor Screen Each press of the [DISP] button changes the contents of the monitor screen as shown below.
I REC Modes Indicators on Ex Finder view on Indicators off 34 Histogram on C GETTING READY B Recording mode (page 59) Snapshot BEST SHOT Aperture Priority AE Shutter Speed Priority AE Manual Exposure C Battery capacity (page 45) D Metering mode indicator (page 120) E Histogram (page 116) F EV value (page 88) Changing the Contents of the Monitor Screen Each press of the [DISP] button changes the contents of the monitor screen as shown below.
Owners Manual
Page 37
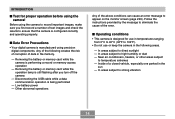
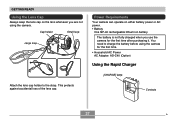
...GETTING READY Using the Lens Cap Always keep the lens cap on either battery power or AC power. • Battery One NP-40 rechargeable lithium ion battery The battery is not fully charged when you are not using the camera for the first time after purchasing it. Cap holder Small loop Large... loop Attach the lens cap holder to charge the battery before using the camera. Power Requirements Your camera can operate on the lens whenever you use the camera for the first time. • Household AC Power AC Adaptor: AD-C40 (Option) Using ...
...GETTING READY Using the Lens Cap Always keep the lens cap on either battery power or AC power. • Battery One NP-40 rechargeable lithium ion battery The battery is not fully charged when you are not using the camera for the first time after purchasing it. Cap holder Small loop Large... loop Attach the lens cap holder to charge the battery before using the camera. Power Requirements Your camera can operate on the lens whenever you use the camera for the first time. • Household AC Power AC Adaptor: AD-C40 (Option) Using ...
Owners Manual
Page 38
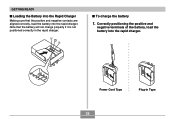
GETTING READY I To charge the battery 1. Note that the positive and negative contacts are aligned correctly, load the battery into the rapid charger. T + I Loading the Battery into the Rapid Charger Making sure that the battery will not charge properly if it is not positioned correctly in Type 38 Power Cord Type Plug-in the rapid charger. - Correctly positioning the positive and negative terminals of the battery, load the battery into the rapid charger.
GETTING READY I To charge the battery 1. Note that the positive and negative contacts are aligned correctly, load the battery into the rapid charger. T + I Loading the Battery into the Rapid Charger Making sure that the battery will not charge properly if it is not positioned correctly in Type 38 Power Cord Type Plug-in the rapid charger. - Correctly positioning the positive and negative terminals of the battery, load the battery into the rapid charger.

Owners Manual
Page 40
... varies according to 240V AC. The [CHARGE] lamp turns green when charging is complete, unplug the rapid charger from the power outlet, and remove the battery from it is up to you to purchase any required adaptors. 40 Note, however, that the shape of the rapid charger power plug is designed...
... varies according to 240V AC. The [CHARGE] lamp turns green when charging is complete, unplug the rapid charger from the power outlet, and remove the battery from it is up to you to purchase any required adaptors. 40 Note, however, that the shape of the rapid charger power plug is designed...
Owners Manual
Page 41
...the environment under which it is used with this happens, plug the charger into the camera. Give the battery time to cool before it needs replacement. • Charging the battery may cause interference with digital cameras. If you want to try to use with TV and radio reception. GETTING READY IMPORTANT...! • If the battery or rapid charger is very hot or cold when you start charging or...
...the environment under which it is used with this happens, plug the charger into the camera. Give the battery time to cool before it needs replacement. • Charging the battery may cause interference with digital cameras. If you want to try to use with TV and radio reception. GETTING READY IMPORTANT...! • If the battery or rapid charger is very hot or cold when you start charging or...
Owners Manual
Page 42
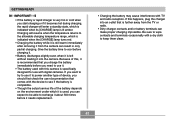
Stopper NP-40 (̆) marks • Push the bottom of the camera in place. 42 Slide the battery cover on the stopper in the direction indicated by the arrow, and then swing it open. 2. Aligning the (̆) marks on the camera and battery as shown in the illustration, press down on the bottom of the battery, and make sure that the stopper securely locks the battery in the direction indicated by the arrow and slide the battery into the camera. GETTING READY To load the battery 1.
Stopper NP-40 (̆) marks • Push the bottom of the camera in place. 42 Slide the battery cover on the stopper in the direction indicated by the arrow, and then swing it open. 2. Aligning the (̆) marks on the camera and battery as shown in the illustration, press down on the bottom of the battery, and make sure that the stopper securely locks the battery in the direction indicated by the arrow and slide the battery into the camera. GETTING READY To load the battery 1.
Owners Manual
Page 43
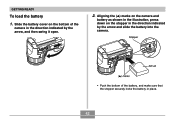
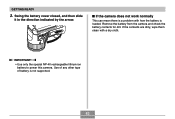
If the contacts are dirty, wipe them clean with how the battery is loaded. Remove the battery from the camera and check the battery contacts for dirt. Use of any other type of battery is a problem with a dry cloth. GETTING READY 3. IMPORTANT! • Use only the special NP-40 rechargeable lithium ion battery to power this camera. Swing the battery cover closed, and then slide it in the direction indicated by the arrow. I If the camera does not work normally This can mean there is not supported. 43
If the contacts are dirty, wipe them clean with how the battery is loaded. Remove the battery from the camera and check the battery contacts for dirt. Use of any other type of battery is a problem with a dry cloth. GETTING READY 3. IMPORTANT! • Use only the special NP-40 rechargeable lithium ion battery to power this camera. Swing the battery cover closed, and then slide it in the direction indicated by the arrow. I If the camera does not work normally This can mean there is not supported. 43
Owners Manual
Page 44
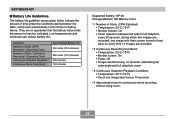
... • Temperature: 23°C (73°F) • Scroll one image with flash; Low temperatures and continued use reduce battery life. Operation Number of Shots (CIPA Standard)*1 (Operating Time) Number of Shots, Continuous Recording*2 (Operating Time) Continuous Snapshot Playback*3 Continuous... Monitor Screen: On • Zoom operation between full wide to battery failure. They do not guarantee that the battery will provide the amount of service indicated. GETTING READY I Battery Life Guidelines The battery life guideline values given below indicate the amount of time under the ...
... • Temperature: 23°C (73°F) • Scroll one image with flash; Low temperatures and continued use reduce battery life. Operation Number of Shots (CIPA Standard)*1 (Operating Time) Number of Shots, Continuous Recording*2 (Operating Time) Continuous Snapshot Playback*3 Continuous... Monitor Screen: On • Zoom operation between full wide to battery failure. They do not guarantee that the battery will provide the amount of service indicated. GETTING READY I Battery Life Guidelines The battery life guideline values given below indicate the amount of time under the ...


