Owners Manual
Page 4
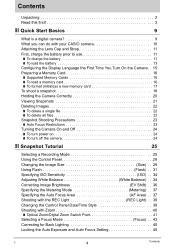
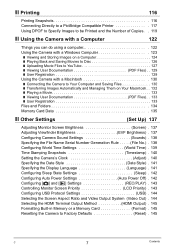
...; To turn off the camera 24 ❚❙ Snapshot Tutorial 25 Selecting a Recording Mode 25 Using the Control Panel 28 Changing the Image Size Size) . . 29 Using Flash Flash) . . 31 Specifying ISO Sensitivity ISO) . . 34 Adjusting White Balance White Balance) . . 34 Correcting Image Brightness EV Shift) . . 36 Specifying the Metering Mode Metering) . . 37 Specifying the Auto Focus Area AF Area) . . 37 Shooting with the REC Light REC Light) . . 39 Changing the Control Panel Date/Time Style 39 Shooting with Zoom 40 ❚ Optical Zoom/Digital Zoom Switch Point...
...; To turn off the camera 24 ❚❙ Snapshot Tutorial 25 Selecting a Recording Mode 25 Using the Control Panel 28 Changing the Image Size Size) . . 29 Using Flash Flash) . . 31 Specifying ISO Sensitivity ISO) . . 34 Adjusting White Balance White Balance) . . 34 Correcting Image Brightness EV Shift) . . 36 Specifying the Metering Mode Metering) . . 37 Specifying the Auto Focus Area AF Area) . . 37 Shooting with the REC Light REC Light) . . 39 Changing the Control Panel Date/Time Style 39 Shooting with Zoom 40 ❚ Optical Zoom/Digital Zoom Switch Point...
Owners Manual
Page 5
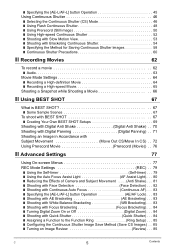
... Movie Prerecord (Movie)) . . 76 ❚❙ Advanced Settings 77 Using On-screen Menus 77 REC Mode Settings REC) . . 79 ❚ Using the Self-timer Self-timer) . . . 79 ❚ Using the Auto Focus Assist Light AF Assist Light) . . . 80 ❚ Reducing the Effects of Camera and Subject Movement . . . . (Anti Shake) . . . 81 ❚ Shooting with Face Detection Face Detection) . . . 82 ❚ Shooting with Continuous Auto Focus Continuous AF) . . . 83 ❚ Specifying the [AE-L/AF-L] button Operation AE/AF Lock) . . . 83 ❚ Shooting...
... Movie Prerecord (Movie)) . . 76 ❚❙ Advanced Settings 77 Using On-screen Menus 77 REC Mode Settings REC) . . 79 ❚ Using the Self-timer Self-timer) . . . 79 ❚ Using the Auto Focus Assist Light AF Assist Light) . . . 80 ❚ Reducing the Effects of Camera and Subject Movement . . . . (Anti Shake) . . . 81 ❚ Shooting with Face Detection Face Detection) . . . 82 ❚ Shooting with Continuous Auto Focus Continuous AF) . . . 83 ❚ Specifying the [AE-L/AF-L] button Operation AE/AF Lock) . . . 83 ❚ Shooting...
Owners Manual
Page 6
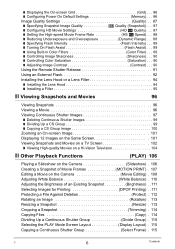
...; Controlling Color Saturation Saturation) . . . 90 ❚ Adjusting Image Contrast Contrast) . . . 90 Using the Remote Shutter Release 91 Using an External Flash 92 Installing the Lens Hood or a Lens Filter 94 ❚ Installing the Lens Hood 94 ❚ Installing a Filter 95 ❚❙ Viewing Snapshots and Movies 96 Viewing Snapshots 96 Viewing a Movie 96 Viewing Continuous Shutter Images 97 ❚ Deleting Continuous Shutter Images 99 ❚ Dividing Up a CS Group 99 ❚ Copying a CS Group Image 100 Zooming an On-screen Image 101 Displaying 12 Images...
...; Controlling Color Saturation Saturation) . . . 90 ❚ Adjusting Image Contrast Contrast) . . . 90 Using the Remote Shutter Release 91 Using an External Flash 92 Installing the Lens Hood or a Lens Filter 94 ❚ Installing the Lens Hood 94 ❚ Installing a Filter 95 ❚❙ Viewing Snapshots and Movies 96 Viewing Snapshots 96 Viewing a Movie 96 Viewing Continuous Shutter Images 97 ❚ Deleting Continuous Shutter Images 99 ❚ Dividing Up a CS Group 99 ❚ Copying a CS Group Image 100 Zooming an On-screen Image 101 Displaying 12 Images...
Owners Manual
Page 7
... . 132 ❚ Playing a Movie 133 ❚ Viewing User Documentation PDF Files) . . 133 ❚ User Registration 133 Files and Folders 134 Memory Card Data 135 ❚❙ Other Settings (Set Up) 137 Adjusting Monitor Screen Brightness Screen) . 137 Adjusting Viewfinder Brightness EVF Brightness) . 137 Configuring Camera Sound Settings Sounds) . 138 Specifying the File Name Serial Number Generation Rule . . . . . (File No.) . 138 Configuring World Time Settings World Time) . 139 Time Stamping Snapshots Timestamp) . 140 Setting the Camera's Clock Adjust) . 140 Specifying...
... . 132 ❚ Playing a Movie 133 ❚ Viewing User Documentation PDF Files) . . 133 ❚ User Registration 133 Files and Folders 134 Memory Card Data 135 ❚❙ Other Settings (Set Up) 137 Adjusting Monitor Screen Brightness Screen) . 137 Adjusting Viewfinder Brightness EVF Brightness) . 137 Configuring Camera Sound Settings Sounds) . 138 Specifying the File Name Serial Number Generation Rule . . . . . (File No.) . 138 Configuring World Time Settings World Time) . 139 Time Stamping Snapshots Timestamp) . 140 Setting the Camera's Clock Adjust) . 140 Specifying...
Owners Manual
Page 15
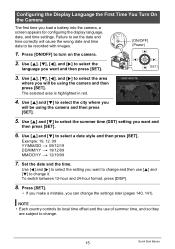
... Turn On the Camera The first time you will be using the camera and then press [SET]. Failure to select the summer time (DST) setting you can change . 15 Quick Start Basics Use [8], [2], [4], and [6] to select the area where you will cause the wrong date and time data to select the city where you load a battery into the camera, a screen appears for configuring the display language, date, and time settings. Use [8] and [2] to be recorded...
... Turn On the Camera The first time you will be using the camera and then press [SET]. Failure to select the summer time (DST) setting you can change . 15 Quick Start Basics Use [8], [2], [4], and [6] to select the area where you will cause the wrong date and time data to select the city where you load a battery into the camera, a screen appears for configuring the display language, date, and time settings. Use [8] and [2] to be recorded...
Owners Manual
Page 18
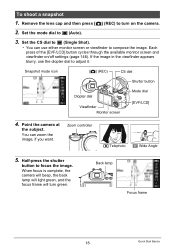
... lamp Focus frame 18 Quick Start Basics Snapshot mode icon [r] (REC) CS dial Shutter button Diopter dial Viewfinder Monitor screen Mode dial [EVF/LCD] 4. Half-press the shutter button to adjust it. To shoot a snapshot 1. You can use the diopter dial to focus the image. If the image in the viewfinder appears blurry, use either monitor screen or viewfinder to t (Auto). 3. When focus is complete, the camera will beep, the back lamp will light green...
... lamp Focus frame 18 Quick Start Basics Snapshot mode icon [r] (REC) CS dial Shutter button Diopter dial Viewfinder Monitor screen Mode dial [EVF/LCD] 4. Half-press the shutter button to adjust it. To shoot a snapshot 1. You can use the diopter dial to focus the image. If the image in the viewfinder appears blurry, use either monitor screen or viewfinder to t (Auto). 3. When focus is complete, the camera will beep, the back lamp will light green...

Owners Manual
Page 22
... appear. 22 Quick Start Basics Deleting Images If memory becomes full, you can delete images you perform the above procedure, all of the images in order to free up storage and record more images. • Remember that a file (image) delete operation cannot be deleted. This will cause the message "There are no longer need in the currently display CS group will be undone. • For information about images recorded using continuous shutter (CS), see...
... appear. 22 Quick Start Basics Deleting Images If memory becomes full, you can delete images you perform the above procedure, all of the images in order to free up storage and record more images. • Remember that a file (image) delete operation cannot be deleted. This will cause the message "There are no longer need in the currently display CS group will be undone. • For information about images recorded using continuous shutter (CS), see...
Owners Manual
Page 43
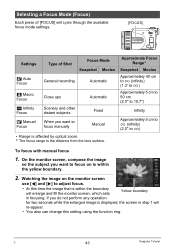
... adjust focus. • At this setting using the function ring. C 43 Snapshot Tutorial To focus with manual focus 1. Watching the image on is displayed, the screen in focusing. On the monitor screen, compose the image so the subject you do not perform any operation for two seconds while the enlarged image is within the boundary will cycle through the available focus mode settings. [FOCUS] Settings Q Auto Focus ´ Macro Focus ) Infinity Focus W Manual Focus Type of Shot Focus Mode Snapshot Movies General recording Automatic...
... adjust focus. • At this setting using the function ring. C 43 Snapshot Tutorial To focus with manual focus 1. Watching the image on is displayed, the screen in focusing. On the monitor screen, compose the image so the subject you do not perform any operation for two seconds while the enlarged image is within the boundary will cycle through the available focus mode settings. [FOCUS] Settings Q Auto Focus ´ Macro Focus ) Infinity Focus W Manual Focus Type of Shot Focus Mode Snapshot Movies General recording Automatic...

Owners Manual
Page 53
... Snapshot Tutorial Use [8] and [2] to t (Auto). 2. Set the CS dial to shoot. Hold down the shutter button to º (Slow Motion View). 3. Releasing the shutter button stops shooting. • When "AUTO-N" is selected, the camera will save the pre-recorded images. Fully pressing the shutter button will start to change the CS speed while image recording is selected for pre-recorded images. 1. Images continue to be shot as long as new ones are recorded, even if you can use the function...
... Snapshot Tutorial Use [8] and [2] to t (Auto). 2. Set the CS dial to shoot. Hold down the shutter button to º (Slow Motion View). 3. Releasing the shutter button stops shooting. • When "AUTO-N" is selected, the camera will save the pre-recorded images. Fully pressing the shutter button will start to change the CS speed while image recording is selected for pre-recorded images. 1. Images continue to be shot as long as new ones are recorded, even if you can use the function...
Owners Manual
Page 60
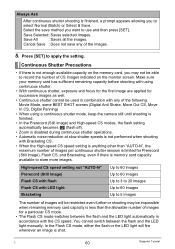
... shot. C 60 Snapshot Tutorial Continuous Shutter Precautions • If there is not enough available capacity on the monitor screen. Always Ask After continuous shutter shooting is finished, a prompt appears allowing you to store more images. Save All : Saves all the images. Save Selected: Saves selected images. High-speed CS speed setting not "AUTO-N" Prerecord (Still image) Flash CS with flash Flash CS with the CS speed. Make sure your memory card has sufficient remaining capacity before shooting with using a continuous shutter mode...
... shot. C 60 Snapshot Tutorial Continuous Shutter Precautions • If there is not enough available capacity on the monitor screen. Always Ask After continuous shutter shooting is finished, a prompt appears allowing you to store more images. Save All : Saves all the images. Save Selected: Saves selected images. High-speed CS speed setting not "AUTO-N" Prerecord (Still image) Flash CS with flash Flash CS with the CS speed. Make sure your memory card has sufficient remaining capacity before shooting with using a continuous shutter mode...
Owners Manual
Page 76
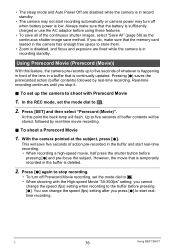
...-speed movie, half press the shutter button before pressing [0]. You can change the speed (fps) setting when recording to t. • When shooting with Prerecord Movie 1. Always make sure that the memory card loaded in the camera has enough free space to store them. • Zoom is disabled, and focus and exposure are disabled while the camera is in record standby. • The camera may not start recording automatically or camera power may turn off when battery power is continually updated. Using Prerecord Movie (Prerecord (Movie...
...-speed movie, half press the shutter button before pressing [0]. You can change the speed (fps) setting when recording to t. • When shooting with Prerecord Movie 1. Always make sure that the memory card loaded in the camera has enough free space to store them. • Zoom is disabled, and focus and exposure are disabled while the camera is in record standby. • The camera may not start recording automatically or camera power may turn off when battery power is continually updated. Using Prerecord Movie (Prerecord (Movie...
Owners Manual
Page 84
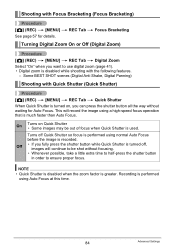
...use digital zoom (page 41). • Digital zoom is performed using a high-speed focus operation that is greater. Some BEST SHOT scenes (Digital Anti Shake, Digital Panning) Shooting with Quick Shutter (Quick Shutter) Procedure [r] (REC) * [MENU] * REC Tab * Quick Shutter When Quick Shutter is used. Off • If you want to ensure proper focus. Turns off Quick Shutter so focus is performed using normal Auto Focus before the image is turned off, images will record the image using Auto Focus at this time. 84 Advanced Settings Recording is disabled while shooting...
...use digital zoom (page 41). • Digital zoom is performed using a high-speed focus operation that is greater. Some BEST SHOT scenes (Digital Anti Shake, Digital Panning) Shooting with Quick Shutter (Quick Shutter) Procedure [r] (REC) * [MENU] * REC Tab * Quick Shutter When Quick Shutter is used. Off • If you want to ensure proper focus. Turns off Quick Shutter so focus is performed using normal Auto Focus before the image is turned off, images will record the image using Auto Focus at this time. 84 Advanced Settings Recording is disabled while shooting...
Owners Manual
Page 98
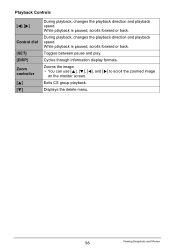
Zooms the image. • You can use [8], [2], [4], and [6] to scroll the zoomed image on the monitor screen. During playback, changes the playback direction and playback speed. Exits CS group playback. While playback is paused, scrolls forward or back. While playback is paused, scrolls forward or back. Cycles through information display formats. Displays the delete menu. 98 Viewing Snapshots and Movies Toggles between pause and play. Playback Controls [4] [6] Control dial [SET] [DISP] Zoom controller [8] [2] During playback, changes the playback direction and playback ...
Zooms the image. • You can use [8], [2], [4], and [6] to scroll the zoomed image on the monitor screen. During playback, changes the playback direction and playback speed. Exits CS group playback. While playback is paused, scrolls forward or back. While playback is paused, scrolls forward or back. Cycles through information display formats. Displays the delete menu. 98 Viewing Snapshots and Movies Toggles between pause and play. Playback Controls [4] [6] Control dial [SET] [DISP] Zoom controller [8] [2] During playback, changes the playback direction and playback ...
Owners Manual
Page 114
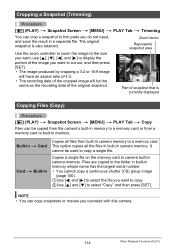
... can copy snapshots or movies you do not need, and save the result in a separate file. Files are copied to the folder in built-in camera memory. The original snapshot is currently displayed Copying Files (Copy) Procedure [p] (PLAY) * Snapshot Screen * [MENU] * PLAY Tab * Copy Files can be copied from the camera's built-in memory to a memory card or from built-in camera memory to camera built-in memory whose name has the largest serial number. • You cannot copy a continuous shutter (CS) group image...
... can copy snapshots or movies you do not need, and save the result in a separate file. Files are copied to the folder in built-in camera memory. The original snapshot is currently displayed Copying Files (Copy) Procedure [p] (PLAY) * Snapshot Screen * [MENU] * PLAY Tab * Copy Files can be copied from the camera's built-in memory to a memory card or from built-in camera memory to camera built-in memory whose name has the largest serial number. • You cannot copy a continuous shutter (CS) group image...

Owners Manual
Page 120
... recording date in the printout of copies. If you take a memory card to a professional print service, be sure to tell them that includes a date stamped with the camera's Timestamp function. Configuring camera settings Configuring computer settings Professional print service Configure DPOF settings (page 119). You can turn on and off each time you print. Doing so can use commercially available image management software to be printed and the number of an image. If you don't, the print service may print...
... recording date in the printout of copies. If you take a memory card to a professional print service, be sure to tell them that includes a date stamped with the camera's Timestamp function. Configuring camera settings Configuring computer settings Professional print service Configure DPOF settings (page 119). You can turn on and off each time you print. Doing so can use commercially available image management software to be printed and the number of an image. If you don't, the print service may print...

Owners Manual
Page 151
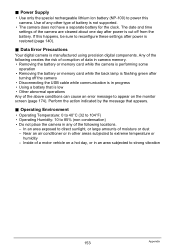
... in camera memory. . Memory Protection • Whenever replacing the battery, be deleted in the case of data in the documentation that comes with the camera. Attempting to charge the battery. Never carry or store the battery together with a CASIO Digital Camera only. Note that can cause the camera to large amounts of locations. Incorrectly replacing the battery can be sure to a computer or other storage device. Rechargeable Battery • Use...
... in camera memory. . Memory Protection • Whenever replacing the battery, be deleted in the case of data in the documentation that comes with the camera. Attempting to charge the battery. Never carry or store the battery together with a CASIO Digital Camera only. Note that can cause the camera to large amounts of locations. Incorrectly replacing the battery can be sure to a computer or other storage device. Rechargeable Battery • Use...
Owners Manual
Page 153
... data in camera memory. • Removing the battery or memory card while the camera is performing some operation • Removing the battery or memory card while the back lamp is flashing green after power is cut off the camera • Disconnecting the USB cable while communication is restored (page 140). . In an area exposed to extreme temperature or humidity - Perform the action indicated by the message that is manufactured using precision digital components. Use...
... data in camera memory. • Removing the battery or memory card while the camera is performing some operation • Removing the battery or memory card while the back lamp is flashing green after power is cut off the camera • Disconnecting the USB cable while communication is restored (page 140). . In an area exposed to extreme temperature or humidity - Perform the action indicated by the message that is manufactured using precision digital components. Use...
Owners Manual
Page 165
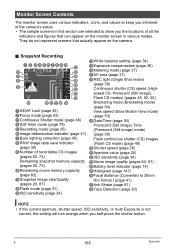
...) 3Continuous Shutter mode (page 46) btDate/Time (page 39) 4Self-timer mode (page 79) Prerecord (Still image) Time 5Recording mode (page 25) (Prerecord (Still image) mode) 6Image deterioration indicator (page 41) (page 50) 7Back lighting correction (page 45) Flash continuous shutter (CS) images 8RAW image data save indicator (Flash CS mode) (page 49) (page 30) 9Number of all the indicators and figures that actually appear on the monitor screen in various modes. Snapshot Recording boWhite balance setting (page...
...) 3Continuous Shutter mode (page 46) btDate/Time (page 39) 4Self-timer mode (page 79) Prerecord (Still image) Time 5Recording mode (page 25) (Prerecord (Still image) mode) 6Image deterioration indicator (page 41) (page 50) 7Back lighting correction (page 45) Flash continuous shutter (CS) images 8RAW image data save indicator (Flash CS mode) (page 49) (page 30) 9Number of all the indicators and figures that actually appear on the monitor screen in various modes. Snapshot Recording boWhite balance setting (page...
Owners Manual
Page 170
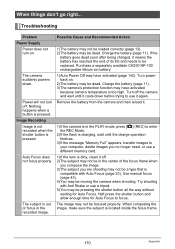
... needs to focus. Nothing happens when a button is pressed. Try shooting with Auto Focus (page 23). The image may be pressing the shutter button all the way without waiting for Auto Focus to be focused properly. Charge the battery (page 11). 3)The camera's protection function may have activated because camera temperature is compatible with Anti Shake or use a tripod. 5)You may not be replaced. Half-press the shutter button and allow enough time for Auto Focus. Image Recording Image...
... needs to focus. Nothing happens when a button is pressed. Try shooting with Auto Focus (page 23). The image may be pressing the shutter button all the way without waiting for Auto Focus to be focused properly. Charge the battery (page 11). 3)The camera's protection function may have activated because camera temperature is compatible with Anti Shake or use a tripod. 5)You may not be replaced. Half-press the shutter button and allow enough time for Auto Focus. Image Recording Image...
Owners Manual
Page 173
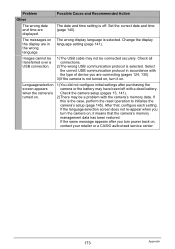
... transferred over a USB connection. 1)The USB cable may be connected securely. The date and time setting is selected. Check all connections. 2)The wrong USB communication protocol is off. Check the camera setup (pages 15, 141). 2)There may not be a problem with the camera's memory data. Set the correct date and time (page 140). If the language selection screen does not re-appear when you turn power back on the display are in accordance with a dead battery...
... transferred over a USB connection. 1)The USB cable may be connected securely. The date and time setting is selected. Check all connections. 2)The wrong USB communication protocol is off. Check the camera setup (pages 15, 141). 2)There may not be a problem with the camera's memory data. Set the correct date and time (page 140). If the language selection screen does not re-appear when you turn power back on the display are in accordance with a dead battery...


