
User Guide
Page 1
Be sure to read the Safety Precautions contained in this manual before you record anything on it . shall not be held liable for any loss or corruption of this printer. * CD-R, CD-RW, DVD-R, etc. Printing on a disc that already has data recorded on it can cause the data to use of data on discs arising through the use the printer for the first time, and always keep this manual on hand for future reference. E CW-75 User's Guide • We recommend that you print on a disc* before trying to become corrupted. • Note that CASIO COMPUTER CO., LTD.
Be sure to read the Safety Precautions contained in this manual before you record anything on it . shall not be held liable for any loss or corruption of this printer. * CD-R, CD-RW, DVD-R, etc. Printing on a disc that already has data recorded on it can cause the data to use of data on discs arising through the use the printer for the first time, and always keep this manual on hand for future reference. E CW-75 User's Guide • We recommend that you print on a disc* before trying to become corrupted. • Note that CASIO COMPUTER CO., LTD.
User Guide
Page 2
... for PC Windows® compatible PC to host computer and/or peripherals in accordance with Part 15 of Conformity Model Number: CW-75 Trade Name: CASIO COMPUTER CO., LTD. This equipment generates, uses and can be used in order to meet FCC emission limits. However, there is encouraged to try to provide reasonable protection against harmful interference in a particular installation. Operation is...
... for PC Windows® compatible PC to host computer and/or peripherals in accordance with Part 15 of Conformity Model Number: CW-75 Trade Name: CASIO COMPUTER CO., LTD. This equipment generates, uses and can be used in order to meet FCC emission limits. However, there is encouraged to try to provide reasonable protection against harmful interference in a particular installation. Operation is...
User Guide
Page 3
... of personal injury or material damage. Before using the label layout software that comes bundled with the printer, see the User's Guide on the DISC TITLE PRINTER Application CD-ROM. • Windows is forbidden without notice. • This manual covers the CW-75 Disc Title Printer only. English Read This First! • CASIO COMPUTER CO., LTD. Keep the manual in the United States and other person or entity that , if...
... of personal injury or material damage. Before using the label layout software that comes bundled with the printer, see the User's Guide on the DISC TITLE PRINTER Application CD-ROM. • Windows is forbidden without notice. • This manual covers the CW-75 Disc Title Printer only. English Read This First! • CASIO COMPUTER CO., LTD. Keep the manual in the United States and other person or entity that , if...
User Guide
Page 7
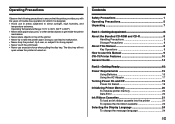
... disc tray. Getting Ready 15 Power Requirements 15 Using Batteries 15 Using the AC Adaptor 17 Turning Power On and Off 19 Power On Recall 19 Initializing Printer Memory 20 To initialize printer memory 20 Data Error 20 Ink Ribbon Cassettes 21 To load an ink ribbon cassette into the printer 21 To replace the ink ribbon cassette 23 Selecting the Display Language 24 To change the message language 24 5 E Contents Safety Precautions 1 Operating Precautions 5 Unpacking 7 Part 1 - Operating...
... disc tray. Getting Ready 15 Power Requirements 15 Using Batteries 15 Using the AC Adaptor 17 Turning Power On and Off 19 Power On Recall 19 Initializing Printer Memory 20 To initialize printer memory 20 Data Error 20 Ink Ribbon Cassettes 21 To load an ink ribbon cassette into the printer 21 To replace the ink ribbon cassette 23 Selecting the Display Language 24 To change the message language 24 5 E Contents Safety Precautions 1 Operating Precautions 5 Unpacking 7 Part 1 - Operating...

User Guide
Page 8
... To turn sound on and off 25 Part 3 - Adjusting Display Contrast 25 To change the font of the printed label 47 Part 7 - Inputting Label Data 33 Display Symbols and Indicators 33 Basic Alpha-Numeric Input 35 To input alpha-numeric characters 35 Inputting Symbols and Special Characters 36 To use the SYMBOL menu 36 Inputting Illustrations 36 To input illustrations 36 User...
... To turn sound on and off 25 Part 3 - Adjusting Display Contrast 25 To change the font of the printed label 47 Part 7 - Inputting Label Data 33 Display Symbols and Indicators 33 Basic Alpha-Numeric Input 35 To input alpha-numeric characters 35 Inputting Symbols and Special Characters 36 To use the SYMBOL menu 36 Inputting Illustrations 36 To input illustrations 36 User...
User Guide
Page 9
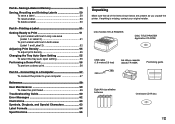
... Memory 50 Saving, Recalling and Deleting Labels 50 To save a label 50 To recall a label 50 To delete a label 50 Part 9 - CW-75 DISC TITLE PRINTER DISC TITLE PRINTER Application CD-ROM USB cable (1.8 meters/5.9 feet) Ink ribbon cassette (black) TR-18BK Positioning guide Eight AA-size alkaline batteries One blank CD-R disc 7 E Saving Labels in both areas (Label 1 and Label 2 52 Adjusting Print Density 55 To adjust print density 55 Changing the Tray Auto Open Setting...
... Memory 50 Saving, Recalling and Deleting Labels 50 To save a label 50 To recall a label 50 To delete a label 50 Part 9 - CW-75 DISC TITLE PRINTER DISC TITLE PRINTER Application CD-ROM USB cable (1.8 meters/5.9 feet) Ink ribbon cassette (black) TR-18BK Positioning guide Eight AA-size alkaline batteries One blank CD-R disc 7 E Saving Labels in both areas (Label 1 and Label 2 52 Adjusting Print Density 55 To adjust print density 55 Changing the Tray Auto Open Setting...
User Guide
Page 10
... you with the printer, see the User's Guide on the actual product. Example: Press 1 and then SET. • The symbols x, z, c, and v indicate cursor key operations. Warning! E 8 Part 1 - Important! • In this manual, the term "printer" refers to play a CD-ROM disc on any other soft cloth to wipe it is not specifically designed to the CASIO CW-75 DISC TITLE PRINTER. • In this manual may differ...
... you with the printer, see the User's Guide on the actual product. Example: Press 1 and then SET. • The symbols x, z, c, and v indicate cursor key operations. Warning! E 8 Part 1 - Important! • In this manual, the term "printer" refers to play a CD-ROM disc on any other soft cloth to wipe it is not specifically designed to the CASIO CW-75 DISC TITLE PRINTER. • In this manual may differ...
User Guide
Page 11
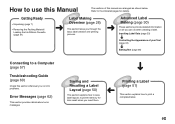
... to printer memory for details. How to use this Manual The sections of your Text (page 43) Editing Text (page 48) Connecting to a Computer (page 57) Troubleshooting Guide (page 60) Check this manual are arranged as shown below. Inputting Label Data (page 33) Controlling the Appearance of this section whenever you need them. Getting Ready • Unpacking (page 7) • Removing the Packing Material/ Loading the Ink Ribbon Cassette (page 21) Label Making Overview (page...
... to printer memory for details. How to use this Manual The sections of your Text (page 43) Editing Text (page 48) Connecting to a Computer (page 57) Troubleshooting Guide (page 60) Check this manual are arranged as shown below. Inputting Label Data (page 33) Controlling the Appearance of this section whenever you need them. Getting Ready • Unpacking (page 7) • Removing the Packing Material/ Loading the Ink Ribbon Cassette (page 21) Label Making Overview (page...
User Guide
Page 12
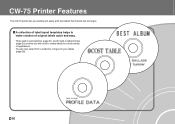
E 10 Three built-in print patterns (page 31) and 24 built-in label formats (page 32) provide you quickly and easily print disc labels that include text and logos. A collection of label layout templates helps to create labels for your labels (page 39). You can also select from a collection of logos for a wide variety of original labels quick and easy. CW-75 Printer Features The CW-75 printer lets you with tools to make creation of applications.
E 10 Three built-in print patterns (page 31) and 24 built-in label formats (page 32) provide you quickly and easily print disc labels that include text and logos. A collection of label layout templates helps to create labels for your labels (page 39). You can also select from a collection of logos for a wide variety of original labels quick and easy. CW-75 Printer Features The CW-75 printer lets you with tools to make creation of applications.

User Guide
Page 16
.... Carriage Printer head Back Battery compartment If the disc tray will not open due to printer malfunction, you can open it to normally open the tray. • Do not use a toothpick or other object with the printer here when connecting to set the positioning guide correctly when you place the disc onto the disc tray. AC adapter terminal Connect the optionally available AC adaptor here. USB port Connect the USB cable that comes...
.... Carriage Printer head Back Battery compartment If the disc tray will not open due to printer malfunction, you can open it to normally open the tray. • Do not use a toothpick or other object with the printer here when connecting to set the positioning guide correctly when you place the disc onto the disc tray. AC adapter terminal Connect the optionally available AC adaptor here. USB port Connect the USB cable that comes...
User Guide
Page 17
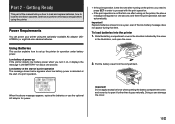
... compartment cover in the direction indicated by the arrow in order to open the cover. 2. Doing so can power your printer using the printer. To load batteries into the printer 1. Part 2 - Getting Ready This part of a print operation. • If the print operation is the first one after turning on , it goes naturally. Low battery at least once a year, even if the low battery message does not appear during that time.
... compartment cover in the direction indicated by the arrow in order to open the cover. 2. Doing so can power your printer using the printer. To load batteries into the printer 1. Part 2 - Getting Ready This part of a print operation. • If the print operation is the first one after turning on , it goes naturally. Low battery at least once a year, even if the low battery message does not appear during that time.

User Guide
Page 26
... language you need to select any one of five different languages (English, German, French, Italian, Spanish) for display of message text. • All of the display examples in a place that is free of the printer. Load a new ink ribbon cassette. Keep it straight out of dirt and dust. Number of the ink ribbon cassette and pull it in this manual use and then press SET. Selecting the Display Language...
... language you need to select any one of five different languages (English, German, French, Italian, Spanish) for display of message text. • All of the display examples in a place that is free of the printer. Load a new ink ribbon cassette. Keep it straight out of dirt and dust. Number of the ink ribbon cassette and pull it in this manual use and then press SET. Selecting the Display Language...

User Guide
Page 30
... make it impossible. • Make sure that the disc is complete, the disc tray opens part way. Guidelines Printing is inside of the disc is facing upwards. Close the disc tray. • Press the disc tray until it closes securely with a click. Important! • Check to it impossible to open automatically, press the printer's button. • See page 55 for details about configuring disc tray settings. 11. Press SET. • This starts the print operation...
... make it impossible. • Make sure that the disc is complete, the disc tray opens part way. Guidelines Printing is inside of the disc is facing upwards. Close the disc tray. • Press the disc tray until it closes securely with a click. Important! • Check to it impossible to open automatically, press the printer's button. • See page 55 for details about configuring disc tray settings. 11. Press SET. • This starts the print operation...
User Guide
Page 45
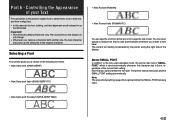
...) You can even specify a default font that you replace a character with another one, the new character also picks up the attributes of the current font setting. About SMALL FONT In addition to align text. • In this manual, the font, bolding, and text alignment are all the text or for a specific line of the display. Part 6 - Controlling the Appearance of your Text...
...) You can even specify a default font that you replace a character with another one, the new character also picks up the attributes of the current font setting. About SMALL FONT In addition to align text. • In this manual, the font, bolding, and text alignment are all the text or for a specific line of the display. Part 6 - Controlling the Appearance of your Text...
User Guide
Page 57
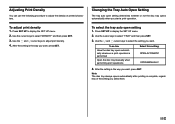
... keys to display the SET UP menu. 2. After the setting is the way you want, press SET. Changing the Tray Auto Open Setting The tray auto open setting 1. To select the tray auto open setting determines whether or not the disc tray opens automatically when you start a print operation. Press SET UP to select "DENSITY" and then press SET. 3. To do this: Have the disc tray open automatically whenever a print operation is complete, regardless of printed characters. To adjust print density 1. Use the x and...
... keys to display the SET UP menu. 2. After the setting is the way you want, press SET. Changing the Tray Auto Open Setting The tray auto open setting 1. To select the tray auto open setting determines whether or not the disc tray opens automatically when you start a print operation. Press SET UP to select "DENSITY" and then press SET. 3. To do this: Have the disc tray open automatically whenever a print operation is complete, regardless of printed characters. To adjust print density 1. Use the x and...
User Guide
Page 58
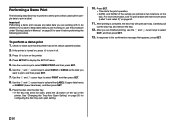
... LABEL2 (lower label area), and then press SET. 9. If the printer is complete, the disc tray will open part way. Use the cursor keys to print, and then press SET. 7. See "Changing the Tray Auto Open Setting" on page 55 for configuring the disc tray auto open , press the button on the top of the sample are working with text in Memory" on , press ] to print a label. Use the x and z cursor keys to select DATA1...
... LABEL2 (lower label area), and then press SET. 9. If the printer is complete, the disc tray will open part way. Use the cursor keys to print, and then press SET. 7. See "Changing the Tray Auto Open Setting" on page 55 for configuring the disc tray auto open , press the button on the top of the sample are working with text in Memory" on , press ] to print a label. Use the x and z cursor keys to select DATA1...

User Guide
Page 59
... LINK button so the message "READY TO TRANSFER DATA" is on the CD-ROM for power. • See page 15 of the connector marked with an arrow is turned on your computer's USB port. On your computer and print the labels. tor for information about using the printer's USB port for more information. 3. Connect the USB cable that the side of this manual, the term "label layout software" refers to remove...
... LINK button so the message "READY TO TRANSFER DATA" is on the CD-ROM for power. • See page 15 of the connector marked with an arrow is turned on your computer's USB port. On your computer and print the labels. tor for information about using the printer's USB port for more information. 3. Connect the USB cable that the side of this manual, the term "label layout software" refers to remove...

User Guide
Page 60
... the USB driver. E 58 Connecting the printer to your computer display to install the driver. After you install the application automatically starts up an installation wizard for installation of this, the printer needs to have batteries installed or the optionally available AC adaptor connected to power it does, click the Yes button and proceed with the installation. • The above messages will appear only the first time you use the...
... the USB driver. E 58 Connecting the printer to your computer display to install the driver. After you install the application automatically starts up an installation wizard for installation of this, the printer needs to have batteries installed or the optionally available AC adaptor connected to power it does, click the Yes button and proceed with the installation. • The above messages will appear only the first time you use the...
User Guide
Page 62
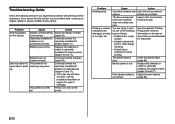
Disc tray does not open it manually. Battery power is low. Batteries are damaged, printing is too light, etc. Replace the batteries or switch to your problem here, contact your original retailer or nearest CASIO service center. Correctly connect the optionally available AC adaptor or load batteries (pages 15 and 17). • If the disc tray still does not open, use the procedure described on one of the following whenever you...
Disc tray does not open it manually. Battery power is low. Batteries are damaged, printing is too light, etc. Replace the batteries or switch to your problem here, contact your original retailer or nearest CASIO service center. Correctly connect the optionally available AC adaptor or load batteries (pages 15 and 17). • If the disc tray still does not open, use the procedure described on one of the following whenever you...
User Guide
Page 68
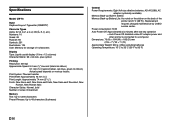
... W Auto Power Off: Approximately six minutes after last key operation • Auto Power Off disabled under AC adaptor power and when printer is connected to 95°F) E 66 Replacement requires charged maintenance by CASIO service center. Specifications Model: CW-75 Input Keyboard Layout: Typewriter (QWERTY) Character Types Alpha: 52 (A to Z, a to z); 99 etc.) Numbers: 10 Greek: 48 Russian: 66 Symbols: 251 Illustrations: 124 User: Memory for storage of 4 characters Display Type: Liquid crystal display (1 line...
... W Auto Power Off: Approximately six minutes after last key operation • Auto Power Off disabled under AC adaptor power and when printer is connected to 95°F) E 66 Replacement requires charged maintenance by CASIO service center. Specifications Model: CW-75 Input Keyboard Layout: Typewriter (QWERTY) Character Types Alpha: 52 (A to Z, a to z); 99 etc.) Numbers: 10 Greek: 48 Russian: 66 Symbols: 251 Illustrations: 124 User: Memory for storage of 4 characters Display Type: Liquid crystal display (1 line...


