User Guide
Page 3
... Using the Printer with a Network 61 Uninstalling Printer Drivers 65 Routine Maintenance 66 When to Replace Ink Tank and Maintain Print Head 67 Replacing an Ink Tank 68 Printing the Nozzle Check Pattern 73 Print Head Cleaning 77 Print Head Deep Cleaning 80 Cleaning the Paper Feed Roller 83 Transporting the Printer 84 Printing Media 88 Compatible Media Types 89 Envelopes ...91 High Resolution Paper HR-101N 95 Glossy Photo Paper GP-301/GP-301N 97 High Gloss Photo Film HG-201 99 Glossy Photo Cards FM-101 101 Photo Paper Pro...
... Using the Printer with a Network 61 Uninstalling Printer Drivers 65 Routine Maintenance 66 When to Replace Ink Tank and Maintain Print Head 67 Replacing an Ink Tank 68 Printing the Nozzle Check Pattern 73 Print Head Cleaning 77 Print Head Deep Cleaning 80 Cleaning the Paper Feed Roller 83 Transporting the Printer 84 Printing Media 88 Compatible Media Types 89 Envelopes ...91 High Resolution Paper HR-101N 95 Glossy Photo Paper GP-301/GP-301N 97 High Gloss Photo Film HG-201 99 Glossy Photo Cards FM-101 101 Photo Paper Pro...
User Guide
Page 4
Table of Contents Cannot Install the Printer Driver 121 Print Quality is Poor or Contains Errors 123 Printer Does Not Start or Stops During Print Jobs 140 Paper Does Not Feed Properly or Paper Jams 147 The POWER Lamp Flashes Orange 151 An Error Message is Displayed on the Screen 154 Problems Unique to Windows 164 Problems Unique to the Macintosh 168 Appendix ...171 For Faster Printing 172 Specifications 175 Index ...187 4
Table of Contents Cannot Install the Printer Driver 121 Print Quality is Poor or Contains Errors 123 Printer Does Not Start or Stops During Print Jobs 140 Paper Does Not Feed Properly or Paper Jams 147 The POWER Lamp Flashes Orange 151 An Error Message is Displayed on the Screen 154 Problems Unique to Windows 164 Problems Unique to the Macintosh 168 Appendix ...171 For Faster Printing 172 Specifications 175 Index ...187 4
User Guide
Page 21
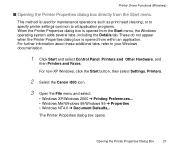
... opens. Printer Driver Functions (Windows) s Opening the Printer Properties dialog box directly from the Start menu This method is used for maintenance operations such as print head cleaning, or to specify printer settings common to your Windows documentation. 1 Click Start and select Control Panel, Printers and Other Hardware, and then Printers and Faxes. For non-XP Windows, click the Start button, then select Settings, Printers. 2 Select the Canon i850 icon. 3 Open the File menu and select: • Windows XP/Windows 2000 Printing Preferences... • Windows Me/Windows...
... opens. Printer Driver Functions (Windows) s Opening the Printer Properties dialog box directly from the Start menu This method is used for maintenance operations such as print head cleaning, or to specify printer settings common to your Windows documentation. 1 Click Start and select Control Panel, Printers and Other Hardware, and then Printers and Faxes. For non-XP Windows, click the Start button, then select Settings, Printers. 2 Select the Canon i850 icon. 3 Open the File menu and select: • Windows XP/Windows 2000 Printing Preferences... • Windows Me/Windows...
User Guide
Page 24
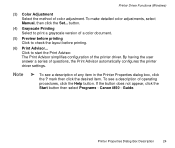
... the Help button. Canon i850 - Printer Driver Functions (Windows) (3) Color Adjustment Select the method of any item in the Printer Properties dialog box, click the ? To make detailed color adjustments, select Manual, then click the Set... Note ® To see a description of the printer driver. Guide. By having the user answer a series of a color document. (5) Preview before printing Click to check the layout before printing. (6) Print Advisor... If the button does not appear, click the Start button then select...
... the Help button. Canon i850 - Printer Driver Functions (Windows) (3) Color Adjustment Select the method of any item in the Printer Properties dialog box, click the ? To make detailed color adjustments, select Manual, then click the Set... Note ® To see a description of the printer driver. Guide. By having the user answer a series of a color document. (5) Preview before printing Click to check the layout before printing. (6) Print Advisor... If the button does not appear, click the Start button then select...
User Guide
Page 35
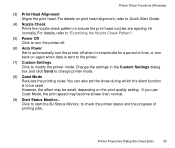
... printer mode. Printer Driver Functions (Windows) (3) Print Head Alignment Aligns the print head. If you use Quiet Mode, the print speed may be used. Printer Properties Dialog Box Description 35 For details, refer to "Examining the Nozzle Check Pattern". (5) Power Off Click to turn the printer off. (6) Auto Power Set to automatically turn the printer off when it remains idle for a period of time, or turn back on again when data is to be small, depending on print head alignment, refer to Quick Start Guide. (4) Nozzle Check Prints the nozzle check pattern...
... printer mode. Printer Driver Functions (Windows) (3) Print Head Alignment Aligns the print head. If you use Quiet Mode, the print speed may be used. Printer Properties Dialog Box Description 35 For details, refer to "Examining the Nozzle Check Pattern". (5) Power Off Click to turn the printer off. (6) Auto Power Set to automatically turn the printer off when it remains idle for a period of time, or turn back on again when data is to be small, depending on print head alignment, refer to Quick Start Guide. (4) Nozzle Check Prints the nozzle check pattern...
User Guide
Page 37
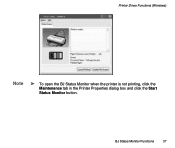
BJ Status Monitor Functions 37 Printer Driver Functions (Windows) Note ® To open the BJ Status Monitor when the printer is not printing, click the Maintenance tab in the Printer Properties dialog box and click the Start Status Monitor button.
BJ Status Monitor Functions 37 Printer Driver Functions (Windows) Note ® To open the BJ Status Monitor when the printer is not printing, click the Maintenance tab in the Printer Properties dialog box and click the Start Status Monitor button.
User Guide
Page 44
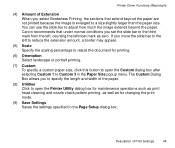
... printing. (7) Custom To specify a custom paper size, click this button to open the Printer Utility dialog box for maintenance operations such as print head cleaning and nozzle check pattern printing, as well as zero. Canon recommends that extend beyond the paper. Description of Print Settings 44 Printer Driver Functions (Macintosh) (4) Amount of Extension When you select Borderless Printing, the sections that under normal conditions you set the slide bar to open the Custom dialog box after selecting Custom 1 to adjust...
... printing. (7) Custom To specify a custom paper size, click this button to open the Printer Utility dialog box for maintenance operations such as print head cleaning and nozzle check pattern printing, as well as zero. Canon recommends that extend beyond the paper. Description of Print Settings 44 Printer Driver Functions (Macintosh) (4) Amount of Extension When you select Borderless Printing, the sections that under normal conditions you set the slide bar to open the Custom dialog box after selecting Custom 1 to adjust...
User Guide
Page 61
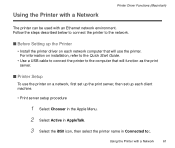
... use the printer on installation, refer to the Quick Start Guide. • Use a USB cable to connect the printer to the computer that will function as the print server. s Before Setting up the Printer • Install the printer driver on each client machine. • Print server setup procedure 1 Select Chooser in the Apple Menu. 2 Select Active in AppleTalk. 3 Select the i850 icon, then select the printer name in Connected to the network. s Printer Setup To use the printer. Using the Printer with a Network Printer Driver...
... use the printer on installation, refer to the Quick Start Guide. • Use a USB cable to connect the printer to the computer that will function as the print server. s Before Setting up the Printer • Install the printer driver on each client machine. • Print server setup procedure 1 Select Chooser in the Apple Menu. 2 Select Active in AppleTalk. 3 Select the i850 icon, then select the printer name in Connected to the network. s Printer Setup To use the printer. Using the Printer with a Network Printer Driver...
User Guide
Page 63
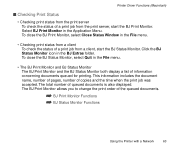
... change the print order of copies and the time when the print job was accepted. Click the BJ Status Monitor icon in the Application Menu. This information includes the document name, number of pages, number of the queued documents. ¬ BJ Print Monitor Functions ¬ BJ Status Monitor Functions Using the Printer with a Network 63 Printer Driver Functions (Macintosh) s Checking Print Status • Checking print status from the print server To check the status of a print job from a client, start the BJ Print...
... change the print order of copies and the time when the print job was accepted. Click the BJ Status Monitor icon in the Application Menu. This information includes the document name, number of pages, number of the queued documents. ¬ BJ Print Monitor Functions ¬ BJ Status Monitor Functions Using the Printer with a Network 63 Printer Driver Functions (Macintosh) s Checking Print Status • Checking print status from the print server To check the status of a print job from a client, start the BJ Print...
User Guide
Page 67
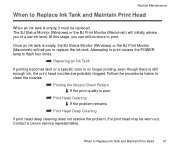
...;c color is no longer printing, even though there is still enough ink, the print head nozzles are probably clogged. When to replace the ink tank. Contact a Canon service representative. Attempting to print causes the POWER lamp to print. At this stage, you of a low ink level. Follow the procedures below to clean the nozzles. ¬ Printing the Nozzle Check Pattern If the print quality is poor ¬ Print Head Cleaning If the problem remains ¬ Print Head Deep Cleaning If print head deep cleaning does...
...;c color is no longer printing, even though there is still enough ink, the print head nozzles are probably clogged. When to replace the ink tank. Contact a Canon service representative. Attempting to print causes the POWER lamp to print. At this stage, you of a low ink level. Follow the procedures below to clean the nozzles. ¬ Printing the Nozzle Check Pattern If the print quality is poor ¬ Print Head Cleaning If the problem remains ¬ Print Head Deep Cleaning If print head deep cleaning does...
User Guide
Page 96
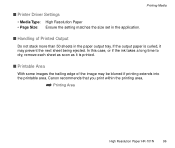
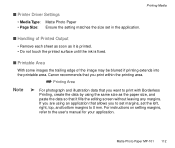
..., it is printed. In this case, or if the ink takes a long time to dry, remove each sheet as soon as it may be blurred if printing extends into the printable area. Canon recommends that you print within the printing area. ¬ Printing Area High Resolution Paper HR-101N 96 s Printer Driver Settings • Media Type: High Resolution Paper • Page Size: Ensure the setting matches the size set in the paper output tray.
..., it is printed. In this case, or if the ink takes a long time to dry, remove each sheet as soon as it may be blurred if printing extends into the printable area. Canon recommends that you print within the printing area. ¬ Printing Area High Resolution Paper HR-101N 96 s Printer Driver Settings • Media Type: High Resolution Paper • Page Size: Ensure the setting matches the size set in the paper output tray.
User Guide
Page 98
... application. s Printer Driver Settings • Media Type: Glossy Photo Paper • Page Size: Ensure the setting matches the size set the left, right, top and bottom margins to 0 mm. Canon recommends that you print within the printing area. ¬ Printing Area Note ® For photograph and illustration data that you are using the same size as it fills the editing screen without leaving any margins. For instructions on setting margins, refer to print with Borderless Printing, create...
... application. s Printer Driver Settings • Media Type: Glossy Photo Paper • Page Size: Ensure the setting matches the size set the left, right, top and bottom margins to 0 mm. Canon recommends that you print within the printing area. ¬ Printing Area Note ® For photograph and illustration data that you are using the same size as it fills the editing screen without leaving any margins. For instructions on setting margins, refer to print with Borderless Printing, create...
User Guide
Page 104
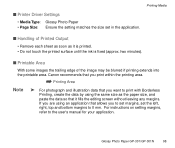
s Printer Driver Settings • Media Type: Photo Paper Pro • Page Size: Ensure the setting matches the size set in hot, damp or humid conditions. s Storing Printed Output • Do not store or display printouts in the application. It is completely dry. Photo Paper Pro PR-101 104 Colors in dark images may appear indistinct at first, but become clearer after about 30 minutes. • Images may smudge if you may...
s Printer Driver Settings • Media Type: Photo Paper Pro • Page Size: Ensure the setting matches the size set in hot, damp or humid conditions. s Storing Printed Output • Do not store or display printouts in the application. It is completely dry. Photo Paper Pro PR-101 104 Colors in dark images may appear indistinct at first, but become clearer after about 30 minutes. • Images may smudge if you may...
User Guide
Page 105
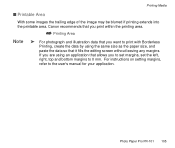
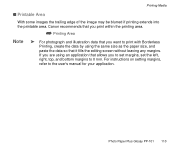
Photo Paper Pro PR-101 105 For instructions on setting margins, refer to print with Borderless Printing, create the data by using an application that allows you are using the same size as the paper size, and paste the data so that it fills the editing screen without leaving any margins. If you to set margins, set the left, right, top and bottom margins to 0 mm. Printing Media s Printable Area With some images the...
Photo Paper Pro PR-101 105 For instructions on setting margins, refer to print with Borderless Printing, create the data by using an application that allows you are using the same size as the paper size, and paste the data so that it fills the editing screen without leaving any margins. If you to set margins, set the left, right, top and bottom margins to 0 mm. Printing Media s Printable Area With some images the...
User Guide
Page 110
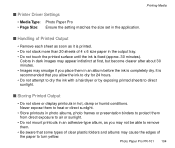
... instructions on setting margins, refer to print with Borderless Printing, create the data by using the same size as the paper size, and paste the data so that allows you are using an application that it fills the editing screen without leaving any margins. Printing Media s Printable Area With some images the trailing edge of the image may be blurred if printing extends into the printable area. Photo Paper Plus...
... instructions on setting margins, refer to print with Borderless Printing, create the data by using the same size as the paper size, and paste the data so that allows you are using an application that it fills the editing screen without leaving any margins. Printing Media s Printable Area With some images the trailing edge of the image may be blurred if printing extends into the printable area. Photo Paper Plus...
User Guide
Page 112
Matte Photo Paper MP-101 112 s Printer Driver Settings • Media Type: Matte Photo Paper • Page Size: Ensure the setting matches the size set the left, right, top, and bottom margins to 0 mm. For instructions on setting margins, refer to print with Borderless Printing, create the data by using an application that allows you want to the user's manual for your application. s Printable Area With some images the trailing edge of Printed Output • Remove each sheet as...
Matte Photo Paper MP-101 112 s Printer Driver Settings • Media Type: Matte Photo Paper • Page Size: Ensure the setting matches the size set the left, right, top, and bottom margins to 0 mm. For instructions on setting margins, refer to print with Borderless Printing, create the data by using an application that allows you want to the user's manual for your application. s Printable Area With some images the trailing edge of Printed Output • Remove each sheet as...
User Guide
Page 116
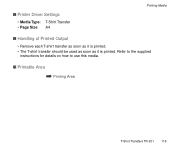
Refer to the supplied instructions for details on how to use this media. s Printable Area ¬ Printing Area T-Shirt Transfers TR-201 116 s Printer Driver Settings • Media Type: T-Shirt Transfer • Page Size: A4 Printing Media s Handling of Printed Output • Remove each T-shirt transfer as soon as it is printed. • The T-shirt transfer should be used as soon as it is printed.
Refer to the supplied instructions for details on how to use this media. s Printable Area ¬ Printing Area T-Shirt Transfers TR-201 116 s Printer Driver Settings • Media Type: T-Shirt Transfer • Page Size: A4 Printing Media s Handling of Printed Output • Remove each T-shirt transfer as soon as it is printed. • The T-shirt transfer should be used as soon as it is printed.

User Guide
Page 120
Troubleshooting • Cannot Install the Printer Driver • Print Quality is Poor or Contains Errors • Printer Does Not Start or Stops During Print Jobs • Paper Does Not Feed Properly or Paper Jams • The POWER Lamp Flashes Orange • An Error Message is Displayed on the Screen • Problems Unique to Windows Windows • Problems Unique to the Macintosh Macintosh Troubleshooting 120
Troubleshooting • Cannot Install the Printer Driver • Print Quality is Poor or Contains Errors • Printer Does Not Start or Stops During Print Jobs • Paper Does Not Feed Properly or Paper Jams • The POWER Lamp Flashes Orange • An Error Message is Displayed on the Screen • Problems Unique to Windows Windows • Problems Unique to the Macintosh Macintosh Troubleshooting 120
User Guide
Page 122
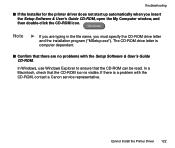
... dependent. In Windows, use Windows Explorer to ensure that there are typing in the file name, you must specify the CD-ROM drive letter and the installation program ("MSetup.exe"). Troubleshooting s If the Installer for the printer driver does not start up automatically when you are no problems with the CD-ROM, contact a Canon service representative. Windows Note ® If you insert the Setup Software & User's Guide CD-ROM, open the My...
... dependent. In Windows, use Windows Explorer to ensure that there are typing in the file name, you must specify the CD-ROM drive letter and the installation program ("MSetup.exe"). Troubleshooting s If the Installer for the printer driver does not start up automatically when you are no problems with the CD-ROM, contact a Canon service representative. Windows Note ® If you insert the Setup Software & User's Guide CD-ROM, open the My...
User Guide
Page 139
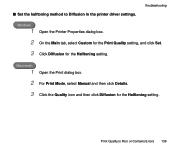
Troubleshooting Windows 1 Open the Printer Properties dialog box. 2 On the Main tab, select Custom for the Print Quality setting, and click Set. 3 Click Diffusion for the Halftoning setting. s Set the halftoning method to Diffusion in the printer driver settings. Macintosh 1 Open the Print dialog box. 2 For Print Mode, select Manual and then click Details. 3 Click the Quality icon and then click Diffusion for the Halftoning setting. Print Quality is Poor or Contains Errors 139
Troubleshooting Windows 1 Open the Printer Properties dialog box. 2 On the Main tab, select Custom for the Print Quality setting, and click Set. 3 Click Diffusion for the Halftoning setting. s Set the halftoning method to Diffusion in the printer driver settings. Macintosh 1 Open the Print dialog box. 2 For Print Mode, select Manual and then click Details. 3 Click the Quality icon and then click Diffusion for the Halftoning setting. Print Quality is Poor or Contains Errors 139


