
ZR Instruction Manual
Page 10
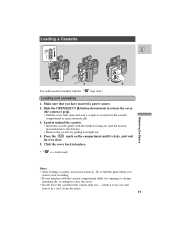
... a cool, clean, dry place. 11 Press the PUSH mark on the compartment until it clicks, and wait for the cassette compartment to the bottom). • Remove the cassette by pulling it in the camera after use record search (p. 34) to find the point where you have inserted a power source. 2. Click the cover back...
... a cool, clean, dry place. 11 Press the PUSH mark on the compartment until it clicks, and wait for the cassette compartment to the bottom). • Remove the cassette by pulling it in the camera after use record search (p. 34) to find the point where you have inserted a power source. 2. Click the cover back...
ZR Instruction Manual
Page 12
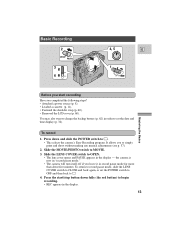
... LENS COVER switch to MOVIE. 3. Press the start recording Have you completed the following steps? • Attached a power source (p. 8). • Loaded a cassette (p. 11). • Fastened the shoulder strap (p. 60). • Removed the LCD cover (p. 60). Slide the MOVIE/PHOTO switch to OPEN. • The lens cover opens and PAUSE appears in the...
... LENS COVER switch to MOVIE. 3. Press the start recording Have you completed the following steps? • Attached a power source (p. 8). • Loaded a cassette (p. 11). • Fastened the shoulder strap (p. 60). • Removed the LCD cover (p. 60). Slide the MOVIE/PHOTO switch to OPEN. • The lens cover opens and PAUSE appears in the...

ZR Instruction Manual
Page 56
...playback on the TV. 3. Slide the camera's POWER switch to copy appears on the VCR as soon as the section you want on the camcorder. Start recording on the screen. 4. Note: • The quality of the edited tape will be slightly lower than that of the section... you want to remove unwanted scenes - Preparations 1. Connect the camera to 4 until your recorded cassette slightly ahead of the original. 57 Repeat steps 1 to the VCR. • See "Connections for details. 3. Find a...
...playback on the TV. 3. Slide the camera's POWER switch to copy appears on the VCR as soon as the section you want on the camcorder. Start recording on the screen. 4. Note: • The quality of the edited tape will be slightly lower than that of the section... you want to remove unwanted scenes - Preparations 1. Connect the camera to 4 until your recorded cassette slightly ahead of the original. 57 Repeat steps 1 to the VCR. • See "Connections for details. 3. Find a...

ZR Instruction Manual
Page 66
...from condensation • Before you take it in the display. Condensation E Condensation may form on the camera when it stops automatically and "REMOVE THE CASSETTE" is displayed for approximately 4 seconds and then EJECT is shown in the display. • The camera may not detect the condensation ...to a warm, humid place Protecting the camera from a cold place to use the camera. 67 What you should do • Remove the cassette, leave the cassette compartment open, and turn the camera off. • Leave it out of the bag. Wait until the condensation evaporates. Using the...
...from condensation • Before you take it in the display. Condensation E Condensation may form on the camera when it stops automatically and "REMOVE THE CASSETTE" is displayed for approximately 4 seconds and then EJECT is shown in the display. • The camera may not detect the condensation ...to a warm, humid place Protecting the camera from a cold place to use the camera. 67 What you should do • Remove the cassette, leave the cassette compartment open, and turn the camera off. • Leave it out of the bag. Wait until the condensation evaporates. Using the...
ZR Instruction Manual
Page 80
...CHANGE THE BATTERY PACK Recording reminder 0sec 10sec When you press the 2 (record) button if the DV cable is detected. Refer to page 59. Remove the tape as soon as a warning to protect the tape and also when condensation is not connected properly (p. 58). COPYRIGHT PROTECTED PLAYBACK IS RESTRICTED Refer... than 10 seconds. Refer to page 59. TAPE END THE TAPE IS SET FOR ERASURE PREVENTION CHECK THE DV INPUT CONDENSATION HAS BEEN DETECTED REMOVE THE CASSETTE Refer to page 67. Appears each time you set the date and time (p. 32). Shots which are not planning to edit the recording,...
...CHANGE THE BATTERY PACK Recording reminder 0sec 10sec When you press the 2 (record) button if the DV cable is detected. Refer to page 59. Remove the tape as soon as a warning to protect the tape and also when condensation is not connected properly (p. 58). COPYRIGHT PROTECTED PLAYBACK IS RESTRICTED Refer... than 10 seconds. Refer to page 59. TAPE END THE TAPE IS SET FOR ERASURE PREVENTION CHECK THE DV INPUT CONDENSATION HAS BEEN DETECTED REMOVE THE CASSETTE Refer to page 67. Appears each time you set the date and time (p. 32). Shots which are not planning to edit the recording,...

ZR Instruction Manual
Page 85
...not cover the cabinet (exterior finish) of the digital video equipment, video cassette tapes, head cleanings, nor does it was purchased as follows: Parts: Defective parts will be exchanged for new parts or, at Canon Canada's option, comparable rebuilt parts for a period of one year from the.... Canon Canada assumes no liability for special, consequential or incidental damages or loss that may arise, whether on the video equipment is altered or removed. (c) The digital video equipment is used for this limited warranty shall not exceed the purchase price of the product. Labour: For...
...not cover the cabinet (exterior finish) of the digital video equipment, video cassette tapes, head cleanings, nor does it was purchased as follows: Parts: Defective parts will be exchanged for new parts or, at Canon Canada's option, comparable rebuilt parts for a period of one year from the.... Canon Canada assumes no liability for special, consequential or incidental damages or loss that may arise, whether on the video equipment is altered or removed. (c) The digital video equipment is used for this limited warranty shall not exceed the purchase price of the product. Labour: For...


