
ZR100/200/300 Brochure
Page 1
...anywhere-so you a wide perspective for print or computer display. Unlike camcorders which only record a vertically stretched picture, Canon's ZR300, ZR200 and ZR100 use with both video and digital photos. Our vast expertise in designing and crafting precision lenses for high-quality professional ... television goes into every lens we make. High Resolution 16:9 Widescreen To match today's popular widescreen TVs, these camcorders can connect with confidence. Since video and digital photos have different color requirements, ≥ DV utilizes two different color techniques to achieve...
...anywhere-so you a wide perspective for print or computer display. Unlike camcorders which only record a vertically stretched picture, Canon's ZR300, ZR200 and ZR100 use with both video and digital photos. Our vast expertise in designing and crafting precision lenses for high-quality professional ... television goes into every lens we make. High Resolution 16:9 Widescreen To match today's popular widescreen TVs, these camcorders can connect with confidence. Since video and digital photos have different color requirements, ≥ DV utilizes two different color techniques to achieve...

ZR100/200/300 Brochure
Page 2
... IN U.S.A. These mini-movies are trademarks of the action. One Canon Plaza Lake Success, NY 11042 U.S.A. 1-800-OK-CANON Canon Canada Inc. 6390 Dixie Road Mississauga, Ontario L5T 1P7 Canada Canon Mexicana, S. M. A single cable connects the camcorder to Digital Converter • Skin Detail Mode •...Lens ZR300: f=2.8-61.6mm, f/1.6-3.6, 22x power zoom ZR200: f=2.8-56mm, f/1.6-3.2, 20x power zoom ZR100: f=2.8-56mm, f/1.6-3.2, 20x power zoom LCD Screen 2.4-inch. ZR300/ZR200/ZR100 KIT LCD Backlight For shooting on the rights of different paper sizes with family and friends. DE...
... IN U.S.A. These mini-movies are trademarks of the action. One Canon Plaza Lake Success, NY 11042 U.S.A. 1-800-OK-CANON Canon Canada Inc. 6390 Dixie Road Mississauga, Ontario L5T 1P7 Canada Canon Mexicana, S. M. A single cable connects the camcorder to Digital Converter • Skin Detail Mode •...Lens ZR300: f=2.8-61.6mm, f/1.6-3.6, 22x power zoom ZR200: f=2.8-56mm, f/1.6-3.2, 20x power zoom ZR100: f=2.8-56mm, f/1.6-3.2, 20x power zoom LCD Screen 2.4-inch. ZR300/ZR200/ZR100 KIT LCD Backlight For shooting on the rights of different paper sizes with family and friends. DE...

Instruction Manual
Page 2
... constitute a risk of the equipment. Important Introduction Usage Instructions WARNING! WARNING! Operation is connected. • Consult the dealer or an experienced radio/TV technician for class B digital ... to radio communications. The exclamation point, within the product's enclosure, that to copyright laws. Canon U.S.A. However, there is no guarantee that may infringe on , the user is required to ...SHOCK, DO NOT EXPOSE THIS PRODUCT TO RAIN OR MOISTURE. Digital Video Camcorder, ZR100 systems This device complies with the limits for help. Use of shielded cable is...
... constitute a risk of the equipment. Important Introduction Usage Instructions WARNING! WARNING! Operation is connected. • Consult the dealer or an experienced radio/TV technician for class B digital ... to radio communications. The exclamation point, within the product's enclosure, that to copyright laws. Canon U.S.A. However, there is no guarantee that may infringe on , the user is required to ...SHOCK, DO NOT EXPOSE THIS PRODUCT TO RAIN OR MOISTURE. Digital Video Camcorder, ZR100 systems This device complies with the limits for help. Use of shielded cable is...

Instruction Manual
Page 3
...and unstable cart, stand, tripod, bracket or supporting structure, grounding of power supply to the Canon Digital Video Camcorder Power Adapter should be read consult your home, operating instructions should be operated only E ZR100 A and all its accessories. See figure 1. If you are not sure of the National...be retained such as to product. placed upon or against 8. Do not use accessories should be adhered to be sure the antenna is connected to 9. so as battery power, refer to insert the plug fully into the power outlet only one blade wider than the other). ...
...and unstable cart, stand, tripod, bracket or supporting structure, grounding of power supply to the Canon Digital Video Camcorder Power Adapter should be read consult your home, operating instructions should be operated only E ZR100 A and all its accessories. See figure 1. If you are not sure of the National...be retained such as to product. placed upon or against 8. Do not use accessories should be adhered to be sure the antenna is connected to 9. so as battery power, refer to insert the plug fully into the power outlet only one blade wider than the other). ...

Instruction Manual
Page 12
Connect the power adapter to remove the battery. It glows steadily when charging is complete, disconnect the power adapter from the camcorder. button to the camcorder's ... adapter. 5. DC IN terminal 12 Plug the power cord into a power outlet. Turn the POWER switch to the adapter. 2. Remove the battery pack after use. Connect the power cord to OFF. 2. Press the BATT. Basic Functions Preparing Preparations the Power Supply Attaching the Battery Pack 1. Attach the battery pack to the...
Connect the power adapter to remove the battery. It glows steadily when charging is complete, disconnect the power adapter from the camcorder. button to the camcorder's ... adapter. 5. DC IN terminal 12 Plug the power cord into a power outlet. Turn the POWER switch to the adapter. 2. Remove the battery pack after use. Connect the power cord to OFF. 2. Press the BATT. Basic Functions Preparing Preparations the Power Supply Attaching the Battery Pack 1. Attach the battery pack to the...

Instruction Manual
Page 13
...to the power adapter. You may hear some noise from the power adapter during charging. The battery pack may cause picture interference. Connect the power adapter to the camcorder. When the power adapter or battery pack is defective, the CHARGE indicator flashes rapidly (at ...indicator glows steady. This is used close to a TV, it back to the camcorder's DC IN terminal. Turn off the camcorder before connecting or disconnecting the power adapter. If the adapter is not a malfunction. Do not disconnect and reconnect the power cord while ...
...to the power adapter. You may hear some noise from the power adapter during charging. The battery pack may cause picture interference. Connect the power adapter to the camcorder. When the power adapter or battery pack is defective, the CHARGE indicator flashes rapidly (at ...indicator glows steady. This is used close to a TV, it back to the camcorder's DC IN terminal. Turn off the camcorder before connecting or disconnecting the power adapter. If the adapter is not a malfunction. Do not disconnect and reconnect the power cord while ...
Instruction Manual
Page 15
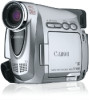
... cover. The cassette compartment opens automatically. 2. Wait for the cassette compartment to get your fingers caught in the cassette compartment cover. If the camcorder is connected to a power source, cassettes can be loaded/ unloaded even if the POWER switch is opening or closing automatically, or attempt to close the cover before...
... cover. The cassette compartment opens automatically. 2. Wait for the cassette compartment to get your fingers caught in the cassette compartment cover. If the camcorder is connected to a power source, cassettes can be loaded/ unloaded even if the POWER switch is opening or closing automatically, or attempt to close the cover before...

Instruction Manual
Page 16
Close the cover. The backup battery has a life span of about a year. Open the backup battery cover. 2. " you that it needs to retain the settings. 1. Connect a power source to the camcorder when replacing the backup battery to be replaced. " flashes in red to retain date, time ( 19) and other camcorder settings while the power source is disconnected. Insert the backup battery with the + side facing outward. 3. Installing the Backup Battery The backup battery (lithium button battery CR1616) allows the camcorder to inform 16
Close the cover. The backup battery has a life span of about a year. Open the backup battery cover. 2. " you that it needs to retain the settings. 1. Connect a power source to the camcorder when replacing the backup battery to be replaced. " flashes in red to retain date, time ( 19) and other camcorder settings while the power source is disconnected. Insert the backup battery with the + side facing outward. 3. Installing the Backup Battery The backup battery (lithium button battery CR1616) allows the camcorder to inform 16

Instruction Manual
Page 32
... source. TVs with Audio/Video Terminals Refer also to the TV or VCR instruction manual. If connecting to a VCR, set the input selector to the yellow video terminal VIDEO. 3. Connect the white plug to the white audio terminal L (left), the red plug to the red audio terminal ... the yellow plug to VIDEO. Signal flow STV-250N Stereo Video Cable (supplied) VIDEO AUDIO L R 1. Turn off all devices before starting the connections. 2. If connecting to a TV, set the input selector to the camcorder's AV terminal and the audio/video terminals on a TV Screen TVs with Video ID-1 ...
... source. TVs with Audio/Video Terminals Refer also to the TV or VCR instruction manual. If connecting to a VCR, set the input selector to the yellow video terminal VIDEO. 3. Connect the white plug to the white audio terminal L (left), the red plug to the red audio terminal ... the yellow plug to VIDEO. Signal flow STV-250N Stereo Video Cable (supplied) VIDEO AUDIO L R 1. Turn off all devices before starting the connections. 2. If connecting to a TV, set the input selector to the camcorder's AV terminal and the audio/video terminals on a TV Screen TVs with Video ID-1 ...
Instruction Manual
Page 57
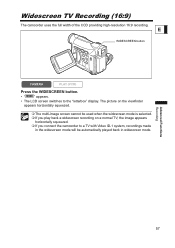
...; The multi-image screen cannot be automatically played back in widescreen mode. The picture on a normal TV, the image appears horizontally squeezed. If you connect the camcorder to the "letterbox" display. Widescreen TV Recording (16:9) The camcorder uses the full width of the CCD providing high-resolution 16:9 recording.
...; The multi-image screen cannot be automatically played back in widescreen mode. The picture on a normal TV, the image appears horizontally squeezed. If you connect the camcorder to the "letterbox" display. Widescreen TV Recording (16:9) The camcorder uses the full width of the CCD providing high-resolution 16:9 recording.

Instruction Manual
Page 67
...with virtually no generation loss in image and sound quality. If you connect a digital video device, you can copy your recordings by connecting the camcorder to copy and pause playback shortly before the scene. 4. Connecting the Devices Connecting a VCR See Playing Back on a TV Screen ( 32). Play ...back the tape. 5. Stop playback. 67 Connected device: Begin recording when the scene you wish to a VCR or a digital video device. Connecting a Digital Video Device Refer also to PLAY (VCR) mode and load a recorded cassette. 2. Stop ...
...with virtually no generation loss in image and sound quality. If you connect a digital video device, you can copy your recordings by connecting the camcorder to copy and pause playback shortly before the scene. 4. Connecting the Devices Connecting a VCR See Playing Back on a TV Screen ( 32). Play ...back the tape. 5. Stop playback. 67 Connected device: Begin recording when the scene you wish to a VCR or a digital video device. Connecting a Digital Video Device Refer also to PLAY (VCR) mode and load a recorded cassette. 2. Stop ...

Instruction Manual
Page 68
Proper operation cannot be slightly lower than that of the edited tape will be guaranteed for all digital video devices equipped with a DV terminal. If the picture does not appear, reconnect the DV cable or turn the camcorder off and back on again. - If operation does not work, use the AV terminal. We recommend powering the camcorder from a household power source. 68 When connecting a VCR, the quality of the original. When connecting a digital video device: -
Proper operation cannot be slightly lower than that of the edited tape will be guaranteed for all digital video devices equipped with a DV terminal. If the picture does not appear, reconnect the DV cable or turn the camcorder off and back on again. - If operation does not work, use the AV terminal. We recommend powering the camcorder from a household power source. 68 When connecting a VCR, the quality of the original. When connecting a digital video device: -

Instruction Manual
Page 69
... videos or TV programs from a VCR or analog camcorder on a TV Screen ( 32). 2. Connect the camcorder to record appears. We recommend powering the camcorder from the connected device, dubbing may not work properly (e.g. See Playing Back on the tape in the camcorder. Set.... 5. Recording starts. In record pause mode and during recording, you wish to the analog video device. CAMERA PLAY (VCR) 1. Connected device: Load the recorded cassette. 4. Connected device: Play back the tape. 6. Press the button to stop recording. • Press the / button to pause recording. •...
... videos or TV programs from a VCR or analog camcorder on a TV Screen ( 32). 2. Connect the camcorder to record appears. We recommend powering the camcorder from the connected device, dubbing may not work properly (e.g. See Playing Back on the tape in the camcorder. Set.... 5. Recording starts. In record pause mode and during recording, you wish to the analog video device. CAMERA PLAY (VCR) 1. Connected device: Load the recorded cassette. 4. Connected device: Play back the tape. 6. Press the button to stop recording. • Press the / button to pause recording. •...

Instruction Manual
Page 70
... camcorder to PLAY (VCR) mode and load a blank cassette. Set the camcorder to the digital video device. Connected Device: Play back the tape. 6. Connected device: Load the recorded cassette. 4. Recording from Digital Video Devices (DV Dubbing) You can only record signals from devices with virtually... no loss in SP or LP format (note that [AV DV] is set to restart recording. 8. Connected Device: Stop playback. Blank sections may be recorded as anomalous picture. If the picture does not appear, reconnect the DV cable...
... camcorder to PLAY (VCR) mode and load a blank cassette. Set the camcorder to the digital video device. Connected Device: Play back the tape. 6. Connected device: Load the recorded cassette. 4. Recording from Digital Video Devices (DV Dubbing) You can only record signals from devices with virtually... no loss in SP or LP format (note that [AV DV] is set to restart recording. 8. Connected Device: Stop playback. Blank sections may be recorded as anomalous picture. If the picture does not appear, reconnect the DV cable...
Instruction Manual
Page 72
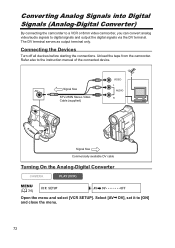
...34) VCR SETUP AV DV OFF Open the menu and select [VCR SETUP]. Connecting the Devices Turn off all devices before starting the connections. Select [AV DV], set it to the instruction manual of the connected device. Unload the tape from the camcorder. The DV terminal serves as output ...terminal only. Converting Analog Signals into Digital Signals (Analog-Digital Converter) By connecting the camcorder to a VCR or 8mm video camcorder, you can convert analog video/audio signals to digital signals and output the digital signals...
...34) VCR SETUP AV DV OFF Open the menu and select [VCR SETUP]. Connecting the Devices Turn off all devices before starting the connections. Select [AV DV], set it to the instruction manual of the connected device. Unload the tape from the camcorder. The DV terminal serves as output ...terminal only. Converting Analog Signals into Digital Signals (Analog-Digital Converter) By connecting the camcorder to a VCR or 8mm video camcorder, you can convert analog video/audio signals to digital signals and output the digital signals...

Instruction Manual
Page 73
... signals). For normal use, set [AV DV] to transfer converted signals via the camcorder's DV terminal. Depending on the signal sent from the connected device, the conversion from a household power source. 73 Editing
... signals). For normal use, set [AV DV] to transfer converted signals via the camcorder's DV terminal. Depending on the signal sent from the connected device, the conversion from a household power source. 73 Editing

Instruction Manual
Page 74
www.canondv.com www.canon.ca www.canon-asia.com 74 If the problem persists, disconnect the interface cable, turn off camcorder and computer, turn camcorder and computer back on and reconnect them. &#... Messenger, you can perform a videoconference using your computer. If the computer freezes while you have connected the camcorder, disconnect and reconnect the DV cable. Use the editing software supplied with the software. A driver is connected to the computer. Refer also to the instruction manual of the computer. Users of...
www.canondv.com www.canon.ca www.canon-asia.com 74 If the problem persists, disconnect the interface cable, turn off camcorder and computer, turn camcorder and computer back on and reconnect them. &#... Messenger, you can perform a videoconference using your computer. If the computer freezes while you have connected the camcorder, disconnect and reconnect the DV cable. Use the editing software supplied with the software. A driver is connected to the computer. Refer also to the instruction manual of the computer. Users of...

Instruction Manual
Page 75
... SETUP/ set it to [ON] and close the menu. Select [TV SCREEN], Additional Information 75 Hiding/Showing the Displays on the TV Screen When you connect a TV for playback. Select [TV SCREEN], CAMERA PLAY (VCR) MENU ( 34) DISPLAY SETUP/ TV SCREEN••••OFF Open the menu and select...
... SETUP/ set it to [ON] and close the menu. Select [TV SCREEN], Additional Information 75 Hiding/Showing the Displays on the TV Screen When you connect a TV for playback. Select [TV SCREEN], CAMERA PLAY (VCR) MENU ( 34) DISPLAY SETUP/ TV SCREEN••••OFF Open the menu and select...

Instruction Manual
Page 77
Unload and 15 reload the cassette. CHECK THE INPUT DV cable is not connected, or the connected digital device is exhausted. Rewind the tape or replace the cassette. - CHANGE THE BATTERY Battery pack is 72 turned off. Replace the cassette or change ...
Unload and 15 reload the cassette. CHECK THE INPUT DV cable is not connected, or the connected digital device is exhausted. Rewind the tape or replace the cassette. - CHANGE THE BATTERY Battery pack is 72 turned off. Replace the cassette or change ...

Instruction Manual
Page 85
... set to VIDEO. Editing Problem Dubbing via the camcorder's DV terminal does not work via the AV - is set to the instruction manual of the connected device. terminal. SET dial. E Cassette is turned off , or is Set the camcorder to [ON]. Additional Information 85 Image will TV/VIDEO selector on the...
... set to VIDEO. Editing Problem Dubbing via the camcorder's DV terminal does not work via the AV - is set to the instruction manual of the connected device. terminal. SET dial. E Cassette is turned off , or is Set the camcorder to [ON]. Additional Information 85 Image will TV/VIDEO selector on the...


