
User Guide
Page 2
... error or omission is found, contact us directly or an authorized Canon representative. • Canon is not responsible for any part of this document is prohibited. • The content of this printer. Trademarks • Canon, the Canon logo, BJ, and NetSpot are registered trademarks of Canon Inc. • Microsoft®, Windows®, Windows NT® and MS...
... error or omission is found, contact us directly or an authorized Canon representative. • Canon is not responsible for any part of this document is prohibited. • The content of this printer. Trademarks • Canon, the Canon logo, BJ, and NetSpot are registered trademarks of Canon Inc. • Microsoft®, Windows®, Windows NT® and MS...
User Guide
Page 7
... the power cord to unplug the cord from the power supply. z The Model N2000 weighs 16 kg (35 lb.) To avoid back strain or other than the one rated for the printer in the country where you purchased the printer. AC 100-127 V, 50/60 Hz AC 220-240 V, 50/60 Hz „...; Cleaning the Printer z To avoid minor burns or minor injury from moving parts, before lifting and moving it from an ink tank...
... the power cord to unplug the cord from the power supply. z The Model N2000 weighs 16 kg (35 lb.) To avoid back strain or other than the one rated for the printer in the country where you purchased the printer. AC 100-127 V, 50/60 Hz AC 220-240 V, 50/60 Hz „...; Cleaning the Printer z To avoid minor burns or minor injury from moving parts, before lifting and moving it from an ink tank...
User Guide
Page 8
... electrical shock, if a foreign object falls or a liquid spills into the printer, press the Power button immediately to switch the printer off then unplug the printer power cord from moving parts inside the printer. z To avoid a fire, electrical shock, or damage to disassemble the printer or attempt repairs. To avoid minor burns, never touch the electrical...
... electrical shock, if a foreign object falls or a liquid spills into the printer, press the Power button immediately to switch the printer off then unplug the printer power cord from moving parts inside the printer. z To avoid a fire, electrical shock, or damage to disassemble the printer or attempt repairs. To avoid minor burns, never touch the electrical...
User Guide
Page 9
... Legal Notice ii Safety Warnings and Precautions iii Contents vii Chapter 1 Before Using the Printer Printer Part Names 1-2 Switching the Printer On and Off 1-7 Switching the Printer On 1-7 Switching the Printer Off 1-8 Setting the Printer Online and Offline 1-9 Setting the Printer Online 1-9 Setting the Printer Offline 1-10 Chapter 2 Print Media You Can Use Print Media That Can Be Used...
... Legal Notice ii Safety Warnings and Precautions iii Contents vii Chapter 1 Before Using the Printer Printer Part Names 1-2 Switching the Printer On and Off 1-7 Switching the Printer On 1-7 Switching the Printer Off 1-8 Setting the Printer Online and Offline 1-9 Setting the Printer Online 1-9 Setting the Printer Offline 1-10 Chapter 2 Print Media You Can Use Print Media That Can Be Used...

User Guide
Page 13
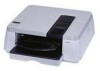
1 Before Using the Printer This section describes printer parts and procedures you should know before you use the printer.
1 Before Using the Printer This section describes printer parts and procedures you should know before you use the printer.

User Guide
Page 14
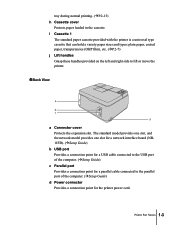
Printer Part Names „ Front View a b c d e f g h j i a Back upper cover Remove to install the printhead or to remove jammed paper. (ÆP.5-10, P.6-15) b Operation panel Provides Power button, ... here for removal in the tray or to remove jammed paper. (ÆP.2-15, P.6-15) d Right cover Open to operate the printer. Also functions as the paper exit 1-2 Before Using the Printer e Manual feed lever Releases the paper feed roller to replace ink tanks, press the Ink Replace button on the operation panel...
Printer Part Names „ Front View a b c d e f g h j i a Back upper cover Remove to install the printhead or to remove jammed paper. (ÆP.5-10, P.6-15) b Operation panel Provides Power button, ... here for removal in the tray or to remove jammed paper. (ÆP.2-15, P.6-15) d Right cover Open to operate the printer. Also functions as the paper exit 1-2 Before Using the Printer e Manual feed lever Releases the paper feed roller to replace ink tanks, press the Ink Replace button on the operation panel...
User Guide
Page 15
Printer Part Names 1-3 i Cassette 1 The standard paper cassette provided with the printer is a universal type cassette that can hold a variety paper sizes and types: plain paper, coated paper, transparencies (OHP film), etc. (ÆP.2-7) j Lift handles Grasp these ...handles provided on the left and right side to the parallel port of the computer. (ÆSetup Guide) c Parallel port Provides a connection point for the printer power cord. The standard model provides one slot, and the network model provides one slot for a network interface board (NB11FB). (ÆSetup Guide) b USB port...
Printer Part Names 1-3 i Cassette 1 The standard paper cassette provided with the printer is a universal type cassette that can hold a variety paper sizes and types: plain paper, coated paper, transparencies (OHP film), etc. (ÆP.2-7) j Lift handles Grasp these ...handles provided on the left and right side to the parallel port of the computer. (ÆSetup Guide) c Parallel port Provides a connection point for the printer power cord. The standard model provides one slot, and the network model provides one slot for a network interface board (NB11FB). (ÆSetup Guide) b USB port...

User Guide
Page 16
... printhead. (ÆSetup Guide) c Printhead Equipped with the nozzles that supply the inks for printing. This important part is not installed before shipping, so you must install it before you can use the printer. (ÆSetup Guide) d Carriage Holds the printhead and moves it left and right across the paper during printing...
... printhead. (ÆSetup Guide) c Printhead Equipped with the nozzles that supply the inks for printing. This important part is not installed before shipping, so you must install it before you can use the printer. (ÆSetup Guide) d Carriage Holds the printhead and moves it left and right across the paper during printing...

User Guide
Page 17
e Y ink tank f M ink tank g C ink tank h Bk ink tank These tanks hold the ink. Open the right cover then raise the ink tank cover. The ink tanks are not installed before shipping, so you must install all the ink times before you can use the printer. (ÆSetup Guide) Printer Part Names 1-5 To replace an ink tank, press the Ink Replace button on the operation panel to release the right cover. „ Under the Right Cover a b c d e f g h a Y ink tank cover b M ink tank cover c C ink tank cover d Bk ink tank cover The ink tank covers protect the tanks and lock them in place.
e Y ink tank f M ink tank g C ink tank h Bk ink tank These tanks hold the ink. Open the right cover then raise the ink tank cover. The ink tanks are not installed before shipping, so you must install all the ink times before you can use the printer. (ÆSetup Guide) Printer Part Names 1-5 To replace an ink tank, press the Ink Replace button on the operation panel to release the right cover. „ Under the Right Cover a b c d e f g h a Y ink tank cover b M ink tank cover c C ink tank cover d Bk ink tank cover The ink tank covers protect the tanks and lock them in place.
User Guide
Page 70
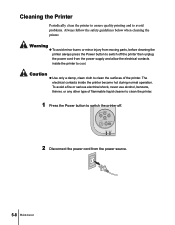
...Enter Power Online Ink Replace Online Message 2 Disconnect the power cord from the power supply and allow the electrical contacts inside the printer become hot during normal operation. To avoid a fire or serious electrical shock, never use alcohol, benzene, thinner, or any other type ...of the printer. Warning z To avoid minor burns or minor injury from moving parts, before cleaning the printer always press the Power button to avoid problems. Always follow the safety guidelines below when cleaning the...
...Enter Power Online Ink Replace Online Message 2 Disconnect the power cord from the power supply and allow the electrical contacts inside the printer become hot during normal operation. To avoid a fire or serious electrical shock, never use alcohol, benzene, thinner, or any other type ...of the printer. Warning z To avoid minor burns or minor injury from moving parts, before cleaning the printer always press the Power button to avoid problems. Always follow the safety guidelines below when cleaning the...

User Guide
Page 76
11 Remove the old printhead. The metal parts of the printhead. To avoid minor burns, never touch the metal parts of the printhead become very hot during printing. a 5-14 Maintenance Caution z If the printer was operating before you started to remove the printhead, allow the printer to cool for a few minutes. Important z Place the removed printhead in a vinyl bag and seal the bag. 12 Hold the new printhead by the grips (a) on both sides, remove it from its package, and remove the protective cap and packing material.
11 Remove the old printhead. The metal parts of the printhead. To avoid minor burns, never touch the metal parts of the printhead become very hot during printing. a 5-14 Maintenance Caution z If the printer was operating before you started to remove the printhead, allow the printer to cool for a few minutes. Important z Place the removed printhead in a vinyl bag and seal the bag. 12 Hold the new printhead by the grips (a) on both sides, remove it from its package, and remove the protective cap and packing material.

User Guide
Page 100
z You must pull the jammed paper to the front of the printer to remove it straight up could affect print quality or damage the printer. 6-18 Troubleshooting z Try to avoid touching other parts of the device. 7 If you see pieces of torn paper inside the printer, remove the rear upper cover then use both hands to pull the jammed paper to the front of the printer. Pulling it . a b Important z Never touch the encoder film (a), and try to avoid bending the transparent film (b).
z You must pull the jammed paper to the front of the printer to remove it straight up could affect print quality or damage the printer. 6-18 Troubleshooting z Try to avoid touching other parts of the device. 7 If you see pieces of torn paper inside the printer, remove the rear upper cover then use both hands to pull the jammed paper to the front of the printer. Pulling it . a b Important z Never touch the encoder film (a), and try to avoid bending the transparent film (b).


