
i9100 Quick Start Guide
Page 30
... OK. 5 Click OK on similar print jobs. 1 Open the Printer Properties dialog box. See "Opening the Printer Properties Dialog Box from Printing Profiles, and click Delete. Advanced Printing „ Saving and Recalling Driver Settings When you change the printer driver settings for a specific print job, such as printing black and white photos, or printing documents with a special background, you can...
... OK. 5 Click OK on similar print jobs. 1 Open the Printer Properties dialog box. See "Opening the Printer Properties Dialog Box from Printing Profiles, and click Delete. Advanced Printing „ Saving and Recalling Driver Settings When you change the printer driver settings for a specific print job, such as printing black and white photos, or printing documents with a special background, you can...
i9100 Quick Start Guide
Page 33
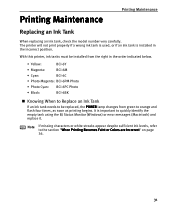
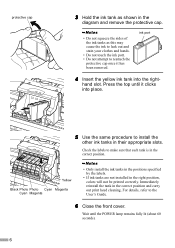
With this printer, ink tanks must be installed from the right in the incorrect position. Printing Maintenance Printing Maintenance Replacing an Ink...white streaks appear despite sufficient ink levels, refer to orange and flash four times, as soon as printing begins. It is installed in the order indicated below. • Yellow: BCI-6Y • ...Black: BCI-6BK „ Knowing When to Replace an Ink Tank If an ink tank needs to be replaced, the POWER lamp changes from green to the section "When Printing Becomes Faint or Colors are Incorrect" on page 36. 31 The printer will not print...
With this printer, ink tanks must be installed from the right in the incorrect position. Printing Maintenance Printing Maintenance Replacing an Ink...white streaks appear despite sufficient ink levels, refer to orange and flash four times, as soon as printing begins. It is installed in the order indicated below. • Yellow: BCI-6Y • ...Black: BCI-6BK „ Knowing When to Replace an Ink Tank If an ink tank needs to be replaced, the POWER lamp changes from green to the section "When Printing Becomes Faint or Colors are Incorrect" on page 36. 31 The printer will not print...
i9100 Quick Start Guide
Page 37
... the ink tank snaps firmly into the printer may not function. Printing Maintenance Important z Do not squeeze the sides of its first use an ink tank within six months of the ink tank, as this may be consumed even when a black-and-white or grayscale printing is specified. z Once an ink tank... cover. The ink tank installation process is removed, do not remove it from the printer and leave it . z Color ink may cause the ink to leak out and stain your clothes and hands. Note z To maintain optimal print quality, use . z Do not re-attach the protective cap once you have removed...
... the ink tank snaps firmly into the printer may not function. Printing Maintenance Important z Do not squeeze the sides of its first use an ink tank within six months of the ink tank, as this may be consumed even when a black-and-white or grayscale printing is specified. z Once an ink tank... cover. The ink tank installation process is removed, do not remove it from the printer and leave it . z Color ink may cause the ink to leak out and stain your clothes and hands. Note z To maintain optimal print quality, use . z Do not re-attach the protective cap once you have removed...
i9100 Quick Start Guide
Page 62
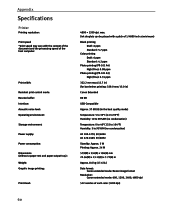
... Appendix Specifications Printer Printing resolution: Print speed *print speed may vary with a pitch of 1/4800 inch at minimum) Black printing Draft: 6 ppm Standard: 5.7 ppm Color printing Draft: 6 ppm Standard: 4.2 ppm Photo printing (PR-101 A4) High (Fine): 0.98 ppm Photo printing (PR-101 A3) High (Fine): 0.55 ppm 322.2 mm max.(12.7 in) (for borderless printing: 329.0 mm/13.0 in) Canon Extended...
... Appendix Specifications Printer Printing resolution: Print speed *print speed may vary with a pitch of 1/4800 inch at minimum) Black printing Draft: 6 ppm Standard: 5.7 ppm Color printing Draft: 6 ppm Standard: 4.2 ppm Photo printing (PR-101 A4) High (Fine): 0.98 ppm Photo printing (PR-101 A3) High (Fine): 0.55 ppm 322.2 mm max.(12.7 in) (for borderless printing: 329.0 mm/13.0 in) Canon Extended...

i9100 Quick Start Guide
Page 63
...2000: 50MB Windows Me/Windows 98: 15MB * USB operation can only be supported as an OS function with Mac OS X v10.2 or later) - Printer Ink Tanks: Appendix Capacity (pages): Black (BCI-6BK) approx. 590 *1, approx. 990 *2 Cyan (BCI-6C) approx. 860 *2 Magenta (BCI-6M) approx. 790 *2 Yellow (BCI-...270 *2 *1 1500 characters per page, normal text, at standard and plain paper mode with Windows XP *2 Based on printing the ISO JIS-SCID No.5 pattern at standard and plain paper mode with Windows XP BJ Printer Driver Systems Requirements z Use a computer on which Mac OS 8.6-9.x can operate. Shared...
...2000: 50MB Windows Me/Windows 98: 15MB * USB operation can only be supported as an OS function with Mac OS X v10.2 or later) - Printer Ink Tanks: Appendix Capacity (pages): Black (BCI-6BK) approx. 590 *1, approx. 990 *2 Cyan (BCI-6C) approx. 860 *2 Magenta (BCI-6M) approx. 790 *2 Yellow (BCI-...270 *2 *1 1500 characters per page, normal text, at standard and plain paper mode with Windows XP *2 Based on printing the ISO JIS-SCID No.5 pattern at standard and plain paper mode with Windows XP BJ Printer Driver Systems Requirements z Use a computer on which Mac OS 8.6-9.x can operate. Shared...
i9100 Quick Start Guide
Page 8
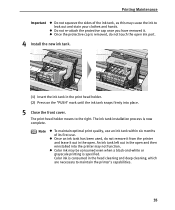
... tank in the correct position. Wait until it has been removed. For details, refer to the User's Guide. 6 Close the front cover. Yellow Black Photo Photo Cyan Magenta Cyan Magenta • Only install the ink tanks in the positions specified by the labels. • If ink tanks are not... installed in the right position, colors will not be printed correctly. ink port 4 Insert the yellow ink tank into place. 5 Use the same procedure to install the other ink tanks in their appropriate...
... tank in the correct position. Wait until it has been removed. For details, refer to the User's Guide. 6 Close the front cover. Yellow Black Photo Photo Cyan Magenta Cyan Magenta • Only install the ink tanks in the positions specified by the labels. • If ink tanks are not... installed in the right position, colors will not be printed correctly. ink port 4 Insert the yellow ink tank into place. 5 Use the same procedure to install the other ink tanks in their appropriate...
i9100 Quick Start Guide
Page 24
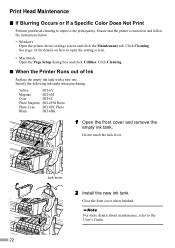
... 2 Install the new ink tank. Yellow BCI-6Y Magenta BCI-6M Cyan BCI-6C Photo Magenta BCI-6PM Photo Photo Cyan BCI-6PC Photo Black BCI-6BK 1 Open the front cover and remove the empty ink tank. See page 14 for details on and follow the instructions below. &#... • Macintosh Open the Page Setup dialog box and click Utilities. Click Cleaning. Close the front cover when finished. Ensure that the printer is turned on how to the User's Guide. 22 Print Head Maintenance „ If Blurring Occurs or If a Specific Color Does Not Print Perform print head cleaning to improve the...
... 2 Install the new ink tank. Yellow BCI-6Y Magenta BCI-6M Cyan BCI-6C Photo Magenta BCI-6PM Photo Photo Cyan BCI-6PC Photo Black BCI-6BK 1 Open the front cover and remove the empty ink tank. See page 14 for details on and follow the instructions below. &#... • Macintosh Open the Page Setup dialog box and click Utilities. Click Cleaning. Close the front cover when finished. Ensure that the printer is turned on how to the User's Guide. 22 Print Head Maintenance „ If Blurring Occurs or If a Specific Color Does Not Print Perform print head cleaning to improve the...
i9100 Easy Setup Instructions
Page 1
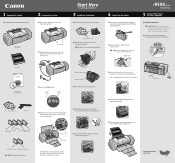
... side two. The print head holder automatically moves to a power outlet. Shipping Tape 2 Plug the power cord into place. Continue with Step 6 on the sides of the printer. Tear at a slight angle. i9100 Series Photo Printer 5 Connect the Printer To Your Computer 1 TURN THE PRINTER OFF. Press down until...cap from the box. 1 Unpack the Printer 1 Carefully remove all items from the print head. Protective cap Paper Rest Documentation and Software Kit i 9100 Series Print Head Power Cord Ink Tanks BCI-6C Cyan BCI-6M Magenta BCI-6BK Black BCI-6Y Yellow BCI-6PC Photo Cyan ...
... side two. The print head holder automatically moves to a power outlet. Shipping Tape 2 Plug the power cord into place. Continue with Step 6 on the sides of the printer. Tear at a slight angle. i9100 Series Photo Printer 5 Connect the Printer To Your Computer 1 TURN THE PRINTER OFF. Press down until...cap from the box. 1 Unpack the Printer 1 Carefully remove all items from the print head. Protective cap Paper Rest Documentation and Software Kit i 9100 Series Print Head Power Cord Ink Tanks BCI-6C Cyan BCI-6M Magenta BCI-6BK Black BCI-6Y Yellow BCI-6PC Photo Cyan ...


