
Service Manual
Page 5
ABOUT THIS MANUAL This manual is divided into five parts containing the information required for servicing the BJC-6500 printer. Part 3: OPERATION This part explains how to operate the unit properly, and how to the separate ...PRODUCT SPECIFICATIONS This part outlines the product and its specifications. Part 4: TROUBLESHOOTING This part explains how to locate and replace serviceable units and parts. MAINTENANCE PRODUCT SPECIFICATIONS OPERATION I It includes precautions and details for disassembling and assembling the BJC-6500 printer. It is divided into two sections...
ABOUT THIS MANUAL This manual is divided into five parts containing the information required for servicing the BJC-6500 printer. Part 3: OPERATION This part explains how to operate the unit properly, and how to the separate ...PRODUCT SPECIFICATIONS This part outlines the product and its specifications. Part 4: TROUBLESHOOTING This part explains how to locate and replace serviceable units and parts. MAINTENANCE PRODUCT SPECIFICATIONS OPERATION I It includes precautions and details for disassembling and assembling the BJC-6500 printer. It is divided into two sections...

Service Manual
Page 30
Part 2: MAINTENANCE BJC-6500 2. DISASSEMBLY AND REASSEMBLY 2.1 List of Tools Ordinary Tools Phillips screwdriver Phillips screwdriver (about 38 mm long) Blade screwdriver Long-nose pliers Tweezers Flat brush Oil ... plastic parts For removing and replacing springs For removing and installing flexible cables For applying grease (one per grease type) For applying FLOIL 946P For troubleshooting Substitute for Lock Pin QY9-0053 Special Tools (part no.) 1.9-mm gap gauge (QY9-0038-000) 0.5-mm gap gauge (QY9-0001-000) Tension spring (QY9...
Part 2: MAINTENANCE BJC-6500 2. DISASSEMBLY AND REASSEMBLY 2.1 List of Tools Ordinary Tools Phillips screwdriver Phillips screwdriver (about 38 mm long) Blade screwdriver Long-nose pliers Tweezers Flat brush Oil ... plastic parts For removing and replacing springs For removing and installing flexible cables For applying grease (one per grease type) For applying FLOIL 946P For troubleshooting Substitute for Lock Pin QY9-0053 Special Tools (part no.) 1.9-mm gap gauge (QY9-0038-000) 0.5-mm gap gauge (QY9-0001-000) Tension spring (QY9...

Service Manual
Page 65
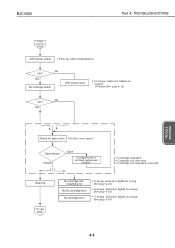
BJC-6500 Part 4: TROUBLESHOOTING 1. One beep Indicator blinks TROUBLE SHOOTING To next page 4-1 MPU/printer controller initialization ROM check DRAM check Ink sensor/waste ink full/printer temperature sensor (TH1) check Ink sensor error • Error not displayed (See page 4-18) Read EEPROM Turn power on • The POWER button is supplied with AC power. TROUBLESHOOTING BY DISPLAYED ERRORS 1.1 Initial Flowchart Plug in the AC cord • The printer is pressed.
BJC-6500 Part 4: TROUBLESHOOTING 1. One beep Indicator blinks TROUBLE SHOOTING To next page 4-1 MPU/printer controller initialization ROM check DRAM check Ink sensor/waste ink full/printer temperature sensor (TH1) check Ink sensor error • Error not displayed (See page 4-18) Read EEPROM Turn power on • The POWER button is supplied with AC power. TROUBLESHOOTING BY DISPLAYED ERRORS 1.1 Initial Flowchart Plug in the AC cord • The printer is pressed.

Service Manual
Page 66
Part 4: TROUBLESHOOTING BJC-6500 From previous page Error check OK? Yes No Head temperature error Carriage unlocked Head temperature sensor error • 10 beeps, indicator blinks in orange 7 times (... • 3 beeps, indicator blinks in orange 5 times (See page 4-6) OK? Yes No EEPROM error ROM error Diode sensor check RAM error Waste ink full error Printer temperature sensor error • 10 beeps, indicator blinks in orange 3 times (See page 4-6) • 10 beeps, indicator blinks in orange 1 time (See page 4-6) • 10...
Part 4: TROUBLESHOOTING BJC-6500 From previous page Error check OK? Yes No Head temperature error Carriage unlocked Head temperature sensor error • 10 beeps, indicator blinks in orange 7 times (... • 3 beeps, indicator blinks in orange 5 times (See page 4-6) OK? Yes No EEPROM error ROM error Diode sensor check RAM error Waste ink full error Printer temperature sensor error • 10 beeps, indicator blinks in orange 3 times (See page 4-6) • 10 beeps, indicator blinks in orange 1 time (See page 4-6) • 10...
Service Manual
Page 67
... orang (See page 4-16) • 6 beeps, indicator lights in orange (See page 4-16) • 7 beeps, indicator lights in orange. 10 times (See page 4-12) OK? BJC-6500 Part 4: TROUBLESHOOTING From previous page ASF sensor check • Pick-up roller initialization No OK?
... orang (See page 4-16) • 6 beeps, indicator lights in orange (See page 4-16) • 7 beeps, indicator lights in orange. 10 times (See page 4-12) OK? BJC-6500 Part 4: TROUBLESHOOTING From previous page ASF sensor check • Pick-up roller initialization No OK?
Service Manual
Page 69
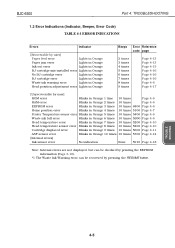
TROUBLE SHOOTING 4-5 BJC-6500 Part 4: TROUBLESHOOTING 1.2 Error Indications (Indicator, Beeper, Error Code) TABLE 4-1 ERROR INDICATIONS Errors Indicator [Recoverable by user] Paper feed error Lights in Orange Paper jam error Lights in ... 2 times 10 times Page 4-6 EEPROM error Blinks in Orange 3 times 10 times 6800 Page 4-6 Home position error Blinks in Orange 4 times 10 times 5100 Page 4-7 Printer Temperature sensor error Blinks in Orange 5 times 10 times 5400 Page 4-6 Waste ink full error Blinks in Orange 6 times 10 times 5B00 Page 4-6 Head temperature...
TROUBLE SHOOTING 4-5 BJC-6500 Part 4: TROUBLESHOOTING 1.2 Error Indications (Indicator, Beeper, Error Code) TABLE 4-1 ERROR INDICATIONS Errors Indicator [Recoverable by user] Paper feed error Lights in Orange Paper jam error Lights in ... 2 times 10 times Page 4-6 EEPROM error Blinks in Orange 3 times 10 times 6800 Page 4-6 Home position error Blinks in Orange 4 times 10 times 5100 Page 4-7 Printer Temperature sensor error Blinks in Orange 5 times 10 times 5400 Page 4-6 Waste ink full error Blinks in Orange 6 times 10 times 5B00 Page 4-6 Head temperature...

Service Manual
Page 70
... ROM Error ROM cannot be read or written. Control ROM Replace the ROM or control board. 2. EEPROM, printer controller Replace the control board. Thermistor (TH1) Replace the control board. 5. Replace the control board. 4-6 Reset ...printer controller Replace the control board. 3. Printer Temperature Sensor Error The thermistor is 100% or 95% of the capacity of waste ink absorbed is defective. BJC-6500 CAUTION Error indications may fail if the ROM or RAM error occurs. 4. RAM Error RAM cannot be written. Part 4: TROUBLESHOOTING 1.3 Troubleshooting...
... ROM Error ROM cannot be read or written. Control ROM Replace the ROM or control board. 2. EEPROM, printer controller Replace the control board. Thermistor (TH1) Replace the control board. 5. Replace the control board. 4-6 Reset ...printer controller Replace the control board. 3. Printer Temperature Sensor Error The thermistor is 100% or 95% of the capacity of waste ink absorbed is defective. BJC-6500 CAUTION Error indications may fail if the ROM or RAM error occurs. 4. RAM Error RAM cannot be written. Part 4: TROUBLESHOOTING 1.3 Troubleshooting...
Service Manual
Page 71
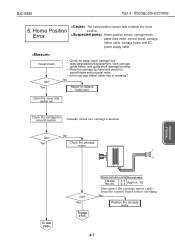
... smoothness and unusual noise. • Is the carriage ribbon cable free of creasing? Yes No Check the carriage motor 1 4 TROUBLE SHOOTING To next page OK? BJC-6500 Part 4: TROUBLESHOOTING 6. OK? Home position sensor, carriage motor, paper feed motor, control board, carriage ribbon cable, carriage board, and DC power supply cable Visual check OK?
... smoothness and unusual noise. • Is the carriage ribbon cable free of creasing? Yes No Check the carriage motor 1 4 TROUBLE SHOOTING To next page OK? BJC-6500 Part 4: TROUBLESHOOTING 6. OK? Home position sensor, carriage motor, paper feed motor, control board, carriage ribbon cable, carriage board, and DC power supply cable Visual check OK?

Service Manual
Page 72
... page 4-9 (1) Measurement points Normal value CN403 Pin 1-3 2-4 Approx. 3 Disconnect the paper feed motor cable from the control board before checking. Replace the carriage board 2. Part 4: TROUBLESHOOTING BJC-6500 From previous page Visually check operation of paper feed unit OK? Replace the purge unit 1. No Replace the paper feed motor Visually check that Visually...
... page 4-9 (1) Measurement points Normal value CN403 Pin 1-3 2-4 Approx. 3 Disconnect the paper feed motor cable from the control board before checking. Replace the carriage board 2. Part 4: TROUBLESHOOTING BJC-6500 From previous page Visually check operation of paper feed unit OK? Replace the purge unit 1. No Replace the paper feed motor Visually check that Visually...

Service Manual
Page 73
Yes No signal) Replace the control board +24 VDC output check • Check for output (J1). +5VDC HVCONT GND +24VDC GND OK? No Yes Replace the control board Replace the AC adapter Replace the DC power supply cable TROUBLE SHOOTING 4-9 OK? BJC-6500 Part 4: TROUBLESHOOTING (1) HVCONT check HVCONT (+24 VDC output control for +24 VDC during operation (J1). • No +24 VDC is output when the carriage is at the cartridge replacement position or if an error occurs.
Yes No signal) Replace the control board +24 VDC output check • Check for output (J1). +5VDC HVCONT GND +24VDC GND OK? No Yes Replace the control board Replace the AC adapter Replace the DC power supply cable TROUBLE SHOOTING 4-9 OK? BJC-6500 Part 4: TROUBLESHOOTING (1) HVCONT check HVCONT (+24 VDC output control for +24 VDC during operation (J1). • No +24 VDC is output when the carriage is at the cartridge replacement position or if an error occurs.
Service Manual
Page 74
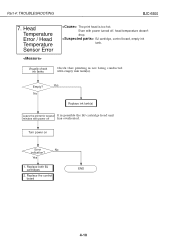
... BJ cartridge, control board, empty ink tank. Replace both BJ cartridges 2. Turn power on Error No indication? Even with empty ink tank(s). Part 4: TROUBLESHOOTING BJC-6500 7. Visually check ink tanks Check that printing is not being conducted with power turned off has overheated. Head Temperature Error / Head Temperature Sensor Error The ... head is possible the BJ cartridge head unit minutes with power off , head temperature doesn't drop. No Yes Replace ink tank(s) Leave the printer for several It is too hot. Replace the control board END 4-10 Yes 1.
... BJ cartridge, control board, empty ink tank. Replace both BJ cartridges 2. Turn power on Error No indication? Even with empty ink tank(s). Part 4: TROUBLESHOOTING BJC-6500 7. Visually check ink tanks Check that printing is not being conducted with power turned off has overheated. Head Temperature Error / Head Temperature Sensor Error The ... head is possible the BJ cartridge head unit minutes with power off , head temperature doesn't drop. No Yes Replace ink tank(s) Leave the printer for several It is too hot. Replace the control board END 4-10 Yes 1.
Service Manual
Page 75
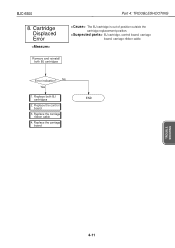
Replace both BJ cartridges The BJ cartridge is out of position outside the cartridge replacement position. Cartridge Displaced Error Remove and reinstall both BJ cartridges 2. BJ cartridge, control board, carriage board, carriage ribbon cable Error indication? Replace the carriage ribbon cable 4. Replace the carriage board END TROUBLE SHOOTING 4-11 BJC-6500 Part 4: TROUBLESHOOTING 8. No Yes 1. Replace the control board 3.
Replace both BJ cartridges The BJ cartridge is out of position outside the cartridge replacement position. Cartridge Displaced Error Remove and reinstall both BJ cartridges 2. BJ cartridge, control board, carriage board, carriage ribbon cable Error indication? Replace the carriage ribbon cable 4. Replace the carriage board END TROUBLE SHOOTING 4-11 BJC-6500 Part 4: TROUBLESHOOTING 8. No Yes 1. Replace the control board 3.

Service Manual
Page 76
LF roller drive switching isn't conducted. No Yes END 1.Replace the ASF drive gear unit 2.Replace the Control board 4-12 OK? Part 4: TROUBLESHOOTING BJC-6500 10. Yes Adjust the ASF gear position No • Was the ASF gear position adjustment Replace pick-up roller doesn't turn. ASF Sensor Error Visually ...
LF roller drive switching isn't conducted. No Yes END 1.Replace the ASF drive gear unit 2.Replace the Control board 4-12 OK? Part 4: TROUBLESHOOTING BJC-6500 10. Yes Adjust the ASF gear position No • Was the ASF gear position adjustment Replace pick-up roller doesn't turn. ASF Sensor Error Visually ...
Service Manual
Page 77
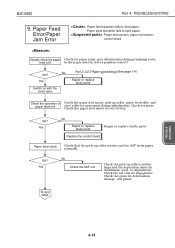
...-of paper feed unit Check the paper feed motor, pick-up roller rotates and the ASF feeds paper normally. To next page TROUBLE SHOOTING 4-13 BJC-6500 Part 4: TROUBLESHOOTING 9. Replace the control board Paper feed check Check that the pick-up roller, paper feed roller, and eject roller for paper jams, gear deformation...
...-of paper feed unit Check the paper feed motor, pick-up roller rotates and the ASF feeds paper normally. To next page TROUBLE SHOOTING 4-13 BJC-6500 Part 4: TROUBLESHOOTING 9. Replace the control board Paper feed check Check that the pick-up roller, paper feed roller, and eject roller for paper jams, gear deformation...

Service Manual
Page 78
... points Sensor Normal value J8 Pin No. 3 Open Low level (paper detected) C l o s e High level (no paper detected) With the printer switched ON, check actuation of the paper end sensor's arm using paper. Yes No Replace the control board Visually check the Drive Swiching Unit Check...ASF gear position adjustment See Part 2: 2.4.5 How to adjust the ASF gear positon (page 2-14). Part 4: TROUBLESHOOTING From previous page Paper End Sensor Paper End Sensor Paper BJC-6500 ASF Feed Path Check the paper end sensor's arm Using paper, check the arm for displaced gears, missing teeth,...
... points Sensor Normal value J8 Pin No. 3 Open Low level (paper detected) C l o s e High level (no paper detected) With the printer switched ON, check actuation of the paper end sensor's arm using paper. Yes No Replace the control board Visually check the Drive Swiching Unit Check...ASF gear position adjustment See Part 2: 2.4.5 How to adjust the ASF gear positon (page 2-14). Part 4: TROUBLESHOOTING From previous page Paper End Sensor Paper End Sensor Paper BJC-6500 ASF Feed Path Check the paper end sensor's arm Using paper, check the arm for displaced gears, missing teeth,...

Service Manual
Page 79
Empty? Ink tank, EEPROM Visually check ink tanks Remove ink tank and confirm that the ink tank is empty. 11. Yes No Reinstall the ink tank Replace the control board TROUBLE SHOOTING 4-15 BJC-6500 Part 4: TROUBLESHOOTING The ink tank is not empty. No Yes Replace ink tank(s) Reinstall the ink tank securely OK? Ink Out Error EEPROM is defective.
Empty? Ink tank, EEPROM Visually check ink tanks Remove ink tank and confirm that the ink tank is empty. 11. Yes No Reinstall the ink tank Replace the control board TROUBLE SHOOTING 4-15 BJC-6500 Part 4: TROUBLESHOOTING The ink tank is not empty. No Yes Replace ink tank(s) Reinstall the ink tank securely OK? Ink Out Error EEPROM is defective.

Service Manual
Page 80
...Repair or replace faulty parts Reinstall the BJ cartridges Reinstall both the left and right BJ cartridges. No Error indication? END 4-16 Part 4: TROUBLESHOOTING BJC-6500 12. No Error indication? Replace the control board 2.Replace the carriage ribbon cable 3.Replace the carriage board. BJ Cartridge Error/BJ Cartridge Misinstalled... the contact section is free of foreign matter. • Check that the Black or Photo BJ cartridge is on the left and the Color BJ cartridge is on the right side of the carriage. • Check that the cartridge lock lever is locked. • Check the...
...Repair or replace faulty parts Reinstall the BJ cartridges Reinstall both the left and right BJ cartridges. No Error indication? END 4-16 Part 4: TROUBLESHOOTING BJC-6500 12. No Error indication? Replace the control board 2.Replace the carriage ribbon cable 3.Replace the carriage board. BJ Cartridge Error/BJ Cartridge Misinstalled... the contact section is free of foreign matter. • Check that the Black or Photo BJ cartridge is on the left and the Color BJ cartridge is on the right side of the carriage. • Check that the cartridge lock lever is locked. • Check the...

Service Manual
Page 81
...) cartridge ribbon cable 4-17 OK? Replace the ink tanks • Black/cyan ink tank 3. Approx. 2.0V OK? BJC-6500 Part 4: TROUBLESHOOTING 13. Yes No Replace the print position sensor 11.. Replace the BJ cartridges • Black/Color BJ cartridge 1 4 TROUBLE SHOOTING Measurement points Pin No. 1- 2 Pin No. 2- 3 Sensor Normal value ... Yes No 1. RReepplalacceeththeecarriage bcoaarrdiage...
...) cartridge ribbon cable 4-17 OK? Replace the ink tanks • Black/cyan ink tank 3. Approx. 2.0V OK? BJC-6500 Part 4: TROUBLESHOOTING 13. Yes No Replace the print position sensor 11.. Replace the BJ cartridges • Black/Color BJ cartridge 1 4 TROUBLE SHOOTING Measurement points Pin No. 1- 2 Pin No. 2- 3 Sensor Normal value ... Yes No 1. RReepplalacceeththeecarriage bcoaarrdiage...

Service Manual
Page 82
Yes Measurement point Pin No. 2-3 1-2 Normal value Approx. 1.2V Approx. 0V No Replace the ink sensor Replace the control board 4-18 Yes Ink sensor check END 13 OK? Turn the printer off, • Turn the printer off, then on in a location away then on from intense light. Ink sensor, control board, ink tank Visual check • Is the ink tank present? • Is it displaced? • Reinstall the ink tank. Does error No still occur? Part 4: TROUBLESHOOTING BJC-6500 14 Ink Sensor Error Ink sensor check does not detect ink out.
Yes Measurement point Pin No. 2-3 1-2 Normal value Approx. 1.2V Approx. 0V No Replace the ink sensor Replace the control board 4-18 Yes Ink sensor check END 13 OK? Turn the printer off, • Turn the printer off, then on in a location away then on from intense light. Ink sensor, control board, ink tank Visual check • Is the ink tank present? • Is it displaced? • Reinstall the ink tank. Does error No still occur? Part 4: TROUBLESHOOTING BJC-6500 14 Ink Sensor Error Ink sensor check does not detect ink out.

Service Manual
Page 83
BJC-6500 Part 4: TROUBLESHOOTING 2. TROUBLESHOOTING BY SYMPTOMS 2.1 Troubleshooting by Symptoms 1. Power Does Pressing the POWER button fails to switch on the printer. Defective AC adapter, control board, or DC power supply cable Check the AC adapter for +5 Vdc output voltage +5VDC OK? Not Turn On. No Yes Replace the control board Replace the DC power supply cable GND Replace the AC adapter TROUBLE SHOOTING 4-19 Pressing the POWER button does not start initialization.
BJC-6500 Part 4: TROUBLESHOOTING 2. TROUBLESHOOTING BY SYMPTOMS 2.1 Troubleshooting by Symptoms 1. Power Does Pressing the POWER button fails to switch on the printer. Defective AC adapter, control board, or DC power supply cable Check the AC adapter for +5 Vdc output voltage +5VDC OK? Not Turn On. No Yes Replace the control board Replace the DC power supply cable GND Replace the AC adapter TROUBLE SHOOTING 4-19 Pressing the POWER button does not start initialization.


