
ZR Instruction Manual
Page 2
... They may be read before cleaning. Do not defeat the safety purpose of electric shock - Pay particular attention to the Canon Digital Video Camcorder ZR and all its accessories. Retain Instructions - All operating and maintenance instructions should be hazardous. 7. A product and cart combination ... plug. 12. Read Instructions - Power cords should be routed so that they may cause picture interference, or permanently damage the camera. 8. Section 810 of the National Electrical Code, ANSI / NFPA No. 70-1984, provides information with respect to proper grounding...
... They may be read before cleaning. Do not defeat the safety purpose of electric shock - Pay particular attention to the Canon Digital Video Camcorder ZR and all its accessories. Retain Instructions - All operating and maintenance instructions should be hazardous. 7. A product and cart combination ... plug. 12. Read Instructions - Power cords should be routed so that they may cause picture interference, or permanently damage the camera. 8. Section 810 of the National Electrical Code, ANSI / NFPA No. 70-1984, provides information with respect to proper grounding...

ZR Instruction Manual
Page 4
...Instructions 3 Audio Recording 44 Thank you for Choosing a Canon ......... 6 Setting the Self-Timer 46 Introducing the ZR 7 Mastering the Basics ~ When Making Manual Adjustments ...~ Adjusting Exposure Manually 47 Adjusting Focus Manually 49 Powering Your Camcorder 8 Setting the White Balance 50 Loading a Cassette ...a permanent record of your purchase to a VCR 57 Introduction Using the Full Range of Features ~ General ... ~ Selecting from the Camera & VCR Menus 28 Turning the Image Stabilizer On/Off .. 30 Using the Wireless Controller 31 ~ For Recording ...~ Setting the Date...
...Instructions 3 Audio Recording 44 Thank you for Choosing a Canon ......... 6 Setting the Self-Timer 46 Introducing the ZR 7 Mastering the Basics ~ When Making Manual Adjustments ...~ Adjusting Exposure Manually 47 Adjusting Focus Manually 49 Powering Your Camcorder 8 Setting the White Balance 50 Loading a Cassette ...a permanent record of your purchase to a VCR 57 Introduction Using the Full Range of Features ~ General ... ~ Selecting from the Camera & VCR Menus 28 Turning the Image Stabilizer On/Off .. 30 Using the Wireless Controller 31 ~ For Recording ...~ Setting the Date...
ZR Instruction Manual
Page 6
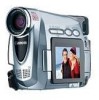
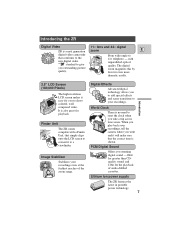
... special effects and scene transitions to 11× telephoto - Introducing the ZR Digital Video 11× lens and 44× digital ZR is a next generation zoom E digital video camcorder that conforms to the new digital video Mini standard to shoot colorful, ...well composed video. Lithium ion power supply The ZR features the latest in portable power technology. 7 Digital Effects Advanced digital technology allows you outstanding picture quality. Image Stabilizer Stabilizes your recordings, tell the camera...
... special effects and scene transitions to 11× telephoto - Introducing the ZR Digital Video 11× lens and 44× digital ZR is a next generation zoom E digital video camcorder that conforms to the new digital video Mini standard to shoot colorful, ...well composed video. Lithium ion power supply The ZR features the latest in portable power technology. 7 Digital Effects Advanced digital technology allows you outstanding picture quality. Image Stabilizer Stabilizes your recordings, tell the camera...
ZR Instruction Manual
Page 7
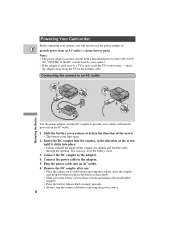
... stopper out slightly and feed the cable through the opening. Connect the DC coupler to emit noise - B A Powering Your Camcorder Before operating your camera, you will need to use . • Place the camera on its side before removing the power source. 8 Mastering the Basics You can now close the battery cover. 3. move the...
... stopper out slightly and feed the cable through the opening. Connect the DC coupler to emit noise - B A Powering Your Camcorder Before operating your camera, you will need to use . • Place the camera on its side before removing the power source. 8 Mastering the Basics You can now close the battery cover. 3. move the...
ZR Instruction Manual
Page 8
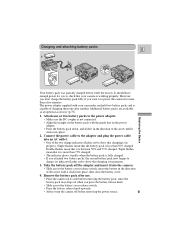
... that charging is not connected. • Align the triangle on the battery pack with your camera is capable of the two charge indicators flashes red to show that it to show that your camcorder can hold two battery packs and is working properly. Double flashes mean that it is more... than a few minutes. Remove the battery pack after another. The power adapter supplied with the guide line on its indicator flashes red to power the camera for you press ...
... that charging is not connected. • Align the triangle on the battery pack with your camera is capable of the two charge indicators flashes red to show that it to show that your camcorder can hold two battery packs and is working properly. Double flashes mean that it is more... than a few minutes. Remove the battery pack after another. The power adapter supplied with the guide line on its indicator flashes red to power the camera for you press ...
ZR Instruction Manual
Page 10
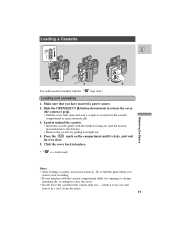
...Press the PUSH mark on the compartment until it clicks, and wait for the cassette compartment to its case and store it in the camera after use record search (p. 34) to find the point where you have inserted a power source. 2. return it to open and ... E EJECT 4 3 5 Use videocassettes marked with the cassette compartment while it straight out. 4. Slide the OPEN/EJECT 5 button downwards to release the cover (the camera's grip). • Pull the cover fully open automatically. 3. Click the cover back into place. * Mini is opening or closing automatically, or attempt to close ...
...Press the PUSH mark on the compartment until it clicks, and wait for the cassette compartment to its case and store it in the camera after use record search (p. 34) to find the point where you have inserted a power source. 2. return it to open and ... E EJECT 4 3 5 Use videocassettes marked with the cassette compartment while it straight out. 4. Slide the OPEN/EJECT 5 button downwards to release the cover (the camera's grip). • Pull the cover fully open automatically. 3. Click the cover back into place. * Mini is opening or closing automatically, or attempt to close ...
ZR Instruction Manual
Page 11
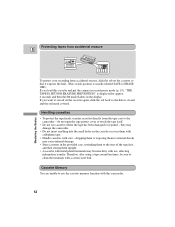
... information transfer. Therefore, after using a tape around ten times, be sure to use the cassette memory function with this cassette and put the camera in record pause mode (p. 13), "THE TAPE IS SET FOR ERASURE PREVENTION" is displayed for approx. 4 seconds and then the v mark... the red mark covered. dropping them or exposing them with cellophane tape. • Handle cassettes with care - If you want to the camcorder - they may cause internal damage. • Store cassettes in the display. Protecting tapes from accidental erasure E REC SAVE REC SAVE Mastering the...
... information transfer. Therefore, after using a tape around ten times, be sure to use the cassette memory function with this cassette and put the camera in record pause mode (p. 13), "THE TAPE IS SET FOR ERASURE PREVENTION" is displayed for approx. 4 seconds and then the v mark... the red mark covered. dropping them or exposing them with cellophane tape. • Handle cassettes with care - If you want to the camcorder - they may cause internal damage. • Store cassettes in the display. Protecting tapes from accidental erasure E REC SAVE REC SAVE Mastering the...
ZR Instruction Manual
Page 12
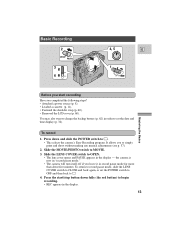
... REC appears in the display. 13 Slide the MOVIE/PHOTO switch to simply point and shoot without making any manual adjustments (see p. 37). 2. the camera is now in record pause mode for more than about five minutes. Basic Recording 2 MOVIE PHOTO 3 OPEN 6 CLOSE 4, 5 E 1 OFF VCR ...then back to charge the backup battery (p. 62) in the display - Press the start recording Have you leave it in "record pause mode." • The camera will turn itself off if you completed the following steps? • Attached a power source (p. 8). • Loaded a cassette (p. 11). • Fastened ...
... REC appears in the display. 13 Slide the MOVIE/PHOTO switch to simply point and shoot without making any manual adjustments (see p. 37). 2. the camera is now in record pause mode for more than about five minutes. Basic Recording 2 MOVIE PHOTO 3 OPEN 6 CLOSE 4, 5 E 1 OFF VCR ...then back to charge the backup battery (p. 62) in the display - Press the start recording Have you leave it in "record pause mode." • The camera will turn itself off if you completed the following steps? • Attached a power source (p. 8). • Loaded a cassette (p. 11). • Fastened ...
ZR Instruction Manual
Page 13
... POWER switch to remember your fingers do not obstruct the microphone or lens during recording. • In addition to [ (Easy Recording), the camera has six other recording programs. Turn the POWER switch to the P position to give you like by pressing the start /stop button. 6. ...as the POWER switch is recording correctly, make a test recording first. • Before making important recordings, clean the video heads using a Canon DVM-CL Digital Video Head Cleaning Cassette or a commercially available digital video head cleaning cassette. • You cannot monitor the sound from the...
... POWER switch to remember your fingers do not obstruct the microphone or lens during recording. • In addition to [ (Easy Recording), the camera has six other recording programs. Turn the POWER switch to the P position to give you like by pressing the start /stop button. 6. ...as the POWER switch is recording correctly, make a test recording first. • Before making important recordings, clean the video heads using a Canon DVM-CL Digital Video Head Cleaning Cassette or a commercially available digital video head cleaning cassette. • You cannot monitor the sound from the...
ZR Instruction Manual
Page 14
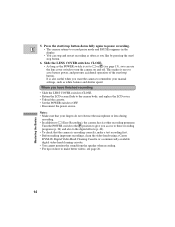
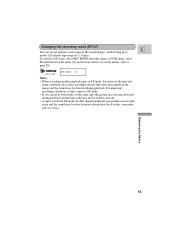
... when played back on how to use the menus, refer to LP mode, select REC MODE from the camera or VCR menu, select LP and then close the menu (for instructions on this camcorder, and vice versa. Mastering the Basics 15 LP extends tape usage by 1.5 times. For important recordings, therefore, ...set the camera to SP mode. • If you record in both modes on the same tape, the picture may ...
... when played back on how to use the menus, refer to LP mode, select REC MODE from the camera or VCR menu, select LP and then close the menu (for instructions on this camcorder, and vice versa. Mastering the Basics 15 LP extends tape usage by 1.5 times. For important recordings, therefore, ...set the camera to SP mode. • If you record in both modes on the same tape, the picture may ...
ZR Instruction Manual
Page 15
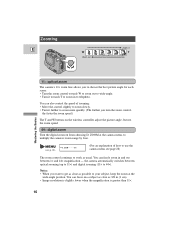
... speed. 44× digital zoom Turn the digital zoom on a subject as close as possible to your subject, keep the zoom at the camera menu, to multiply the camera's zoom range by four. (see p. 28) D.ZOOM ON (For an explanation of zooming: • Move the control slightly to zoom slowly. &#...to 11×) and digital zooming (11× to 44×). Zooming E W Zoom out W T Zoom in T Mastering the Basics 11× optical zoom The camera's 11× zoom lens allows you want to get as close as 3/8 in (1 cm). • Image resolution is slightly lower when the magnification is greater...
... speed. 44× digital zoom Turn the digital zoom on a subject as close as possible to your subject, keep the zoom at the camera menu, to multiply the camera's zoom range by four. (see p. 28) D.ZOOM ON (For an explanation of zooming: • Move the control slightly to zoom slowly. &#...to 11×) and digital zooming (11× to 44×). Zooming E W Zoom out W T Zoom in T Mastering the Basics 11× optical zoom The camera's 11× zoom lens allows you want to get as close as 3/8 in (1 cm). • Image resolution is slightly lower when the magnification is greater...
ZR Instruction Manual
Page 16
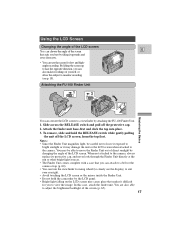
...inside the Finder Unit. • Do not hold the RELEASE switch while gently pulling the unit off the protective cap. 2. When not attached to the camera, always replace its protective cap, and never look through the Finder Unit directly at the sun or other bright light sources. • The Finder Unit... the angle of the screen that suits you best by tilting it upwards and away from the top first. To remove, slide and hold the camcorder by attaching the FU-100 Finder Unit. 1. In this case, attach the finder unit. Attaching the FU-100 Finder Unit 1 3 RELEASE E 2 Mastering the Basics ...
...inside the Finder Unit. • Do not hold the RELEASE switch while gently pulling the unit off the protective cap. 2. When not attached to the camera, always replace its protective cap, and never look through the Finder Unit directly at the sun or other bright light sources. • The Finder Unit... the angle of the screen that suits you best by tilting it upwards and away from the top first. To remove, slide and hold the camcorder by attaching the FU-100 Finder Unit. 1. In this case, attach the finder unit. Attaching the FU-100 Finder Unit 1 3 RELEASE E 2 Mastering the Basics ...
ZR Instruction Manual
Page 18
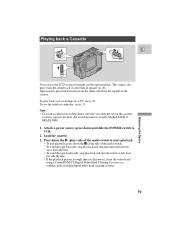
To use the LCD screen for instant, on the top left of the camera. Note: • To avoid accidental recording, make sure that you slide the tab on a TV, see p. 31. Press down the e (play back your recordings on ...the cassette so that it exposes the hole (the switch position is rough (mosaic-like noise), clean the video heads using a Canon DVM-CL Digital Video Head Cleaning Cassette or a commercially available digital video head cleaning cassette. 19 Playing back a Cassette FOCUS EXP E OFF VCR POWER Mastering...
To use the LCD screen for instant, on the top left of the camera. Note: • To avoid accidental recording, make sure that you slide the tab on a TV, see p. 31. Press down the e (play back your recordings on ...the cassette so that it exposes the hole (the switch position is rough (mosaic-like noise), clean the video heads using a Canon DVM-CL Digital Video Head Cleaning Cassette or a commercially available digital video head cleaning cassette. 19 Playing back a Cassette FOCUS EXP E OFF VCR POWER Mastering...
ZR Instruction Manual
Page 19
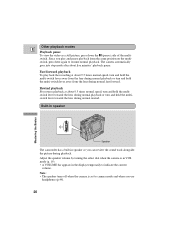
... hold the multi-switch lever away from the same position on the multiswitch, press here again to indicate the current volume. The camera automatically goes into stop mode after about 9.5 times normal speed, turn and hold the multiswitch lever towards the lens during playback.... Built-in speaker Speaker The camcorder has a built-in the display temporarily to resume normal playback. Mastering the Basics Other playback modes E Playback pause To view the video...
... hold the multi-switch lever away from the same position on the multiswitch, press here again to indicate the current volume. The camera automatically goes into stop mode after about 9.5 times normal speed, turn and hold the multiswitch lever towards the lens during playback.... Built-in speaker Speaker The camcorder has a built-in the display temporarily to resume normal playback. Mastering the Basics Other playback modes E Playback pause To view the video...
ZR Instruction Manual
Page 20
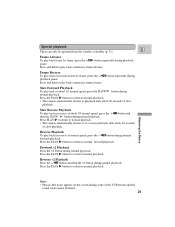
...play back at normal speed, press the -/4a button during playback pause. Press the PLAY e button to return to normal playback. • The camera automatically returns to playback after about 30 seconds of the VCR modes and the sound track cannot be operated from the wireless controller (p. 31) E... press the -/4a button and then the SLOW button during some of slow playback. Press PLAY e to return to normal playback. • The camera automatically returns to normal playback. Press the PLAY e button to return to ×1 reverse playback after about 30 seconds of slow playback.
...play back at normal speed, press the -/4a button during playback pause. Press the PLAY e button to return to normal playback. • The camera automatically returns to playback after about 30 seconds of the VCR modes and the sound track cannot be operated from the wireless controller (p. 31) E... press the -/4a button and then the SLOW button during some of slow playback. Press PLAY e to return to normal playback. • The camera automatically returns to normal playback. Press the PLAY e button to return to ×1 reverse playback after about 30 seconds of slow playback.
ZR Instruction Manual
Page 21
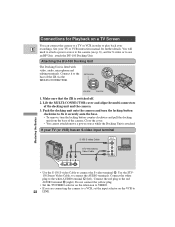
Make sure that the ZR is attached. Lift the MULTI-CONNECTOR cover and align the multi-connectors of the camera. Use the STV150 Stereo Video Cable, to the white AUDIO terminal 7 (left). Connect the white plug to connect the AUDIO terminals. Push the docking unit onto the camera and turn the locking ...You can connect the camera to a TV or VCR in order to play back your TV (or VCR) has an S-video input terminal S-150 S-video Cable STV-150 Stereo Video Cable INPUT S-VIDEO VIDEO AUDIO L R V L R S • Use the S-150 S-video Cable to the base of the ZR via the MULTI-CONNECTOR...
Make sure that the ZR is attached. Lift the MULTI-CONNECTOR cover and align the multi-connectors of the camera. Use the STV150 Stereo Video Cable, to the white AUDIO terminal 7 (left). Connect the white plug to connect the AUDIO terminals. Push the docking unit onto the camera and turn the locking ...You can connect the camera to a TV or VCR in order to play back your TV (or VCR) has an S-video input terminal S-150 S-video Cable STV-150 Stereo Video Cable INPUT S-VIDEO VIDEO AUDIO L R V L R S • Use the S-150 S-video Cable to the base of the ZR via the MULTI-CONNECTOR...
ZR Instruction Manual
Page 22
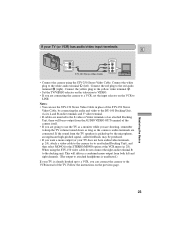
...audio terminals and V video terminal. • If cables are connected. If your TV does not have audio/video terminals, p. 24), attach a video cable to the camera (or to an attached Docking Unit), and then select MONO for the STEREO/MONO option at the VCR menu (p. 28). Notes: • You can connect... the camera to the VCR instead of an attached Docking Unit, there will deliver a combined mono output from both left ). When using the STV-250 Stereo ...
...audio terminals and V video terminal. • If cables are connected. If your TV does not have audio/video terminals, p. 24), attach a video cable to the camera (or to an attached Docking Unit), and then select MONO for the STEREO/MONO option at the VCR menu (p. 28). Notes: • You can connect... the camera to the VCR instead of an attached Docking Unit, there will deliver a combined mono output from both left ). When using the STV-250 Stereo ...

ZR Instruction Manual
Page 23
... with flat twin-lead antenna cable RU-100 RF Unit Mastering the Basics 2 V L R 300-75 ohm adapter 3 VHF 75-300 ohm adapter To connect the camera directly to a TV which does not have audio/video terminals, you will need to use the optional RU-100 RF Unit together with F-connectors. Connect...
... with flat twin-lead antenna cable RU-100 RF Unit Mastering the Basics 2 V L R 300-75 ohm adapter 3 VHF 75-300 ohm adapter To connect the camera directly to a TV which does not have audio/video terminals, you will need to use the optional RU-100 RF Unit together with F-connectors. Connect...
ZR Instruction Manual
Page 24
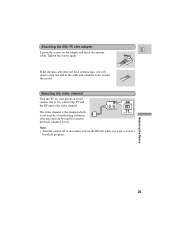
... to strip one end of the cable and wind the wires around the screws. Attaching the 300-75 ohm adapter E Loosen the screws on the camera (see p. 19), and set the TV and the RF unit to the video channel. 4CH 3CH TO TV FROM ANT The video channel is the... which is not used by a broadcasting station in your area and can be used for cassette playback (channel 3 or 4). 4CH 3CH Note: • Turn the camera off or disconnect it from the RF unit when you will need to watch a broadcast program.
... to strip one end of the cable and wind the wires around the screws. Attaching the 300-75 ohm adapter E Loosen the screws on the camera (see p. 19), and set the TV and the RF unit to the video channel. 4CH 3CH TO TV FROM ANT The video channel is the... which is not used by a broadcasting station in your area and can be used for cassette playback (channel 3 or 4). 4CH 3CH Note: • Turn the camera off or disconnect it from the RF unit when you will need to watch a broadcast program.

ZR Instruction Manual
Page 25
... not have to be able to move a little bit above or below). Leave some space on a tripod, (or any unwanted movement, you can mount the camera on the side of the frame that the fastening screw of the tripod is no longer than 3/16 inch (5.5 mm), or it with the wireless... controller. • When you will damage the camera. Support the camera underneath with your right hand and keep your right elbow pressed against your body. Watch out for Making Better Videos Holding the...
... not have to be able to move a little bit above or below). Leave some space on a tripod, (or any unwanted movement, you can mount the camera on the side of the frame that the fastening screw of the tripod is no longer than 3/16 inch (5.5 mm), or it with the wireless... controller. • When you will damage the camera. Support the camera underneath with your right hand and keep your right elbow pressed against your body. Watch out for Making Better Videos Holding the...

