Basic Users Guide
Page 1
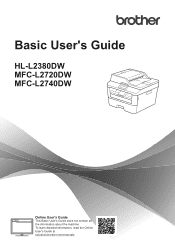
Basic User's Guide HL-L2380DW MFC-L2720DW MFC-L2740DW Online User's Guide This Basic User's Guide does not contain all the information about the machine. To learn detailed information, read the Online User's Guide at solutions.brother.com/manuals
Basic User's Guide HL-L2380DW MFC-L2720DW MFC-L2740DW Online User's Guide This Basic User's Guide does not contain all the information about the machine. To learn detailed information, read the Online User's Guide at solutions.brother.com/manuals
Basic Users Guide
Page 8
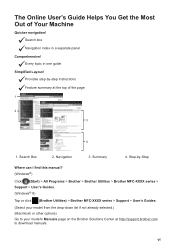
... panel Comprehensive! Provides step-by -Step Where can I find this manual? (Windows®) Click (Start) > All Programs > Brother > Brother Utilities > Brother MFC-XXXX series > Support > User's Guides. (Windows® 8) Tap or click (Brother Utilities) > Brother MFC-XXXX series > Support > User's Guides. (Select your model... from the drop-down list if not already selected.) (Macintosh or other options) Go to your model's Manuals page on the Brother Solutions Center at the top of Your Machine Quicker navigation! Summary 4. Search box Navigation index in one guide Simplified...
... panel Comprehensive! Provides step-by -Step Where can I find this manual? (Windows®) Click (Start) > All Programs > Brother > Brother Utilities > Brother MFC-XXXX series > Support > User's Guides. (Windows® 8) Tap or click (Brother Utilities) > Brother MFC-XXXX series > Support > User's Guides. (Select your model... from the drop-down list if not already selected.) (Macintosh or other options) Go to your model's Manuals page on the Brother Solutions Center at the top of Your Machine Quicker navigation! Summary 4. Search box Navigation index in one guide Simplified...

Basic Users Guide
Page 12
The contents of this manual and the specifications of Brother Industries, Ltd., this product are subject to the publication. Brother reserves the right to make changes without notice in the specifications and materials contained herein and shall not be responsible for any damages (including consequential)... presented, including but not limited to typographical and other errors relating to change without notice. x Compilation and Publication Notice Under the supervision of this manual has been compiled and published, covering the latest product's descriptions and specifications.
The contents of this manual and the specifications of Brother Industries, Ltd., this product are subject to the publication. Brother reserves the right to make changes without notice in the specifications and materials contained herein and shall not be responsible for any damages (including consequential)... presented, including but not limited to typographical and other errors relating to change without notice. x Compilation and Publication Notice Under the supervision of this manual has been compiled and published, covering the latest product's descriptions and specifications.
Basic Users Guide
Page 13
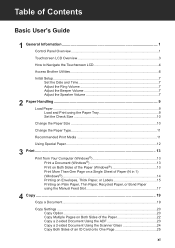
Table of Contents Basic User's Guide 1 General Information 1 Control Panel Overview 1 Touchscreen LCD Overview 3 How to Navigate the Touchscreen LCD 4 Access Brother Utilities 6 Initial Setup...7 Set the Date and Time 7 Adjust the Ring Volume 7 Adjust the Beeper Volume 7 Adjust the Speaker Volume 7 2 Paper...Windows®)...14 Printing on Envelopes, Thick Paper, or Labels 15 Printing on Plain Paper, Thin Paper, Recycled Paper, or Bond Paper using the Manual Feed Slot 17 4 Copy ...19 Copy a Document...19 Copy Settings ...20 Copy Option 20 Copy Multiple Pages on Both Sides of the Paper...
Table of Contents Basic User's Guide 1 General Information 1 Control Panel Overview 1 Touchscreen LCD Overview 3 How to Navigate the Touchscreen LCD 4 Access Brother Utilities 6 Initial Setup...7 Set the Date and Time 7 Adjust the Ring Volume 7 Adjust the Beeper Volume 7 Adjust the Speaker Volume 7 2 Paper...Windows®)...14 Printing on Envelopes, Thick Paper, or Labels 15 Printing on Plain Paper, Thin Paper, Recycled Paper, or Bond Paper using the Manual Feed Slot 17 4 Copy ...19 Copy a Document...19 Copy Settings ...20 Copy Option 20 Copy Multiple Pages on Both Sides of the Paper...
Basic Users Guide
Page 18
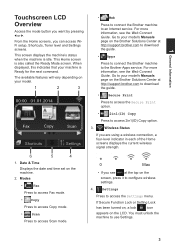
.... For more information, see the Web Connect Guide. Go to your model's Manuals page on the Brother Solutions Center at http://support.brother.com to download the guide. • Apps Press to connect the Brother machine to use Settings. 3 For more information, see the Web Connect Guide.... mode. • Scan Press to access Scan mode. • Web Press to connect the Brother machine to access 2in1(ID) Copy option. 3. Go to your model's Manuals page on the Brother Solutions Center at the top on the machine. 2. Settings Press to configure wireless settings. 4. ...
.... For more information, see the Web Connect Guide. Go to your model's Manuals page on the Brother Solutions Center at http://support.brother.com to download the guide. • Apps Press to connect the Brother machine to use Settings. 3 For more information, see the Web Connect Guide.... mode. • Scan Press to access Scan mode. • Web Press to connect the Brother machine to access 2in1(ID) Copy option. 3. Go to your model's Manuals page on the Brother Solutions Center at the top on the machine. 2. Settings Press to configure wireless settings. 4. ...

Basic Users Guide
Page 30
...up output tray). 2 (For printing envelopes) Pull down , the machine has a straight paper path from the manual feed slot on the front of the machine through the back of the paper. 15 Doing this manual feed and output method for printing on thick paper or envelopes. • Load the paper or envelope... one on the right side, to the envelope position as shown in the illustration. 3 On the front of the machine, open the manual feed slot cover. 4 Slide the manual feed slot paper guides to the width of the machine and onto the face-up output tray. 3 Print Printing on Envelopes, Thick Paper...
...up output tray). 2 (For printing envelopes) Pull down , the machine has a straight paper path from the manual feed slot on the front of the machine through the back of the paper. 15 Doing this manual feed and output method for printing on thick paper or envelopes. • Load the paper or envelope... one on the right side, to the envelope position as shown in the illustration. 3 On the front of the machine, open the manual feed slot cover. 4 Slide the manual feed slot paper guides to the width of the machine and onto the face-up output tray. 3 Print Printing on Envelopes, Thick Paper...
Basic Users Guide
Page 31
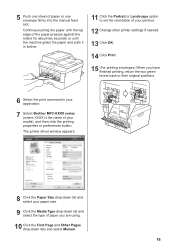
The printer driver window appears. 8 Click the Paper Size drop-down lists and select Manual. 16 5 Push one envelope firmly into the manual feed slot. Continue pushing the paper until the top edge of the paper presses against the rollers for about two seconds, or until the machine ... printing envelopes) When you have finished printing, return the two green levers back to their original positions. 6 Select the print command in your application. 7 Select Brother MFC-XXXX series (where XXXX is the name of your paper size. 9 Click the Media Type drop-down list and select the type of paper...
The printer driver window appears. 8 Click the Paper Size drop-down lists and select Manual. 16 5 Push one envelope firmly into the manual feed slot. Continue pushing the paper until the top edge of the paper presses against the rollers for about two seconds, or until the machine ... printing envelopes) When you have finished printing, return the two green levers back to their original positions. 6 Select the print command in your application. 7 Select Brother MFC-XXXX series (where XXXX is the name of your paper size. 9 Click the Media Type drop-down list and select the type of paper...
Basic Users Guide
Page 32
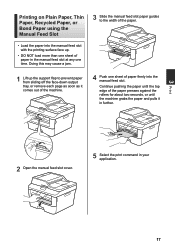
... two seconds, or until the machine grabs the paper and pulls it comes out of the machine. 4 Push one sheet of paper firmly into the manual feed slot with the printing surface face up the support flap to prevent paper from sliding off the face-down output tray, or remove each... page as soon as it in further. 2 Open the manual feed slot cover. 5 Select the print command in the manual feed slot at any one time. 3 Print Printing on Plain Paper, Thin Paper, Recycled Paper, or Bond Paper using the...
... two seconds, or until the machine grabs the paper and pulls it comes out of the machine. 4 Push one sheet of paper firmly into the manual feed slot with the printing surface face up the support flap to prevent paper from sliding off the face-down output tray, or remove each... page as soon as it in further. 2 Open the manual feed slot cover. 5 Select the print command in the manual feed slot at any one time. 3 Print Printing on Plain Paper, Thin Paper, Recycled Paper, or Bond Paper using the...
Basic Users Guide
Page 33
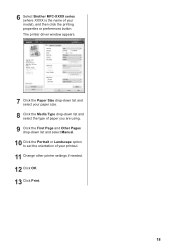
6 Select Brother MFC-XXXX series (where XXXX is the name of your model), and then click the printing properties or preferences button. The printer driver window appears. 7 Click the Paper Size drop-down list and select your paper size. 8 Click the Media Type drop-down list and select the type of paper you are using. 9 Click the First Page and Other Pages drop-down list and select Manual. 10 Click the Portrait or Landscape option to set the orientation of your printout. 11 Change other printer settings if needed. 12 Click OK. 13 Click Print. 18
6 Select Brother MFC-XXXX series (where XXXX is the name of your model), and then click the printing properties or preferences button. The printer driver window appears. 7 Click the Paper Size drop-down list and select your paper size. 8 Click the Media Type drop-down list and select the type of paper you are using. 9 Click the First Page and Other Pages drop-down list and select Manual. 10 Click the Portrait or Landscape option to set the orientation of your printout. 11 Change other printer settings if needed. 12 Click OK. 13 Click Print. 18
Basic Users Guide
Page 47
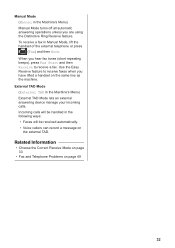
... a fax in the Machine's Menu) External TAD Mode lets an external answering device manage your incoming calls. External TAD Mode (External TAD in Manual Mode, lift the handset of the external telephone or press (Fax) and then Hook. Incoming calls will be handled in the following ways: &#...8226; Faxes will be received automatically. • Voice callers can record a message on page 49 32 Manual Mode (Manual in the Machine's Menu) Manual Mode turns off all automatic answering operations unless you have lifted a handset on the same line as the machine. Use the Easy...
... a fax in the Machine's Menu) External TAD Mode lets an external answering device manage your incoming calls. External TAD Mode (External TAD in Manual Mode, lift the handset of the external telephone or press (Fax) and then Hook. Incoming calls will be handled in the following ways: &#...8226; Faxes will be received automatically. • Voice callers can record a message on page 49 32 Manual Mode (Manual in the Machine's Menu) Manual Mode turns off all automatic answering operations unless you have lifted a handset on the same line as the machine. Use the Easy...

Basic Users Guide
Page 48
.... Select External TAD Mode as your receive mode. The Fax/Tel Mode is used when sharing the Brother machine and your telephone on the external TAD and fax messages are printed. Choose Manual Mode as your receive mode. Voice messages are stored on the same line. If you cannot change... and telephone subscriber services (Voice Mail, Distinctive Ring and so on) you will be using Voice Mail on the same telephone line as your Brother machine? Will you be using a Telephone Answering Device on the same telephone line as your receive mode. See Related Information: Voice Mail Will ...
.... Select External TAD Mode as your receive mode. The Fax/Tel Mode is used when sharing the Brother machine and your telephone on the external TAD and fax messages are printed. Choose Manual Mode as your receive mode. Voice messages are stored on the same line. If you cannot change... and telephone subscriber services (Voice Mail, Distinctive Ring and so on) you will be using Voice Mail on the same telephone line as your Brother machine? Will you be using a Telephone Answering Device on the same telephone line as your receive mode. See Related Information: Voice Mail Will ...

Basic Users Guide
Page 49
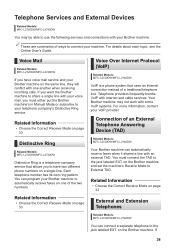
Related Information • Receive Modes on page 31 • Voice Mail on page 38 • Distinctive Ring on page 38 • Connection of an External Telephone Answering Device (TAD) on page 38 • Fax and Telephone Problems on page 49 34 2 Press a or b to display the Fax, Fax/Tel, External TAD, or Manual option, and then press the option you want. 3 Press .
Related Information • Receive Modes on page 31 • Voice Mail on page 38 • Distinctive Ring on page 38 • Connection of an External Telephone Answering Device (TAD) on page 38 • Fax and Telephone Problems on page 49 34 2 Press a or b to display the Fax, Fax/Tel, External TAD, or Manual option, and then press the option you want. 3 Press .
Basic Users Guide
Page 53
... to the jack labeled EXT. Connection of an External Telephone Answering Device (TAD) Related Models: MFC-L2720DW/MFC-L2740DW Your Brother machine can connect a separate telephone to External TAD. Each telephone number has its own ring pattern. Telephone providers frequently bundle ...VoIP with your voice mail, you to your VoIP provider. You must either put the Brother machine's in Manual Mode or subscribe to have voice mail service and your Brother machine on one another when receiving incoming calls. Related Information • Choose the Correct Receive Mode ...
... to the jack labeled EXT. Connection of an External Telephone Answering Device (TAD) Related Models: MFC-L2720DW/MFC-L2740DW Your Brother machine can connect a separate telephone to External TAD. Each telephone number has its own ring pattern. Telephone providers frequently bundle ...VoIP with your voice mail, you to your VoIP provider. You must either put the Brother machine's in Manual Mode or subscribe to have voice mail service and your Brother machine on one another when receiving incoming calls. Related Information • Choose the Correct Receive Mode ...
Basic Users Guide
Page 61
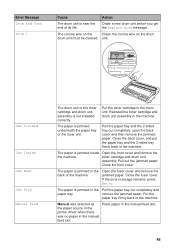
...The drum unit is not installed correctly. Jam 2-sided Jam Inside Jam Rear Jam Tray Manual Feed The drum unit or the toner cartridge and drum unit assembly is near the ... the Pull the paper tray out completely and paper tray. Put the toner cartridge in the manual feed slot. Manual was no paper in the machine. unit. remove the jammed paper. Reinstall the toner cartridge and drum ...unit assembly in the manual feed slot. 46 Close the fuser cover. the paper source in the printer driver when there was...
...The drum unit is not installed correctly. Jam 2-sided Jam Inside Jam Rear Jam Tray Manual Feed The drum unit or the toner cartridge and drum unit assembly is near the ... the Pull the paper tray out completely and paper tray. Put the toner cartridge in the manual feed slot. Manual was no paper in the machine. unit. remove the jammed paper. Reinstall the toner cartridge and drum ...unit assembly in the manual feed slot. 46 Close the fuser cover. the paper source in the printer driver when there was...
Basic Users Guide
Page 65
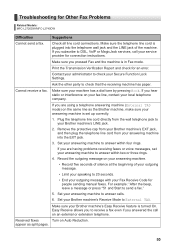
...; Limit your speaking to answer within four rings. Set your answering machine to 20 seconds. • End your outgoing message with your Brother machine's LINE jack. 2. If you subscribe to receive a fax even if you are having problems receiving faxes or voice messages, set up... Fax Receive Code for connection instructions. Record the outgoing message on your fax line, contact your service provider for people sending manual faxes. Make sure you hear static or interference on your answering machine. • Record five seconds of silence at the beginning...
...; Limit your speaking to answer within four rings. Set your answering machine to 20 seconds. • End your outgoing message with your Brother machine's LINE jack. 2. If you subscribe to receive a fax even if you are having problems receiving faxes or voice messages, set up... Fax Receive Code for connection instructions. Record the outgoing message on your fax line, contact your service provider for people sending manual faxes. Make sure you hear static or interference on your answering machine. • Record five seconds of silence at the beginning...
Basic Users Guide
Page 79
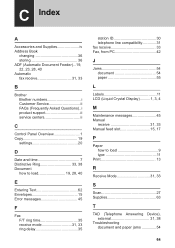
... and Supplies iv Address Book changing 36 storing 36 ADF (Automatic Document Feeder)...19, 22, 23, 28, 40 Automatic fax receive 31, 33 B Brother Brother numbers i Customer Service ii FAQs (Frequently Asked Questions)..i product support ii service centers ii C Control Panel Overview 1 Copy 19 settings 20 D Date...Fax, from PC 42 J Jams 54 document 54 paper 55 L Labels 11 LCD (Liquid Crystal Display).......... 1, 3, 4 M Maintenance messages 45 Manual receive 31, 33 Manual feed slot 15, 17 P Paper how to load 9 type 11 Print 13 R Receive Mode 31, 33 S Scan 27 Supplies 63 T ...
... and Supplies iv Address Book changing 36 storing 36 ADF (Automatic Document Feeder)...19, 22, 23, 28, 40 Automatic fax receive 31, 33 B Brother Brother numbers i Customer Service ii FAQs (Frequently Asked Questions)..i product support ii service centers ii C Control Panel Overview 1 Copy 19 settings 20 D Date...Fax, from PC 42 J Jams 54 document 54 paper 55 L Labels 11 LCD (Liquid Crystal Display).......... 1, 3, 4 M Maintenance messages 45 Manual receive 31, 33 Manual feed slot 15, 17 P Paper how to load 9 type 11 Print 13 R Receive Mode 31, 33 S Scan 27 Supplies 63 T ...
Quick Setup Guide
Page 1
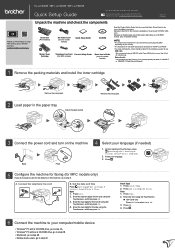
...Macintosh, go to step 6B • Mobile device users, go to select AM or PM. 3. Press Date. 2. Press Clock Type. 2. HL‑L2380DW / MFC‑L2720DW / MFC‑L2740DW Quick Setup Guide Not all models are available in the paper tray Adjust the paper guides. 3 Connect... 1. Enter the time using a USB 2.0 cable (Type A/B) that is no more than 6 feet (2 meters) long. Manuals in this Quick Setup Guide are available at the Brother Solutions Center: solutions.brother.com/manuals. Set the date and time Press (Settings) > All Settings > Initial Setup > Date & Time. Press . 6 Connect...
...Macintosh, go to step 6B • Mobile device users, go to select AM or PM. 3. Press Date. 2. Press Clock Type. 2. HL‑L2380DW / MFC‑L2720DW / MFC‑L2740DW Quick Setup Guide Not all models are available in the paper tray Adjust the paper guides. 3 Connect... 1. Enter the time using a USB 2.0 cable (Type A/B) that is no more than 6 feet (2 meters) long. Manuals in this Quick Setup Guide are available at the Brother Solutions Center: solutions.brother.com/manuals. Set the date and time Press (Settings) > All Settings > Initial Setup > Date & Time. Press . 6 Connect...


