Network User's Guide - English
Page 41
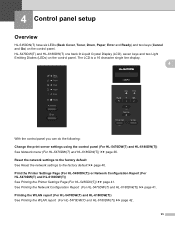
...Light Emitting Diodes (LEDs) on the control panel. See Printing the Network Configuration Report (For HL-5470DW(T) and HL-6180DW(T)) uu page 41. Reset the network settings to the factory default 4 See Reset the network settings to the factory default uu page 40. The LCD is a 16 character ...: Change the print server settings using the control panel (For HL-5470DW(T) and HL-6180DW(T)) 4 See Network menu (For HL-5470DW(T) and HL-6180DW(T)) uu page 36. 4 Control panel setup 4 Overview 4 HL-5450DN(T) have six LEDs (Back Cover, Toner, Drum, Paper, Error and Ready) and two keys (Cancel and Go...
...Light Emitting Diodes (LEDs) on the control panel. See Printing the Network Configuration Report (For HL-5470DW(T) and HL-6180DW(T)) uu page 41. Reset the network settings to the factory default 4 See Reset the network settings to the factory default uu page 40. The LCD is a 16 character ...: Change the print server settings using the control panel (For HL-5470DW(T) and HL-6180DW(T)) 4 See Network menu (For HL-5470DW(T) and HL-6180DW(T)) uu page 36. 4 Control panel setup 4 Overview 4 HL-5450DN(T) have six LEDs (Back Cover, Toner, Drum, Paper, Error and Ready) and two keys (Cancel and Go...
User's Guide - English
Page 116
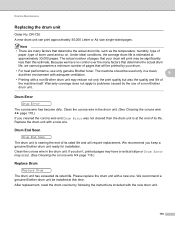
... does not apply to problems caused by the use only genuine Brother toner. Clean the corona wire in the drum unit. After replacement, reset the drum counter by your drum will print may occur. (See Cleaning the corona wire uu page 118.) Replace Drum 5 Replace Drum The drum unit has exceeded its life. Note • There are many...
... does not apply to problems caused by the use only genuine Brother toner. Clean the corona wire in the drum unit. After replacement, reset the drum counter by your drum will print may occur. (See Cleaning the corona wire uu page 118.) Replace Drum 5 Replace Drum The drum unit has exceeded its life. Note • There are many...
User's Guide - English
Page 117
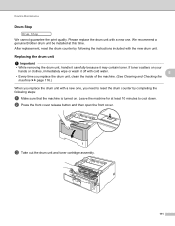
... c Take out the drum unit and toner cartridge assembly. 111 After replacement, reset the drum counter by completing the following the instructions included with the new drum unit. b Press the front cover release button and then open the front cover. We recommend a genuine Brother drum unit be installed at ...least 10 minutes to reset the drum counter by following steps: a Make sure that the machine is turned on your hands or clothes, immediately wipe or ...
... c Take out the drum unit and toner cartridge assembly. 111 After replacement, reset the drum counter by completing the following the instructions included with the new drum unit. b Press the front cover release button and then open the front cover. We recommend a genuine Brother drum unit be installed at ...least 10 minutes to reset the drum counter by following steps: a Make sure that the machine is turned on your hands or clothes, immediately wipe or ...
User's Guide - English
Page 121
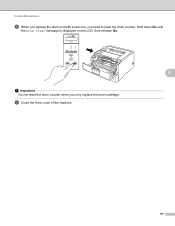
i Close the front cover of the machine. 115 Routine Maintenance h When you replace the drum unit with a new one, you only replace the toner cartridge. Hold down Go until the Drum Clear message is displayed on the LCD, then release Go. 5 Important Do not reset the drum counter when you need to reset the drum counter.
i Close the front cover of the machine. 115 Routine Maintenance h When you replace the drum unit with a new one, you only replace the toner cartridge. Hold down Go until the Drum Clear message is displayed on the LCD, then release Go. 5 Important Do not reset the drum counter when you need to reset the drum counter.
User's Guide - English
Page 138
... is time to locate a Brother Authorized Service Center, visit us at: http://www.brother-usa.com/service/ 132 Reduce the complexity of Memory Secure Print Data is time to replace the drum unit. Replace the drum unit. (See Replacing the drum unit uu page 111.) 6 The drum unit counter was not reset Reset the drum unit counter. (See Replacing...
... is time to locate a Brother Authorized Service Center, visit us at: http://www.brother-usa.com/service/ 132 Reduce the complexity of Memory Secure Print Data is time to replace the drum unit. Replace the drum unit. (See Replacing the drum unit uu page 111.) 6 The drum unit counter was not reset Reset the drum unit counter. (See Replacing...


