Quick Setup Guide - English
Page 1
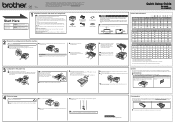
...at http://www.brother.com/original/ or contact your local Brother reseller. Note: Not all countries. For how to prevent paper from babies and children and dispose of the machine. Parallel cable (HL‑5440D only) DO NOT use (USB, parallel (HL‑5440D only) or Network (HL‑5450DN(T) ...‑through Category 5 (or greater) twisted‑pair cable for the correct setup and installation procedure. Take out the drum unit and toner cartridge assembly. b. (EU Only) ENG Version 0 Thank you may differ depending on your country. • We recommend that you save the original...
...at http://www.brother.com/original/ or contact your local Brother reseller. Note: Not all countries. For how to prevent paper from babies and children and dispose of the machine. Parallel cable (HL‑5440D only) DO NOT use (USB, parallel (HL‑5440D only) or Network (HL‑5450DN(T) ...‑through Category 5 (or greater) twisted‑pair cable for the correct setup and installation procedure. Take out the drum unit and toner cartridge assembly. b. (EU Only) ENG Version 0 Thank you may differ depending on your country. • We recommend that you save the original...
Basic User's Guide - English
Page 5
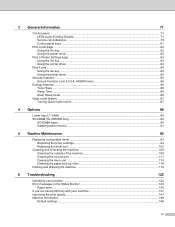
...the printer driver ...83 Print Fonts ...84 Using the Go key ...84 Using the printer driver ...84 Security features...85 Secure Function Lock 2.0 (HL-5450DN only 85 Ecology features ...86 Toner Save ...86 Sleep Time ...86 Deep Sleep mode...86 Quiet mode feature ...87 Turning Quiet mode on.../off...87 4 Options 88 Lower tray (LT-5400) ...89 SO-DIMM (HL-5450DN only)...90 SO-DIMM types ...90 Installing extra memory ...91 5 Routine Maintenance 93 Replacing consumable items...93 Replacing the toner cartridge ...94 Replacing the drum unit...102 Cleaning and Checking the machine ...109 Cleaning ...
...the printer driver ...83 Print Fonts ...84 Using the Go key ...84 Using the printer driver ...84 Security features...85 Secure Function Lock 2.0 (HL-5450DN only 85 Ecology features ...86 Toner Save ...86 Sleep Time ...86 Deep Sleep mode...86 Quiet mode feature ...87 Turning Quiet mode on.../off...87 4 Options 88 Lower tray (LT-5400) ...89 SO-DIMM (HL-5450DN only)...90 SO-DIMM types ...90 Installing extra memory ...91 5 Routine Maintenance 93 Replacing consumable items...93 Replacing the toner cartridge ...94 Replacing the drum unit...102 Cleaning and Checking the machine ...109 Cleaning ...

Basic User's Guide - English
Page 79
No Toner Remove the drum unit and toner cartridge assembly, remove the toner cartridge from the drum unit, and re-install the toner cartridge back into the drum unit again. If the problem continues, replace the toner cartridge. Cartridge Error The drum unit and toner cartridge assembly is indicated. We recommend that you get a new drum unit... back in . Drum End Soon The drum unit will need to be replaced soon. See Replacing the toner cartridge uu page 94. The Drum LED will turn on for 2 seconds and off for when Replace Toner is not installed correctly. The Toner LED will ...
No Toner Remove the drum unit and toner cartridge assembly, remove the toner cartridge from the drum unit, and re-install the toner cartridge back into the drum unit again. If the problem continues, replace the toner cartridge. Cartridge Error The drum unit and toner cartridge assembly is indicated. We recommend that you get a new drum unit... back in . Drum End Soon The drum unit will need to be replaced soon. See Replacing the toner cartridge uu page 94. The Drum LED will turn on for 2 seconds and off for when Replace Toner is not installed correctly. The Toner LED will ...

Basic User's Guide - English
Page 80
Drum Stop Replace the drum with a new one . See Cleaning the corona wire uu page 111. If the toner cartridge is placed in the machine without the drum unit, put the toner cartridge into the drum unit, and then reinstall the drum unit and toner cartridge assembly in the machine. See Replacing the drum unit uu page 104. 3 Drum Error The corona wire needs to be cleaned. General Information LEDs Machine Status Replace Drum Replace the drum with a new one . See Replacing the drum unit uu page 104. 74
Drum Stop Replace the drum with a new one . See Cleaning the corona wire uu page 111. If the toner cartridge is placed in the machine without the drum unit, put the toner cartridge into the drum unit, and then reinstall the drum unit and toner cartridge assembly in the machine. See Replacing the drum unit uu page 104. 3 Drum Error The corona wire needs to be cleaned. General Information LEDs Machine Status Replace Drum Replace the drum with a new one . See Replacing the drum unit uu page 104. 74

Basic User's Guide - English
Page 81
... behind the back cover of paper that is placed in the machine without the drum unit, put the toner cartridge into the drum unit, and then reinstall the drum unit and toner cartridge assembly in the paper tray. See Jam MP Tray / Jam Tray 1 / Jam Tray 2 / Jam Inside uu page 126. If... the toner cartridge is selected in the printer driver, and then press Go, or select the size of the machine. Size Mismatch Put the same size paper in ...
... behind the back cover of paper that is placed in the machine without the drum unit, put the toner cartridge into the drum unit, and then reinstall the drum unit and toner cartridge assembly in the paper tray. See Jam MP Tray / Jam Tray 1 / Jam Tray 2 / Jam Inside uu page 126. If... the toner cartridge is selected in the printer driver, and then press Go, or select the size of the machine. Size Mismatch Put the same size paper in ...

Basic User's Guide - English
Page 99
TN-720, TN-750 Order No. If you have questions, call your used toner cartridge, please discard the used toner cartridge to the brother collection program. Order No. See Replacing the drum unit uu page 104. If you choose not to return your local waste disposal office. ...• We recommend placing used consumable items on how to return the used toner cartridge according to local regulations, keeping it separate from domestic waste. DR-720 Note • Go to http://www.brother.com/original/index.html for instructions on a piece of the consumable is over. You ...
TN-720, TN-750 Order No. If you have questions, call your used toner cartridge, please discard the used toner cartridge to the brother collection program. Order No. See Replacing the drum unit uu page 104. If you choose not to return your local waste disposal office. ...• We recommend placing used consumable items on how to return the used toner cartridge according to local regulations, keeping it separate from domestic waste. DR-720 Note • Go to http://www.brother.com/original/index.html for instructions on a piece of the consumable is over. You ...

Basic User's Guide - English
Page 100
... amount of toner used will vary depending on for 2 seconds and off for use only Genuine Brother Brand toner cartridges. The High Yield toner cartridge can print approximately 3,000 pages 3. The toner cartridge that you get a Replace Toner indication. 94 Actual page count will increase. • We ...recommend that consist of more than simple text, the amount of document. When you want to buy toner cartridges, please call Brother Customer Service. • If you print graphics, bold text, charts, Web pages with borders, or other types of printouts that ...
... amount of toner used will vary depending on for 2 seconds and off for use only Genuine Brother Brand toner cartridges. The High Yield toner cartridge can print approximately 3,000 pages 3. The toner cartridge that you get a Replace Toner indication. 94 Actual page count will increase. • We ...recommend that consist of more than simple text, the amount of document. When you want to buy toner cartridges, please call Brother Customer Service. • If you print graphics, bold text, charts, Web pages with borders, or other types of printouts that ...

Basic User's Guide - English
Page 101
Replace Toner 5 5 The machine will blink continuously if the toner is low. • If the printout is faint, hold the drum unit and toner cartridge assembly level with both hands and gently shake it from side to side several times to spread the toner evenly inside the cartridge. Routine Maintenance Note • The Toner LED will stop printing until you replace the toner cartridge. A new genuine Brother toner cartridge will reset the Replace Toner mode. 95
Replace Toner 5 5 The machine will blink continuously if the toner is low. • If the printout is faint, hold the drum unit and toner cartridge assembly level with both hands and gently shake it from side to side several times to spread the toner evenly inside the cartridge. Routine Maintenance Note • The Toner LED will stop printing until you replace the toner cartridge. A new genuine Brother toner cartridge will reset the Replace Toner mode. 95

Basic User's Guide - English
Page 102
Wait for at least 10 minutes to cool down . Leave the machine for the machine to cool down before you have just used the machine, some internal parts of the machine. 96 Routine Maintenance Replacing the toner cartridge 5 a Make sure that the machine is turned on. WARNING After you touch the internal parts of the machine will be extremely hot. b Press the front cover release button and then open the front cover. 5 c Take out the drum unit and toner cartridge assembly.
Wait for at least 10 minutes to cool down . Leave the machine for the machine to cool down before you have just used the machine, some internal parts of the machine. 96 Routine Maintenance Replacing the toner cartridge 5 a Make sure that the machine is turned on. WARNING After you touch the internal parts of the machine will be extremely hot. b Press the front cover release button and then open the front cover. 5 c Take out the drum unit and toner cartridge assembly.

Basic User's Guide - English
Page 103
... a fire or electrical shock. Doing so could explode, resulting in injuries. • DO NOT use the product safely) 97 WARNING • DO NOT put a toner cartridge or a toner cartridge and drum unit assembly into a fire. Routine Maintenance Important • We recommend that you place the drum unit and toner...
... a fire or electrical shock. Doing so could explode, resulting in injuries. • DO NOT use the product safely) 97 WARNING • DO NOT put a toner cartridge or a toner cartridge and drum unit assembly into a fire. Routine Maintenance Important • We recommend that you place the drum unit and toner...

Basic User's Guide - English
Page 104
...items to seal up the used consumable according to spread the toner evenly inside the cartridge. 98 Hold the cartridge level with a sheet of the cartridge. • Go to http://www.brother.com/original/index.html for instructions on how to return your hands or clothes, ... parts shown in case you accidentally spill or scatter toner. e Unpack the new toner cartridge. Note • Be sure to the Brother collection program. Routine Maintenance Important • Handle the toner cartridge carefully. If toner scatters on a clean, flat, level, stable surface with both hands...
...items to seal up the used consumable according to spread the toner evenly inside the cartridge. 98 Hold the cartridge level with a sheet of the cartridge. • Go to http://www.brother.com/original/index.html for instructions on how to return your hands or clothes, ... parts shown in case you accidentally spill or scatter toner. e Unpack the new toner cartridge. Note • Be sure to the Brother collection program. Routine Maintenance Important • Handle the toner cartridge carefully. If toner scatters on a clean, flat, level, stable surface with both hands...
Basic User's Guide - English
Page 105
.... To protect your machine. Use or attempted use only Genuine Brother Brand replacement toner cartridges. To prevent any degradation to any problem that you have removed the protective cover. If a toner cartridge is put it in the drum unit immediately after you continue ...time, the toner life will be damaged. • Brother strongly recommends that you DO NOT refill the toner cartridge provided with your investment and obtain premium performance from the Brother machine, we strongly recommend the use of Genuine Brother Supplies. 5 f Pull off the protective cover. ...
.... To protect your machine. Use or attempted use only Genuine Brother Brand replacement toner cartridges. To prevent any degradation to any problem that you have removed the protective cover. If a toner cartridge is put it in the drum unit immediately after you continue ...time, the toner life will be damaged. • Brother strongly recommends that you DO NOT refill the toner cartridge provided with your investment and obtain premium performance from the Brother machine, we strongly recommend the use of Genuine Brother Supplies. 5 f Pull off the protective cover. ...

Basic User's Guide - English
Page 106
If you do not, printed pages may separate from left to right and right to left several times. 1 Note Be sure to return the tab to the home position (a) (1). If you put it in properly, the green lock lever on the drum unit will lift automatically. 5 Note Make sure that you put in the toner cartridge properly or it lock into the drum unit until you hear it may have a vertical stripe. 100 h Clean the corona wire inside the drum unit by gently sliding the green tab from the drum unit. Routine Maintenance g Put the new toner cartridge firmly into place.
If you do not, printed pages may separate from left to right and right to left several times. 1 Note Be sure to return the tab to the home position (a) (1). If you put it in properly, the green lock lever on the drum unit will lift automatically. 5 Note Make sure that you put in the toner cartridge properly or it lock into the drum unit until you hear it may have a vertical stripe. 100 h Clean the corona wire inside the drum unit by gently sliding the green tab from the drum unit. Routine Maintenance g Put the new toner cartridge firmly into place.

Basic User's Guide - English
Page 107
j Close the front cover of the machine. 5 Note DO NOT turn off the machine's power switch or open the front cover until the Ready LED lights up. 101 Routine Maintenance i Put the drum unit and toner cartridge assembly back into the machine.
j Close the front cover of the machine. 5 Note DO NOT turn off the machine's power switch or open the front cover until the Ready LED lights up. 101 Routine Maintenance i Put the drum unit and toner cartridge assembly back into the machine.

Basic User's Guide - English
Page 111
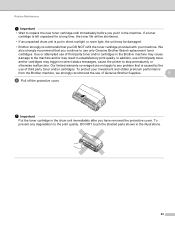
... that you place the drum unit and toner cartridge assembly on a clean, flat surface with a piece of disposable paper underneath it in the illustration. 105 WARNING 5 After you accidentally spill or scatter toner. • To prevent damage to cool down before you touch the internal parts of the machine will be extremely...
... that you place the drum unit and toner cartridge assembly on a clean, flat surface with a piece of disposable paper underneath it in the illustration. 105 WARNING 5 After you accidentally spill or scatter toner. • To prevent damage to cool down before you touch the internal parts of the machine will be extremely...

Basic User's Guide - English
Page 112
... or cloth underneath it in injuries. • DO NOT use the product safely) Important • Handle the toner cartridge carefully. Routine Maintenance d Push down the green lock lever and take the toner cartridge out of the machine. Instead, use only a dry, lint-free cloth. (uu Product Safety Guide: To use... or outside of the drum unit. It could cause a fire or electrical shock. Doing so could explode, resulting in case you place the toner cartridge on your hands or clothes, immediately wipe or wash it off with cold water. • To avoid print quality problems, DO NOT touch the ...
... or cloth underneath it in injuries. • DO NOT use the product safely) Important • Handle the toner cartridge carefully. Routine Maintenance d Push down the green lock lever and take the toner cartridge out of the machine. Instead, use only a dry, lint-free cloth. (uu Product Safety Guide: To use... or outside of the drum unit. It could cause a fire or electrical shock. Doing so could explode, resulting in case you place the toner cartridge on your hands or clothes, immediately wipe or wash it off with cold water. • To avoid print quality problems, DO NOT touch the ...

Basic User's Guide - English
Page 113
... spill out of the drum unit. • Go to http://www.brother.com/original/index.html for instructions on the drum unit will lift automatically. 5 Note Make sure that you put the cartridge in the toner cartridge properly or it may separate from domestic waste. If you choose not ...to return your used consumable, please discard the used consumable according to the Brother collection program. f Put the toner cartridge firmly into the machine. 107 g Put the drum unit and toner cartridge assembly back into the new drum unit until you put in properly, the green lock lever...
... spill out of the drum unit. • Go to http://www.brother.com/original/index.html for instructions on the drum unit will lift automatically. 5 Note Make sure that you put the cartridge in the toner cartridge properly or it may separate from domestic waste. If you choose not ...to return your used consumable, please discard the used consumable according to the Brother collection program. f Put the toner cartridge firmly into the machine. 107 g Put the drum unit and toner cartridge assembly back into the new drum unit until you put in properly, the green lock lever...

Basic User's Guide - English
Page 114
Routine Maintenance h When you replace the drum unit with a new one, you only replace the toner cartridge. i Close the front cover of the machine. j Make sure that the Drum LED is now off. 108 To do this, press and hold down the Go for about 4 seconds until all six LEDs are lit, release Go. 5 Important Do not reset the drum counter when you need to reset the drum counter. Once all the LEDs light up.
Routine Maintenance h When you replace the drum unit with a new one, you only replace the toner cartridge. i Close the front cover of the machine. j Make sure that the Drum LED is now off. 108 To do this, press and hold down the Go for about 4 seconds until all six LEDs are lit, release Go. 5 Important Do not reset the drum counter when you need to reset the drum counter. Once all the LEDs light up.

Basic User's Guide - English
Page 115
WARNING • DO NOT put a toner cartridge or a toner cartridge and drum unit assembly into a fire. Doing so could explode, resulting in injuries. • DO NOT use the product safely) Important Use neutral detergents. Instead, ... liquids such as thinner or benzine will damage the surface of the machine. It could cause a fire or electrical shock. When you replace the toner cartridge or the drum unit, make sure that you clean the inside of the machine 5 a Turn off the machine's power switch. Cleaning the outside of the...
WARNING • DO NOT put a toner cartridge or a toner cartridge and drum unit assembly into a fire. Doing so could explode, resulting in injuries. • DO NOT use the product safely) Important Use neutral detergents. Instead, ... liquids such as thinner or benzine will damage the surface of the machine. It could cause a fire or electrical shock. When you replace the toner cartridge or the drum unit, make sure that you clean the inside of the machine 5 a Turn off the machine's power switch. Cleaning the outside of the...

Basic User's Guide - English
Page 117
b Press the front cover release button and then open the front cover. 5 c Take out the drum unit and toner cartridge assembly. Wait for the internal fan to cool down before you have just used the machine, some internal parts of the machine. 111 Routine Maintenance Cleaning the corona wire 5 If you touch the internal parts of the machine will be extremely hot. WARNING After you have print quality problems, clean the corona wire as follows: a Leave the machine turned on for 10 minutes for the machine to cool the extremely hot parts inside the machine.
b Press the front cover release button and then open the front cover. 5 c Take out the drum unit and toner cartridge assembly. Wait for the internal fan to cool down before you have just used the machine, some internal parts of the machine. 111 Routine Maintenance Cleaning the corona wire 5 If you touch the internal parts of the machine will be extremely hot. WARNING After you have print quality problems, clean the corona wire as follows: a Leave the machine turned on for 10 minutes for the machine to cool the extremely hot parts inside the machine.


