Quick Setup Guide - English
Page 1
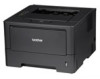
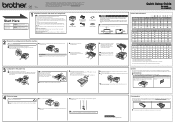
...jams. The side to be injured or cause damage to the machine because it will blink ON and OFF at http://solutions.brother.com/. e. f. You can expand the capabilities of ON for 2 seconds and then OFF for 3 seconds. When the tray is installed... Replacing consumable items in death or serious injuries. Toner cartridge Drum unit For replacing the consumable items, see Packing and shipping the machine in the User's Guide. • Illustrations in the slots. Quick Setup Guide HL-5440D HL-5450DN(T) Start Here WARNING CAUTION WARNING indicates a potentially hazardous ...
...jams. The side to be injured or cause damage to the machine because it will blink ON and OFF at http://solutions.brother.com/. e. f. You can expand the capabilities of ON for 2 seconds and then OFF for 3 seconds. When the tray is installed... Replacing consumable items in death or serious injuries. Toner cartridge Drum unit For replacing the consumable items, see Packing and shipping the machine in the User's Guide. • Illustrations in the slots. Quick Setup Guide HL-5440D HL-5450DN(T) Start Here WARNING CAUTION WARNING indicates a potentially hazardous ...
Basic User's Guide - English
Page 5
... Deep Sleep mode...86 Quiet mode feature ...87 Turning Quiet mode on/off...87 4 Options 88 Lower tray (LT-5400) ...89 SO-DIMM (HL-5450DN only)...90 SO-DIMM types ...90 Installing extra memory ...91 5 Routine Maintenance 93 Replacing consumable items...93 Replacing the toner cartridge ...94 Replacing ......102 Cleaning and Checking the machine ...109 Cleaning the outside of the machine 109 Cleaning the corona wire...111 Cleaning the drum unit ...113 Cleaning the paper pick-up roller...118 Packing and shipping the machine ...119 6 Troubleshooting 122 Identifying your problem ...122 Error ...
... Deep Sleep mode...86 Quiet mode feature ...87 Turning Quiet mode on/off...87 4 Options 88 Lower tray (LT-5400) ...89 SO-DIMM (HL-5450DN only)...90 SO-DIMM types ...90 Installing extra memory ...91 5 Routine Maintenance 93 Replacing consumable items...93 Replacing the toner cartridge ...94 Replacing ......102 Cleaning and Checking the machine ...109 Cleaning the outside of the machine 109 Cleaning the corona wire...111 Cleaning the drum unit ...113 Cleaning the paper pick-up roller...118 Packing and shipping the machine ...119 6 Troubleshooting 122 Identifying your problem ...122 Error ...

Basic User's Guide - English
Page 12
...able to avoid 1 Do not use with each side folded as shown in the fuser unit. Labels exceeding this machine must be covered under any Brother warranty or service agreement. This damage may stick to your machine. • DO NOT reuse or insert labels that they may damage your machine will... print on the sheet. 6 Adhesives should not come in this specification may not feed or print properly and may cause damage to the drum unit or rollers and cause jams and print quality problems. No adhesive should have previously been used or are damaged, curled, wrinkled or an ...
...able to avoid 1 Do not use with each side folded as shown in the fuser unit. Labels exceeding this machine must be covered under any Brother warranty or service agreement. This damage may stick to your machine. • DO NOT reuse or insert labels that they may damage your machine will... print on the sheet. 6 Adhesives should not come in this specification may not feed or print properly and may cause damage to the drum unit or rollers and cause jams and print quality problems. No adhesive should have previously been used or are damaged, curled, wrinkled or an ...

Basic User's Guide - English
Page 77
... LED indicates the kind of the machine or the duplex tray. 2 2 Toner LED The Toner LED indicates that the Toner is low. 3 3 Drum LED The Drum LED indicates that the Drum will blink depending on . LED is on the machine status. 7 Cancel Key 8 1 Job Cancel / All Jobs Cancel 8 Go Key Error recovery / Form...
... LED indicates the kind of the machine or the duplex tray. 2 2 Toner LED The Toner LED indicates that the Toner is low. 3 3 Drum LED The Drum LED indicates that the Drum will blink depending on . LED is on the machine status. 7 Cancel Key 8 1 Job Cancel / All Jobs Cancel 8 Go Key Error recovery / Form...

Basic User's Guide - English
Page 79
... toner cartridge assembly back in . If the problem continues, replace the toner cartridge. Drum End Soon The drum unit will need to be replaced soon. Cartridge Error The drum unit and toner cartridge assembly is indicated. Take the drum unit and toner cartridge assembly out of the machine and put it ready for... page 94. General Information LEDs Machine Status Toner Low The toner cartridge will need to be replaced soon. We recommend that you get a new drum unit to replace the current one . Buy a new toner cartridge and have it back in the machine. See Replacing the...
... toner cartridge assembly back in . If the problem continues, replace the toner cartridge. Drum End Soon The drum unit will need to be replaced soon. Cartridge Error The drum unit and toner cartridge assembly is indicated. Take the drum unit and toner cartridge assembly out of the machine and put it ready for... page 94. General Information LEDs Machine Status Toner Low The toner cartridge will need to be replaced soon. We recommend that you get a new drum unit to replace the current one . Buy a new toner cartridge and have it back in the machine. See Replacing the...

Basic User's Guide - English
Page 80
Drum Stop Replace the drum with a new one . See Cleaning the corona wire uu page 111. If the toner cartridge is placed in the machine without the drum unit, put the toner cartridge into the drum unit, and then reinstall the drum unit and toner cartridge assembly in the machine. See Replacing the drum unit uu page 104. 3 Drum Error The corona wire needs to be cleaned. See Replacing the drum unit uu page 104. 74 General Information LEDs Machine Status Replace Drum Replace the drum with a new one .
Drum Stop Replace the drum with a new one . See Cleaning the corona wire uu page 111. If the toner cartridge is placed in the machine without the drum unit, put the toner cartridge into the drum unit, and then reinstall the drum unit and toner cartridge assembly in the machine. See Replacing the drum unit uu page 104. 3 Drum Error The corona wire needs to be cleaned. See Replacing the drum unit uu page 104. 74 General Information LEDs Machine Status Replace Drum Replace the drum with a new one .

Basic User's Guide - English
Page 81
... 1 / Jam Tray 2 / Jam Inside Clear the paper jam. Choose a paper size which is placed in the machine without the drum unit, put the toner cartridge into the drum unit, and then reinstall the drum unit and toner cartridge assembly in the printer driver, and then press Go, or select the size of the...
... 1 / Jam Tray 2 / Jam Inside Clear the paper jam. Choose a paper size which is placed in the machine without the drum unit, put the toner cartridge into the drum unit, and then reinstall the drum unit and toner cartridge assembly in the printer driver, and then press Go, or select the size of the...

Basic User's Guide - English
Page 85
... the user, the machine will show that cannot be cleared by lighting up as shown below. 3 If you see the service call your dealer or Brother Customer Service. 79 LED error indication 3 LEDs Main PCB Fuser unit Laser unit Main motor failure failure 1 failure failure Back Cover Toner... Drum Paper Error Ready High voltage failure FAN failure Zero Cross error 1 If this error occurs, turn off the power switch, and then turn it back ...
... the user, the machine will show that cannot be cleared by lighting up as shown below. 3 If you see the service call your dealer or Brother Customer Service. 79 LED error indication 3 LEDs Main PCB Fuser unit Laser unit Main motor failure failure 1 failure failure Back Cover Toner... Drum Paper Error Ready High voltage failure FAN failure Zero Cross error 1 If this error occurs, turn off the power switch, and then turn it back ...

Basic User's Guide - English
Page 99
You can replace the following consumable items by yourself: Note The drum unit and toner cartridge are two separate parts. Toner cartridge Drum unit 5 See Replacing the toner cartridge uu page 94. DR-720 Note • Go to http://www.brother.com/original/index.html for instructions on a piece of the ...consumable is over. See Replacing the drum unit uu page 104. Order No. TN-720, TN-750 Order No. If you have questions,...
You can replace the following consumable items by yourself: Note The drum unit and toner cartridge are two separate parts. Toner cartridge Drum unit 5 See Replacing the toner cartridge uu page 94. DR-720 Note • Go to http://www.brother.com/original/index.html for instructions on a piece of the ...consumable is over. See Replacing the drum unit uu page 104. Order No. TN-720, TN-750 Order No. If you have questions,...

Basic User's Guide - English
Page 101
A new genuine Brother toner cartridge will blink continuously if the toner is low. • If the printout is faint, hold the drum unit and toner cartridge assembly level with both hands and gently shake it from side to side several times to spread the toner evenly inside the cartridge. Routine Maintenance Note • The Toner LED will reset the Replace Toner mode. 95 Replace Toner 5 5 The machine will stop printing until you replace the toner cartridge.
A new genuine Brother toner cartridge will blink continuously if the toner is low. • If the printout is faint, hold the drum unit and toner cartridge assembly level with both hands and gently shake it from side to side several times to spread the toner evenly inside the cartridge. Routine Maintenance Note • The Toner LED will reset the Replace Toner mode. 95 Replace Toner 5 5 The machine will stop printing until you replace the toner cartridge.

Basic User's Guide - English
Page 102
Routine Maintenance Replacing the toner cartridge 5 a Make sure that the machine is turned on. b Press the front cover release button and then open the front cover. 5 c Take out the drum unit and toner cartridge assembly. Wait for at least 10 minutes to cool down . WARNING After you touch the internal parts of the machine will be extremely hot. Leave the machine for the machine to cool down before you have just used the machine, some internal parts of the machine. 96
Routine Maintenance Replacing the toner cartridge 5 a Make sure that the machine is turned on. b Press the front cover release button and then open the front cover. 5 c Take out the drum unit and toner cartridge assembly. Wait for at least 10 minutes to cool down . WARNING After you touch the internal parts of the machine will be extremely hot. Leave the machine for the machine to cool down before you have just used the machine, some internal parts of the machine. 96

Basic User's Guide - English
Page 103
It could cause a fire or electrical shock. WARNING • DO NOT put a toner cartridge or a toner cartridge and drum unit assembly into a fire. Doing so could explode, resulting in injuries. • DO NOT use the product safely) 97 Instead, use only a dry, lint-... 5 d Push down the green lock lever and take the toner cartridge out of the machine. Routine Maintenance Important • We recommend that you place the drum unit and toner cartridge assembly on a clean, flat surface with a piece of disposable paper underneath it in case you accidentally spill or scatter toner. •...
It could cause a fire or electrical shock. WARNING • DO NOT put a toner cartridge or a toner cartridge and drum unit assembly into a fire. Doing so could explode, resulting in injuries. • DO NOT use the product safely) 97 Instead, use only a dry, lint-... 5 d Push down the green lock lever and take the toner cartridge out of the machine. Routine Maintenance Important • We recommend that you place the drum unit and toner cartridge assembly on a clean, flat surface with a piece of disposable paper underneath it in case you accidentally spill or scatter toner. •...

Basic User's Guide - English
Page 104
... up the used toner cartridge tightly in a suitable bag so that toner powder does not spill out of the cartridge. • Go to http://www.brother.com/original/index.html for instructions on a clean, flat, level, stable surface with a sheet of disposable paper or cloth underneath it in the illustrations. 5 •... hands or clothes, immediately wipe or wash it off with both hands and gently shake it separate from side to side several times to the Brother collection program.
... up the used toner cartridge tightly in a suitable bag so that toner powder does not spill out of the cartridge. • Go to http://www.brother.com/original/index.html for instructions on a clean, flat, level, stable surface with a sheet of disposable paper or cloth underneath it in the illustrations. 5 •... hands or clothes, immediately wipe or wash it off with both hands and gently shake it separate from side to side several times to the Brother collection program.
Basic User's Guide - English
Page 105
...quality, DO NOT touch the shaded parts shown in unsatisfactory print quality. Important Put the toner cartridge in the drum unit immediately after you continue to use only Genuine Brother Brand replacement toner cartridges. To prevent any problem that you have removed the protective cover. In addition, use ...new toner cartridge until immediately before you put in direct sunlight or room light, the unit may be shortened. • If an unpacked drum unit is caused by the use of third party toner and/or cartridges. To protect your machine. We also strongly recommend that is ...
...quality, DO NOT touch the shaded parts shown in unsatisfactory print quality. Important Put the toner cartridge in the drum unit immediately after you continue to use only Genuine Brother Brand replacement toner cartridges. To prevent any problem that you have removed the protective cover. In addition, use ...new toner cartridge until immediately before you put in direct sunlight or room light, the unit may be shortened. • If an unpacked drum unit is caused by the use of third party toner and/or cartridges. To protect your machine. We also strongly recommend that is ...

Basic User's Guide - English
Page 106
If you put it in properly, the green lock lever on the drum unit will lift automatically. 5 Note Make sure that you put in the toner cartridge properly or it lock into the drum unit until you do not, printed pages may separate from left to right and right to left several times. 1 Note Be sure to return the tab to the home position (a) (1). If you hear it may have a vertical stripe. 100 h Clean the corona wire inside the drum unit by gently sliding the green tab from the drum unit. Routine Maintenance g Put the new toner cartridge firmly into place.
If you put it in properly, the green lock lever on the drum unit will lift automatically. 5 Note Make sure that you put in the toner cartridge properly or it lock into the drum unit until you do not, printed pages may separate from left to right and right to left several times. 1 Note Be sure to return the tab to the home position (a) (1). If you hear it may have a vertical stripe. 100 h Clean the corona wire inside the drum unit by gently sliding the green tab from the drum unit. Routine Maintenance g Put the new toner cartridge firmly into place.

Basic User's Guide - English
Page 107
Routine Maintenance i Put the drum unit and toner cartridge assembly back into the machine. j Close the front cover of the machine. 5 Note DO NOT turn off the machine's power switch or open the front cover until the Ready LED lights up. 101
Routine Maintenance i Put the drum unit and toner cartridge assembly back into the machine. j Close the front cover of the machine. 5 Note DO NOT turn off the machine's power switch or open the front cover until the Ready LED lights up. 101
Basic User's Guide - English
Page 108
...type of toner used only in the drum unit. (See Cleaning the corona wire uu page 111.) If you cleaned the corona wire and Drum Error was not cleared then the drum unit is estimated at the end of a non-Brother drum unit. Replace the drum unit with a non-Brother drum unit may be used and so on.... DR-720 A new drum unit can print approximately 30,000 Letter or A4 size...
...type of toner used only in the drum unit. (See Cleaning the corona wire uu page 111.) If you cleaned the corona wire and Drum Error was not cleared then the drum unit is estimated at the end of a non-Brother drum unit. Replace the drum unit with a non-Brother drum unit may be used and so on.... DR-720 A new drum unit can print approximately 30,000 Letter or A4 size...

Basic User's Guide - English
Page 109
...rated life. If you keep a genuine Brother drum unit ready for installation. After replacement, reset the drum counter by following the instructions included with a new one. Please replace the drum unit with the new drum unit. 103 We recommend a genuine Brother drum unit be installed at this time. Clean... the corona wire in the drum unit. We recommend you don't, printed pages may have a vertical stripe or Drum Error may occur. (See Cleaning...
...rated life. If you keep a genuine Brother drum unit ready for installation. After replacement, reset the drum counter by following the instructions included with a new one. Please replace the drum unit with the new drum unit. 103 We recommend a genuine Brother drum unit be installed at this time. Clean... the corona wire in the drum unit. We recommend you don't, printed pages may have a vertical stripe or Drum Error may occur. (See Cleaning...

Basic User's Guide - English
Page 110
...Brother drum unit be installed at least 10 minutes to reset the drum counter by following steps: a Make sure that the machine is turned on. After replacement, reset the drum counter by completing the following the instructions included with a new one. Please replace the drum unit with the new drum unit. Routine Maintenance Drum... Stop 5 5 We cannot guarantee the print quality. Replacing the drum unit 5 Important • While removing the drum unit, handle it carefully because it ...
...Brother drum unit be installed at least 10 minutes to reset the drum counter by following steps: a Make sure that the machine is turned on. After replacement, reset the drum counter by completing the following the instructions included with a new one. Please replace the drum unit with the new drum unit. Routine Maintenance Drum... Stop 5 5 We cannot guarantee the print quality. Replacing the drum unit 5 Important • While removing the drum unit, handle it carefully because it ...

Basic User's Guide - English
Page 111
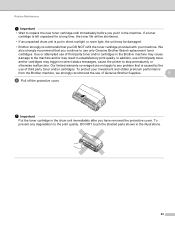
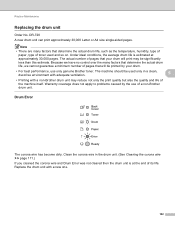
...in the illustration. 105 Important • We recommend that you place the drum unit and toner cartridge assembly on a clean, flat surface with a piece of disposable paper underneath it in case you touch the internal parts of the machine will be extremely hot. WARNING 5 After you ...have just used the machine, some internal parts of the machine. Routine Maintenance c Take out the drum unit and toner cartridge assembly.
...in the illustration. 105 Important • We recommend that you place the drum unit and toner cartridge assembly on a clean, flat surface with a piece of disposable paper underneath it in case you touch the internal parts of the machine will be extremely hot. WARNING 5 After you ...have just used the machine, some internal parts of the machine. Routine Maintenance c Take out the drum unit and toner cartridge assembly.


