
Users Manual - English
Page 7
... tray unit (LT-5300) ...56 DIMM ...57 DIMM types ...57 Installing extra memory ...58 Print server (NC-2100p) (For HL-5240 60 6 Routine Maintenance Replacing the consumable items...61 Consumables...61 Toner cartridge ...62 Drum unit ...68 Replacing periodic maintenance parts...72 Cleaning ...73 Cleaning the outside of the printer...73 Cleaning the...
... tray unit (LT-5300) ...56 DIMM ...57 DIMM types ...57 Installing extra memory ...58 Print server (NC-2100p) (For HL-5240 60 6 Routine Maintenance Replacing the consumable items...61 Consumables...61 Toner cartridge ...62 Drum unit ...68 Replacing periodic maintenance parts...72 Cleaning ...73 Cleaning the outside of the printer...73 Cleaning the...
Users Manual - English
Page 9
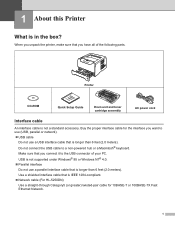
... PC. Make sure that is not a standard accessory. Printer CD-ROM Quick Setup Guide Drum unit and toner cartridge assembly AC power cord Interface cable An interface cable is IEEE 1284-compliant. „ Network cable (For HL-5250DN) Use a straight-through Category5 (or greater) twisted-pair cable for the interface you want to...
... PC. Make sure that is not a standard accessory. Printer CD-ROM Quick Setup Guide Drum unit and toner cartridge assembly AC power cord Interface cable An interface cable is IEEE 1284-compliant. „ Network cable (For HL-5250DN) Use a straight-through Category5 (or greater) twisted-pair cable for the interface you want to...
Users Manual - English
Page 55
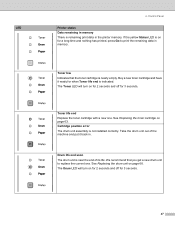
...Indicates that you get a new drum unit to print the remaining data in the printer memory. Toner life end Replace the toner cartridge with a new one . See Replacing the drum unit on for 3 seconds. See Replacing the toner cartridge on for 2 seconds and off for a long time and nothing has printed, press Go ...to replace the current one . The Drum LED will turn on page 63. LED 4. We recommend that the toner cartridge is near the end of the machine and put it ready for 3 seconds. 47 Drum life end soon The drum unit is nearly empty. ...
...Indicates that you get a new drum unit to print the remaining data in the printer memory. Toner life end Replace the toner cartridge with a new one . See Replacing the drum unit on for 3 seconds. See Replacing the toner cartridge on for 2 seconds and off for a long time and nothing has printed, press Go ...to replace the current one . The Drum LED will turn on page 63. LED 4. We recommend that the toner cartridge is near the end of the machine and put it ready for 3 seconds. 47 Drum life end soon The drum unit is nearly empty. ...

Users Manual - English
Page 69
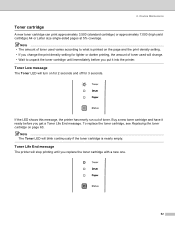
... need to replace certain parts and clean the printer regularly. Replacing the consumable items You will need to inhale toner. • After you have just used the printer, some internal parts of the printer, DO NOT touch the shaded parts shown in Improving the print quality on page 91.... When you open the front cover or back cover of the printer will be extremely hot. See Drum unit on page 62. Consumables Toner Cartridge Drum Unit See Toner cartridge on page 68. 61 When you replace certain parts or clean the inside of the printer, remember the following: • If your...
... need to replace certain parts and clean the printer regularly. Replacing the consumable items You will need to inhale toner. • After you have just used the printer, some internal parts of the printer, DO NOT touch the shaded parts shown in Improving the print quality on page 91.... When you open the front cover or back cover of the printer will be extremely hot. See Drum unit on page 62. Consumables Toner Cartridge Drum Unit See Toner cartridge on page 68. 61 When you replace certain parts or clean the inside of the printer, remember the following: • If your...
Users Manual - English
Page 70
... has nearly run out of toner used varies according to unpack the toner cartridge until you get a Toner Life End message. Routine Maintenance Toner cartridge A new toner cartridge can print approximately 3,500 (standard cartridge) or approximately 7,000 (high yield cartridge) A4 or Letter size single-sided pages at 5% coverage. To replace the toner cartridge, see Replacing the toner cartridge on for 2 seconds and off...
... has nearly run out of toner used varies according to unpack the toner cartridge until you get a Toner Life End message. Routine Maintenance Toner cartridge A new toner cartridge can print approximately 3,500 (standard cartridge) or approximately 7,000 (high yield cartridge) A4 or Letter size single-sided pages at 5% coverage. To replace the toner cartridge, see Replacing the toner cartridge on for 2 seconds and off...

Users Manual - English
Page 71
... you accidentally spill or scatter toner. Routine Maintenance Replacing the toner cartridge Note • To ensure high quality printing, we recommend that you clean the printer when you use only genuine Brother toner cartridges. b Take out the drum unit and toner cartridge assembly. See Cleaning on a... piece of disposable paper or cloth in the illustration. 63 6. To prevent damage to buy toner cartridges, call the dealer you bought the printer...
... you accidentally spill or scatter toner. Routine Maintenance Replacing the toner cartridge Note • To ensure high quality printing, we recommend that you clean the printer when you use only genuine Brother toner cartridges. b Take out the drum unit and toner cartridge assembly. See Cleaning on a... piece of disposable paper or cloth in the illustration. 63 6. To prevent damage to buy toner cartridges, call the dealer you bought the printer...

Users Manual - English
Page 72
... or six times to spread the toner evenly inside the cartridge. 64 Note • Be sure to seal up the toner cartridge tightly in a bag so that toner powder does not spill out of the drum unit. Handle the toner cartridge carefully. d Unpack the new toner cartridge. 6. CAUTION DO NOT put a toner cartridge into a fire. If toner scatters on your local waste...
... or six times to spread the toner evenly inside the cartridge. 64 Note • Be sure to seal up the toner cartridge tightly in a bag so that toner powder does not spill out of the drum unit. Handle the toner cartridge carefully. d Unpack the new toner cartridge. 6. CAUTION DO NOT put a toner cartridge into a fire. If toner scatters on your local waste...
Users Manual - English
Page 73
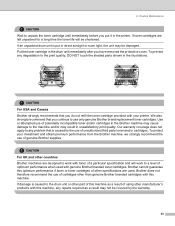
...printer. Put the toner cartridge in the printer. We also strongly recommend that you do not refill the toner cartridge provided with toner of unauthorized third party toner and/or cartridges. Use or attempted use of potentially incompatible toner and/or cartridges in the Brother machine may cause ...result may be covered by the use of other than genuine Brother branded cartridges with this optimum performance if toner or toner cartridges of genuine Brother supplies. CAUTION For UK and other countries Brother machines are used with this machine, any problem that you ...
...printer. Put the toner cartridge in the printer. We also strongly recommend that you do not refill the toner cartridge provided with toner of unauthorized third party toner and/or cartridges. Use or attempted use of potentially incompatible toner and/or cartridges in the Brother machine may cause ...result may be covered by the use of other than genuine Brother branded cartridges with this optimum performance if toner or toner cartridges of genuine Brother supplies. CAUTION For UK and other countries Brother machines are used with this machine, any problem that you ...
Users Manual - English
Page 74
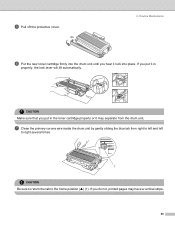
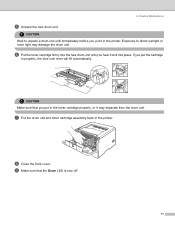
... Be sure to return the tab to the home position (a) (1). e Pull off the protective cover. 6. Routine Maintenance f Put the new toner cartridge firmly into place. If you put it in the toner cartridge properly or it lock into the drum unit until you put in properly, the lock lever will lift automatically. If you...
... Be sure to return the tab to the home position (a) (1). e Pull off the protective cover. 6. Routine Maintenance f Put the new toner cartridge firmly into place. If you put it in the toner cartridge properly or it lock into the drum unit until you put in properly, the lock lever will lift automatically. If you...
Users Manual - English
Page 75
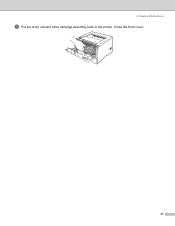
Routine Maintenance h Put the drum unit and toner cartridge assembly back in the printer. 6. Close the front cover. 67
Routine Maintenance h Put the drum unit and toner cartridge assembly back in the printer. 6. Close the front cover. 67

Users Manual - English
Page 77
b Press and hold down Go for about 4 seconds until all four LEDs are lit, release Go. Once all the LEDs light up. Routine Maintenance When you replace the drum unit with a new one, you only replace the toner cartridge. Improper Setup Do not reset the drum counter when you need to reset the drum counter by completing the following steps: a Make sure that the printer is turned on and the Drum LED is blinking. c Take out the drum unit and toner cartridge assembly. 69 6. Press the front cover release button and then open the front cover.
b Press and hold down Go for about 4 seconds until all four LEDs are lit, release Go. Once all the LEDs light up. Routine Maintenance When you replace the drum unit with a new one, you only replace the toner cartridge. Improper Setup Do not reset the drum counter when you need to reset the drum counter by completing the following steps: a Make sure that the printer is turned on and the Drum LED is blinking. c Take out the drum unit and toner cartridge assembly. 69 6. Press the front cover release button and then open the front cover.
Users Manual - English
Page 78
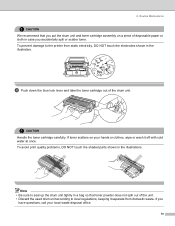
... 6. Routine Maintenance CAUTION We recommend that toner powder does not spill out of the drum unit. Note • Be sure to the printer from domestic waste. CAUTION Handle the toner cartridge carefully. If you accidentally spill or scatter toner. To prevent damage to seal up the... drum unit tightly in a bag so that you put the drum unit and toner cartridge assembly on your local waste disposal office. 70...
... 6. Routine Maintenance CAUTION We recommend that toner powder does not spill out of the drum unit. Note • Be sure to the printer from domestic waste. CAUTION Handle the toner cartridge carefully. If you accidentally spill or scatter toner. To prevent damage to seal up the... drum unit tightly in a bag so that you put the drum unit and toner cartridge assembly on your local waste disposal office. 70...
Users Manual - English
Page 79
... a drum unit until you hear it lock into the new drum unit until immediately before you put the cartridge in properly, the blue lock lever will lift automatically. If you put in the toner cartridge properly, or it in the printer. h Close the front cover. g Put the drum unit and... toner cartridge assembly back in the printer. CAUTION Wait to direct sunlight or room light may separate from the drum unit. i ...
... a drum unit until you hear it lock into the new drum unit until immediately before you put the cartridge in properly, the blue lock lever will lift automatically. If you put in the toner cartridge properly, or it in the printer. h Close the front cover. g Put the drum unit and... toner cartridge assembly back in the printer. CAUTION Wait to direct sunlight or room light may separate from the drum unit. i ...
Users Manual - English
Page 81
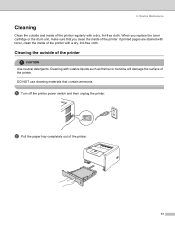
... regularly with a dry, lint-free cloth. Routine Maintenance Cleaning Clean the outside of the printer. 73 DO NOT use cleaning materials that you replace the toner cartridge or the drum unit, make sure that contain ammonia. If printed pages are stained with a dry, lint-free cloth. When you clean the inside of...
... regularly with a dry, lint-free cloth. Routine Maintenance Cleaning Clean the outside of the printer. 73 DO NOT use cleaning materials that you replace the toner cartridge or the drum unit, make sure that contain ammonia. If printed pages are stained with a dry, lint-free cloth. When you clean the inside of...
Users Manual - English
Page 83
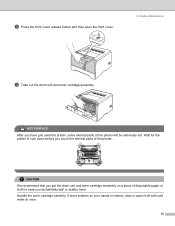
...the printer. Wait for the printer to cool down before you have just used the printer, some internal parts of disposable paper or cloth in case you put the drum unit and toner cartridge assembly on your hands or clothes, wipe or wash it off with cold water at once. ...75 Handle the toner cartridge carefully. Routine Maintenance c Take out the drum unit and toner cartridge assembly. CAUTION We recommend that you accidentally spill or scatter toner. b Press the front cover release button and then open the front cover. 6. If...
...the printer. Wait for the printer to cool down before you have just used the printer, some internal parts of disposable paper or cloth in case you put the drum unit and toner cartridge assembly on your hands or clothes, wipe or wash it off with cold water at once. ...75 Handle the toner cartridge carefully. Routine Maintenance c Take out the drum unit and toner cartridge assembly. CAUTION We recommend that you accidentally spill or scatter toner. b Press the front cover release button and then open the front cover. 6. If...
Users Manual - English
Page 84
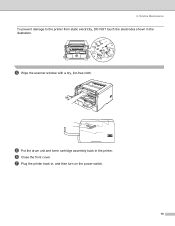
6. Routine Maintenance To prevent damage to the printer from static electricity, DO NOT touch the electrodes shown in the printer. e Put the drum unit and toner cartridge assembly back in the illustration. g Plug the printer back in, and then turn on the power switch. 76 f Close the front cover. d Wipe the scanner window with a dry, lint-free cloth.
6. Routine Maintenance To prevent damage to the printer from static electricity, DO NOT touch the electrodes shown in the printer. e Put the drum unit and toner cartridge assembly back in the illustration. g Plug the printer back in, and then turn on the power switch. 76 f Close the front cover. d Wipe the scanner window with a dry, lint-free cloth.
Users Manual - English
Page 85
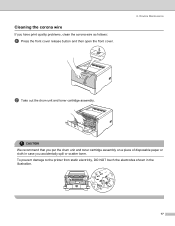
Cleaning the corona wire If you accidentally spill or scatter toner. To prevent damage to the printer from static electricity, DO NOT touch the electrodes shown in case you have print quality problems, clean the corona wire as follows: a Press the front cover release button and then open the front cover. 6. CAUTION We recommend that you put the drum unit and toner cartridge assembly on a piece of disposable paper or cloth in the illustration. 77 Routine Maintenance b Take out the drum unit and toner cartridge assembly.
Cleaning the corona wire If you accidentally spill or scatter toner. To prevent damage to the printer from static electricity, DO NOT touch the electrodes shown in case you have print quality problems, clean the corona wire as follows: a Press the front cover release button and then open the front cover. 6. CAUTION We recommend that you put the drum unit and toner cartridge assembly on a piece of disposable paper or cloth in the illustration. 77 Routine Maintenance b Take out the drum unit and toner cartridge assembly.
Users Manual - English
Page 86
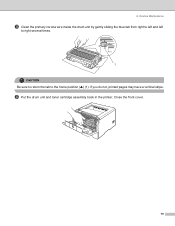
Close the front cover. 78 d Put the drum unit and toner cartridge assembly back in the printer. 6. Routine Maintenance c Clean the primary corona wire inside the drum unit by gently sliding the blue tab from right to left and left to right several times. 1 CAUTION Be sure to return the tab to the home position (a) (1). If you do not, printed pages may have a vertical stripe.
Close the front cover. 78 d Put the drum unit and toner cartridge assembly back in the printer. 6. Routine Maintenance c Clean the primary corona wire inside the drum unit by gently sliding the blue tab from right to left and left to right several times. 1 CAUTION Be sure to return the tab to the home position (a) (1). If you do not, printed pages may have a vertical stripe.

Users Manual - English
Page 87
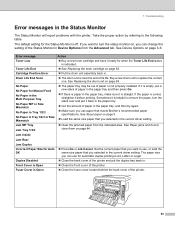
... problems on page 83 and Paper jams and how to the correct printer port. Printer does not print: If you need additional help, the Brother Solutions Center offers the latest FAQs and troubleshooting tips. If you did not solve your problem and then go to the page suggested below. ... on page 98. Visit us at http://solutions.brother.com. Identifying your problem First, check the following: „ The AC power cord is connected properly and the printer is turned on. „ All of the protective parts have been removed. „ The toner cartridge and drum unit are installed properly. „ ...
... problems on page 83 and Paper jams and how to the correct printer port. Printer does not print: If you need additional help, the Brother Solutions Center offers the latest FAQs and troubleshooting tips. If you did not solve your problem and then go to the page suggested below. ... on page 98. Visit us at http://solutions.brother.com. Identifying your problem First, check the following: „ The AC power cord is connected properly and the printer is turned on. „ All of the protective parts have been removed. „ The toner cartridge and drum unit are installed properly. „ ...
Users Manual - English
Page 88
...Soon No Paper No Paper for when the Toner Life End status is straight. See About paper on page 63. „ Put the drum unit assembly back in Tray 1/2/3 or Size Mismatch Jam MP Tray Jam Tray 1/2/3 Action „ Buy a new toner cartridge and have it is indicated. „ ...See Replacing the toner cartridge on page 5. „ Load the same size paper that meets Brother's recommended paper specifications. The paper size you selected in the paper tray, make sure it...
...Soon No Paper No Paper for when the Toner Life End status is straight. See About paper on page 63. „ Put the drum unit assembly back in Tray 1/2/3 or Size Mismatch Jam MP Tray Jam Tray 1/2/3 Action „ Buy a new toner cartridge and have it is indicated. „ ...See Replacing the toner cartridge on page 5. „ Load the same size paper that meets Brother's recommended paper specifications. The paper size you selected in the paper tray, make sure it...


