
Users Manual - English
Page 3
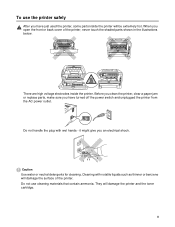
... the printer. Before you clean the printer, clear a paper jam or replace parts, make sure you an electrical shock. II There are high voltage electrodes inside the printer will be extremely hot. Cleaning with wet hands - Do not ... off the power switch and unplugged the printer from the AC power outlet. They will damage the surface of the printer, never touch the shaded parts shown in the illustrations below. Do not handle the plug with volatile liquids such as thinner or benzene will damage the printer and the toner...
... the printer. Before you clean the printer, clear a paper jam or replace parts, make sure you an electrical shock. II There are high voltage electrodes inside the printer will be extremely hot. Cleaning with wet hands - Do not ... off the power switch and unplugged the printer from the AC power outlet. They will damage the surface of the printer, never touch the shaded parts shown in the illustrations below. Do not handle the plug with volatile liquids such as thinner or benzene will damage the printer and the toner...
Users Manual - English
Page 6
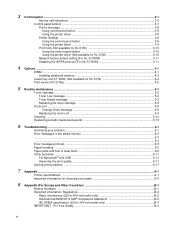
...HL-5130 4-4 Print server (NC-2100p) ...4-5 5 Routine maintenance ...5-1 Toner cartridge ...5-2 Toner Low message ...5-2 Toner Empty message ...5-3 Replacing the toner cartridge 5-3 Drum unit ...5-8 Change Drum message ...5-8 Replacing the drum unit ...5-9 Cleaning ...5-12 Replacing periodic maintenance parts...for choosing your paper A-6 8 Appendix (For Europe and Other Countries B-1 Brother Numbers ...B-1 Important information: Regulations B-2 Radio interference (220 to 240 volt model only B-2 International ENERGY STAR® Compliance Statement B-2 IEC 60825 specification (220 to 240 ...
...HL-5130 4-4 Print server (NC-2100p) ...4-5 5 Routine maintenance ...5-1 Toner cartridge ...5-2 Toner Low message ...5-2 Toner Empty message ...5-3 Replacing the toner cartridge 5-3 Drum unit ...5-8 Change Drum message ...5-8 Replacing the drum unit ...5-9 Cleaning ...5-12 Replacing periodic maintenance parts...for choosing your paper A-6 8 Appendix (For Europe and Other Countries B-1 Brother Numbers ...B-1 Important information: Regulations B-2 Radio interference (220 to 240 volt model only B-2 International ENERGY STAR® Compliance Statement B-2 IEC 60825 specification (220 to 240 ...
Users Manual - English
Page 8
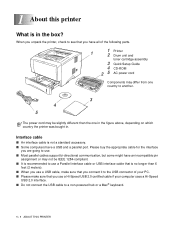
.... ■ Please make sure that you are going to use a USB cable, make sure that you connect it to the USB connector of the following parts. 1 1 Printer 2 Drum unit and toner cartridge assembly 3 Quick Setup Guide 4 CD-ROM 2 5 AC power cord Components may differ from one country to another. 3 4 5 The power...
.... ■ Please make sure that you are going to use a USB cable, make sure that you connect it to the USB connector of the following parts. 1 1 Printer 2 Drum unit and toner cartridge assembly 3 Quick Setup Guide 4 CD-ROM 2 5 AC power cord Components may differ from one country to another. 3 4 5 The power...
Users Manual - English
Page 93
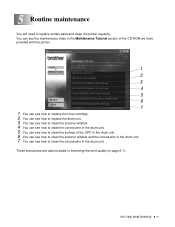
... unit. 6 You can see how to clean the scanner window and the corona wire in the drum unit. 7 You can see how to replace certain parts and clean the printer regularly. 5 Routine maintenance You will need to clean the corona wire in Improving the print quality on page 6-11.
... unit. 6 You can see how to clean the scanner window and the corona wire in the drum unit. 7 You can see how to replace certain parts and clean the printer regularly. 5 Routine maintenance You will need to clean the corona wire in Improving the print quality on page 6-11.

Users Manual - English
Page 98
Do not touch the shaded parts shown in properly, the lock lever will lift automatically. If you insert the toner cartridge properly or it lock into the drum unit you have removed the protective cover. Figure 5-11 Caution Make sure you put it in Figure 5-9 and Figure 5-10 to prevent any degradation to the print quality. Caution Put the toner cartridge in the drum unit immediately after you hear it may separate from the drum unit. 5 - 6 ROUTINE MAINTENANCE Figure 5-9 Figure 5-10 6 Put the new toner cartridge firmly into place.
Do not touch the shaded parts shown in properly, the lock lever will lift automatically. If you insert the toner cartridge properly or it lock into the drum unit you have removed the protective cover. Figure 5-11 Caution Make sure you put it in Figure 5-9 and Figure 5-10 to prevent any degradation to the print quality. Caution Put the toner cartridge in the drum unit immediately after you hear it may separate from the drum unit. 5 - 6 ROUTINE MAINTENANCE Figure 5-9 Figure 5-10 6 Put the new toner cartridge firmly into place.
Users Manual - English
Page 105
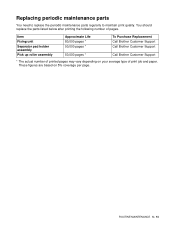
...,000 pages * 50,000 pages * 50,000 pages * To Purchase Replacement Call Brother Customer Support Call Brother Customer Support Call Brother Customer Support * The actual number of printed pages may vary depending on 5% coverage per page. You should replace the parts listed below after printing the following number of print job and paper. ROUTINE...
...,000 pages * 50,000 pages * 50,000 pages * To Purchase Replacement Call Brother Customer Support Call Brother Customer Support Call Brother Customer Support * The actual number of printed pages may vary depending on 5% coverage per page. You should replace the parts listed below after printing the following number of print job and paper. ROUTINE...

Users Manual - English
Page 106
... Identifying your problem First, check the following: ■ The power plug is connected properly and the printer is turned on. ■ All of the protective parts have been removed. ■ The toner cartridge and drum unit are problems with the above checks, please find your problem with : Print quality See Improving...
... Identifying your problem First, check the following: ■ The power plug is connected properly and the printer is turned on. ■ All of the protective parts have been removed. ■ The toner cartridge and drum unit are problems with the above checks, please find your problem with : Print quality See Improving...

Users Manual - English
Page 111
... lighting the control panel LEDs as follows. This helps prevent multiple sheets of the printer, never touch the shaded parts shown in the following steps, you have just used the printer, some parts inside the printer are extremely hot. Toner Drum Paper Status Figure 6-1 After you can install the paper tray first...
... lighting the control panel LEDs as follows. This helps prevent multiple sheets of the printer, never touch the shaded parts shown in the following steps, you have just used the printer, some parts inside the printer are extremely hot. Toner Drum Paper Status Figure 6-1 After you can install the paper tray first...
Users Manual - English
Page 114
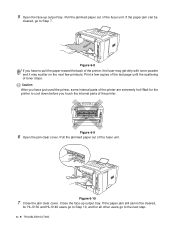
... paper out of the printer are extremely hot! Figure 6-8 If you have just used the printer, some internal parts of the fuser unit. Figure 6-10 7 Close the jam clear cover. 5 Open the face-up output...the jam clear cover. Close the face-up output tray. Print a few printouts. Caution After you touch the internal parts of the fuser unit. Pull the jammed paper out of the printer. Wait for all other users go to pull... have to Step 7. If the paper jam can be cleared, for HL-5130 and HL-5140 users go to Step 10, and for the printer to the next step. 6 - 9 TROUBLESHOOTING
... paper out of the printer are extremely hot! Figure 6-8 If you have just used the printer, some internal parts of the fuser unit. Figure 6-10 7 Close the jam clear cover. 5 Open the face-up output...the jam clear cover. Close the face-up output tray. Print a few printouts. Caution After you touch the internal parts of the fuser unit. Pull the jammed paper out of the printer. Wait for all other users go to pull... have to Step 7. If the paper jam can be cleared, for HL-5130 and HL-5140 users go to Step 10, and for the printer to the next step. 6 - 9 TROUBLESHOOTING
Users Manual - English
Page 132
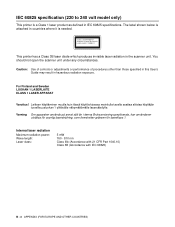
...;jän turvallisuusluokan 1 ylittävälle näkymättömälle lasersäteilylle. Internal laser radiation Maximum radiation power: Wave length: Laser class: 5 mW 760 - 810 nm Class IIIb (Accordance with 21 CFR Part 1040.10) Class 3B (Accordance with IEC 60825) B - 3 APPENDIX (FOR EUROPE AND OTHER COUNTRIES) Caution...
...;jän turvallisuusluokan 1 ylittävälle näkymättömälle lasersäteilylle. Internal laser radiation Maximum radiation power: Wave length: Laser class: 5 mW 760 - 810 nm Class IIIb (Accordance with 21 CFR Part 1040.10) Class 3B (Accordance with IEC 60825) B - 3 APPENDIX (FOR EUROPE AND OTHER COUNTRIES) Caution...
Users Manual - English
Page 138
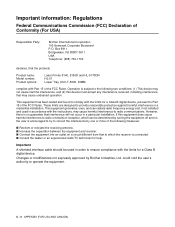
... the equipment into an outlet on , the user is no guarantee that may cause harmful interference to Part 15 of Conformity (For USA) Responsible Party: Brother International Corporation 100 Somerset Corporate Boulevard P.O. Box 6911 Bridgewater, NJ 08807-0911 USA Telephone: (908) 704-...1700 declares, that the products Product name: Model number: Product options: Laser Printer 5140, 5150D and HL-5170DN HL-51 Lower Tray ...
... the equipment into an outlet on , the user is no guarantee that may cause harmful interference to Part 15 of Conformity (For USA) Responsible Party: Brother International Corporation 100 Somerset Corporate Boulevard P.O. Box 6911 Bridgewater, NJ 08807-0911 USA Telephone: (908) 704-...1700 declares, that the products Product name: Model number: Product options: Laser Printer 5140, 5150D and HL-5170DN HL-51 Lower Tray ...
Users Manual - English
Page 142
... supplies 4-1, 5-13, C-2 Accessories tab 2-9 Automatic duplex printing 1-47 Automatic emulation selection 2-21 B BRAdmin Professional 2-20 Brother Solutions Center 2-1 BR-Script 2-1 C Carton contents 1-1 Cleaning 5-12 Control panel 3-1, A-3 Control panel buttons 3-7 Corona ... 3-9 Print media 1-5 Print quality 2-3, 6-11 Print server 4-5 Print test page 3-8 Printable area 1-7 Printer driver 2-1, 2-11, A-3 Printer parts 1-2, 1-3 Printer settings 3-9 Processor A-2 PS printer driver 2-11 R Register your printer B-1, C-1 Resolution A-1 S Separator pad holder 5-13 Service...
... supplies 4-1, 5-13, C-2 Accessories tab 2-9 Automatic duplex printing 1-47 Automatic emulation selection 2-21 B BRAdmin Professional 2-20 Brother Solutions Center 2-1 BR-Script 2-1 C Carton contents 1-1 Cleaning 5-12 Control panel 3-1, A-3 Control panel buttons 3-7 Corona ... 3-9 Print media 1-5 Print quality 2-3, 6-11 Print server 4-5 Print test page 3-8 Printable area 1-7 Printer driver 2-1, 2-11, A-3 Printer parts 1-2, 1-3 Printer settings 3-9 Processor A-2 PS printer driver 2-11 R Register your printer B-1, C-1 Resolution A-1 S Separator pad holder 5-13 Service...
Quick Setup Guide - English
Page 2
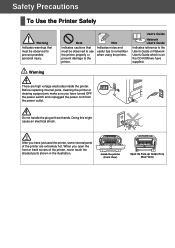
... To Use the Printer Safely Warning Indicates warnings that must be observed to use the printer properly or prevent damage to the printer. Before replacing internal parts, cleaning the printer or clearing a paper jam, make sure you have just used the printer, some...
... To Use the Printer Safely Warning Indicates warnings that must be observed to use the printer properly or prevent damage to the printer. Before replacing internal parts, cleaning the printer or clearing a paper jam, make sure you have just used the printer, some...

Quick Setup Guide - English
Page 4
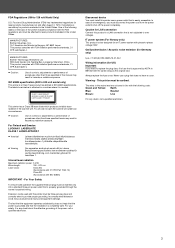
... the limits for Health and Safety Act of Conformity Manufacture Brother Industries Ltd., 15-1, Naeshiro-cho, Mizuho-ku, Nagoya 467-8561, Japan Plant Brother Technology (Shenzhen) Ltd. Operation is encouraged to try to Part 15 of the FCC Rules. This equipment generates, uses,...Model number: Model number: Product options: Laser Printer Laser Printer HL-5130, 5140, 5150D and HL-5170DN HL-51 Lower Tray Unit LT-5000/DIMM complies with provisions of Conformity (For USA) Responsible Party: Brother International Corporation 100 Somerset Corporate Boulevard P.O. These limits are in which ...
... the limits for Health and Safety Act of Conformity Manufacture Brother Industries Ltd., 15-1, Naeshiro-cho, Mizuho-ku, Nagoya 467-8561, Japan Plant Brother Technology (Shenzhen) Ltd. Operation is encouraged to try to Part 15 of the FCC Rules. This equipment generates, uses,...Model number: Model number: Product options: Laser Printer Laser Printer HL-5130, 5140, 5150D and HL-5170DN HL-51 Lower Tray Unit LT-5000/DIMM complies with provisions of Conformity (For USA) Responsible Party: Brother International Corporation 100 Somerset Corporate Boulevard P.O. These limits are in which ...
Quick Setup Guide - English
Page 5
... with the FDA regulations and must install this product to laser products marketed in any doubt, call a qualified electrician. MANUFACTURED: Brother Technology (Shenzhen) Ltd. Laitteen käyttäminen muulla kuin tässä käyttöohjeessa mainitulla tavalla saattaa...3B laser diode which produces invisible laser radiation in IEC 60825 specifications. Internal laser radiation Maximum radiation power: 5 mW Wave length: 760 - 810 nm Laser class: Class IIIb (Accordance with 21 CFR Part 1040.10) Class 3B (Accordance with the following labels on and after...
... with the FDA regulations and must install this product to laser products marketed in any doubt, call a qualified electrician. MANUFACTURED: Brother Technology (Shenzhen) Ltd. Laitteen käyttäminen muulla kuin tässä käyttöohjeessa mainitulla tavalla saattaa...3B laser diode which produces invisible laser radiation in IEC 60825 specifications. Internal laser radiation Maximum radiation power: 5 mW Wave length: 760 - 810 nm Laser class: Class IIIb (Accordance with 21 CFR Part 1040.10) Class 3B (Accordance with the following labels on and after...
Quick Setup Guide - English
Page 10
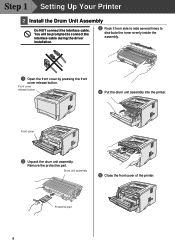
You will be prompted to connect the interface cable during the driver installation. 3 Rock it from side to side several times to distribute the toner evenly inside the assembly. 1 Open the front cover by pressing the front cover release button. Protective part 8 Remove the protective part. Drum unit assembly 5 Close the front cover of the printer. Front cover 2 Unpack the drum unit assembly. Front cover release button 4 Put the drum unit assembly into the printer. Step 1 Setting Up Your Printer 2 Install the Drum Unit Assembly Do NOT connect the interface cable.
You will be prompted to connect the interface cable during the driver installation. 3 Rock it from side to side several times to distribute the toner evenly inside the assembly. 1 Open the front cover by pressing the front cover release button. Protective part 8 Remove the protective part. Drum unit assembly 5 Close the front cover of the printer. Front cover 2 Unpack the drum unit assembly. Front cover release button 4 Put the drum unit assembly into the printer. Step 1 Setting Up Your Printer 2 Install the Drum Unit Assembly Do NOT connect the interface cable.
Network Users Manual - English
Page 49
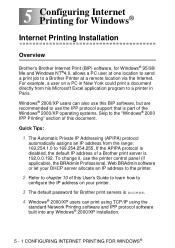
... is part of the Windows® 2000/XP operating systems. Skip to a Brother Printer at one location to send a print job to the "Windows® 2000 IPP Printing" section of this document. If the APIPA protocol is disabled, the default IP address of a Brother print.... 5 - 1 CONFIGURING INTERNET PRINTING FOR WINDOWS® 5 Configuring Internet 5 Printing for Windows® Internet Printing Installation Overview Brother's Brother Internet Print (BIP) software, for Brother print servers is access. 4 Windows® 2000/XP users can also use this BIP software, but are recommended to use the...
... is part of the Windows® 2000/XP operating systems. Skip to a Brother Printer at one location to send a print job to the "Windows® 2000 IPP Printing" section of this document. If the APIPA protocol is disabled, the default IP address of a Brother print.... 5 - 1 CONFIGURING INTERNET PRINTING FOR WINDOWS® 5 Configuring Internet 5 Printing for Windows® Internet Printing Installation Overview Brother's Brother Internet Print (BIP) software, for Brother print servers is access. 4 Windows® 2000/XP users can also use this BIP software, but are recommended to use the...
Network Users Manual - English
Page 51
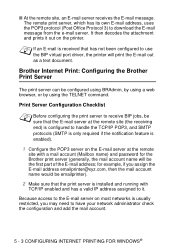
...: Configuring the Brother Print Server The print server can be emailprinter). 2 Make sure that the print server is installed and running with a mail...configured to have your network administrator check the configuration and add the mail account. 5 - 3 CONFIGURING INTERNET PRINTING FOR WINDOWS® for the Brother print server (generally, the mail account name will print the E-mail out as a text document. Because access to it out on the E-...uses the POP3 protocol (Post Office Protocol 3) to use the BIP virtual port driver, the printer will be the first part of the E-mail address;
...: Configuring the Brother Print Server The print server can be emailprinter). 2 Make sure that the print server is installed and running with a mail...configured to have your network administrator check the configuration and add the mail account. 5 - 3 CONFIGURING INTERNET PRINTING FOR WINDOWS® for the Brother print server (generally, the mail account name will print the E-mail out as a text document. Because access to it out on the E-...uses the POP3 protocol (Post Office Protocol 3) to use the BIP virtual port driver, the printer will be the first part of the E-mail address;
Network Users Manual - English
Page 52
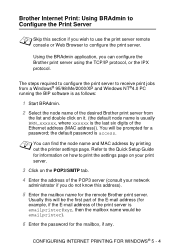
...configure the print server. You will be the first part of the E-mail address (for example, if the E-mail address of the Ethernet address (MAC address)). You can configure the Brother print server using the TCP/IP protocol, or the IPX protocol. Brother Internet Print: Using BRAdmin to Configure the Print .../2000/XP and Windows NT®4.0 PC running the BIP software is as follows: 1 Start BRAdmin. 2 Select the node name of the desired Brother print server from the list and double click on the POP3/SMTP tab. 4 Enter the address of the POP3 server (consult your network administrator if...
...configure the print server. You will be the first part of the E-mail address (for example, if the E-mail address of the Ethernet address (MAC address)). You can configure the Brother print server using the TCP/IP protocol, or the IPX protocol. Brother Internet Print: Using BRAdmin to Configure the Print .../2000/XP and Windows NT®4.0 PC running the BIP software is as follows: 1 Start BRAdmin. 2 Select the node name of the desired Brother print server from the list and double click on the POP3/SMTP tab. 4 Enter the address of the POP3 server (consult your network administrator if...

Network Users Manual - English
Page 54
... seconds. The console can use the print server remote console to configure the print server. Usually the mailbox name is the same as the first part of the remote print server mailbox and emailpassword is the password associated with your network administrator if you do not know this address). 2 Enter the... (consult with this value, enter the command: SET POP3 POLLING rate where rate is set by default to poll the POP3 server every 30 seconds. Brother Internet Print: Using TELNET to Configure the Print Server Skip this section if you defined previously (for a password.
... seconds. The console can use the print server remote console to configure the print server. Usually the mailbox name is the same as the first part of the remote print server mailbox and emailpassword is the password associated with your network administrator if you do not know this address). 2 Enter the... (consult with this value, enter the command: SET POP3 POLLING rate where rate is set by default to poll the POP3 server every 30 seconds. Brother Internet Print: Using TELNET to Configure the Print Server Skip this section if you defined previously (for a password.


